

Confluence Google Drive Integration
Create a single source of truth with seamless syncing and real-time collaboration.
Read more


_2026-03-26_20-48-42-1.png?length=720&name=untitled_Gemini%203%20(Nano%20Banana%20Pro)_2026-03-26_20-48-42-1.png)


Take the very first steps to use the SharePoint Connector for Jira app
You can install the SharePoint Connector for Jira app from the Atlassian Marketplace, then open it by clicking the SharePoint & OneDrive Tab on Jira’s board. If not visible on the tab, click on the more option and drag it to the visible tab area.
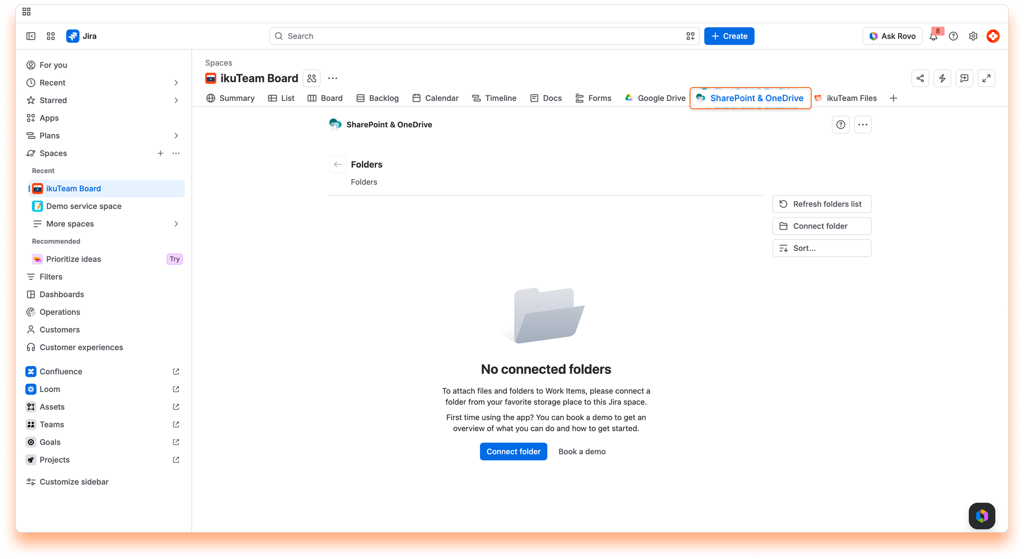
You don't need to create an account to use the app. The only thing required is to connect at least one folder to the Jira space so that you can start collaborating with your team and build your single source of truth.
ℹ️ If there's already a folder connected when you first open the app, that means someone in your team already shared a folder, and you can use that one or add more, following the same steps.
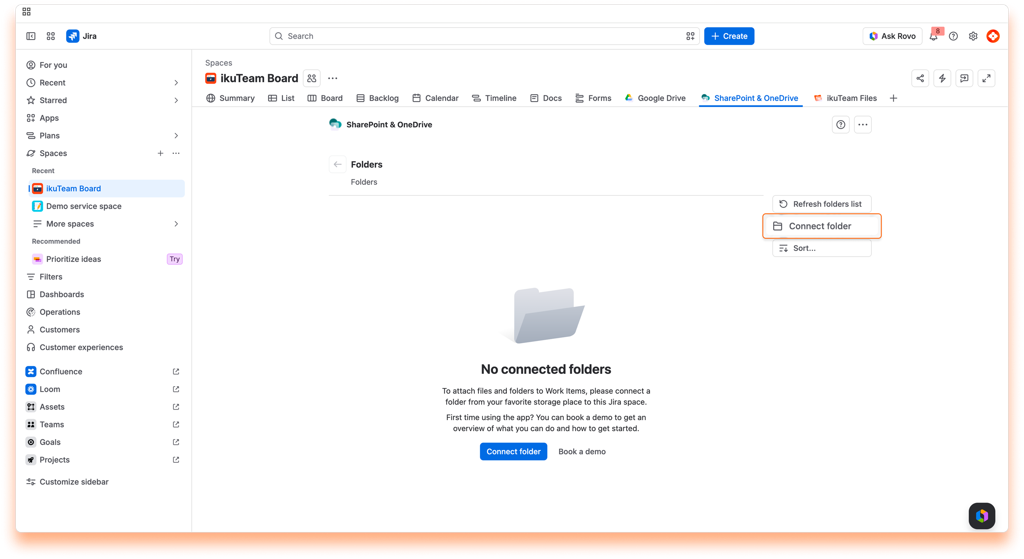
You can connect a folder stored in SharePoint or OneDrive for Business.
ℹ️ You can connect more places later from the file manager. Learn more
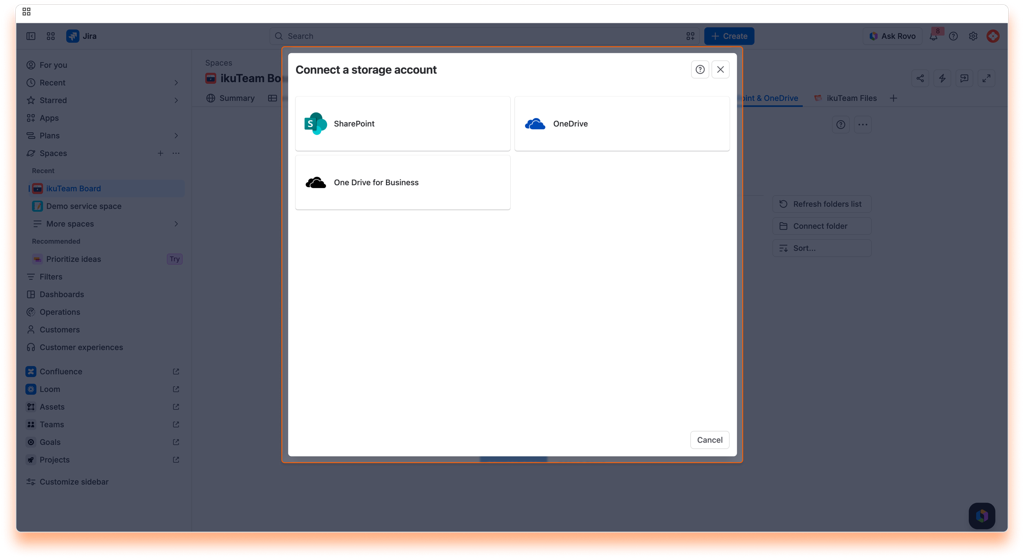
Connecting a SharePoint folder
Learn how to authorize the SharePoint Connector for Jira app to access the content in your SharePoint account so that you can connect a folder.
Instructions:
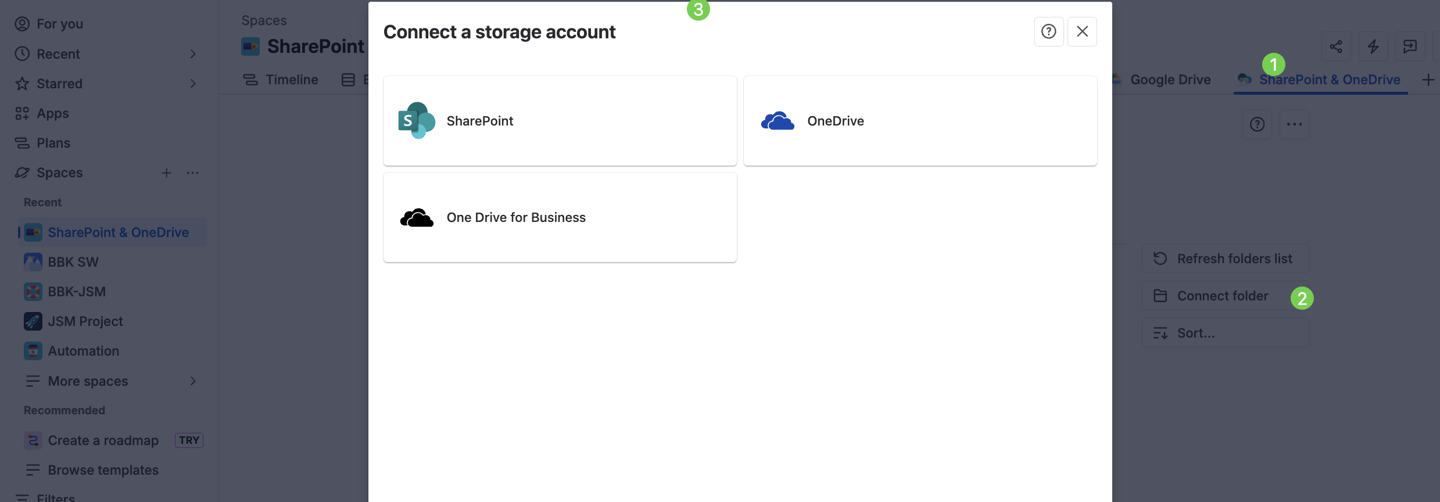
⫶☰ If you have problems connecting your account, please check the SharePoint Permissions Setup
Connecting a OneDrive for Business folder
Learn how to authorize the SharePoint Connector for Jira app to access the content in your OneDrive for Business account so that you can connect a folder.
Instructions:
⫶☰ If you have problems connecting your account, please check the SharePoint Permissions Setup
ℹ️ SharePoint tip: If you can’t see the site where your folder is, you can use the “Find site” or “Connect by URL“ option and enter your SharePoint address.
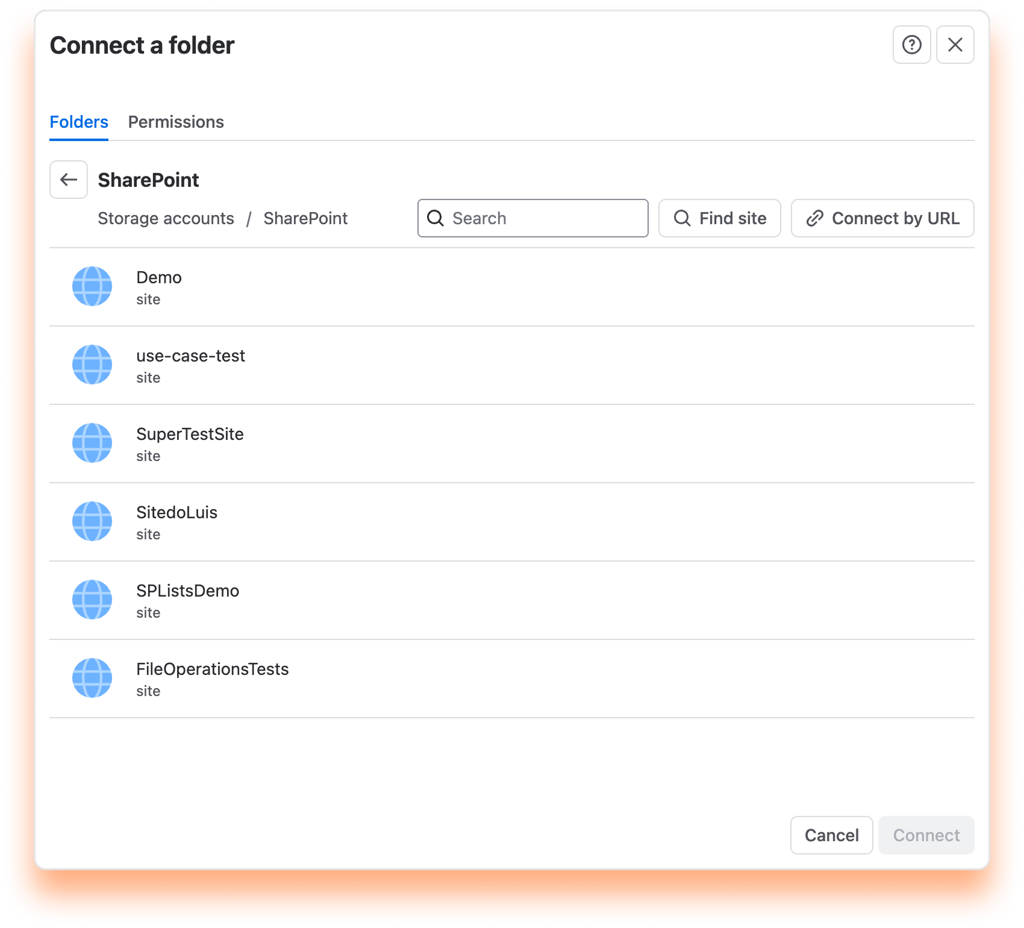
Use the checkbox to select the folder you want to connect.
We recommend connecting a folder where you and your team store your documents, but you can start with a new one by clicking the "New folder" button.
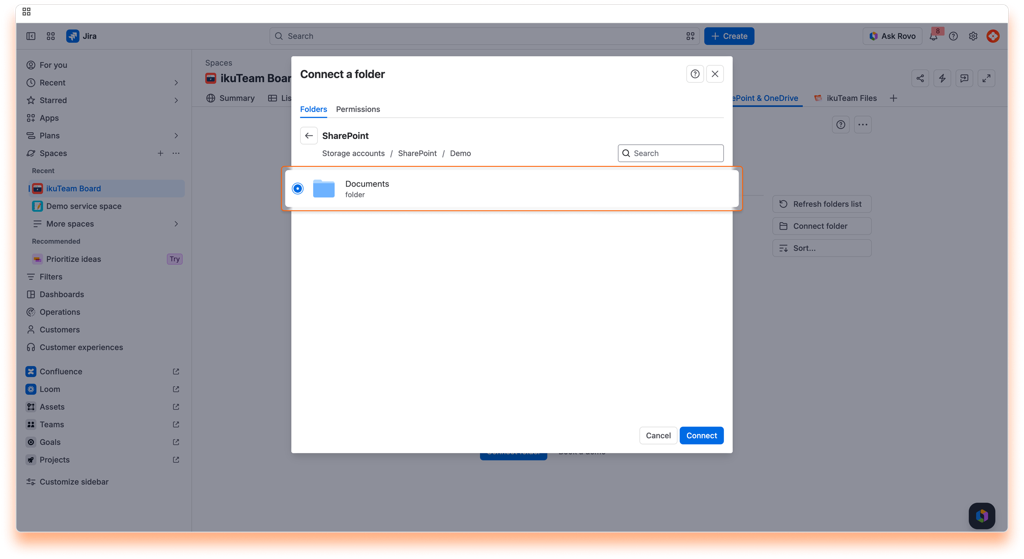
ℹ️ Tip: You can select multiple folders.
Click the "Permissions" tab. By default, any folder you connect will be visible and editable by your team. If you want to limit access or block the edit feature, click the dropdown to change the permissions.
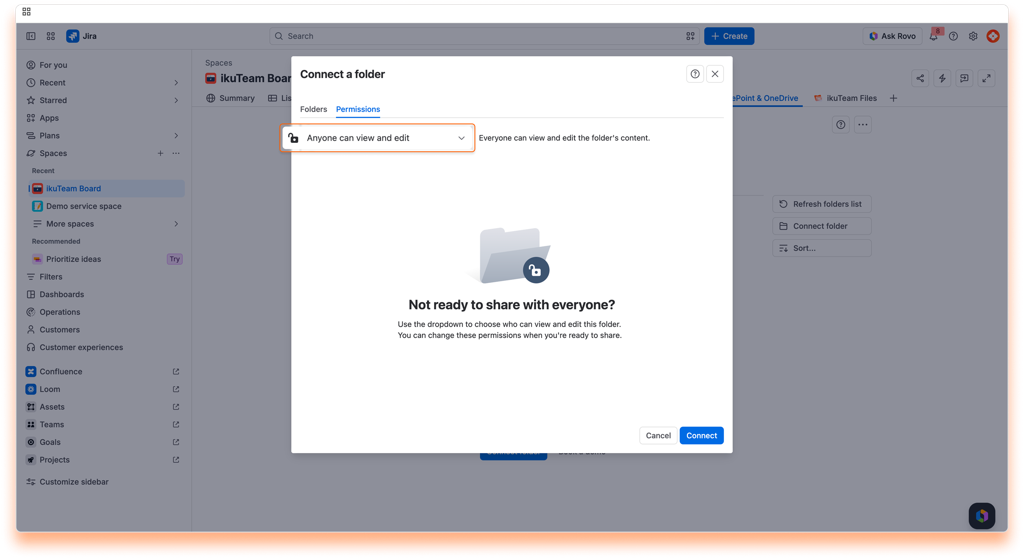
ℹ️️ For more information, check the permissions page.
✅ All done. You're ready to use the app. Learn more about the file manager, how to edit documents or Attach files and folders to issues.
⚠️ IMPORTANT! Please read.
The app uses the storage place as the "single source of truth," However, you need to understand that it has some particular behaviors. Like:
You can browse the folders shared with a Jira space, preview files, edit documents, and more on the file manager.
The file manager is easily accessible from the space(previously called project) board, and it's the cornerstone for all you can do with the SharePoint Connector for Jira app. When you attach files and folders to your work items, you'll also be using the file manager, and it works the same way.
This page covers everything related to using the SharePoint Connector for Jira app, from what you can do with your files and folders to managing connected folders. Let's start with the latter since you always need at least one connected folder to use the app.
When you open the SharePoint Connector for Jira app, the first thing you'll see is a list of the connected folders. You can browse and use these folders to collaborate with your team.
SharePoint Connector for jira app home screen:
List of the connected folders to the current Jira project.
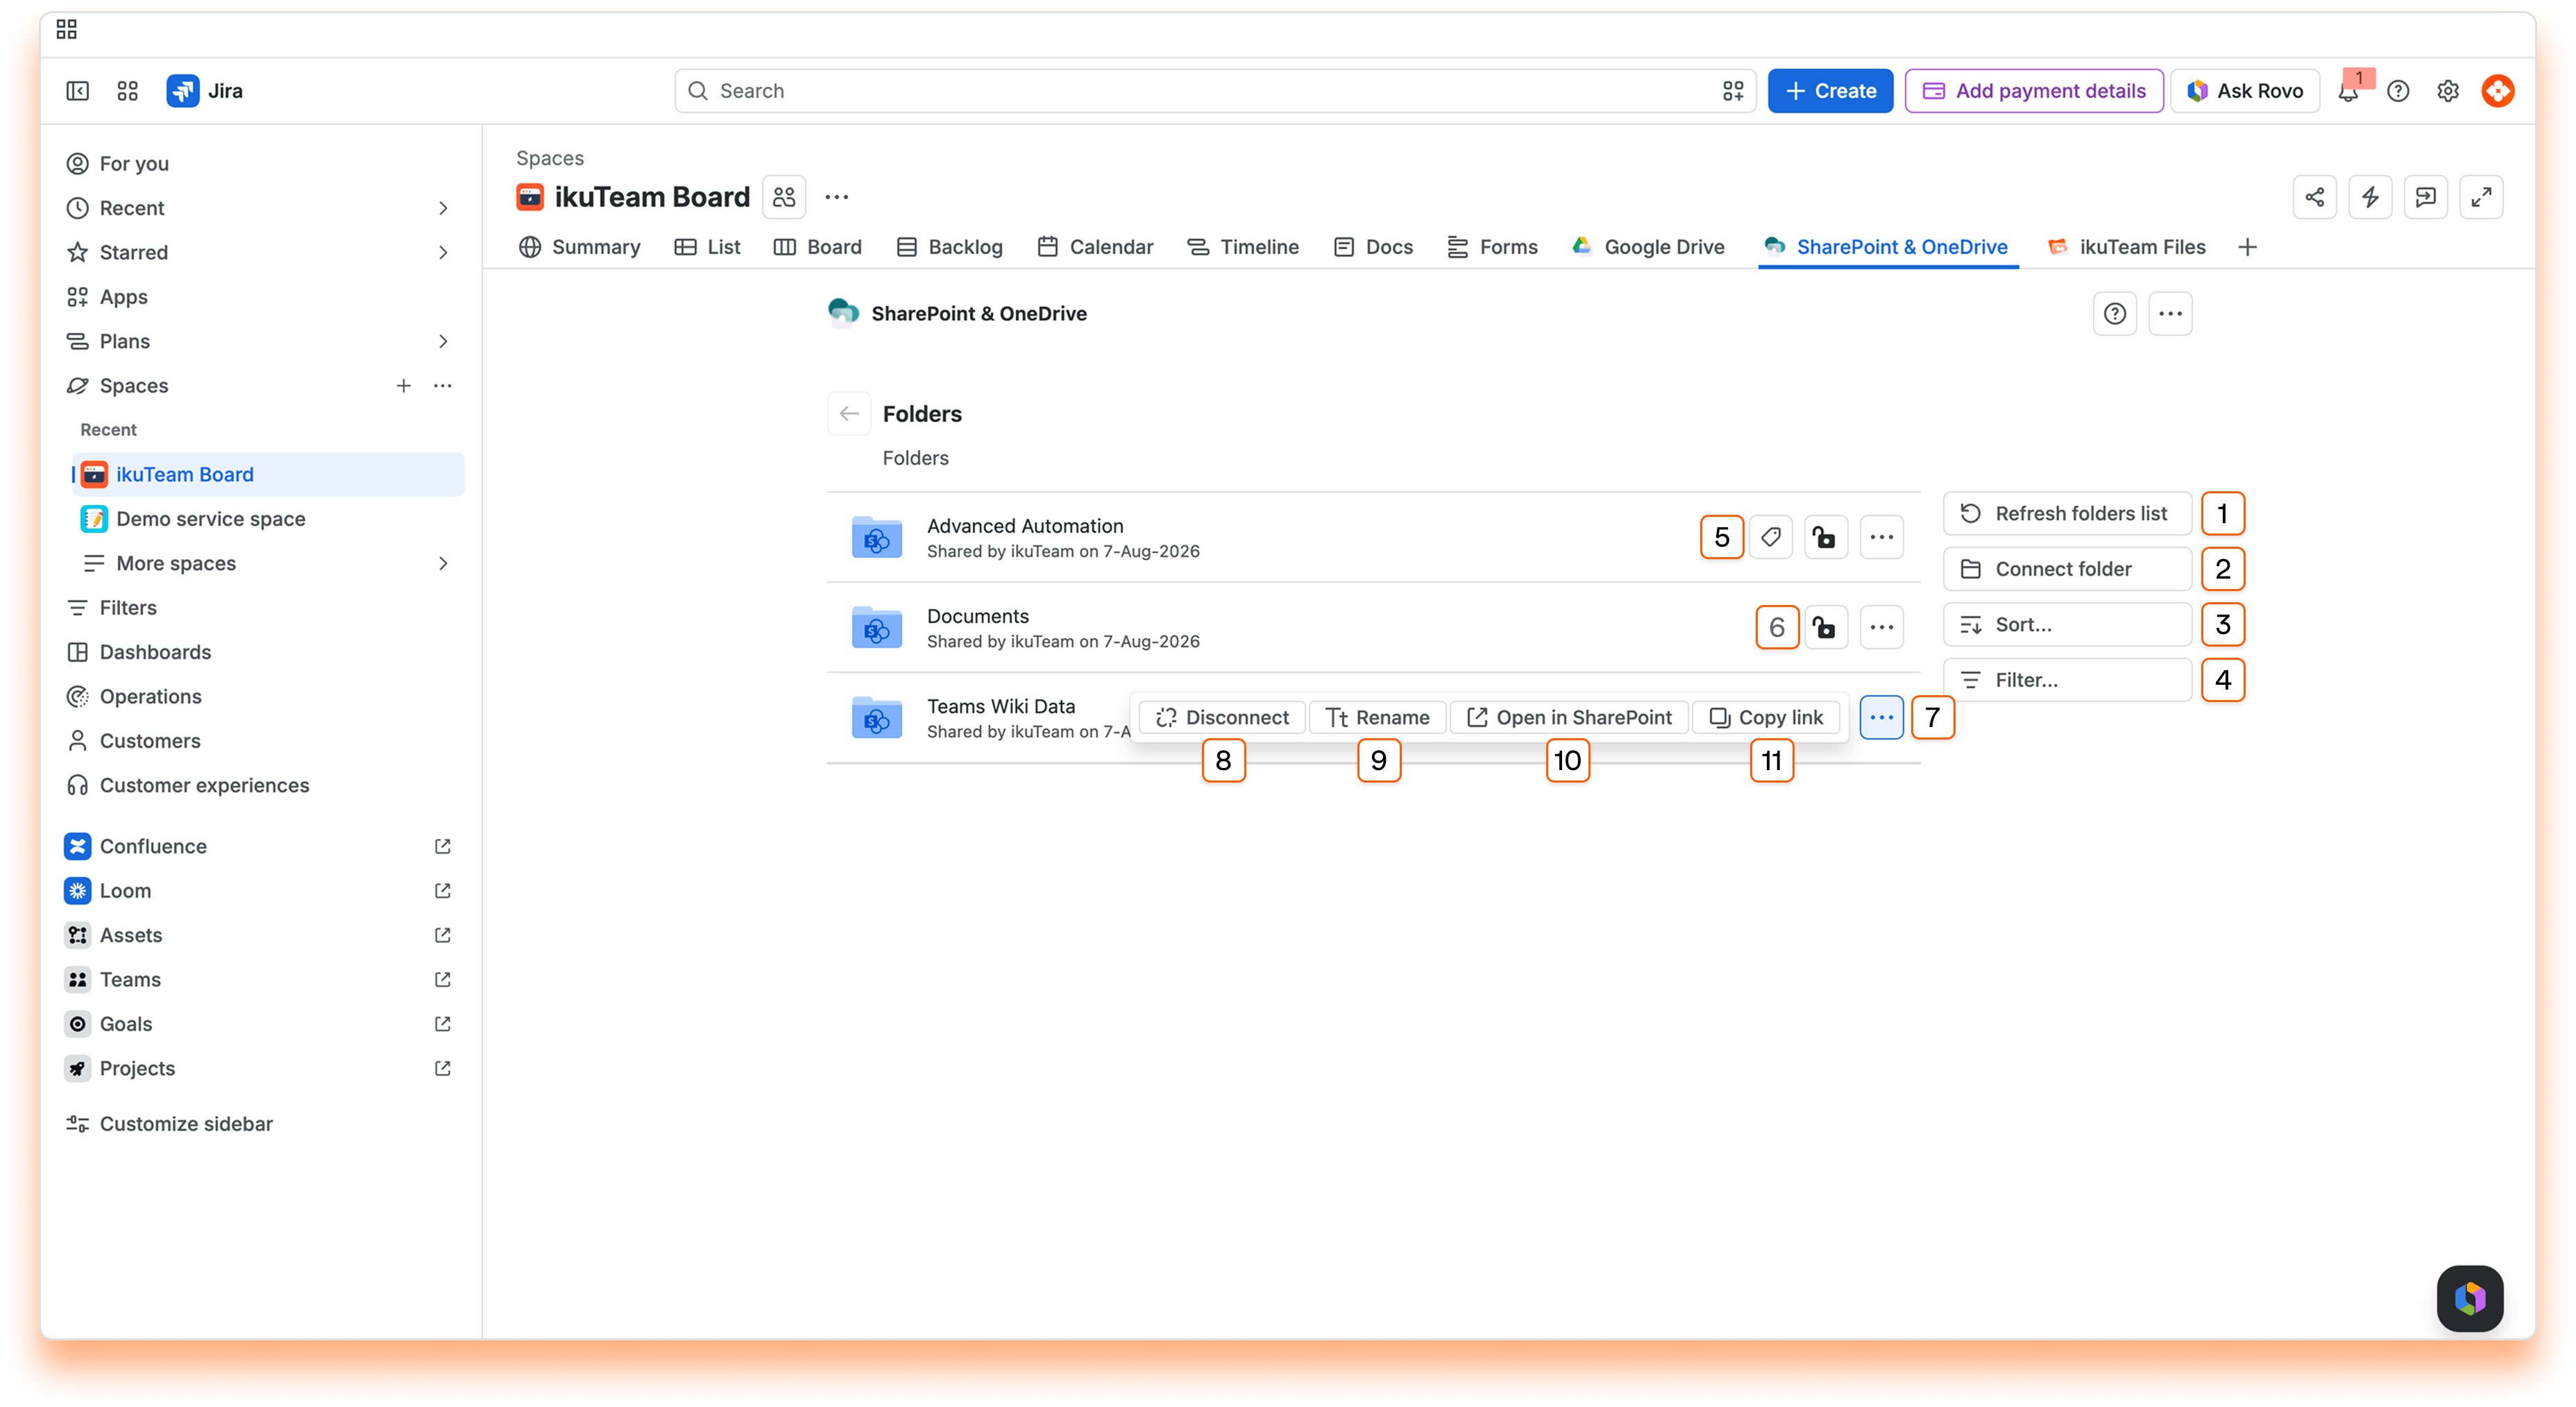
Use the "Refresh folders list" button to update the connected folders list and access folders your team shared with the latest permissions.
In the Getting started page, we covered how to connect your first folder. The empty screen makes it easy to see how to do it, but you can connect as many folders as you need.
Instructions:
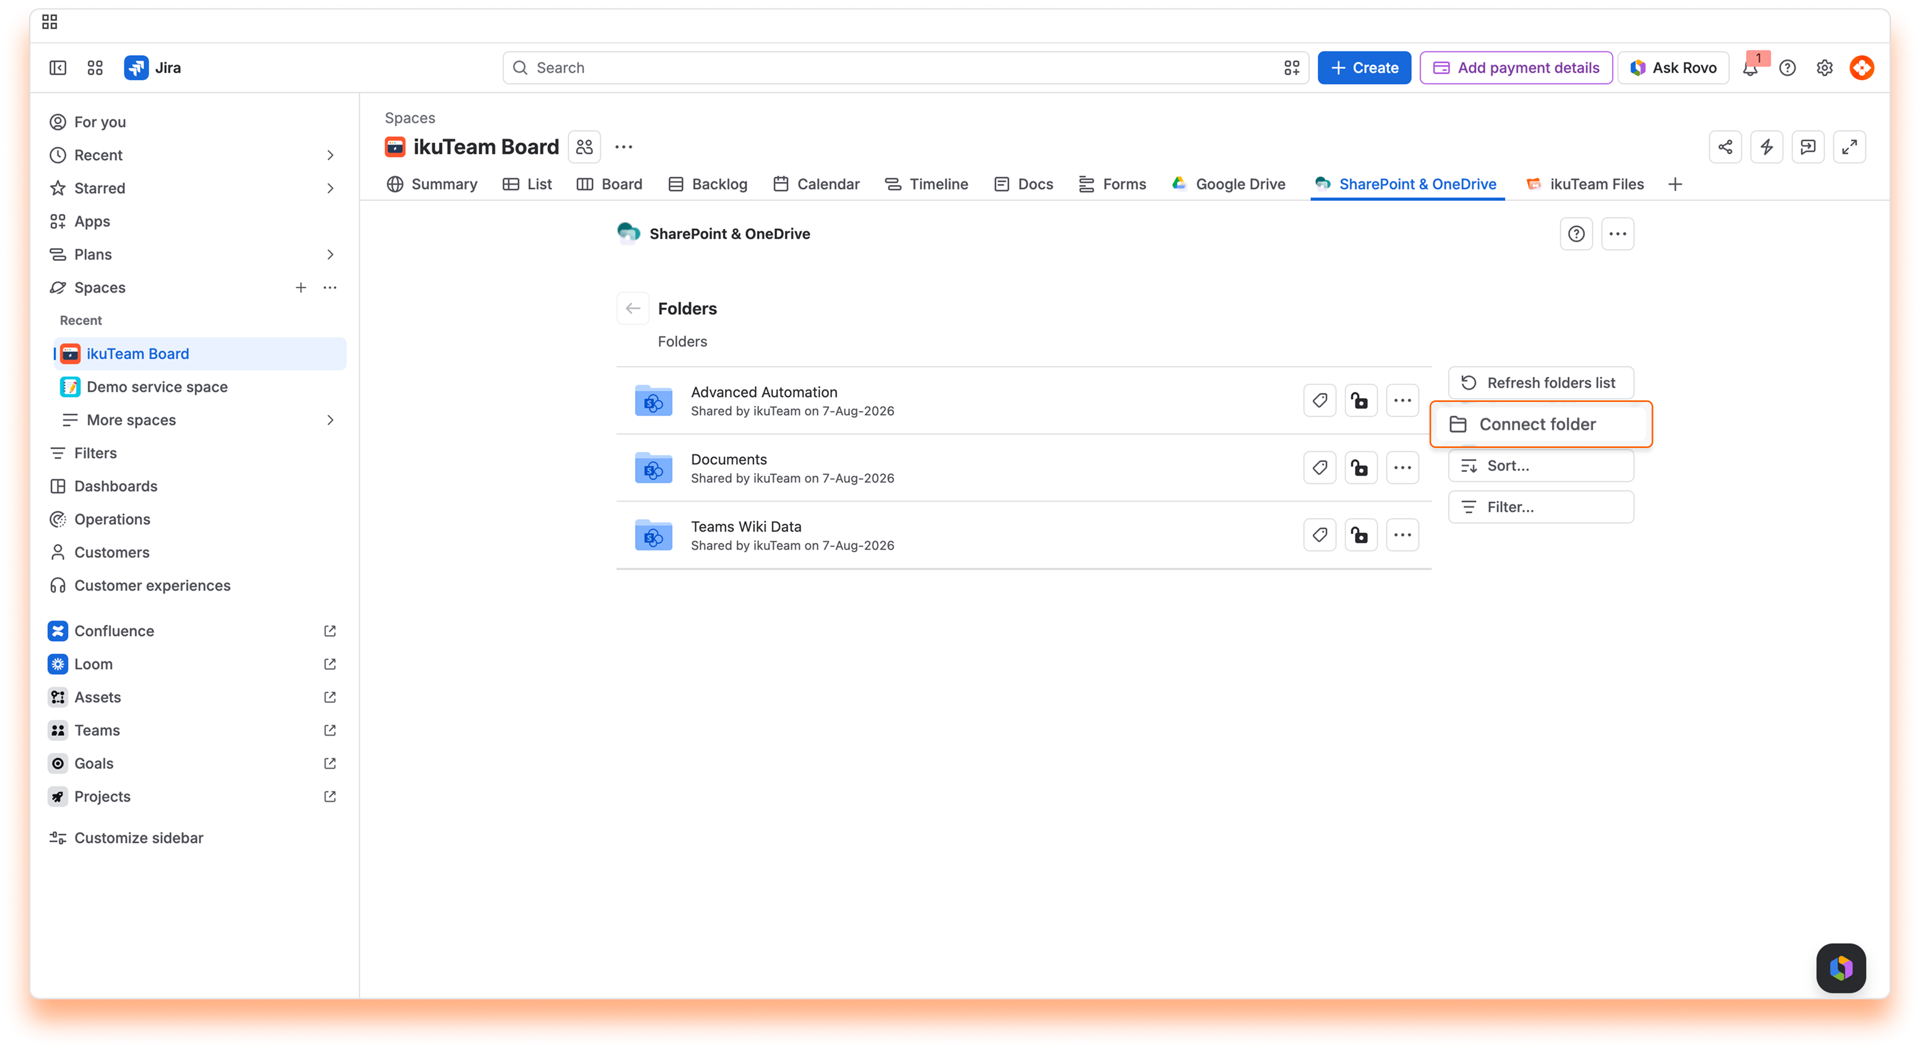
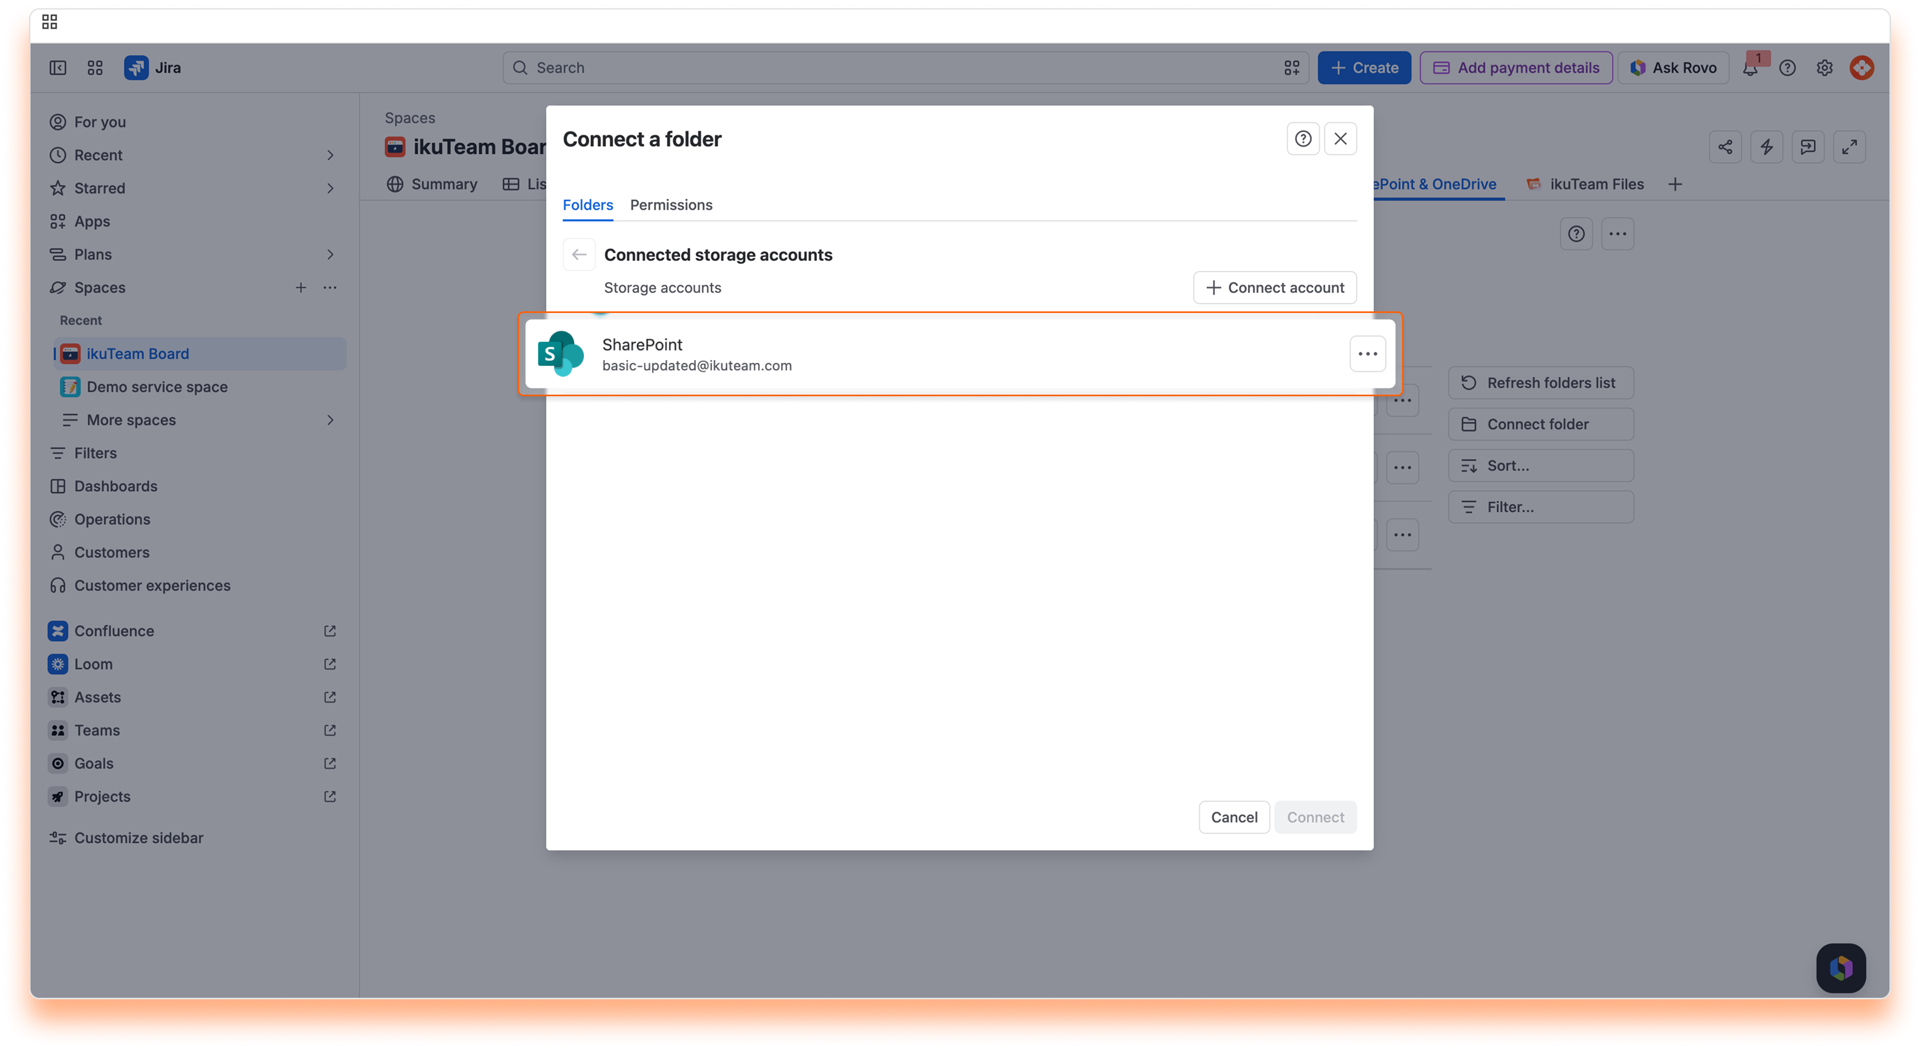
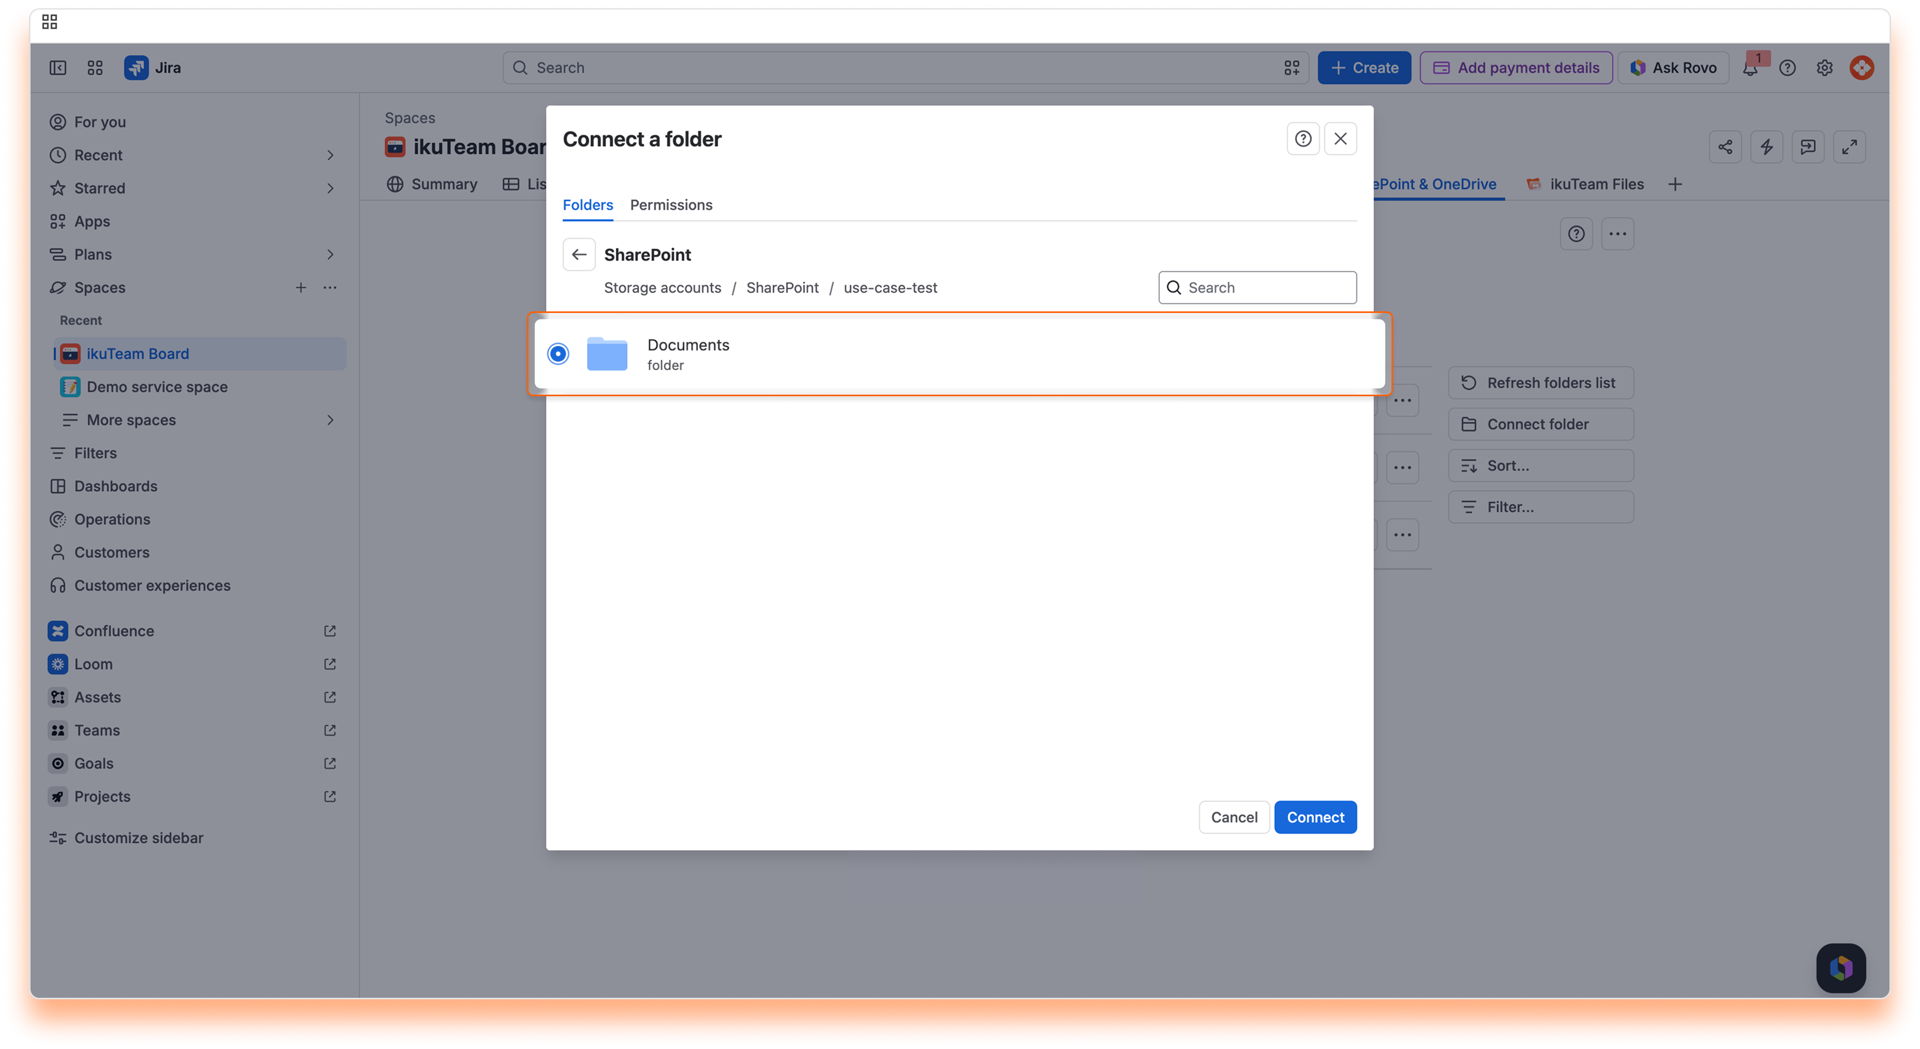
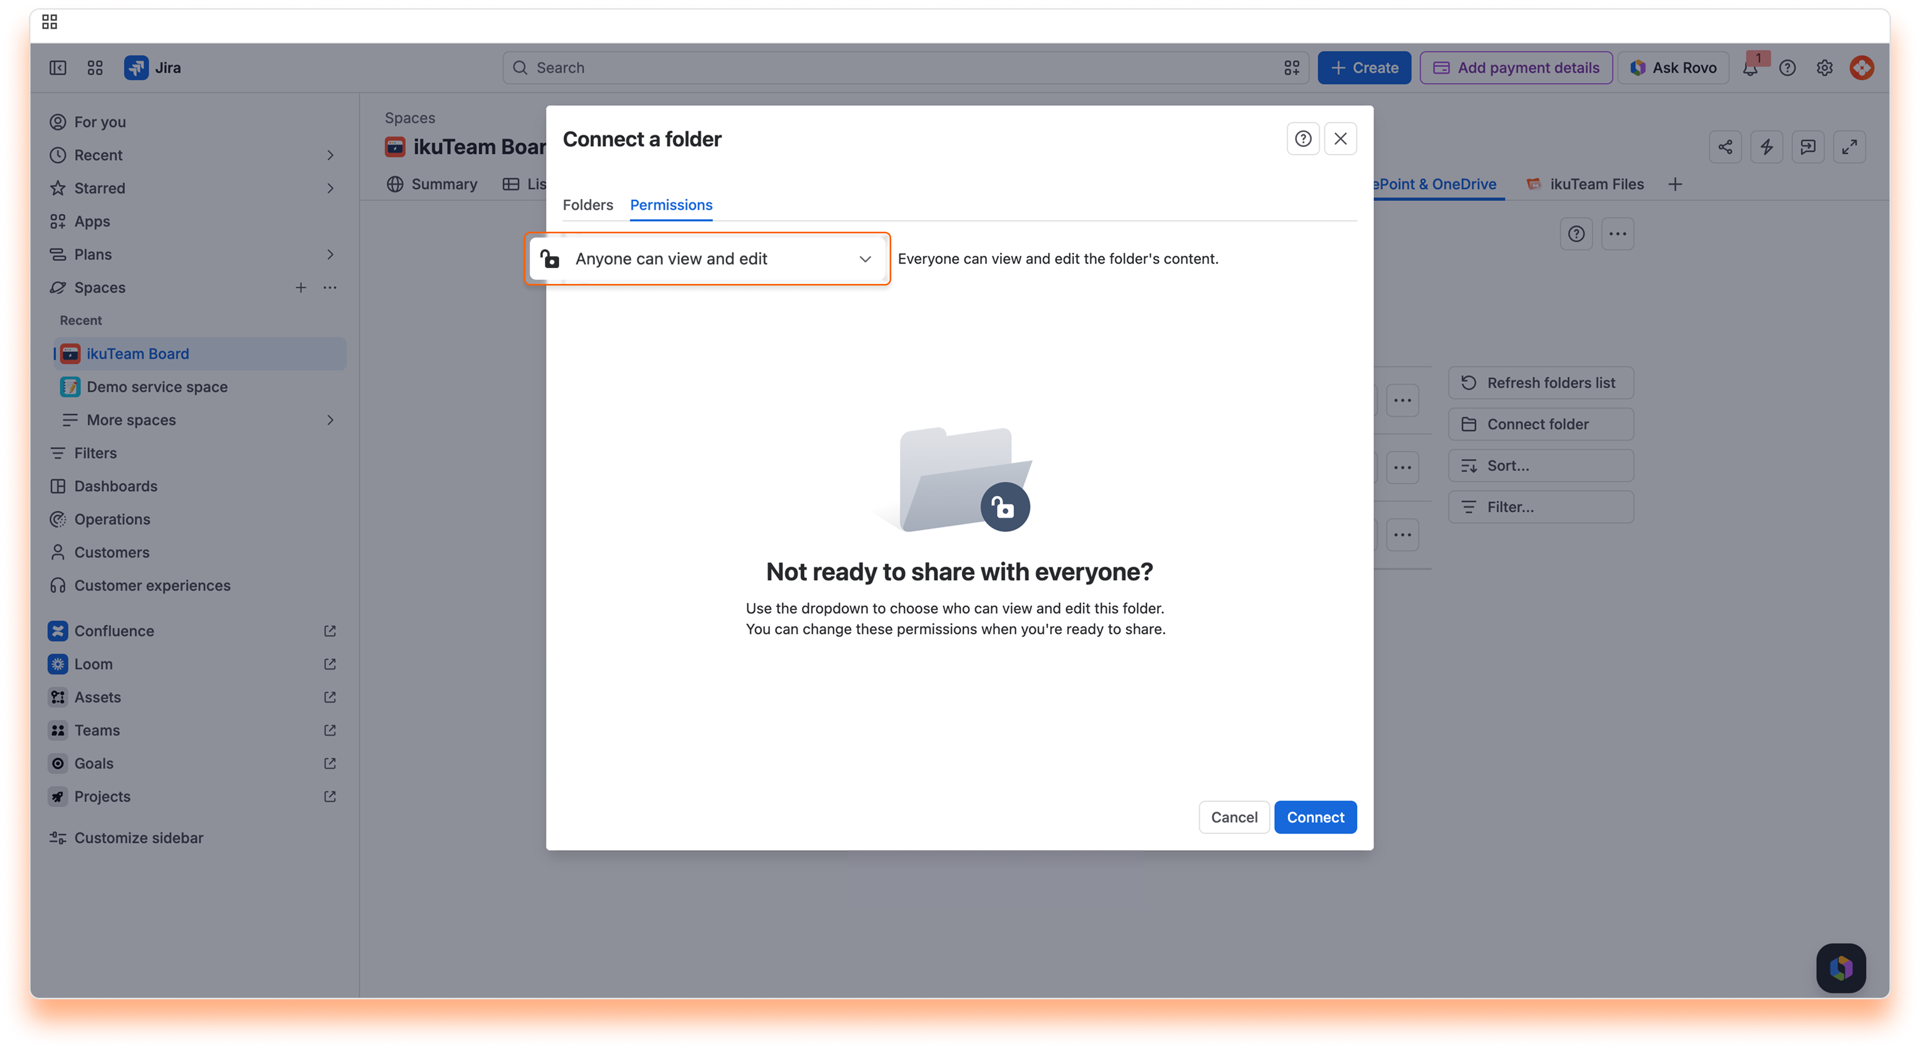
ℹ️ We recommend connecting a folder where you and your team store your documents, but you can start with a new one by clicking the "New folder" button.
ℹ️ SharePoint tip: If you can’t see the site where your folder is, you can use the Find site Or Connect by URL to locate and link your sharepoint folder.
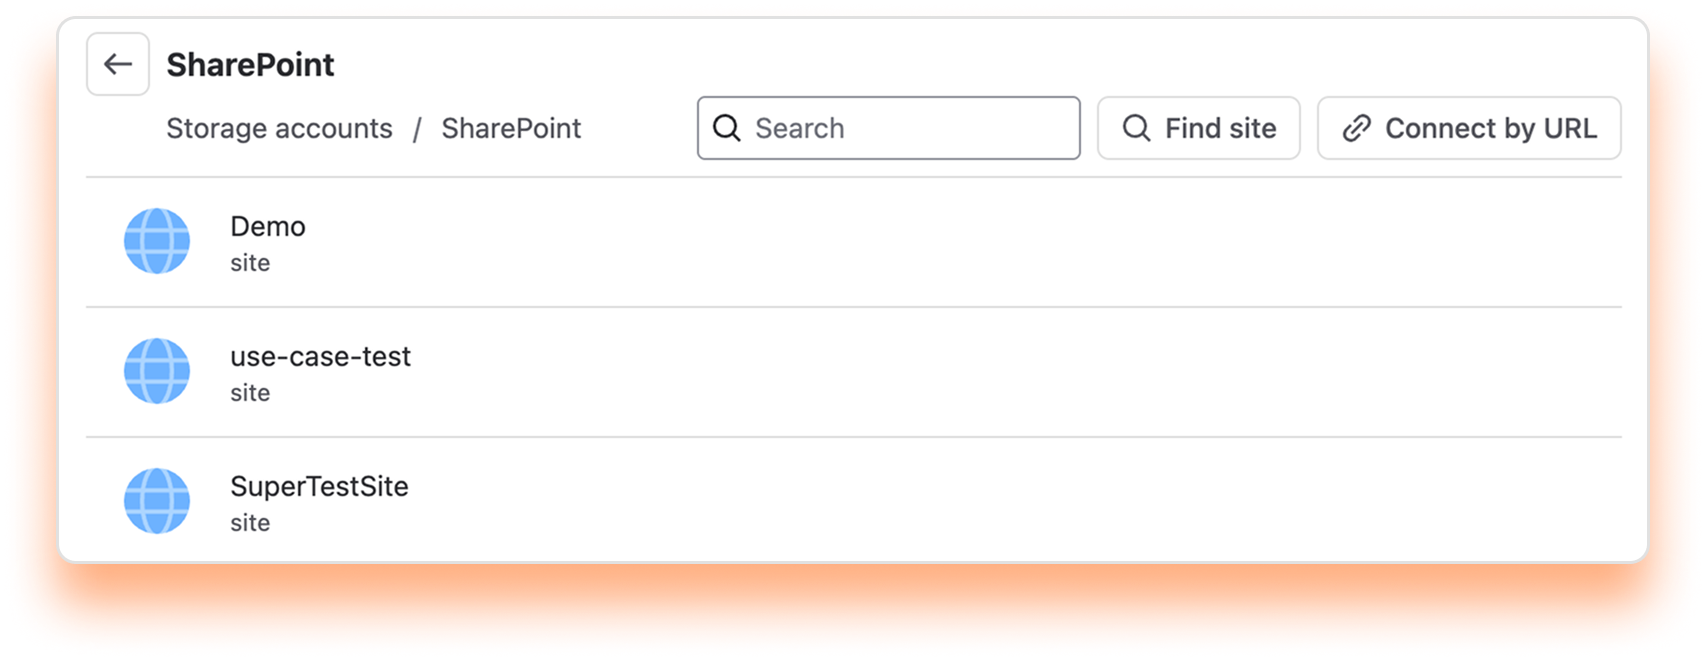
✅ All done. You can now use your new folder or add more using the same process.
The connected folders are ordered alphabetically by default.
You can change this by clicking the "Sort by name" button and selecting a sort of option and the order you prefer. You can sort them by name or added date. The button will always reflect your selection.
By default, the file manager shows every folder connected to the space, including folders your teammates connected. Select “Connected by me” to narrow the list to the folders you connected yourself.
This is handy in spaces with a lot of connected folders. Instead of scrolling through the full list, you can jump straight to the folders you work with, and any search or browsing you do runs against that shorter list.
You can add a tag to your connected folders to help you keep them organized and easily accessible.
ℹ️ Anyone who can access the folder can add and edit the tag.
Adding a tag
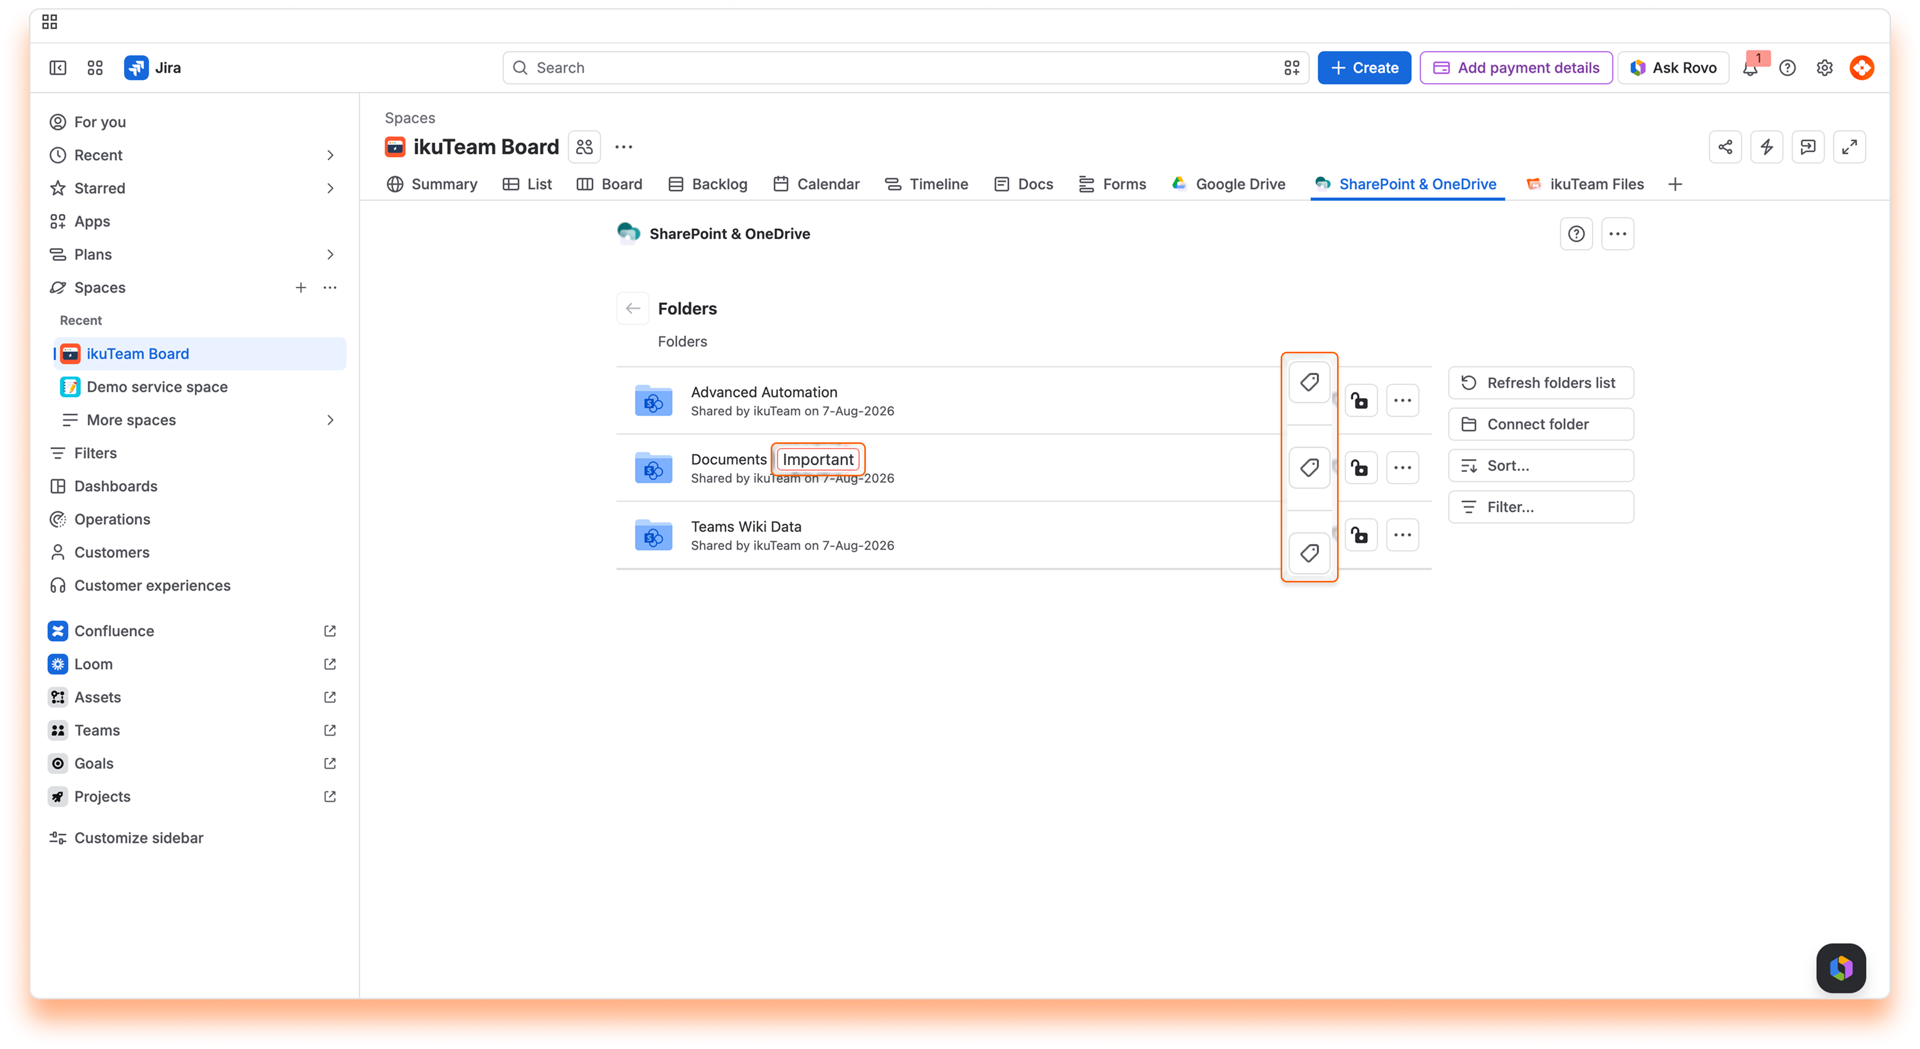
To add a tag:
✅ All done.
Editing a tag
To edit the tag, click the tag button again. You can change the description and color. When you’re done, click Save.
Removing a tag
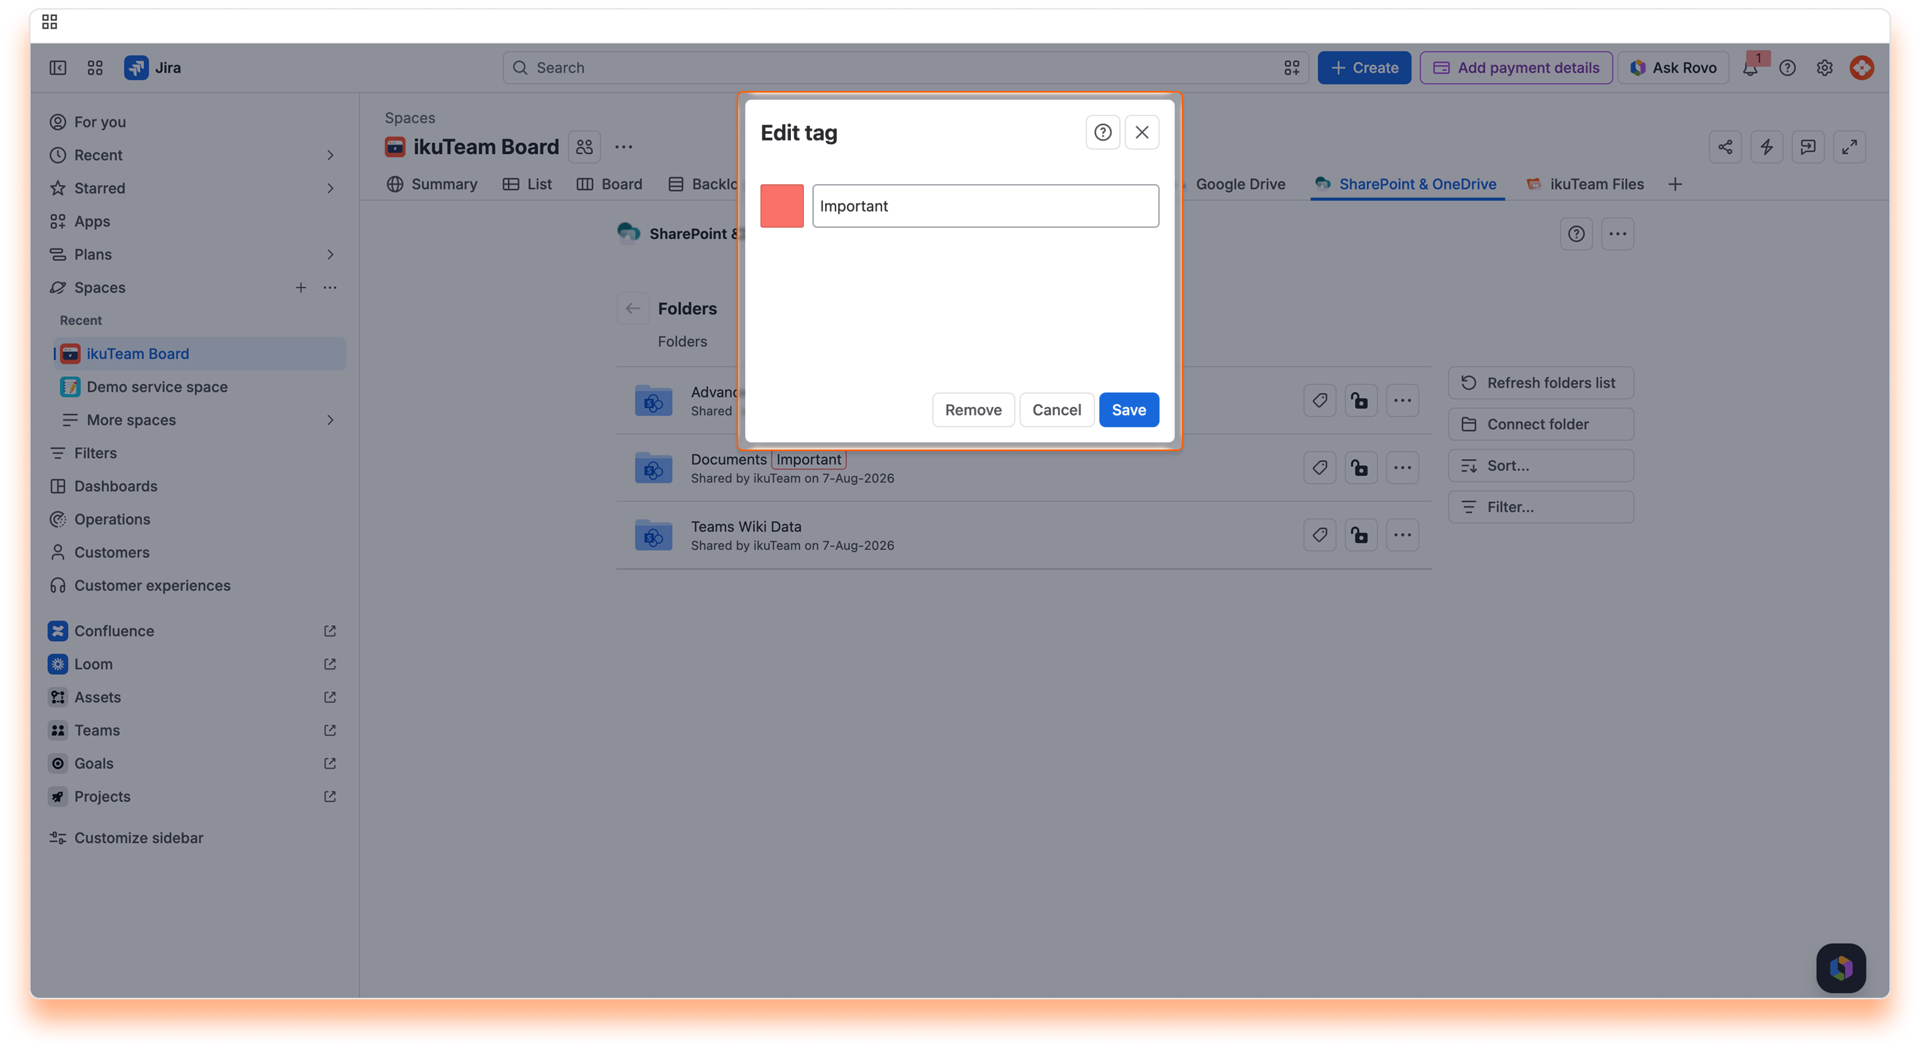
To altogether remove a tag:
✅ All done.
⚠️ This action is undoable, but you can add a tag again anytime.
You can set permissions for connected folders from the File Manager at any time by clicking the lock icon. For more information, check the permissions page.
It's also possible to disconnect folders you no longer need. Before getting into how to do it, it's relevant to know that you're only breaking the link in the SharePoint app to the original storage when you disconnect a folder. All your content is safe, but any files and folders you or your team attached to Jira Work Items from the disconnected folder also lose the link to the original storage and become unavailable.
⚠️ If you accidentally disconnect a folder, you can connect it again in 30 days to restore the attachments. After this period, it’s no longer possible to restore the existing attachments.
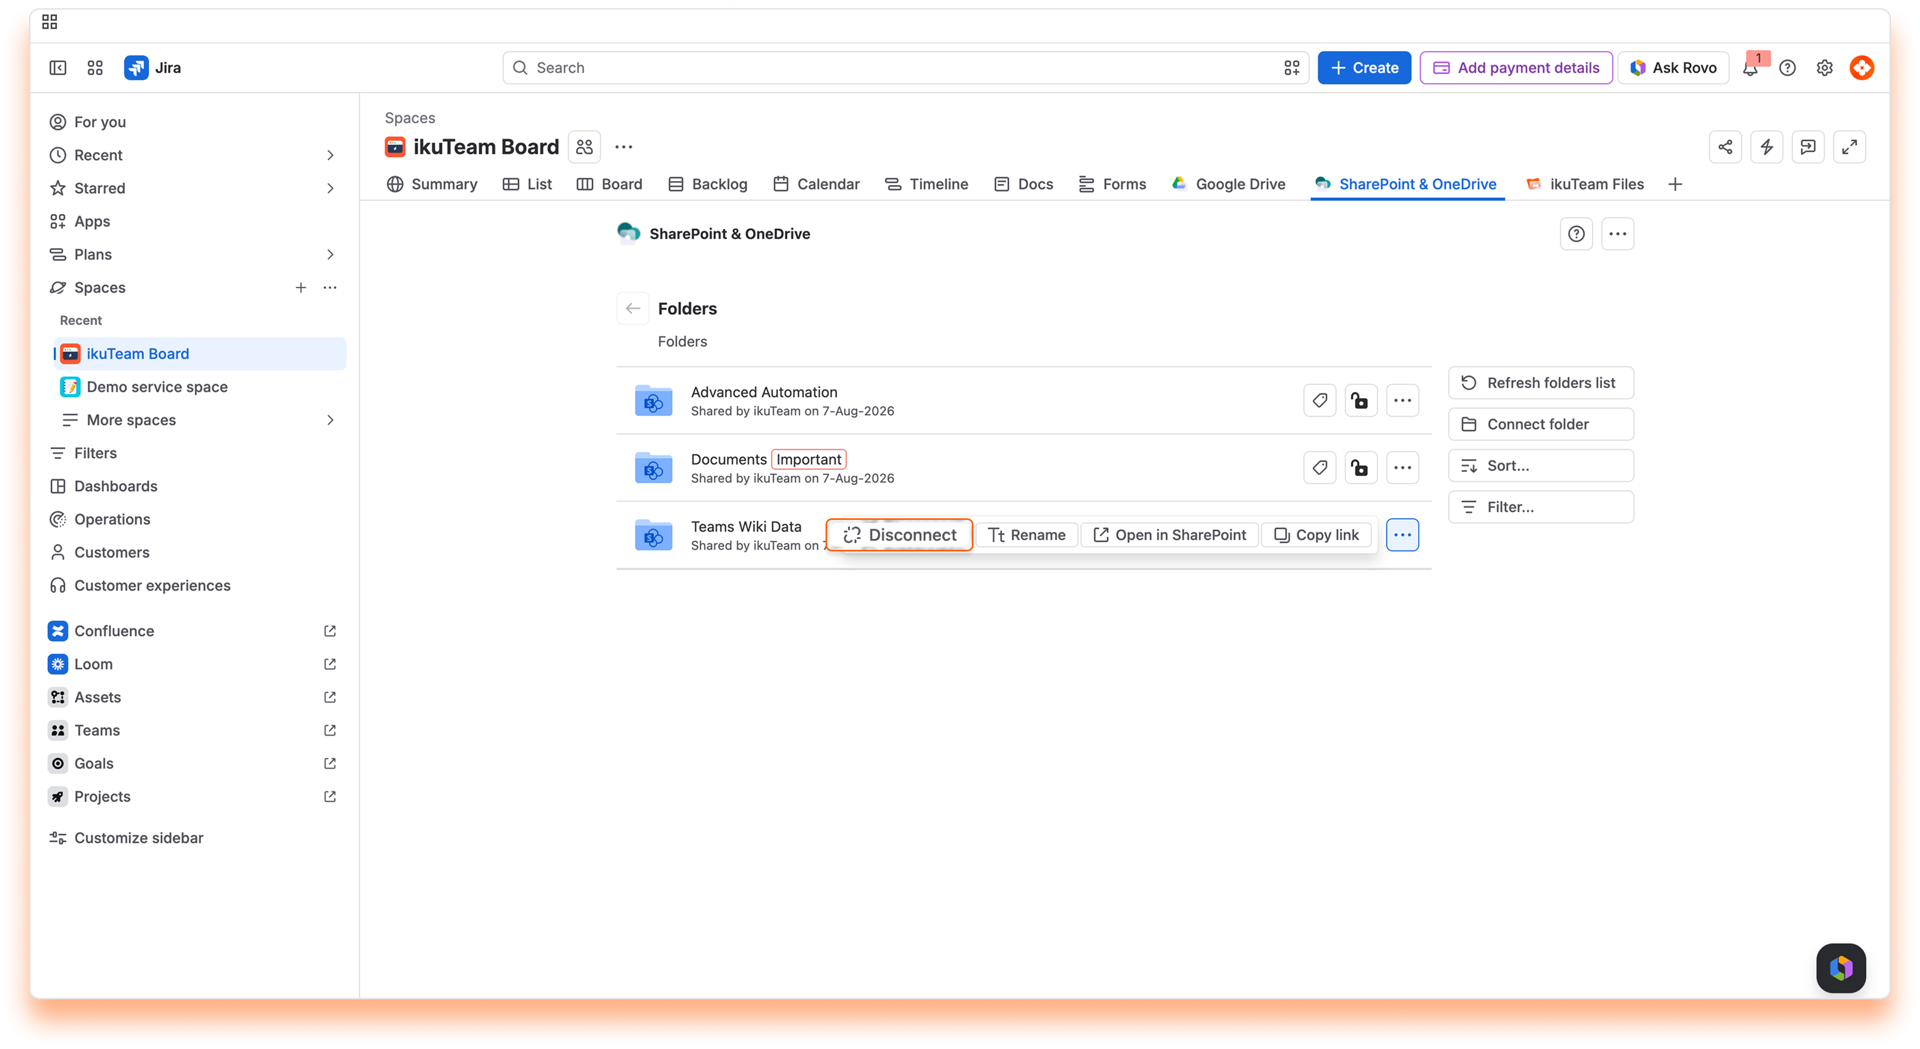
Instructions:
✅ All done. Your folder is safe and sound, but your team can't use it anymore in the SharePoint Connector app.
ℹ️ Keep in mind that you can only disconnect the folders you added.
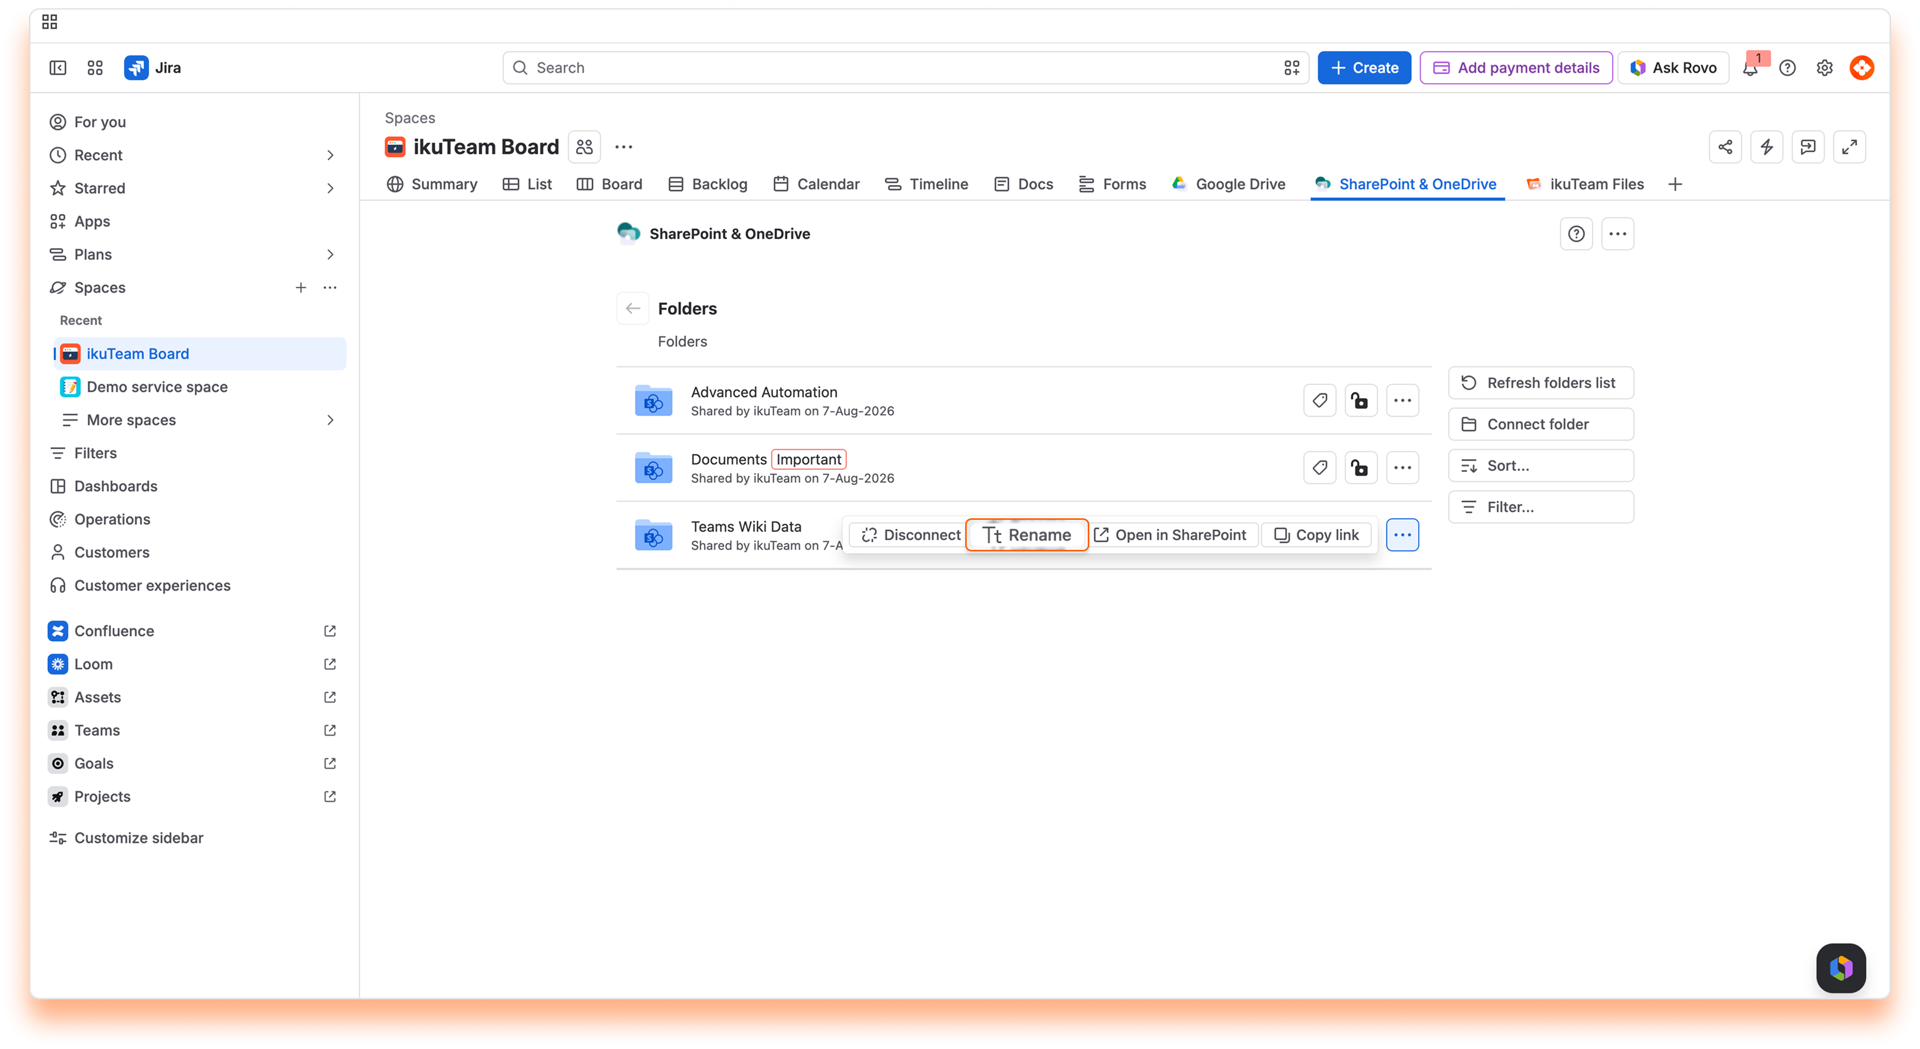
Instructions:
ℹ️ When you change the name of a folder, it's updated in the connected storage, too.
⚠️ Changing the name of connected folders from Dropbox and Egnyte breaks existing attachments.
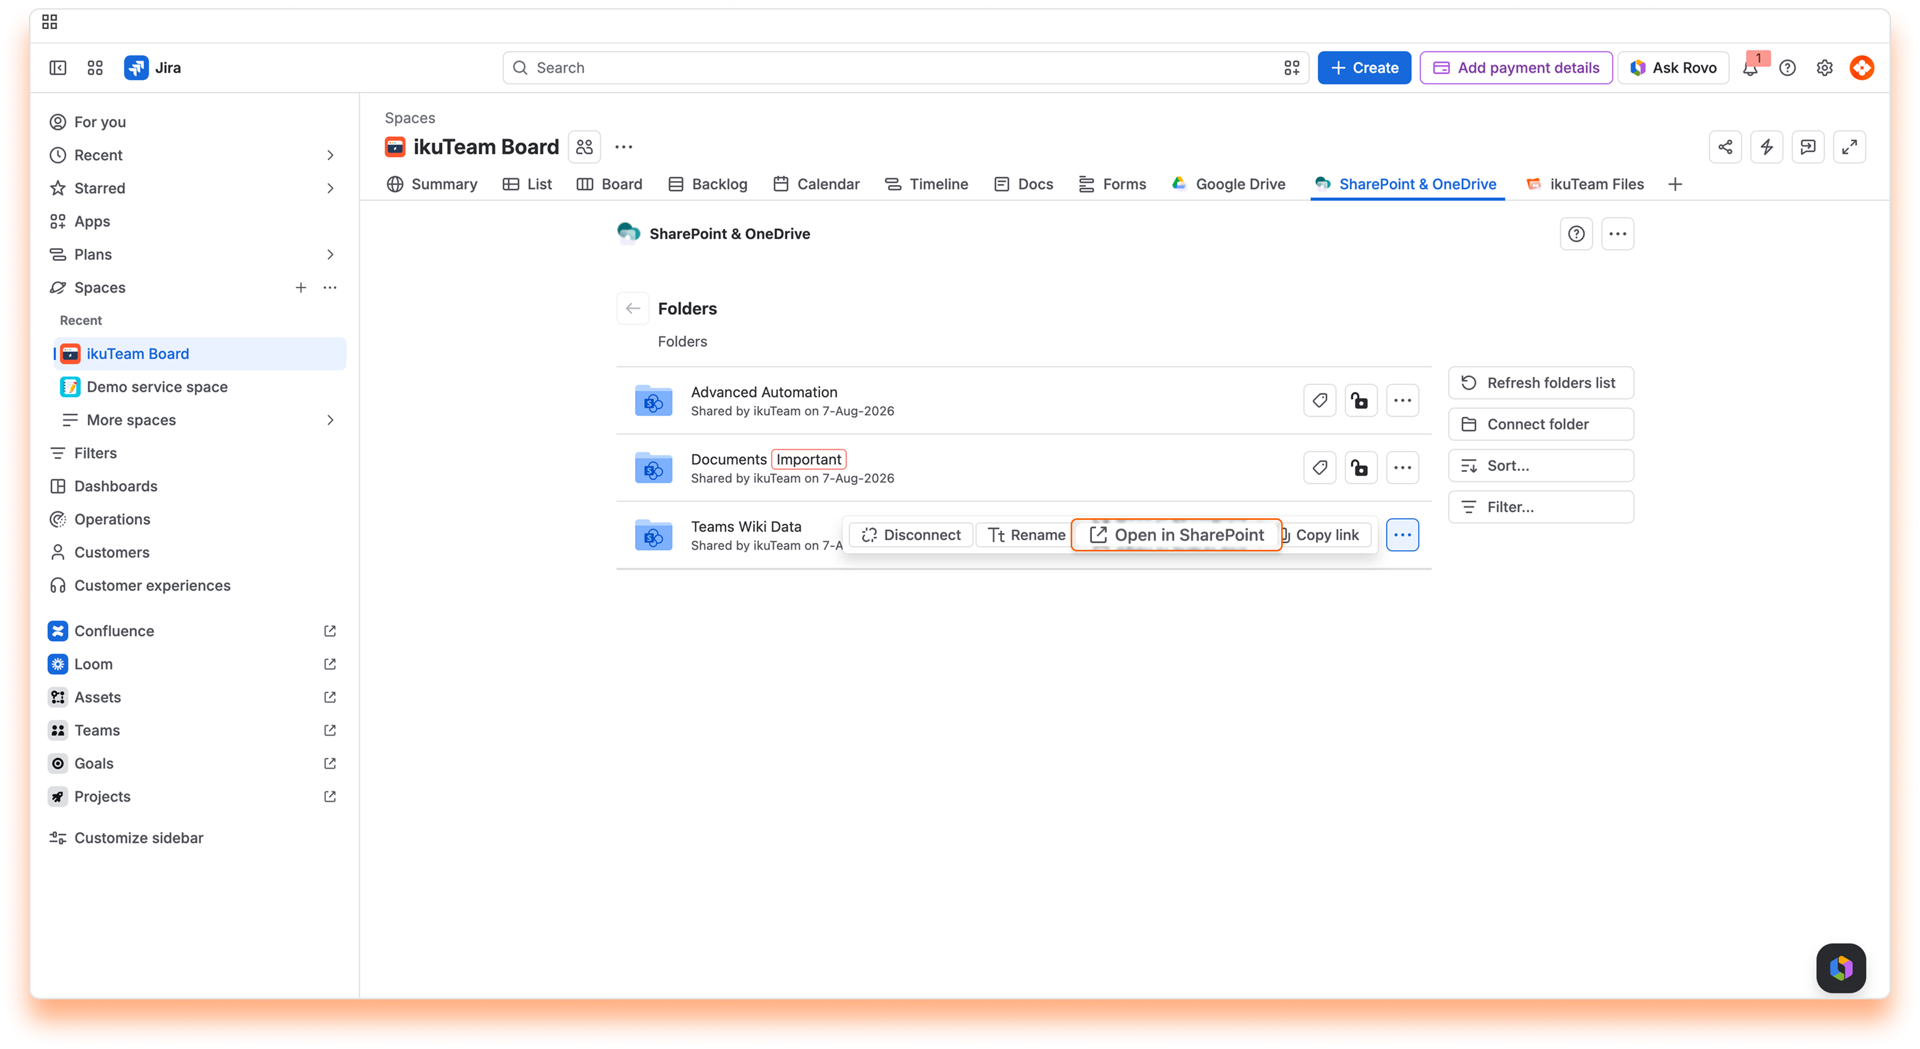
The folder opens in a few seconds on the original storage site.
This option lets you copy the link of the folder/file on the remote location.
While using the SharePoint Connector for Jira app, you can connect folders stored in SharePoint (Multiple sites). You only need to authorize the app to access that storage place first. You're in control of your storage places: only you can see the places you allowed, and you, and only you, can disconnect them.
You can view your connected places when you connect a new folder or from the settings page.
Connect folder dialog:
List of your connected places.
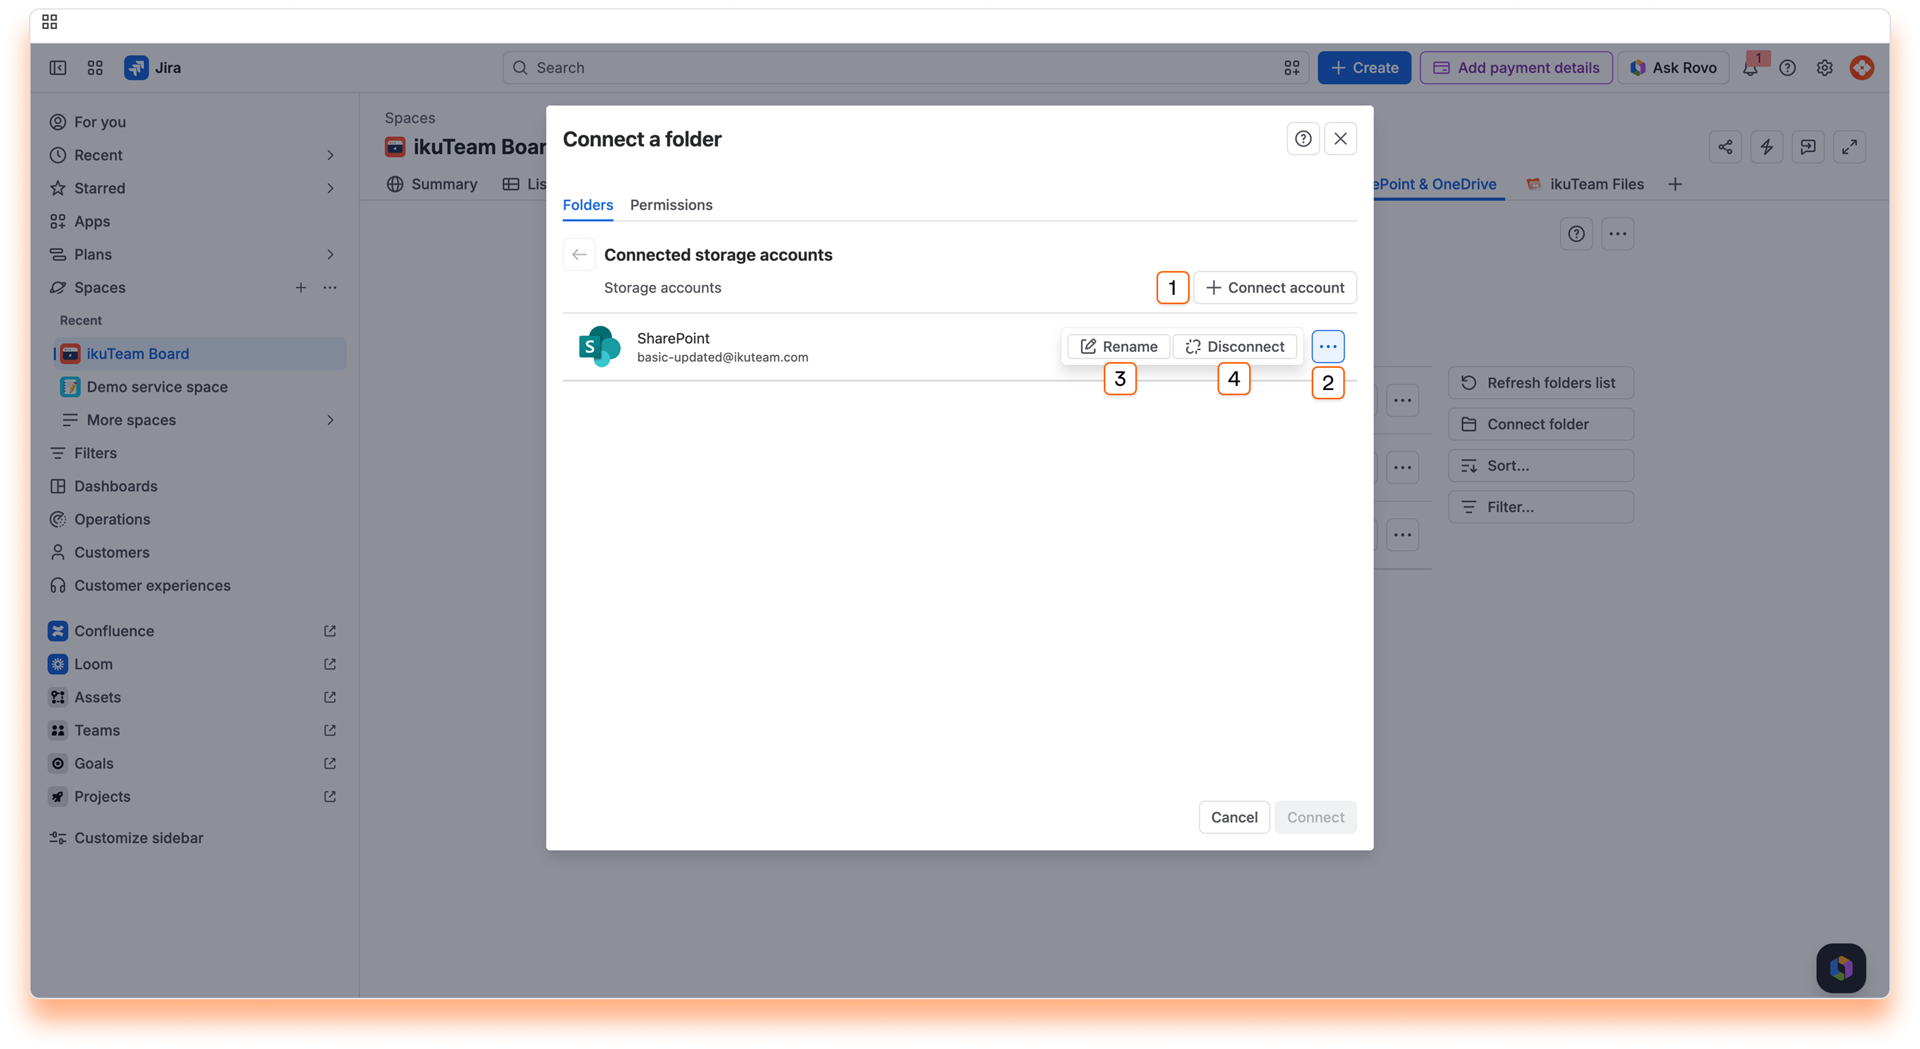
Instructions:
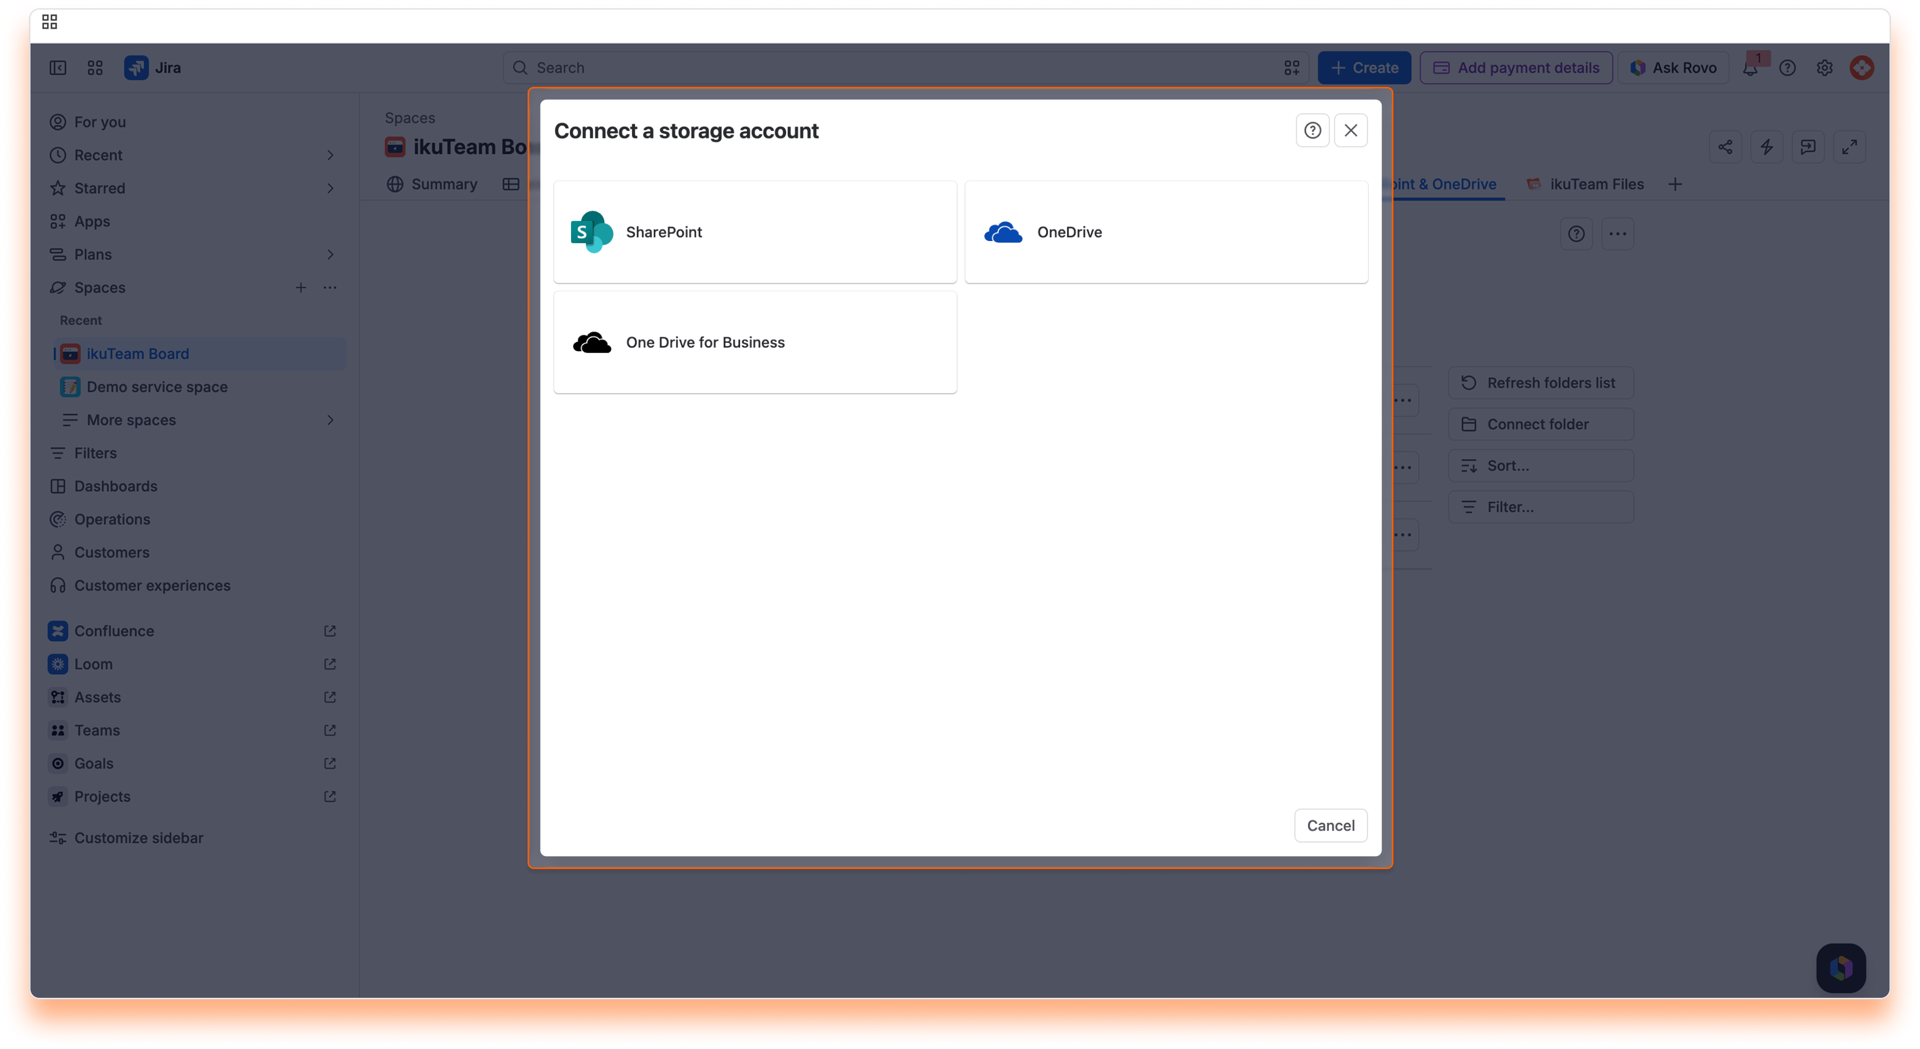
ℹ️ You can connect several accounts of the same service.
Connecting a SharePoint folder
Connecting an OneDrive for Business folder
✅ It's all done. Your new place is now connected. You can browse it to connect a folder or return to the file manager.
You can connect several accounts from the same service, and by default, we add a number at the end when you do it to differentiate them. To help you keep things organized, you can rename your places to something more meaningful to you.
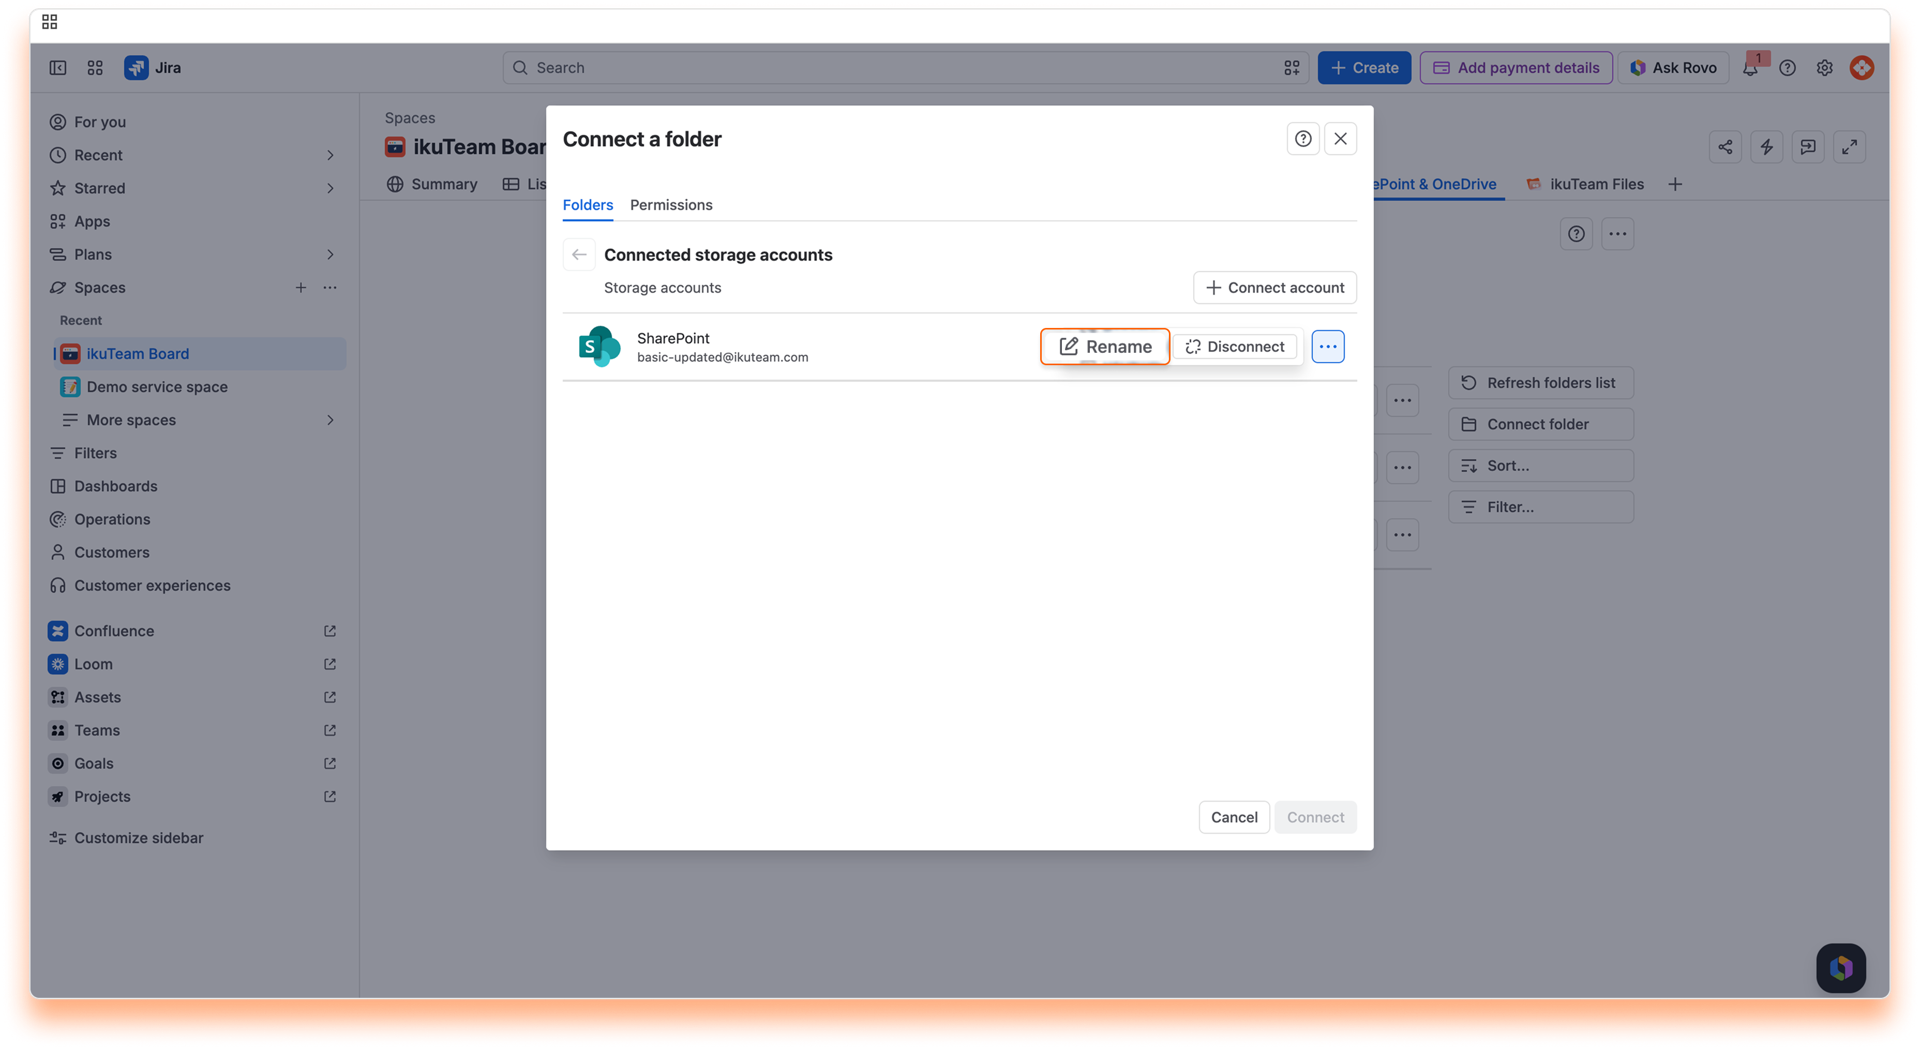
Instructions:
✅ That's it. It just takes a few moments to update the name, and it's ready to use.
ℹ️️ You can also rename and manage your places from the settings page.
When disconnecting a place in the SharePoint Connector Automation app, you must understand that you solely sever the link to the original storage rather than deleting any data. All your content is safe, but any folders you have connected from that place will also be disconnected. Consequently, files and folders you or your team attached to Confluence pages from the disconnected folders also lose the original storage link and become unavailable.
⚠️ If you accidentally disconnect a place, you can connect it again in 30 days to restore the connected folders and attachments. After this period, it’s no longer possible to restore the existing attachments.
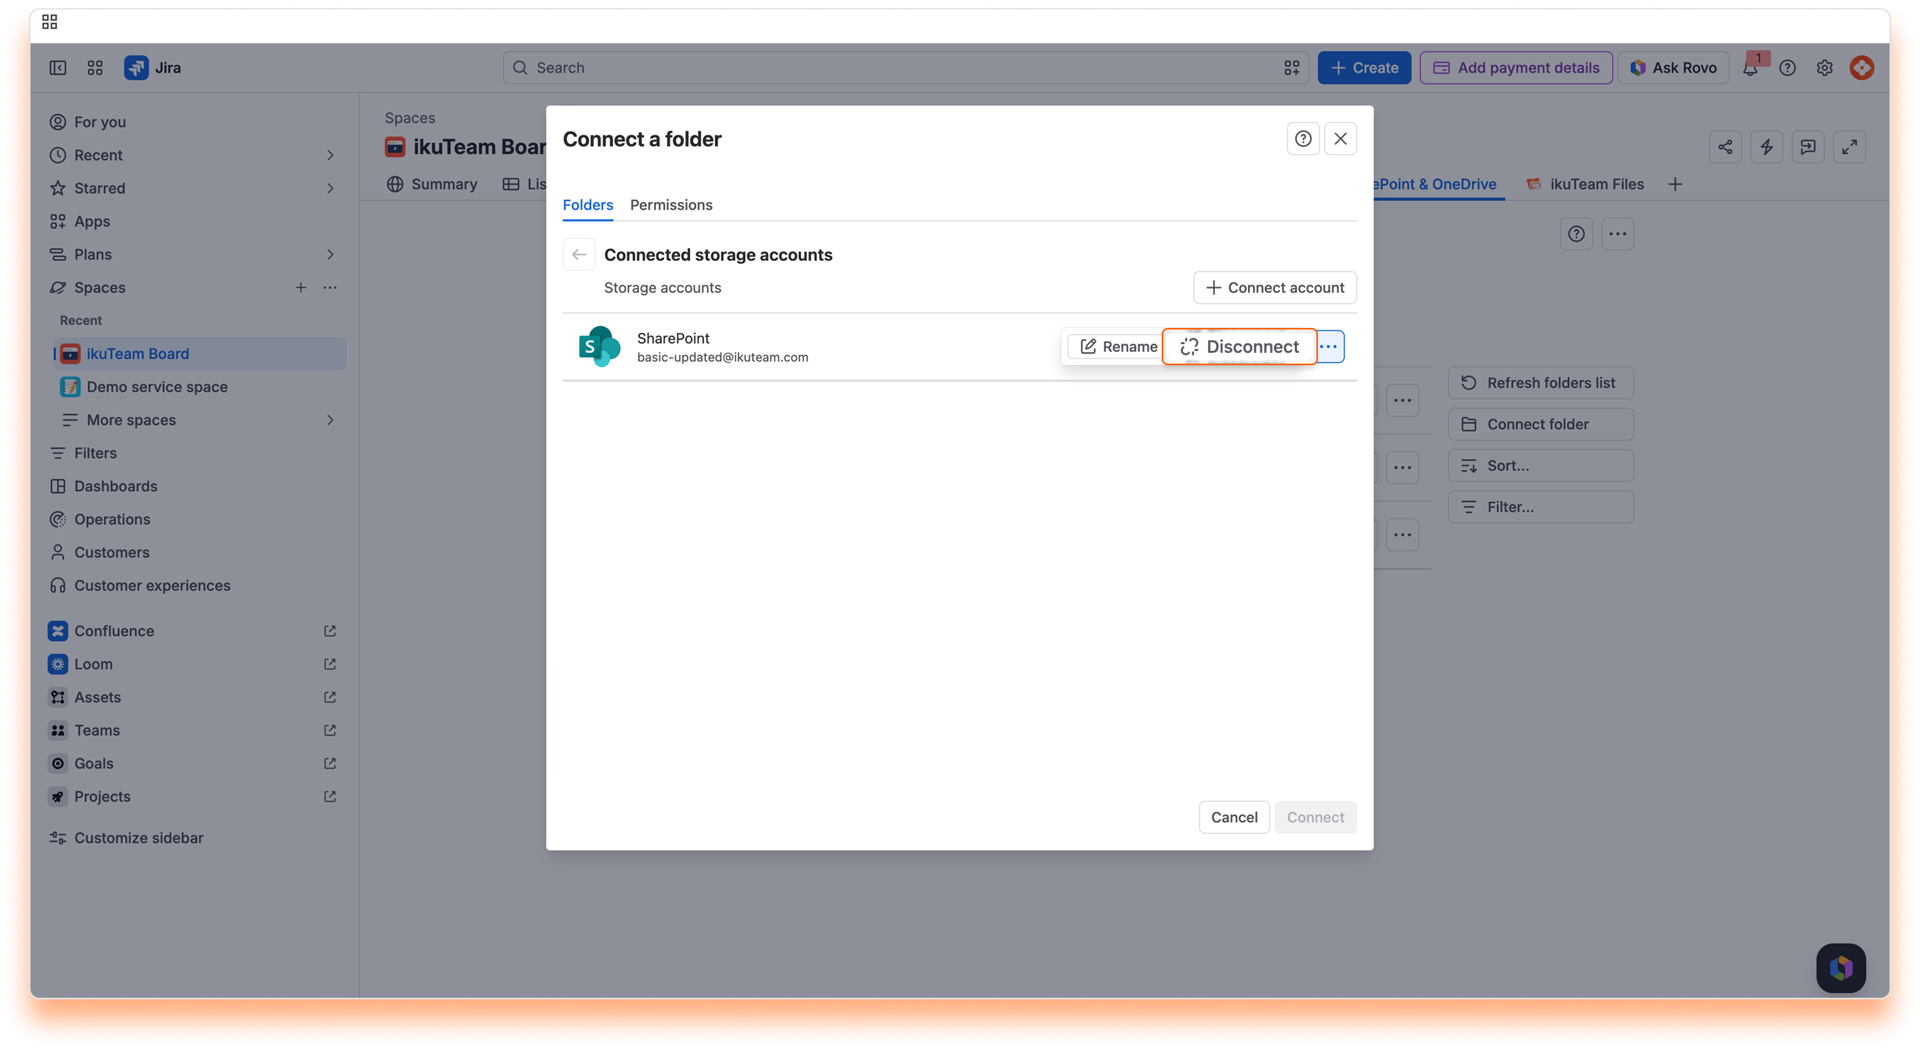
Instructions:
✅ All done. Your storage place is safe and sound but no longer accessible in the SharePoint Connector app.
ℹ️ You can also disconnect and manage your places from the settings page.
Now that we know how to connect folders, it's time to learn how to make the most of the SharePoint Connector for Jira app. This section will cover what you can do with files and folders and how to add content to your connected folder.
Click a connected folder to view its content. The navigation is at the top, your content is in the center, and extra options are to the right.
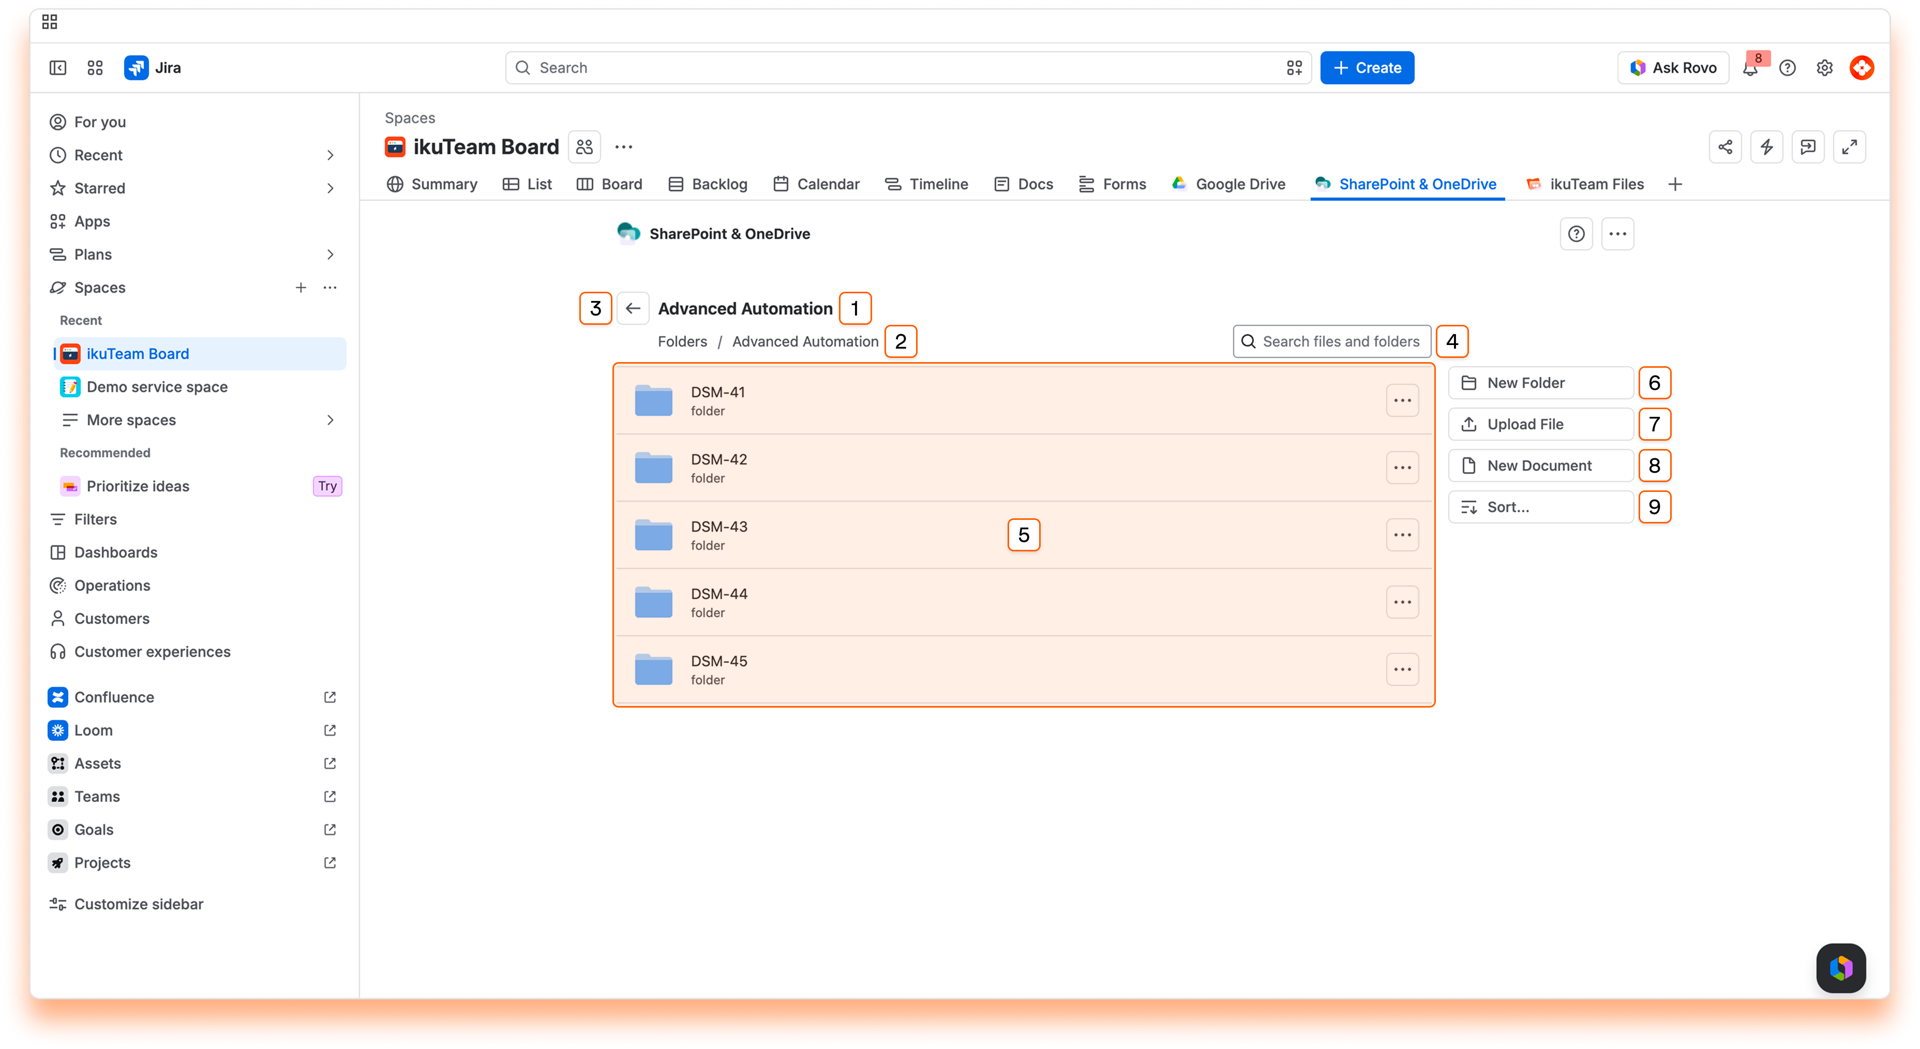
If your window is too narrow, the right section is hidden, but all the options are available in the context menu next to the navigation.
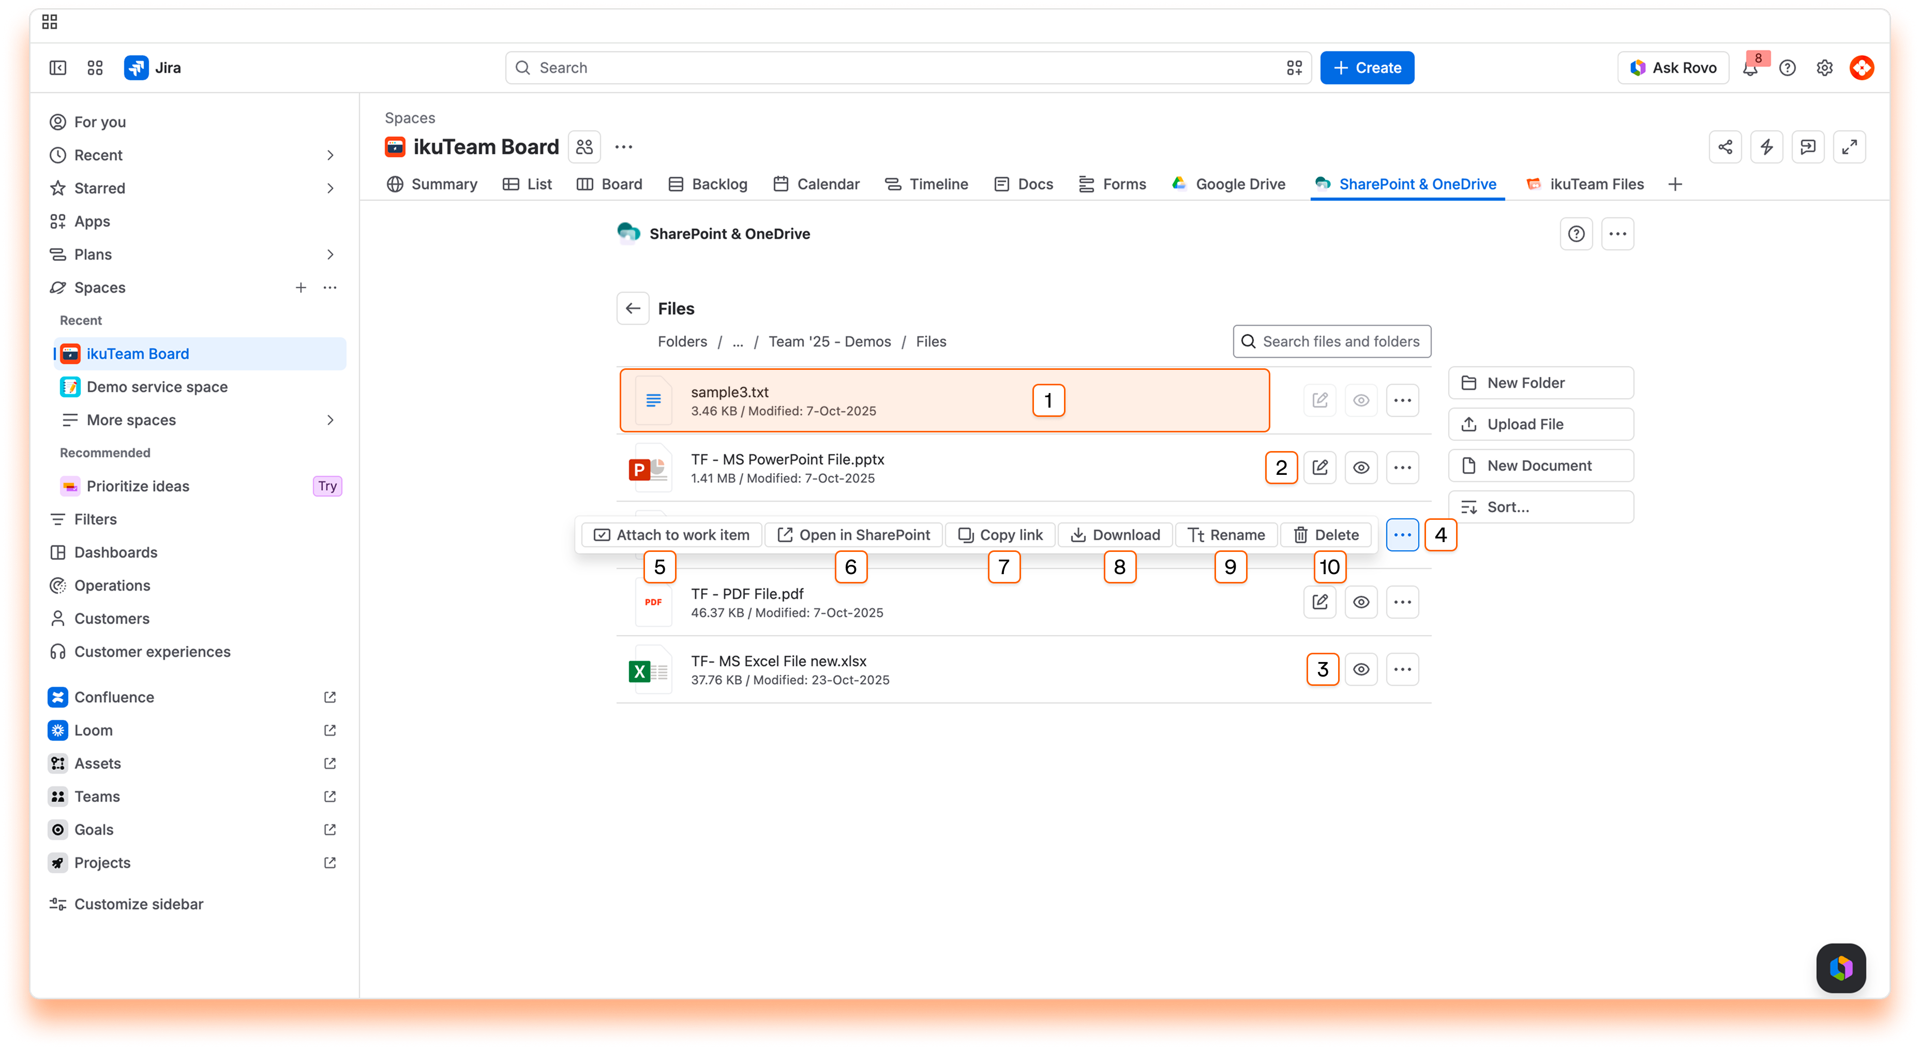
Preview files
You can preview the content of your files by clicking the name of the file you want or the preview button. You can preview images, PDFs, Microsoft Office, and Google Docs files. For more details, check the preview and edit documents page.
Edit documents
You can edit Microsoft Office files from the file manager by clicking the Edit button. A new tab opens with the corresponding Microsoft Office 365 editor, and it's ready for editing. It supports real-time collaboration. There's an autosave feature, so when you finish, just close the tab.
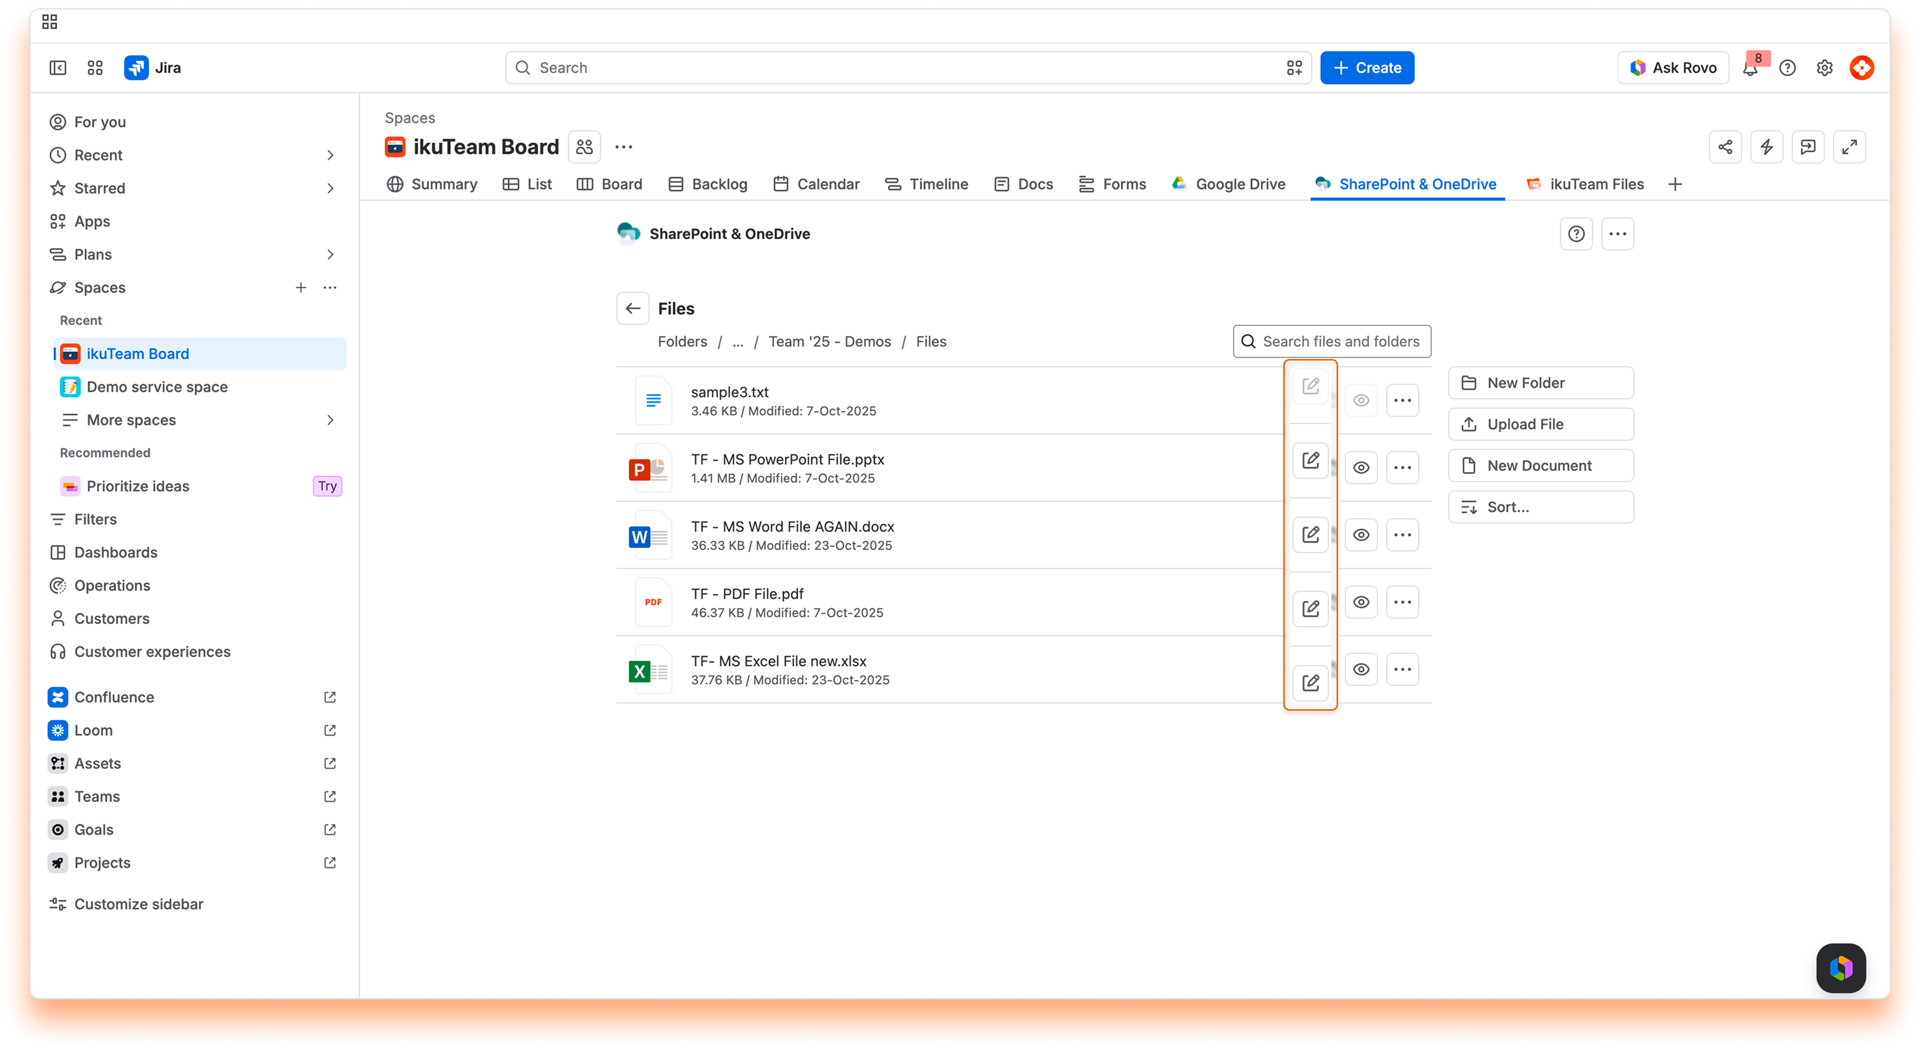
If you're using Google Drive, you can edit Google Docs files the same way. Just click the edit button. Google Docs also supports real-time collaboration and autosave.
You can edit PDF files with the advanced version of the SharePoint Connector Automation app.
ℹ️ The edit option is also available when previewing the file (check Preview files on Jira Cloud) and when you attach the document to an Work Item.
For more details, check the Edit documents on Jira Cloud page.
Attach a file to a Work Item
In Jira, you can attach files and folders to your Work Items directly from the file manager.
Instructions:
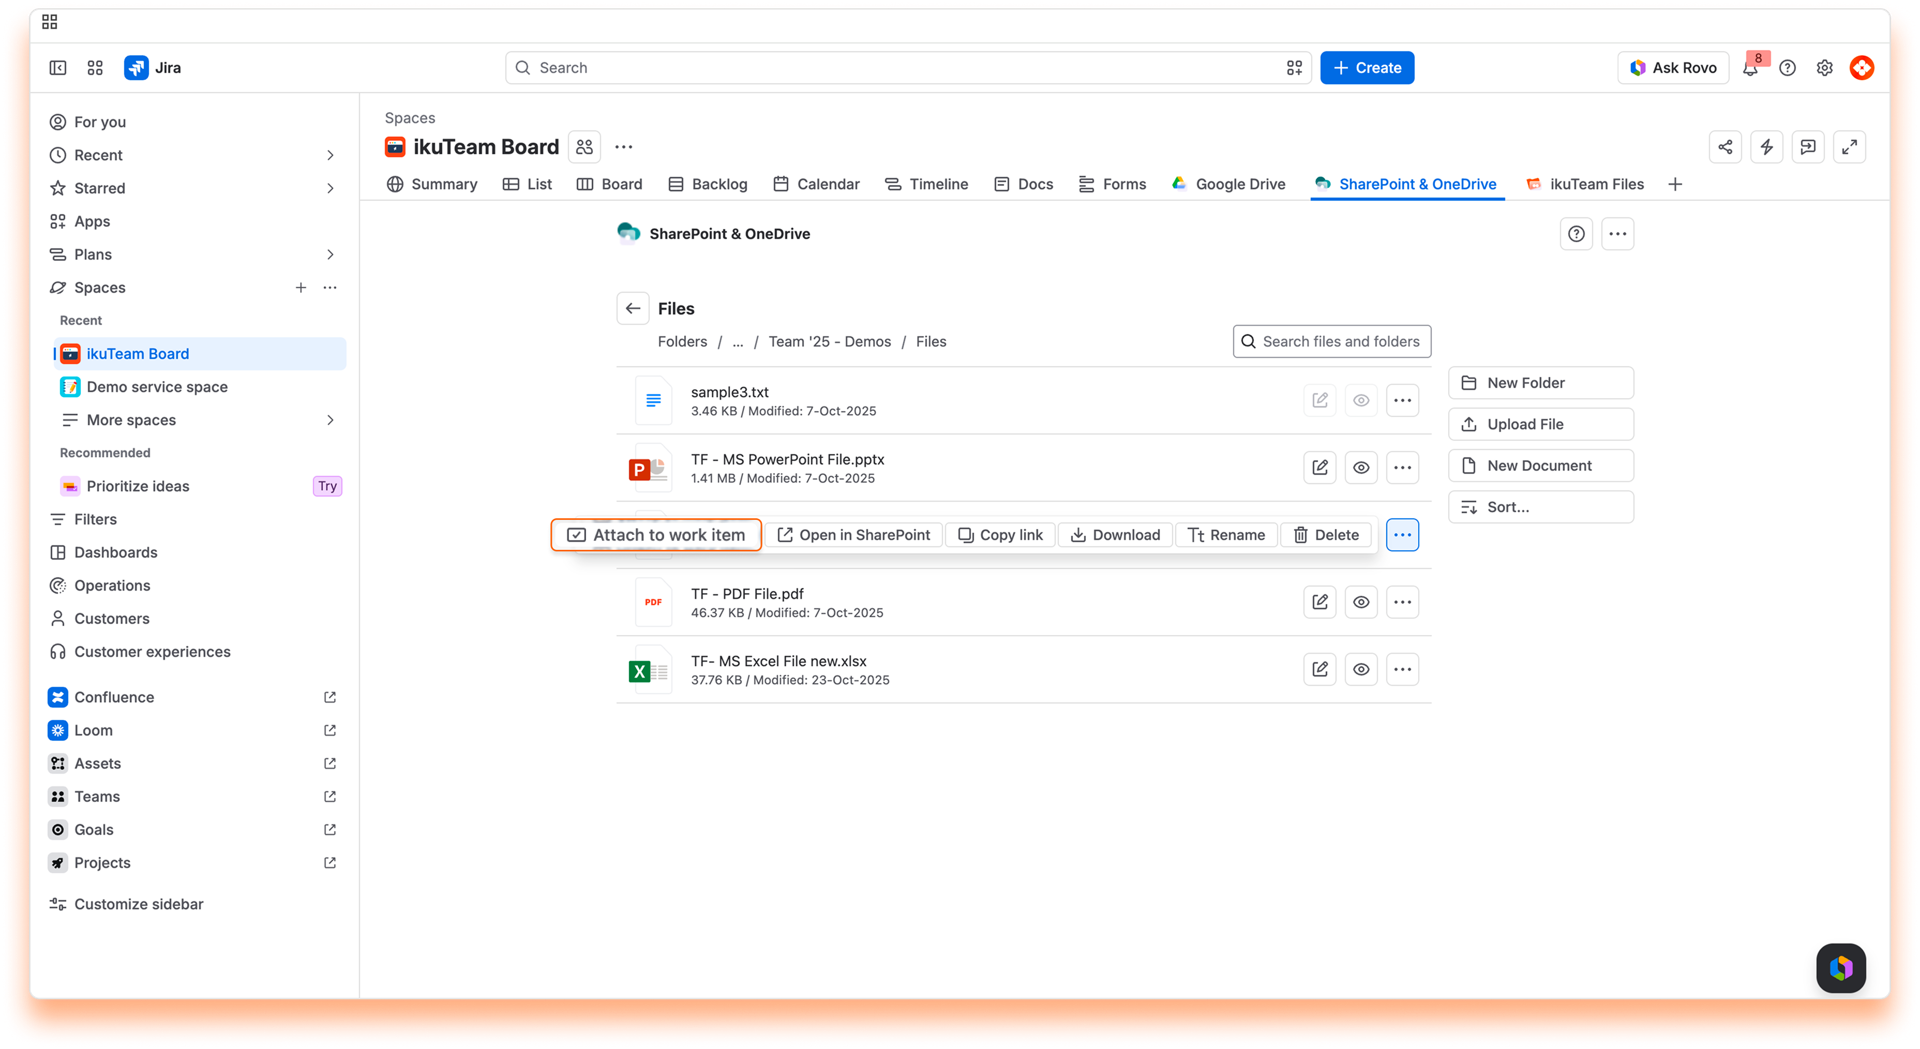
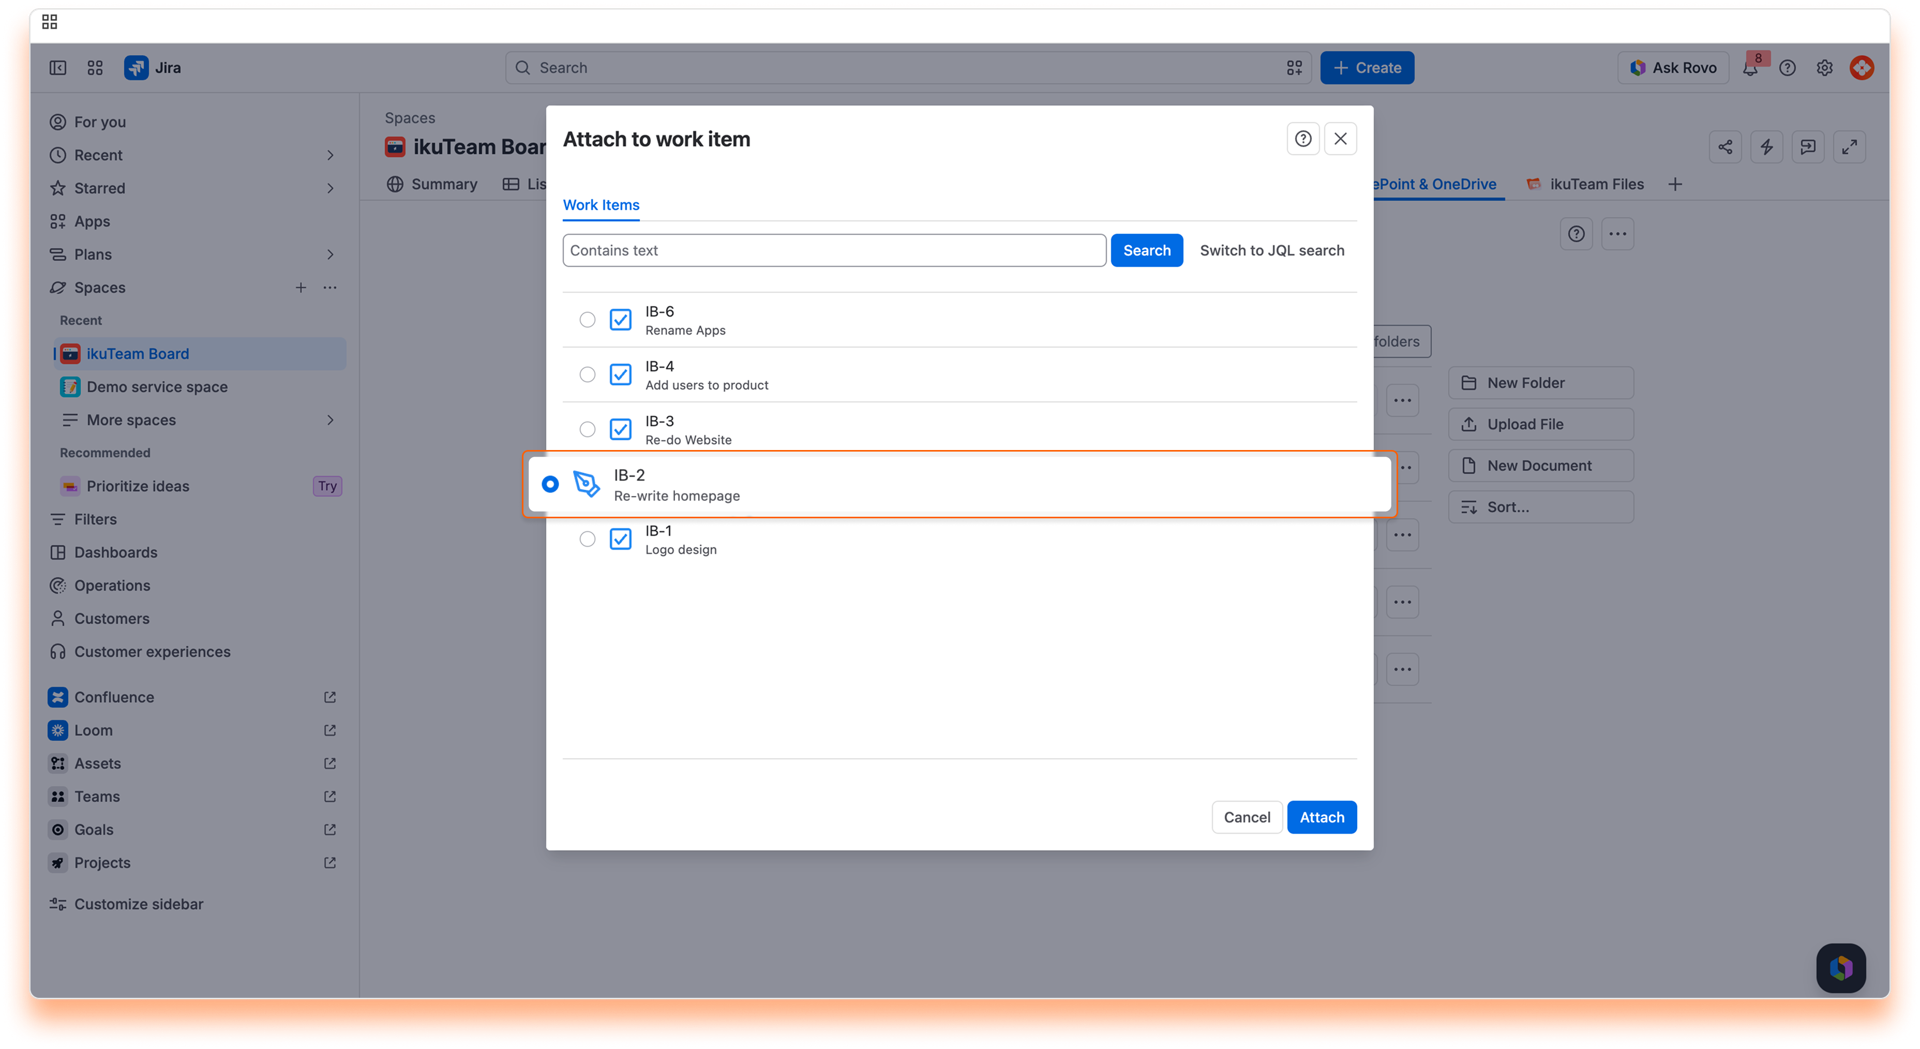
✅ All done. Your file is now attached to the Work Item. Click the "View Work Item" button to jump to the Work Item page.
ℹ️ You need to add the app to the Work Item page to view the attached files and folders from the file manager.
Download a file
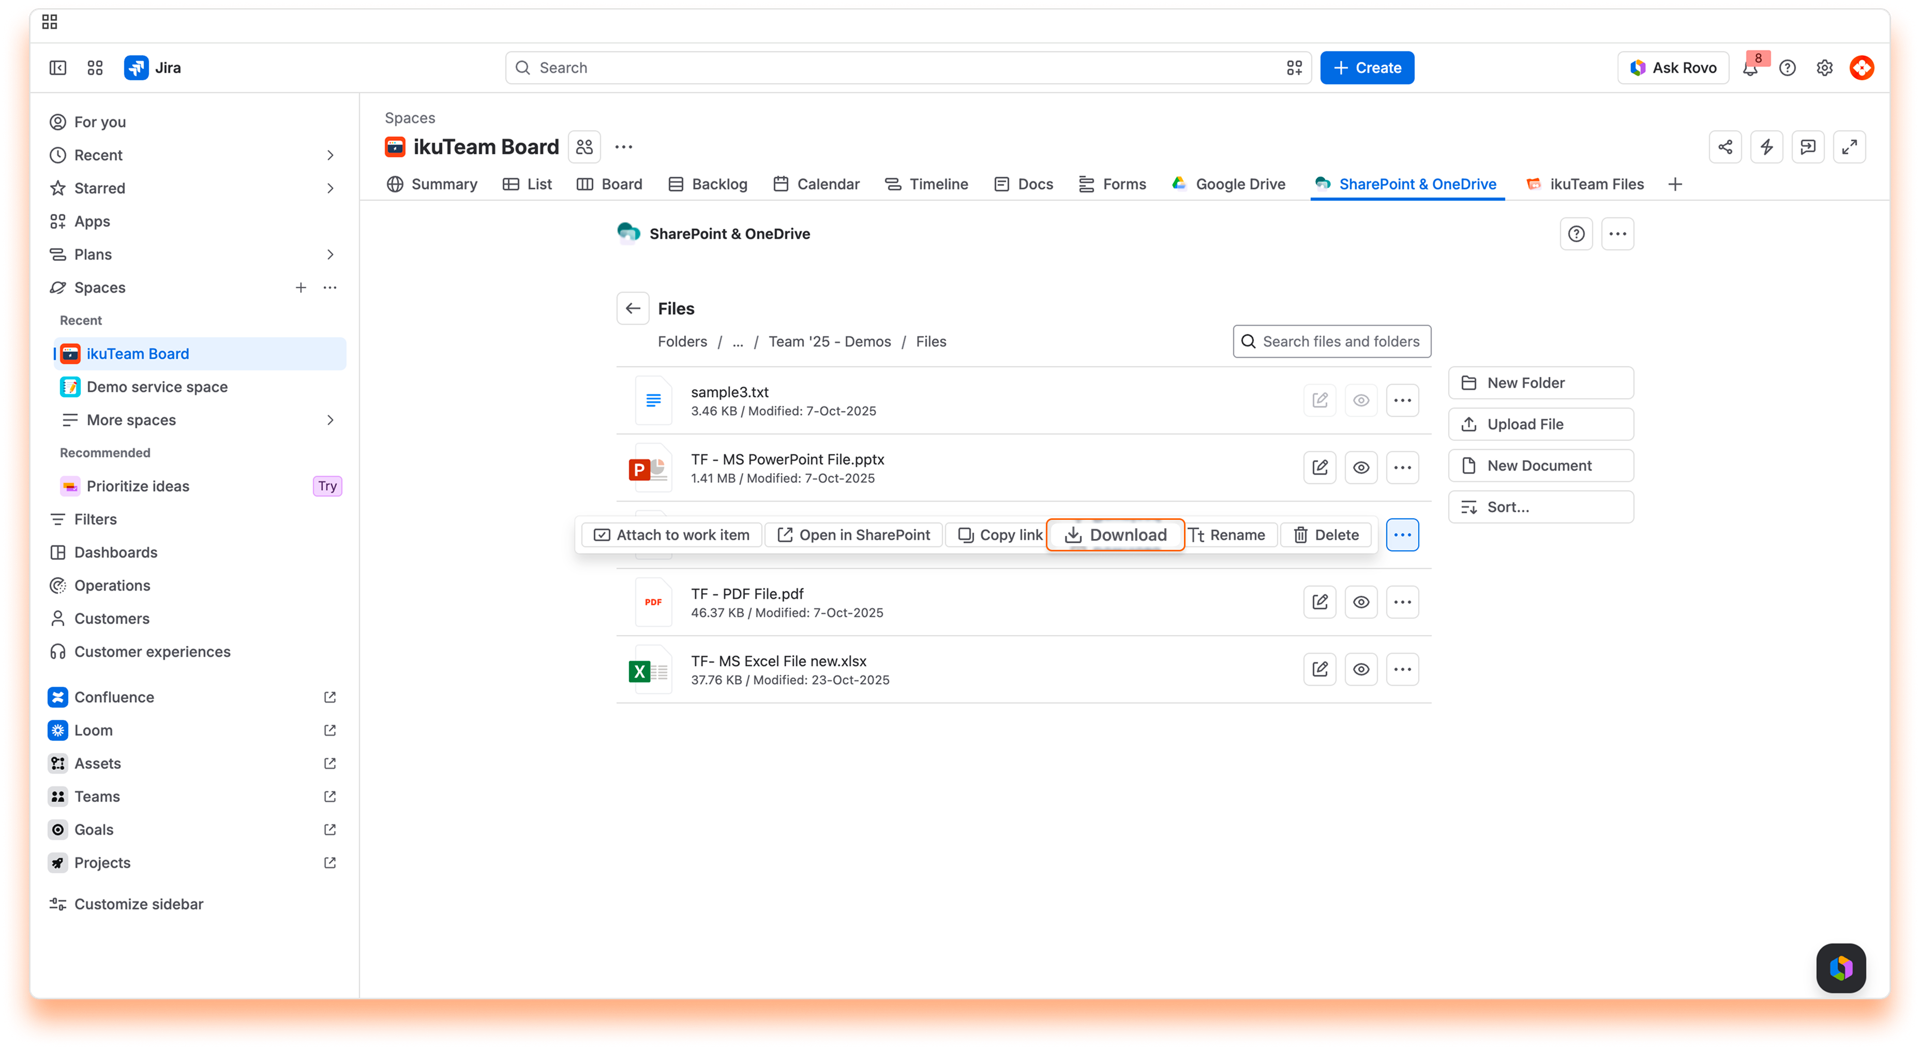
Your browser will open a new tab to download the file automatically. Depending on the browser you're using, the tab closes itself when the download starts, or it might ask you permission to download the file (noticeably Safari browser), requiring that you click the "Allow" button.
Depending on its size, the file will be available in your default download folder after a few moments.
The download option is also available in preview mode (check Preview files on Jira Cloud) and files attached to Work Items.
Rename a file
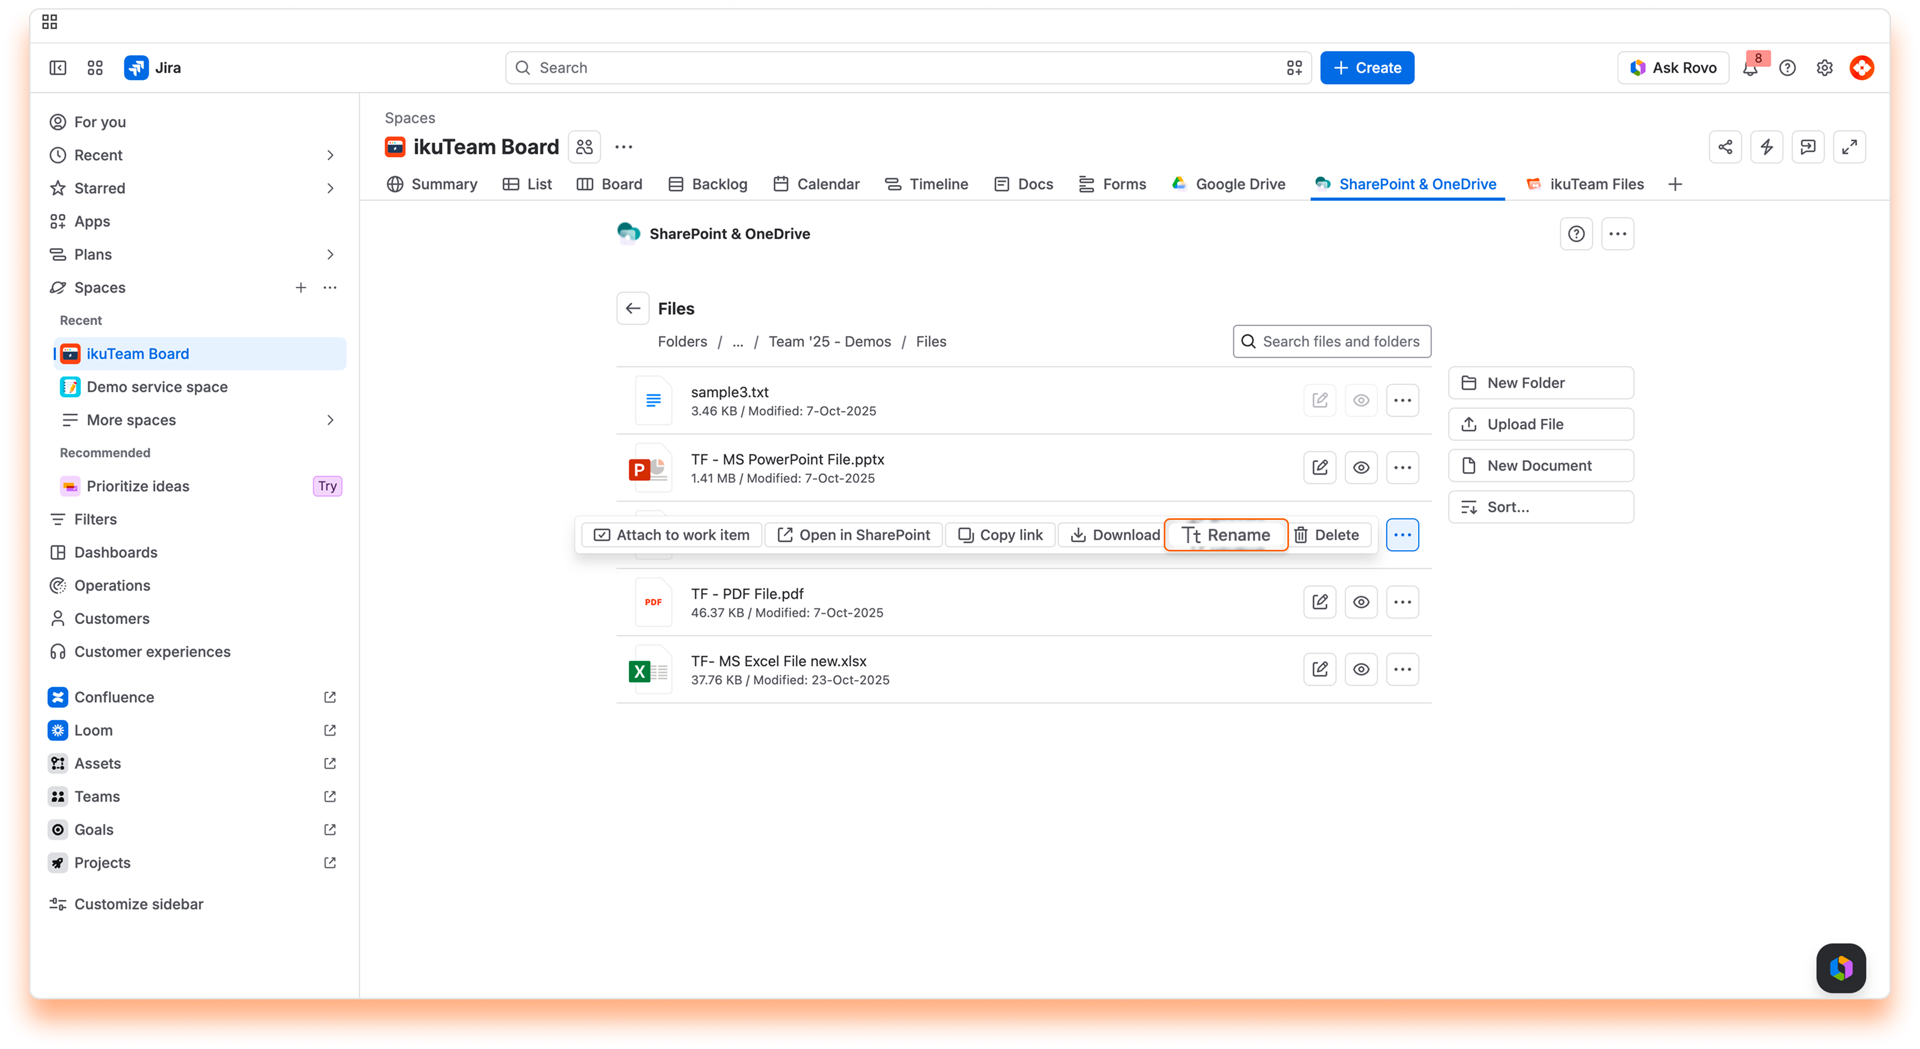
ℹ️ When you change the name of a file, it's updated in the connected storage too.
Open in SharePoint
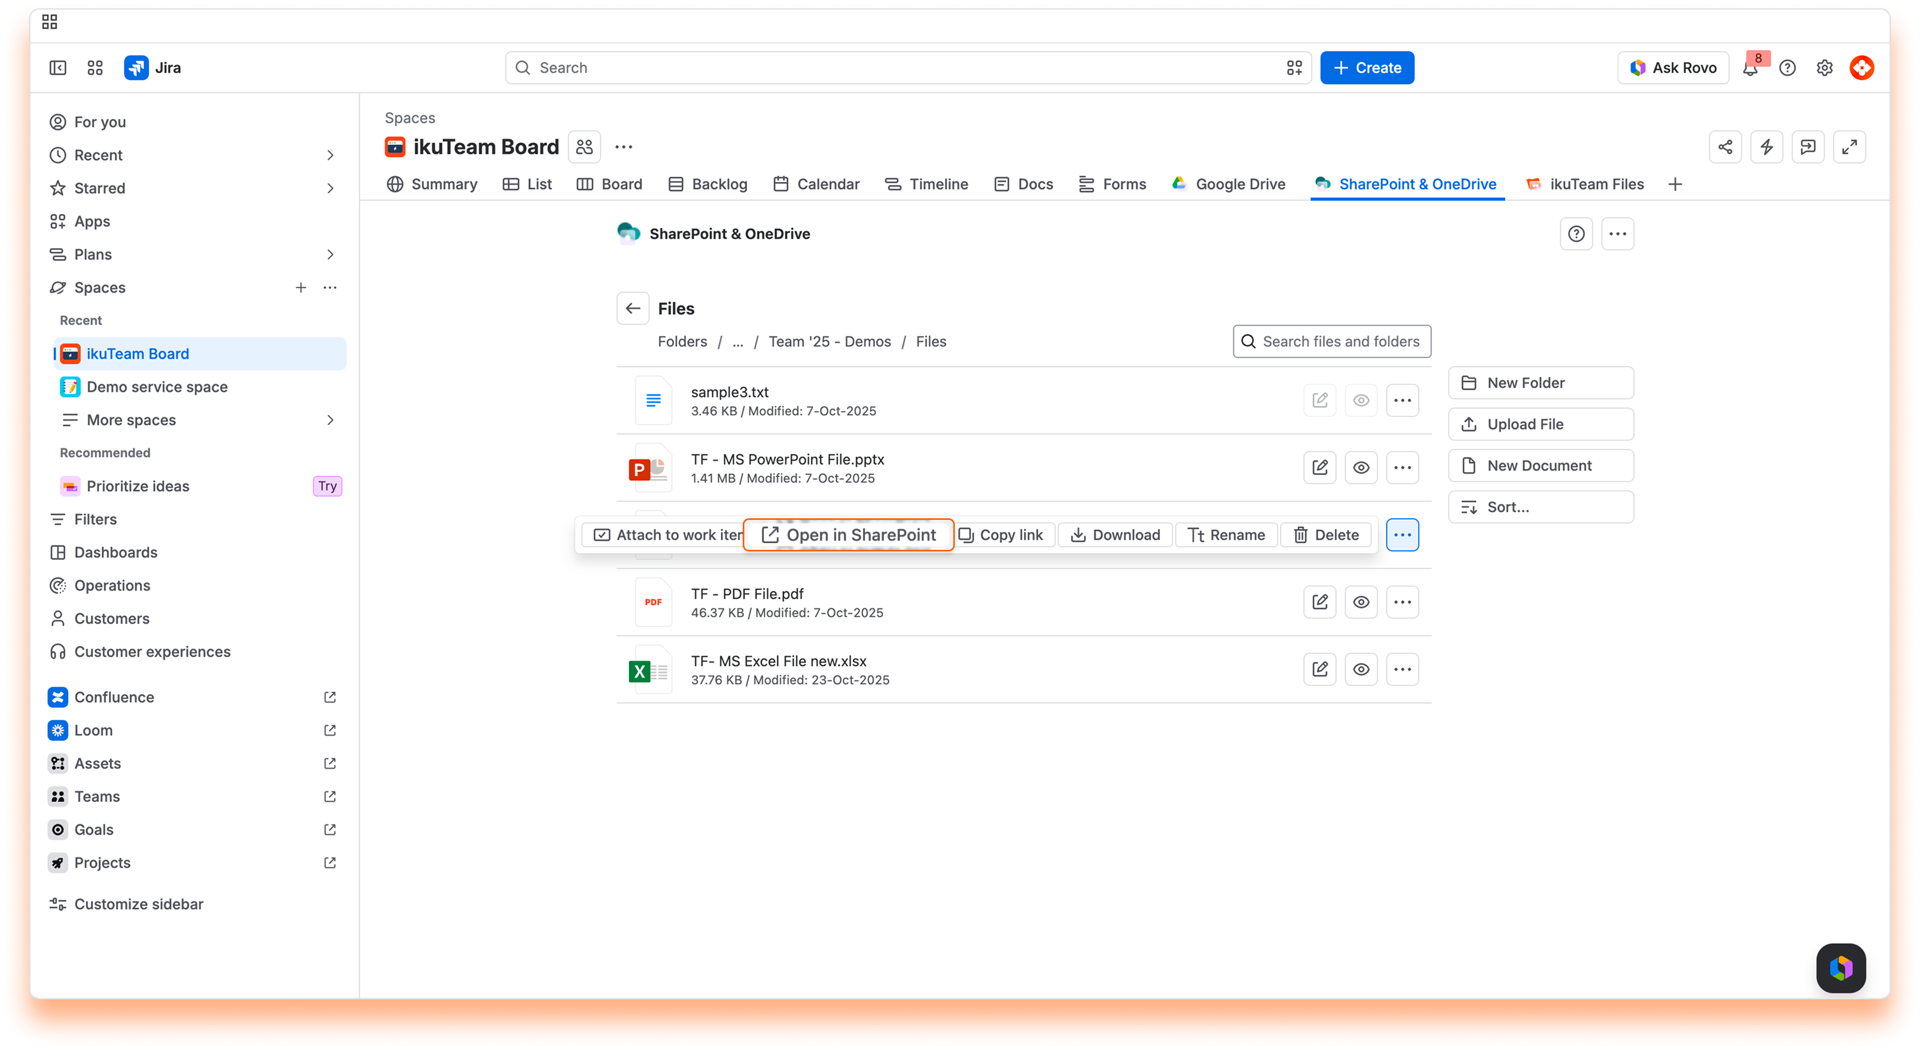
The file opens in a few seconds on the original storage site.
Delete a file
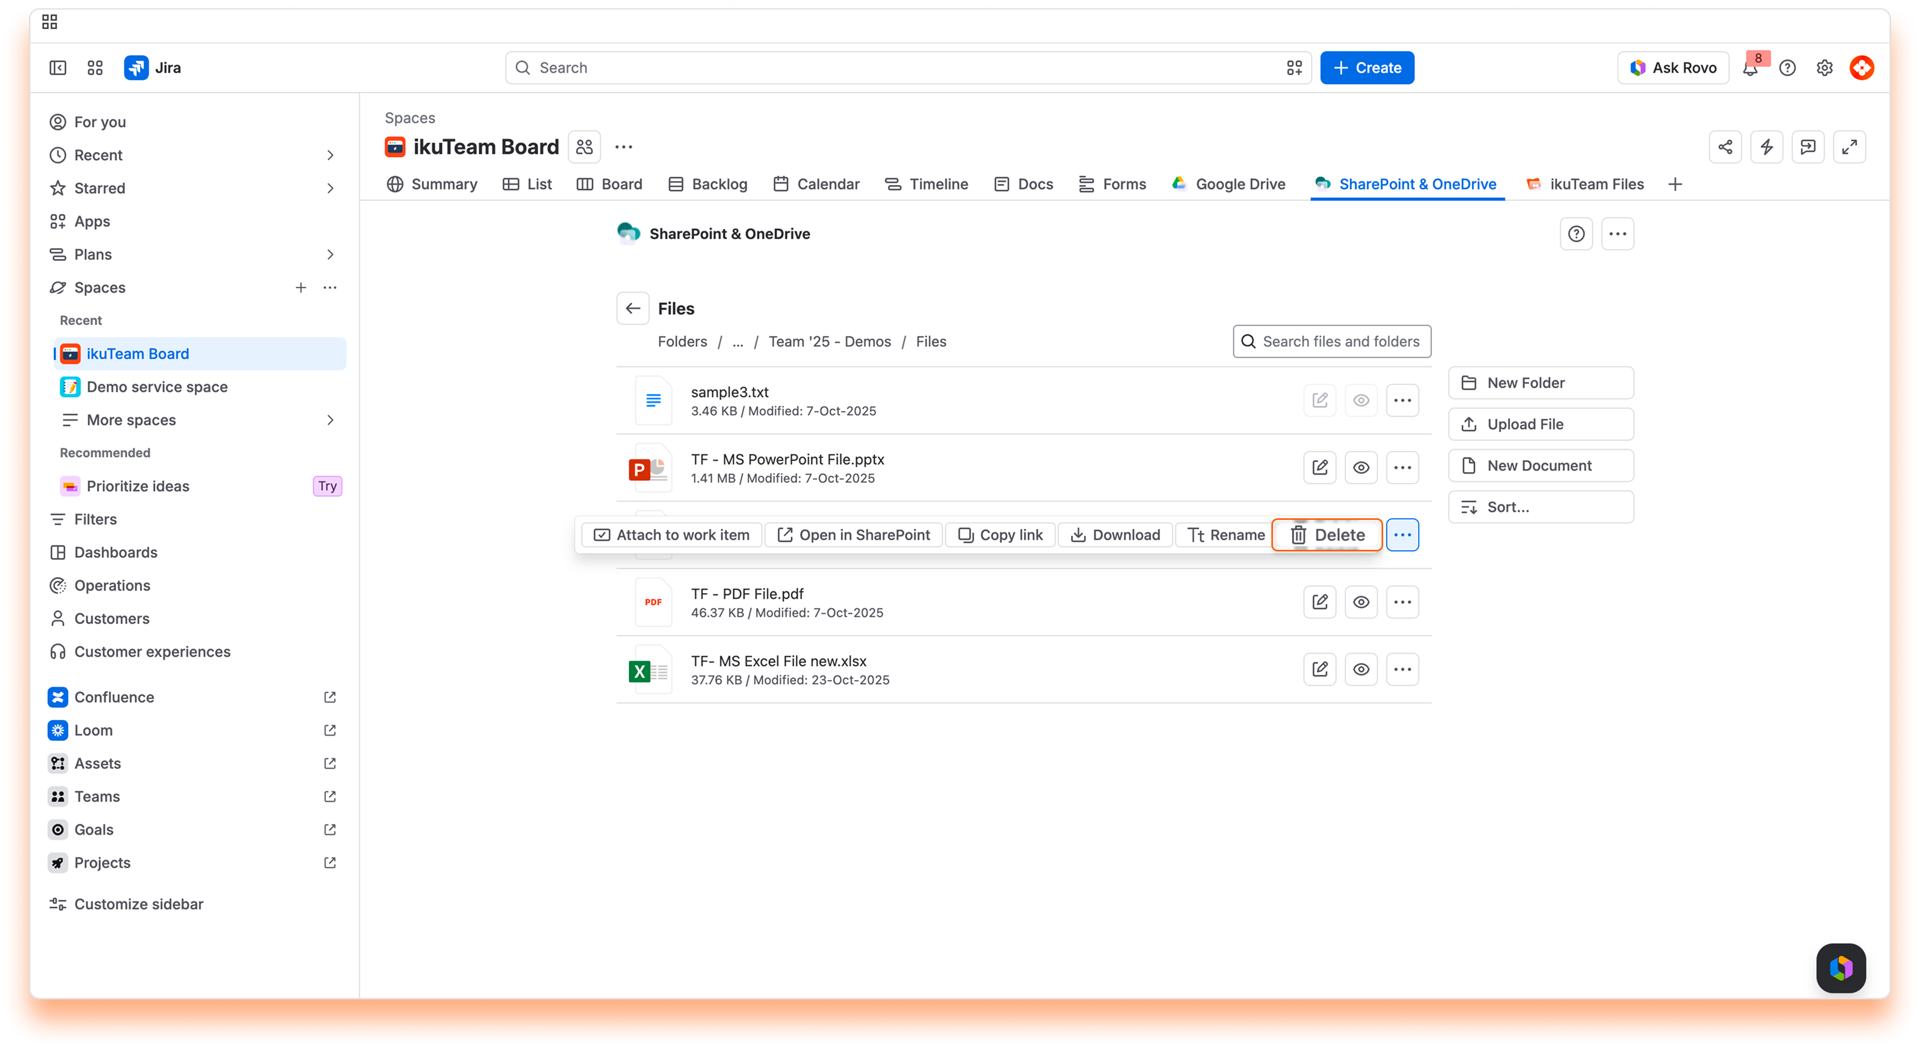
⚠️ When you delete a file, it's also removed from the connected storage place. This action is undoable in the SharePoint Connector app.
Upload a file
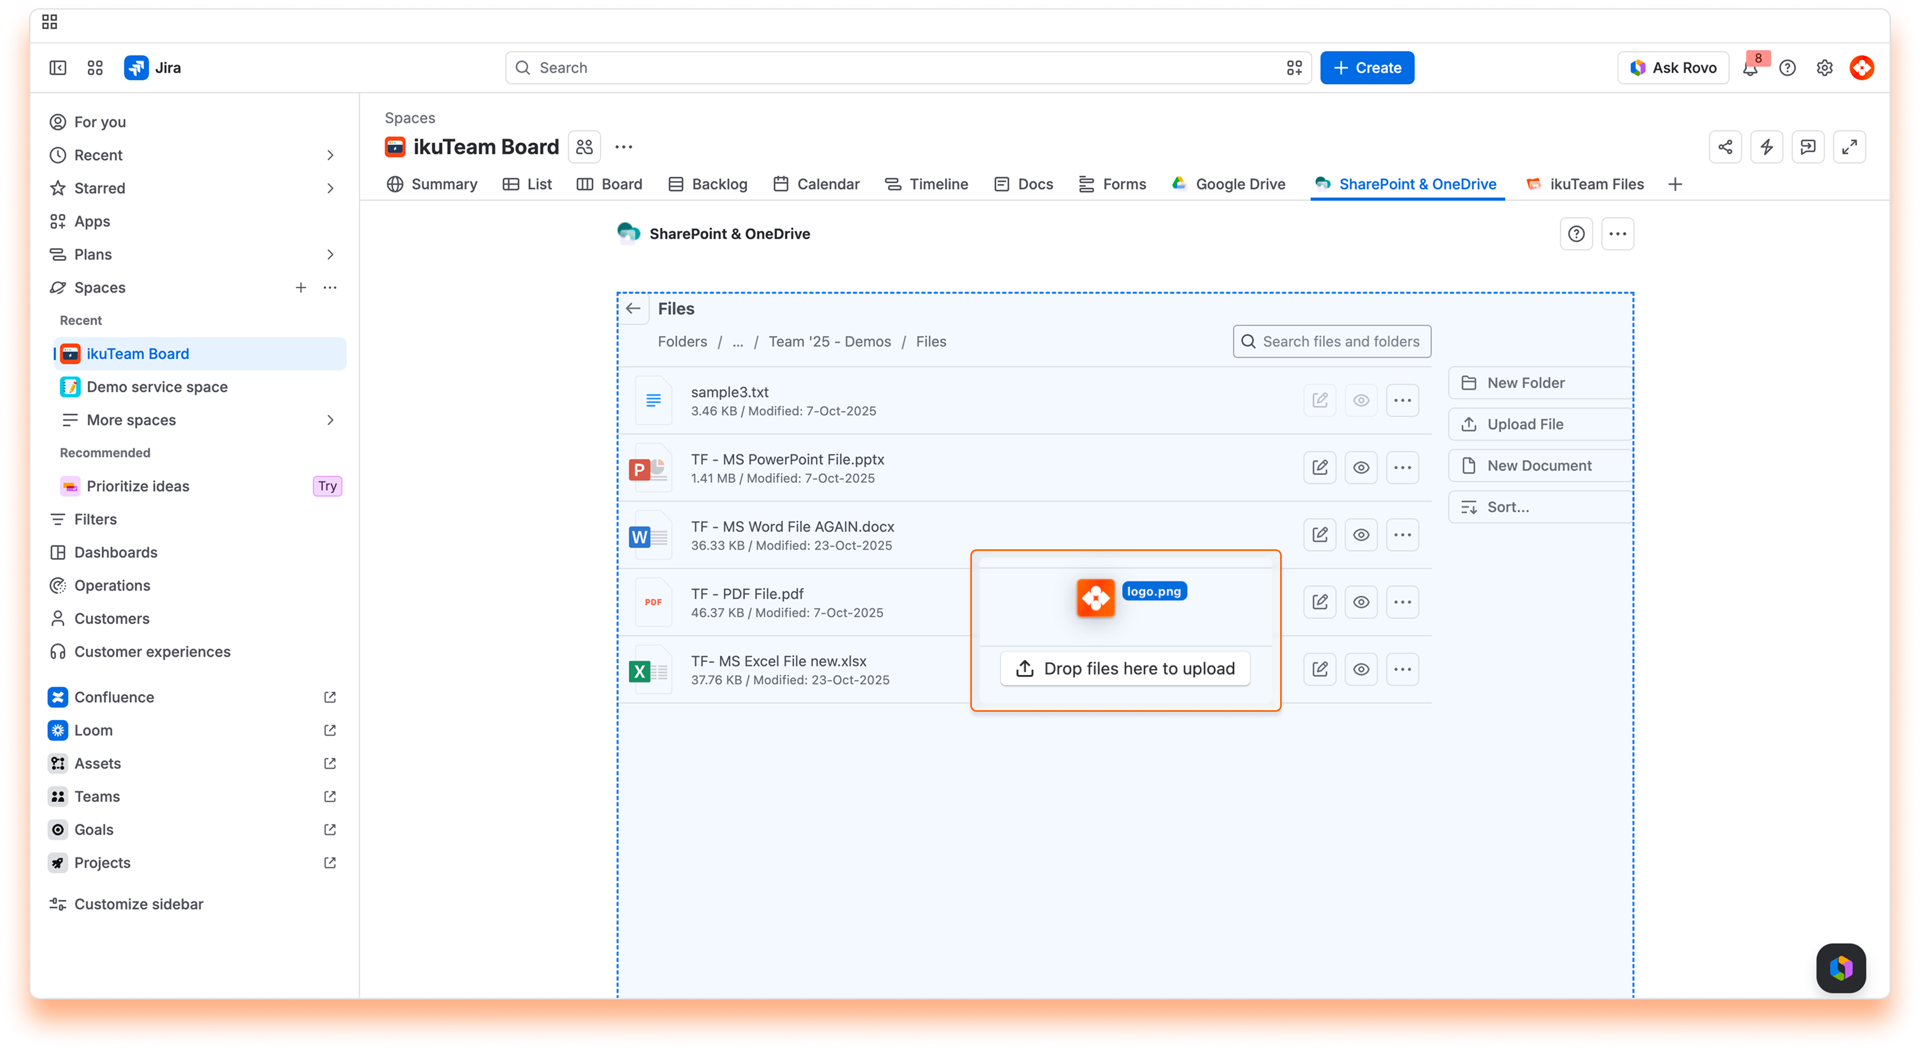
Via drag and drop
You can drag a file from a local folder and drop it in the folder you have open in the SharePoint Connector app to upload it there. Doing this will save the file in the storage place containing the connected folder, helping you build your single source of truth.
Via file picker
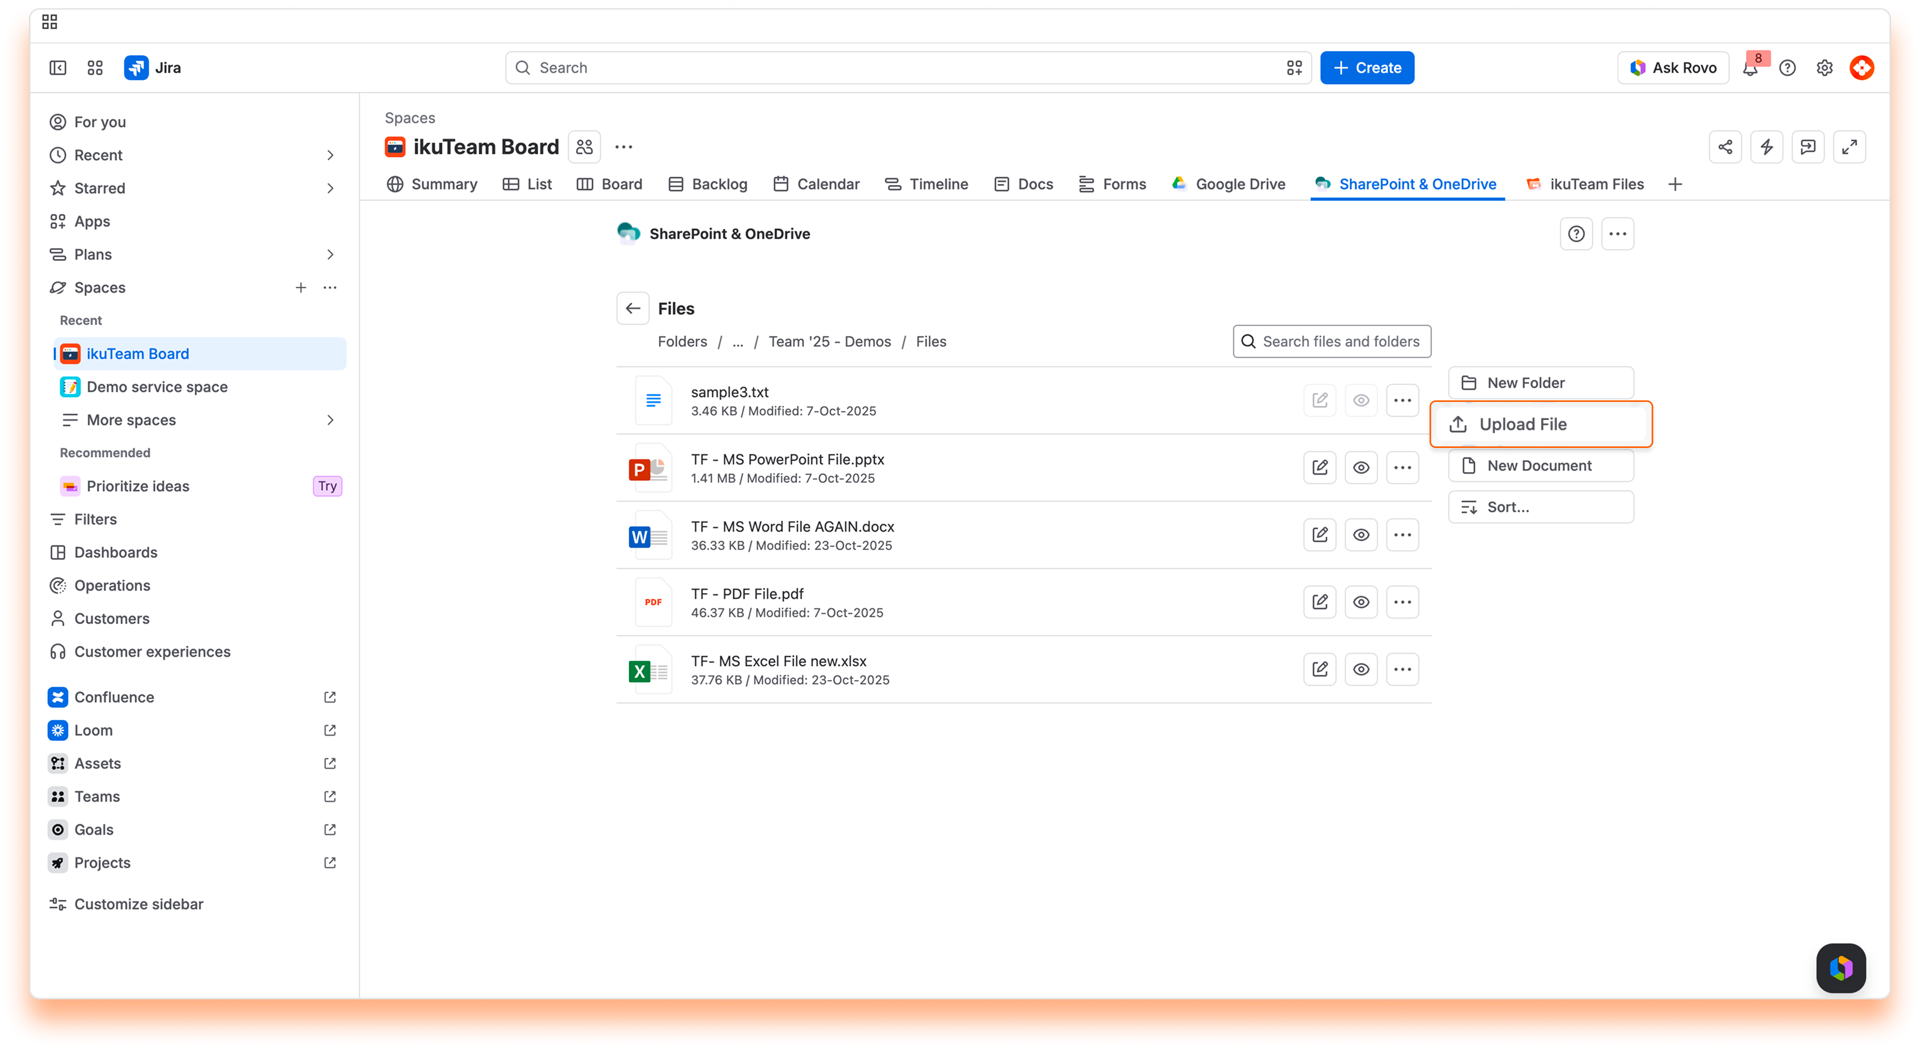
Depending on the size of the file, it may take a few moments for it to become available in the app.
ℹ️ The upload option is also available when you attach a folder to an Work Item. You can drag and drop a file there to upload it.
Creating new documents
With the SharePoint Connector app, you can create documents where needed. They are always ready for real-time collaboration, with no file locks, and saved back to the storage place containing the connected folder, avoiding duplicates.
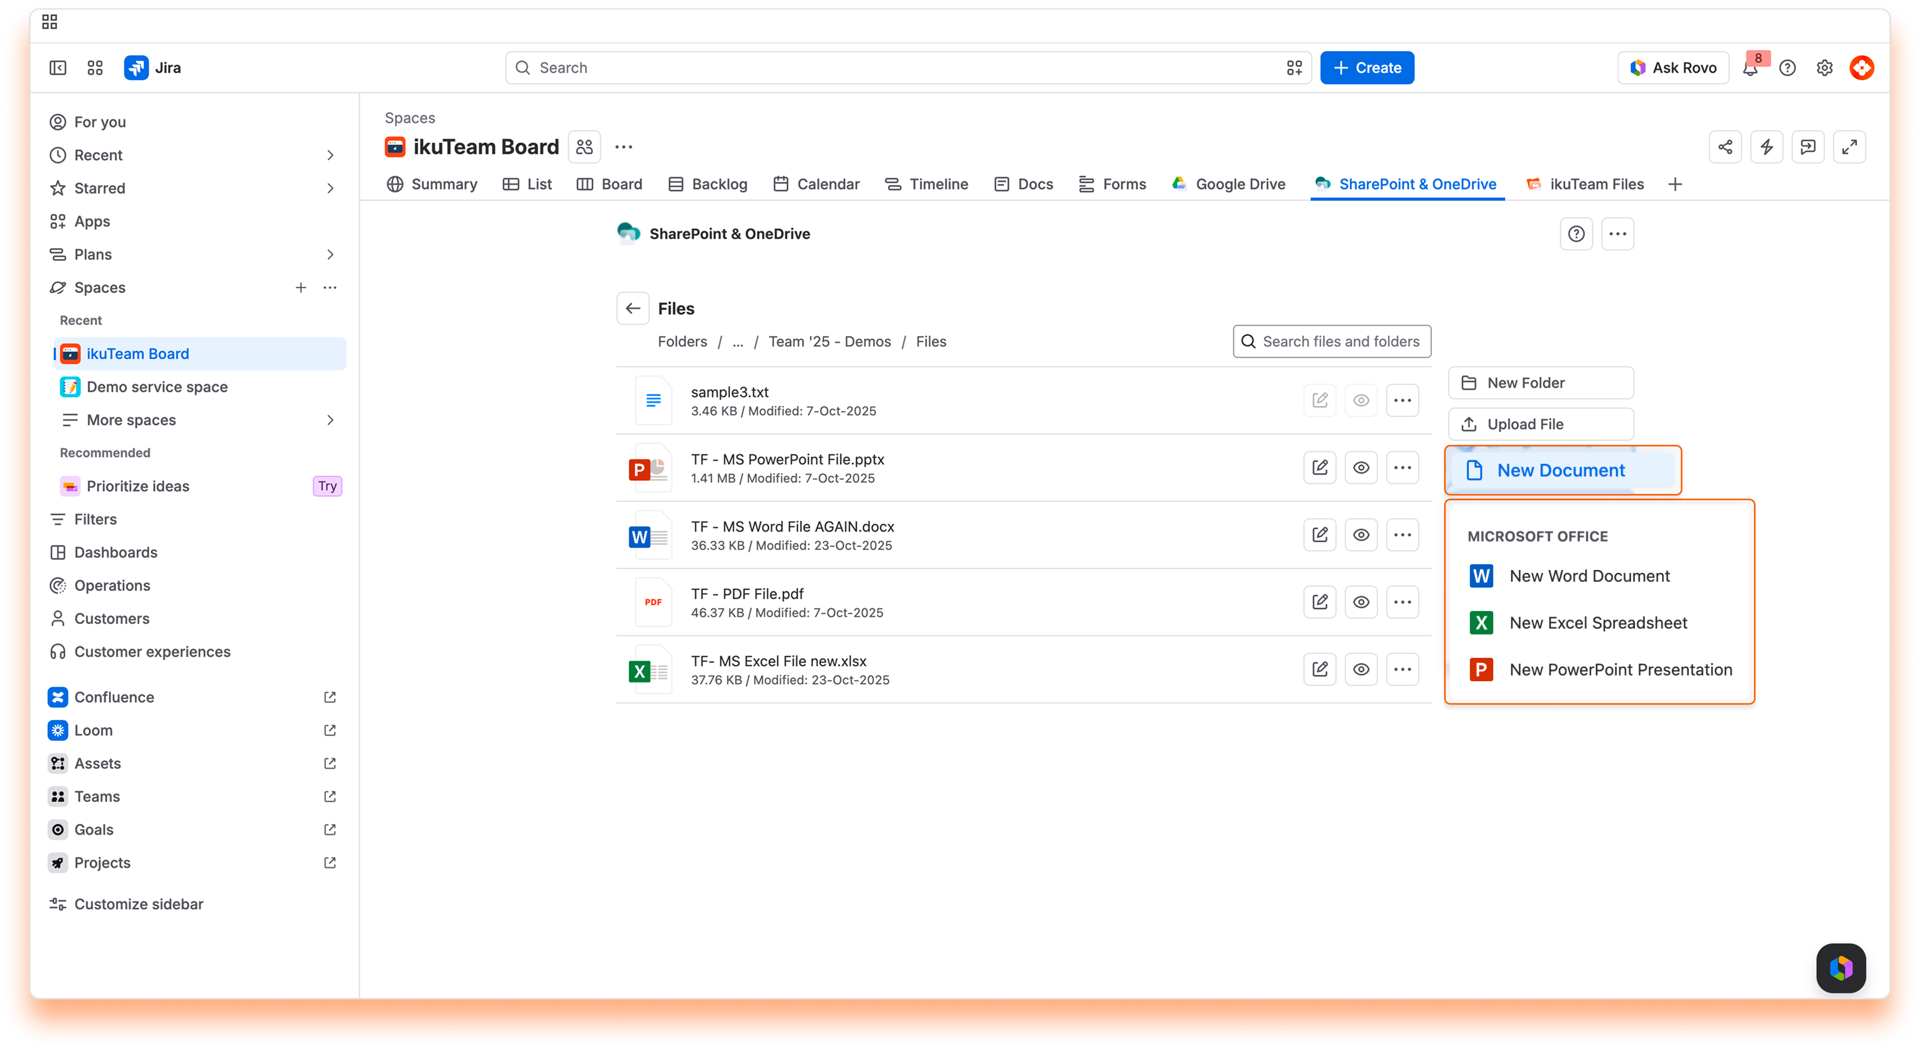
For Microsoft Office Documents:
After a few moments, your document appears in the folder, and you can edit it.
You can close the tab when you finish your edits. Your new document will show in your folder when you reload the page.
ℹ️ You can create Microsoft Office documents in any connected folder, but Google Documents are only available for connected folders from Google Drive.
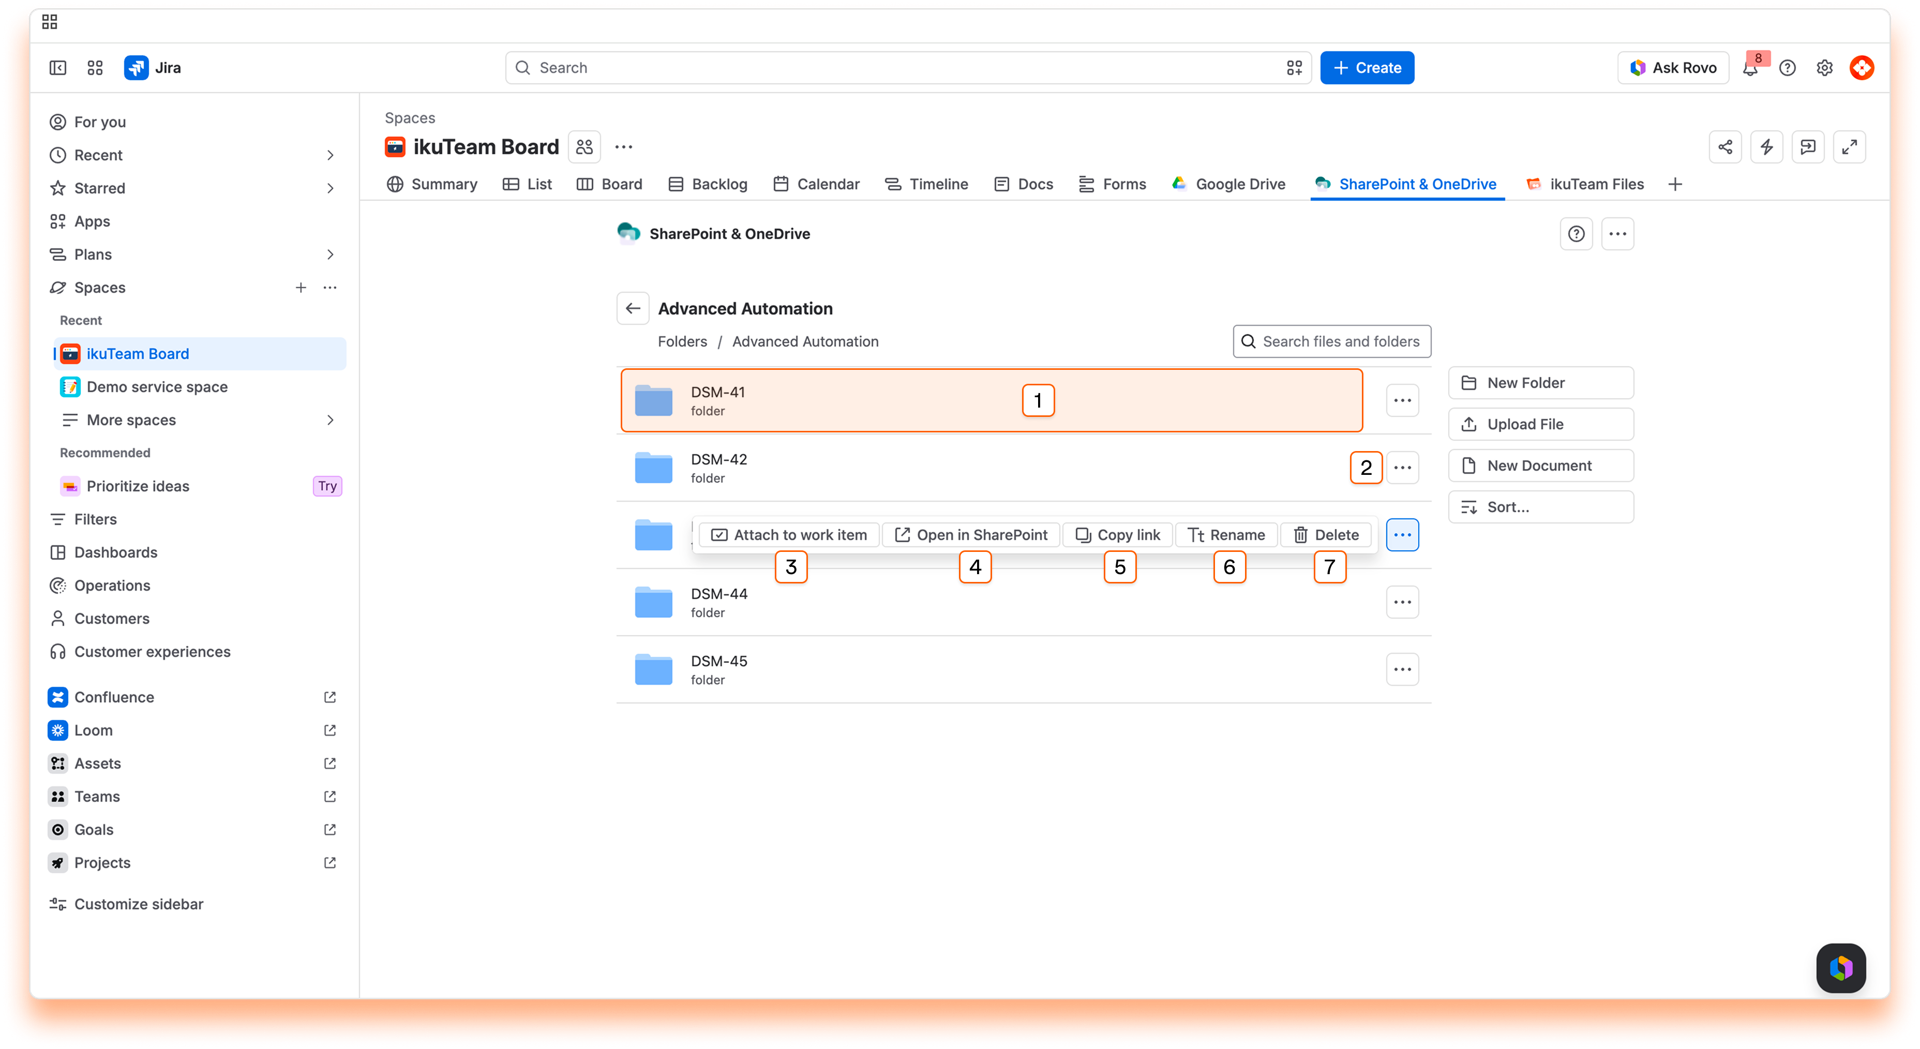
View the content of a folder
You can see the content of a folder by clicking on it. You can also click folders inside to view the content or click the back button to return to the previous one.
Attach a folder to an Work Item
In Jira, you can attach files and folders to your Work Items directly from the file manager.
Instructions:
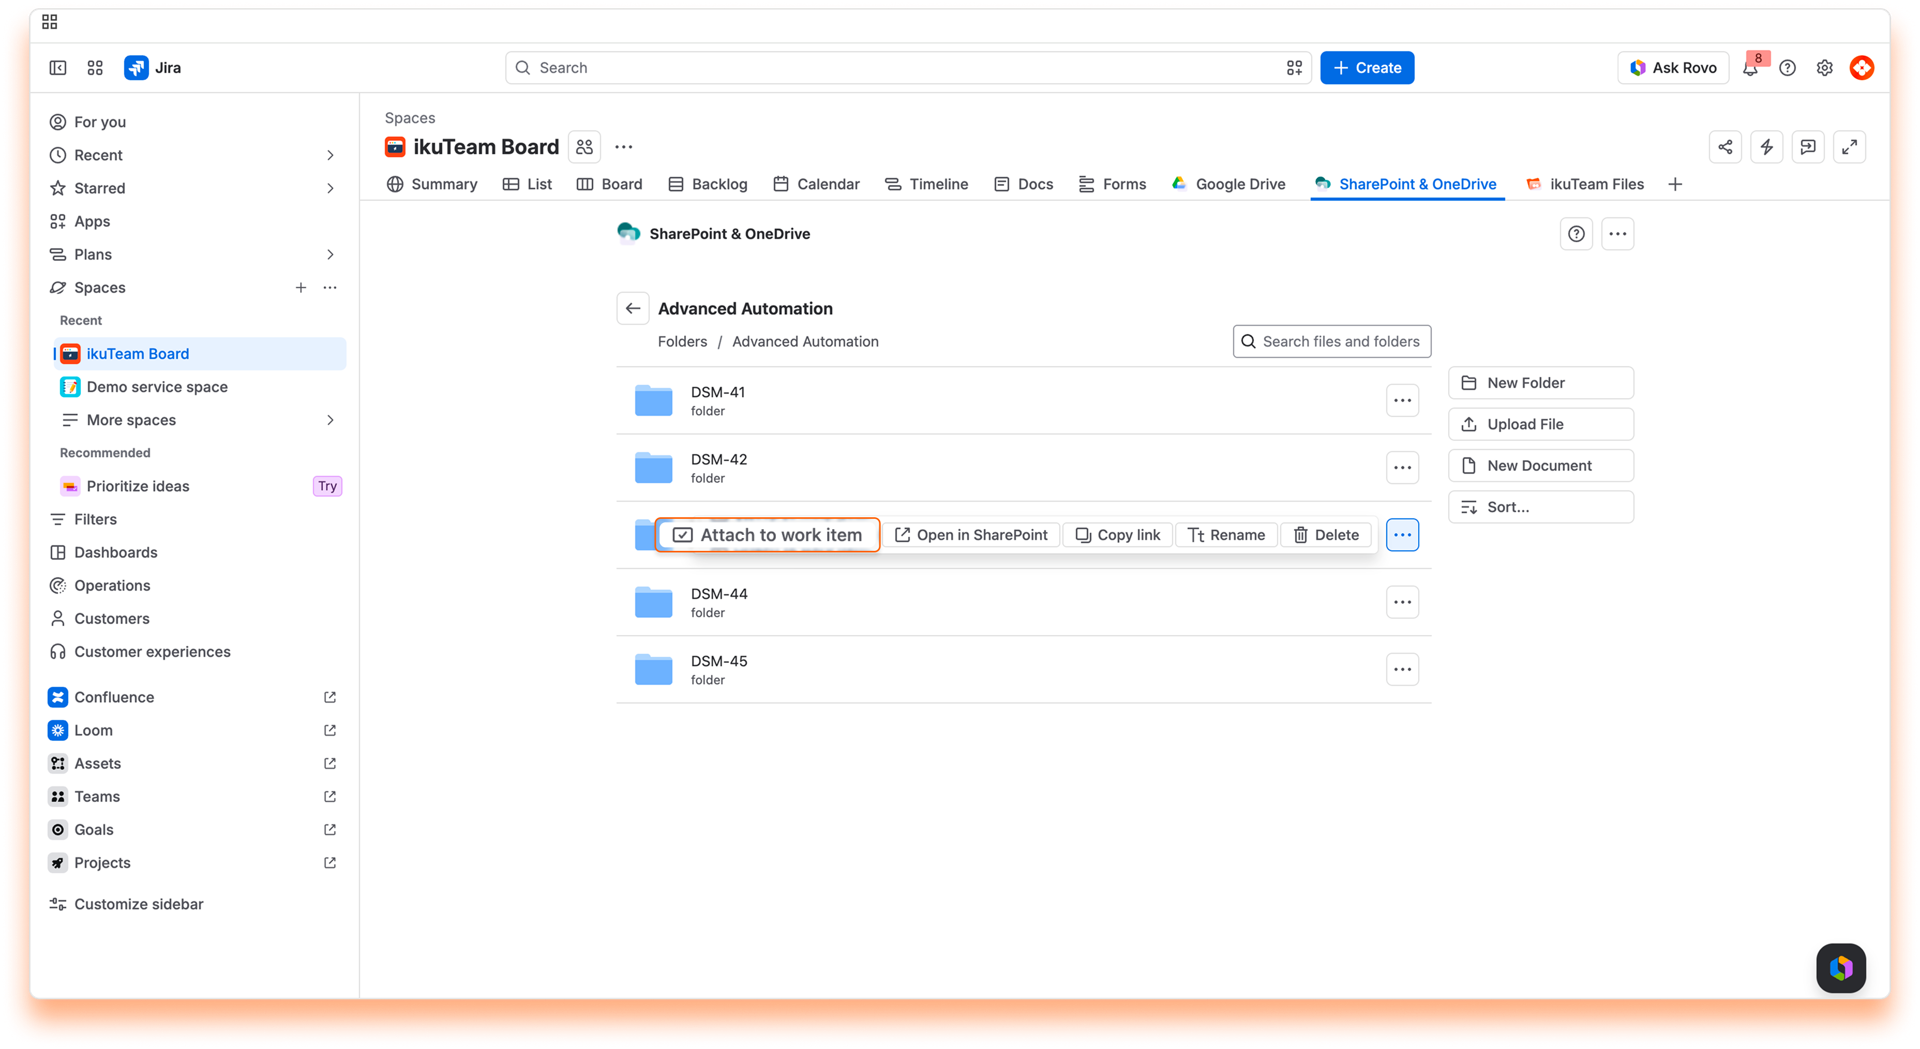
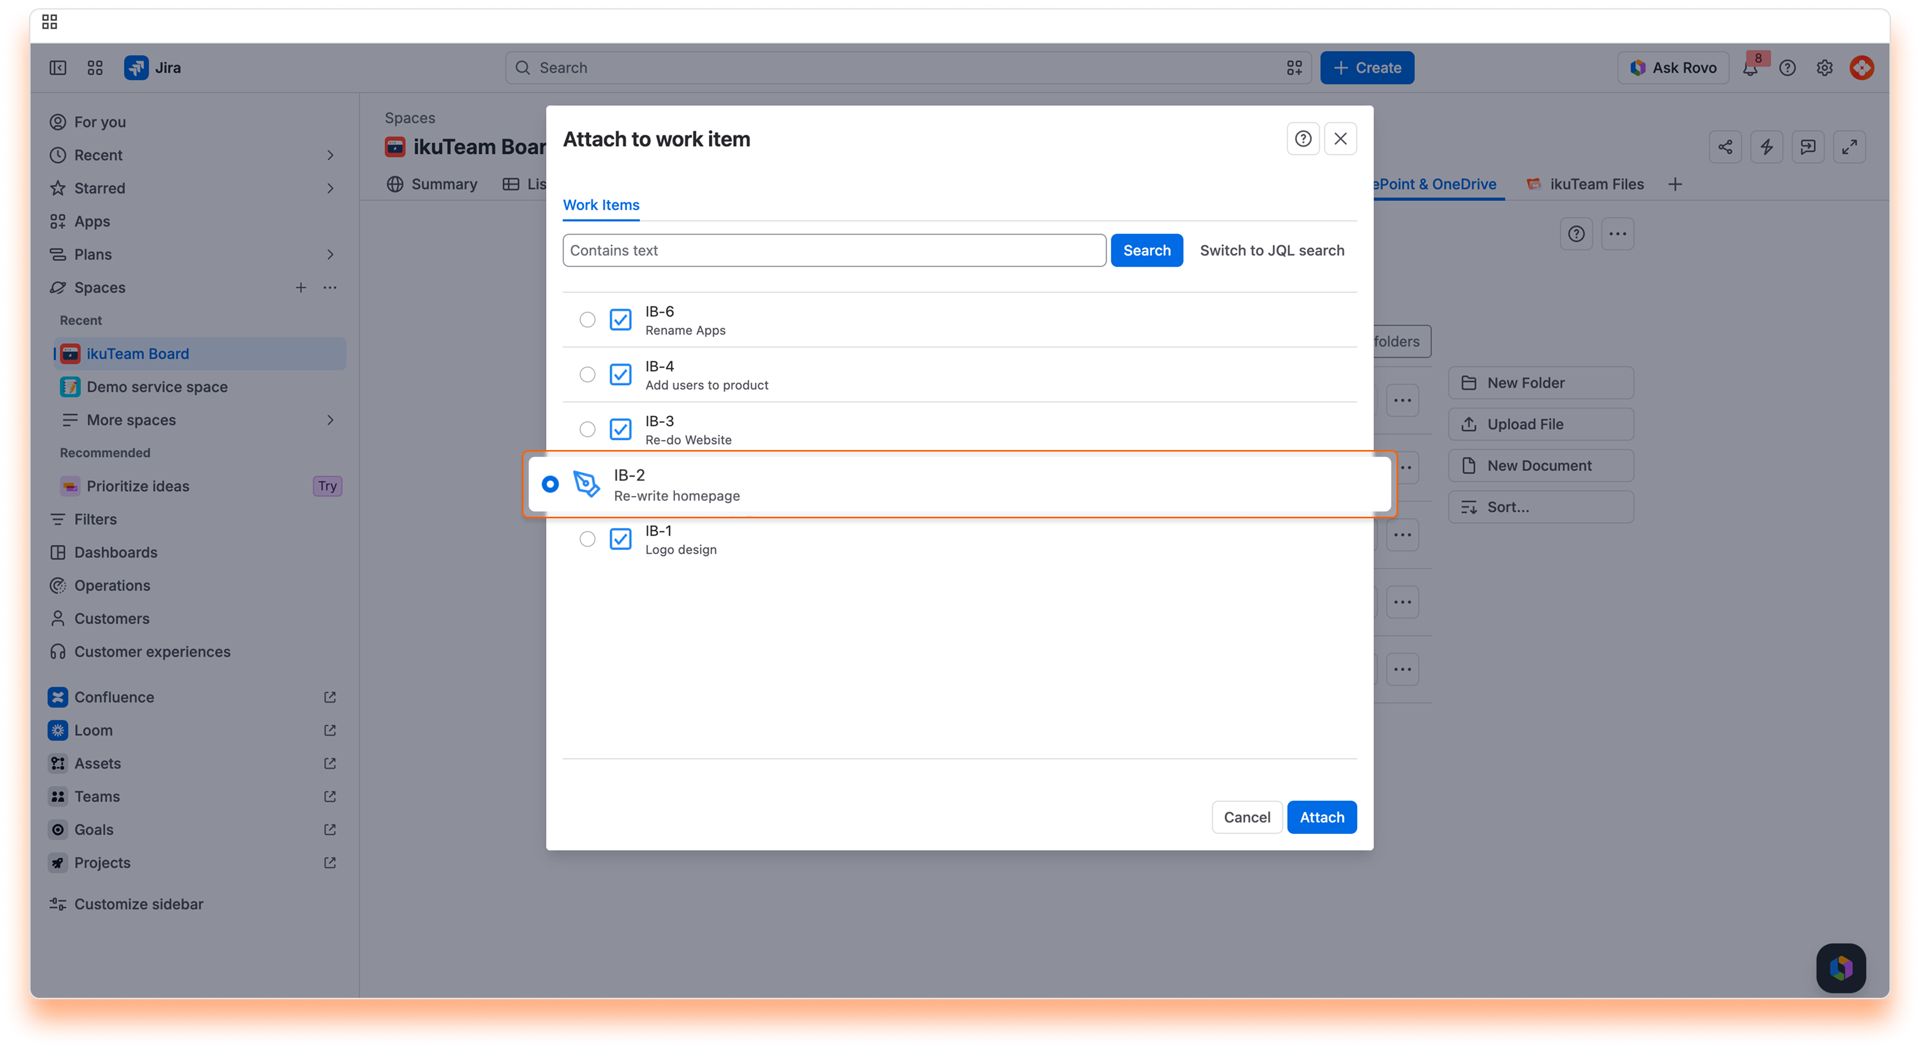
✅ All done. Your folder is now attached to the Work Item. Click the "View Work Item" button to jump to the Work Item page.
ℹ️ You need to add the app to the Work Item page to view the attached files and folders from the file manager.
Rename a folder
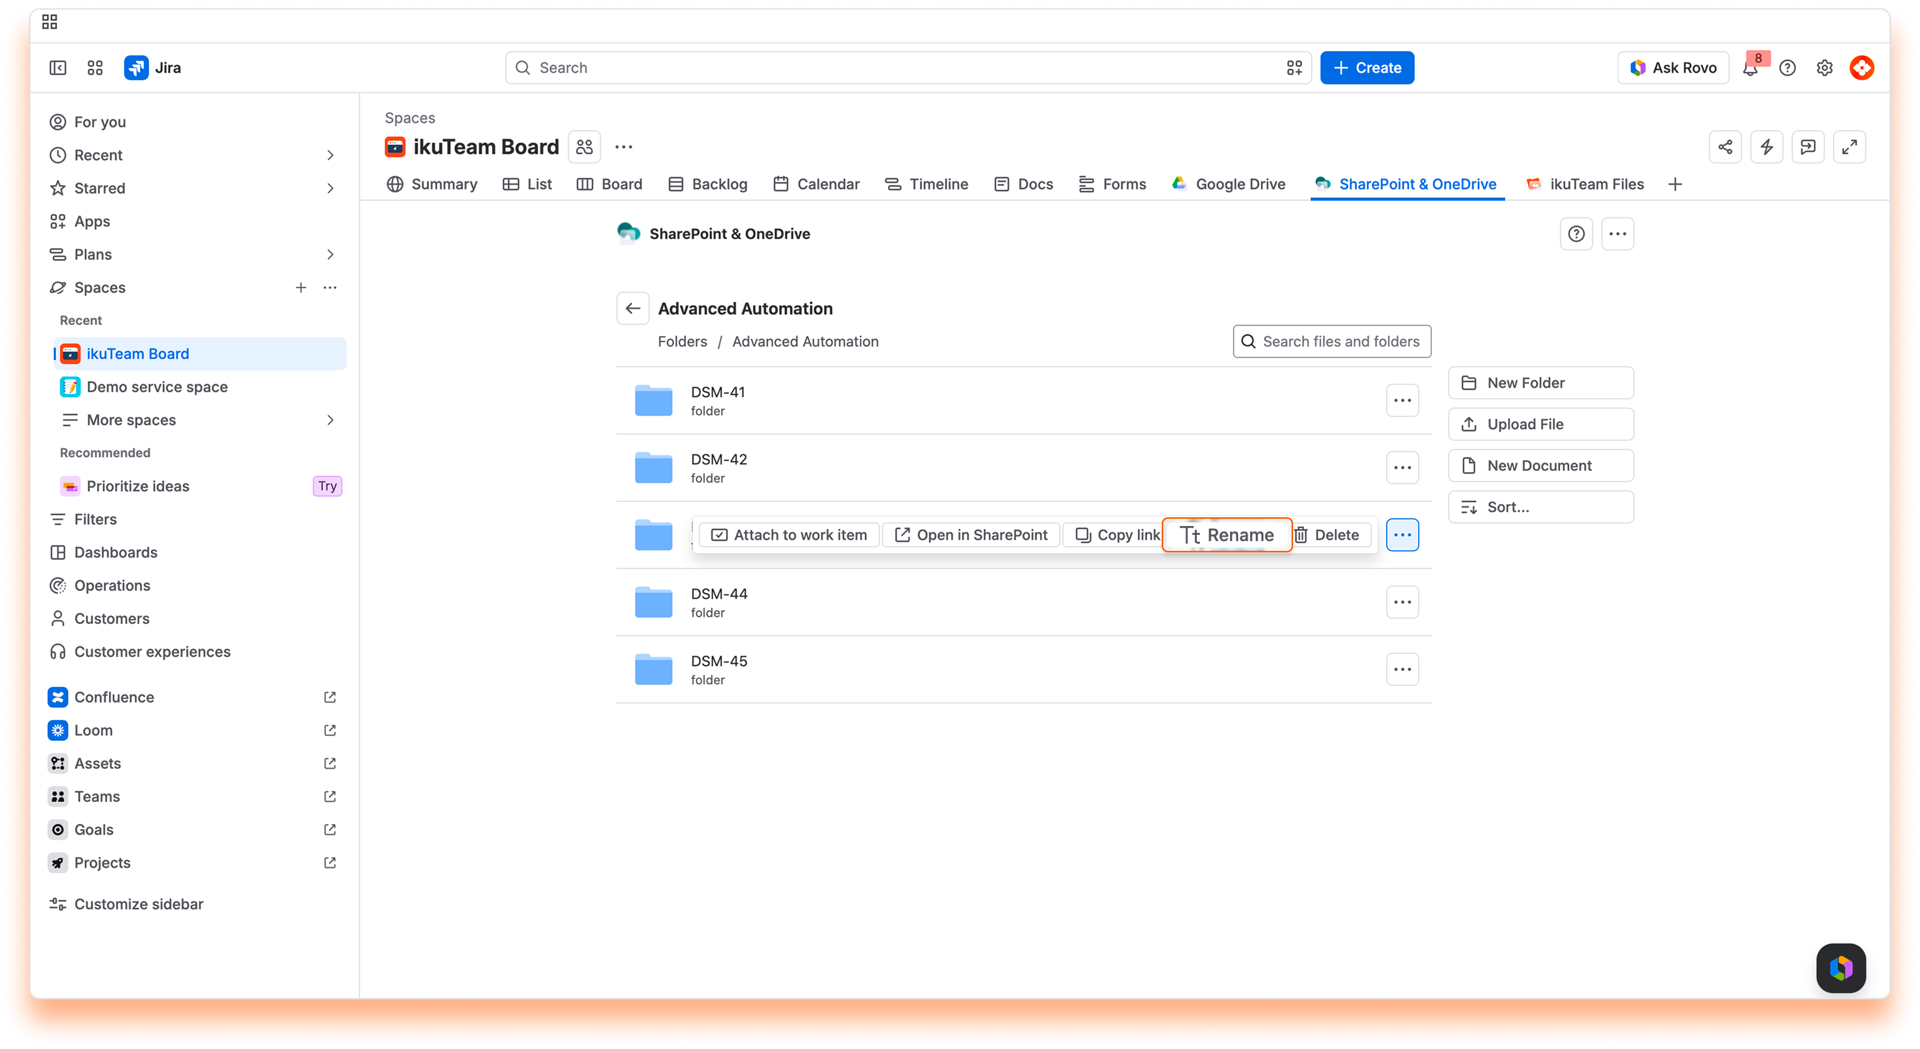
Instructions:
ℹ️ When you change the name of a folder, it's updated in the connected storage too.
Open in original storage
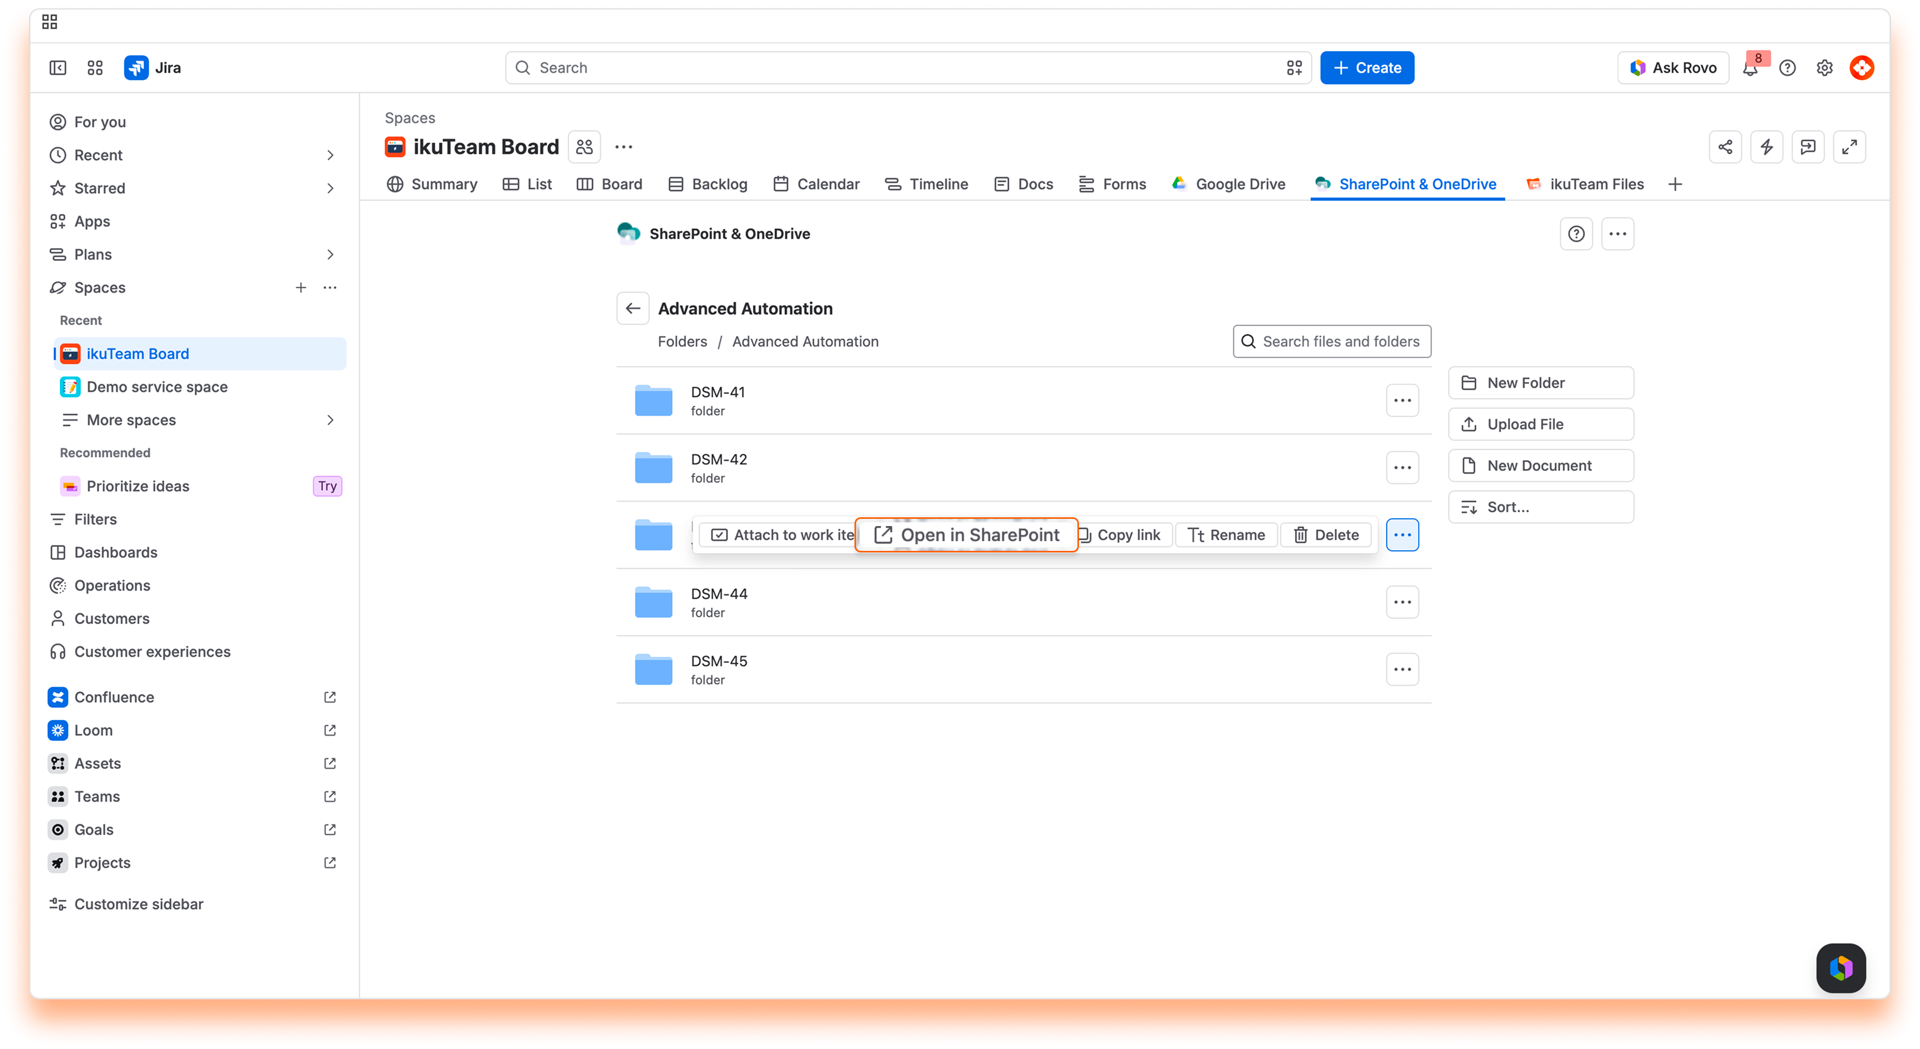
The folder opens in a few seconds on the original storage site.
Delete a folder
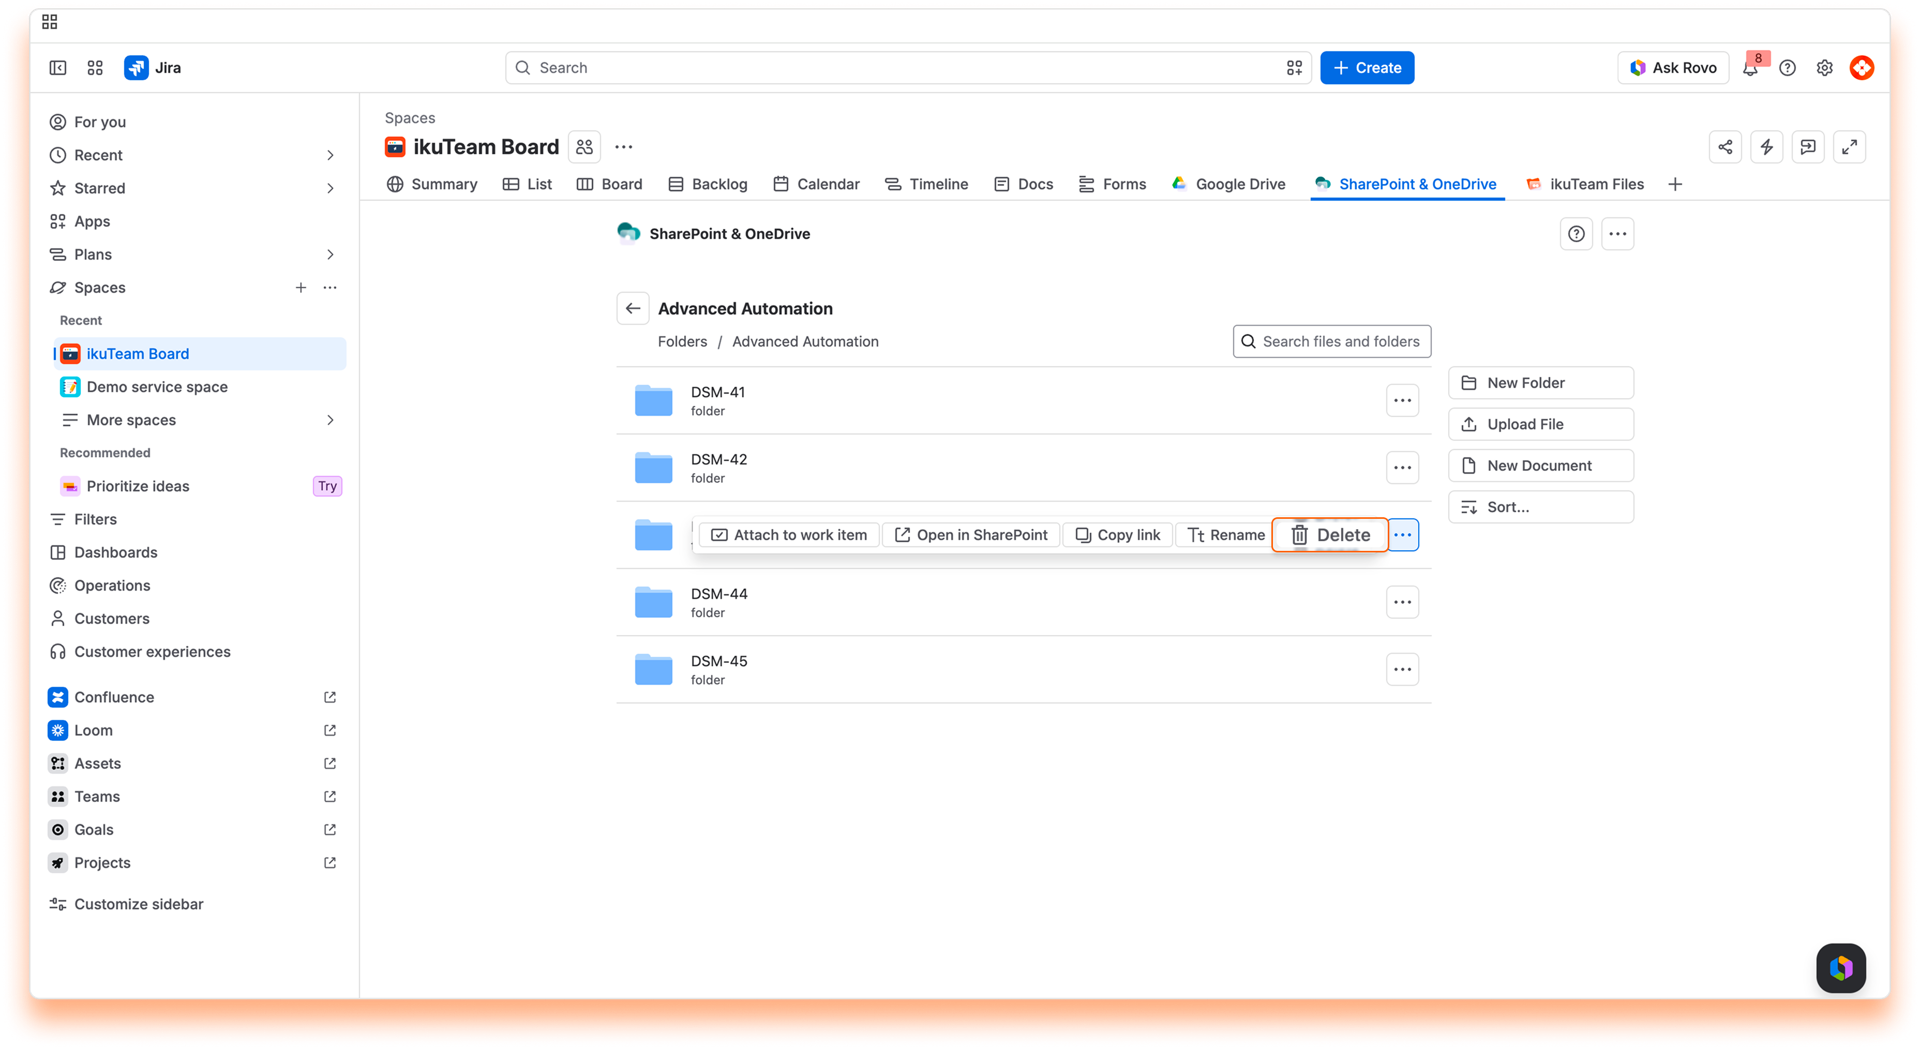
Instructions:
⚠️ When you delete a folder, it's also removed from the connected storage. This action is undoable in the SharePoint Connector app.
Create a folder
To help you keep things organized, you can create new folders whenever needed.
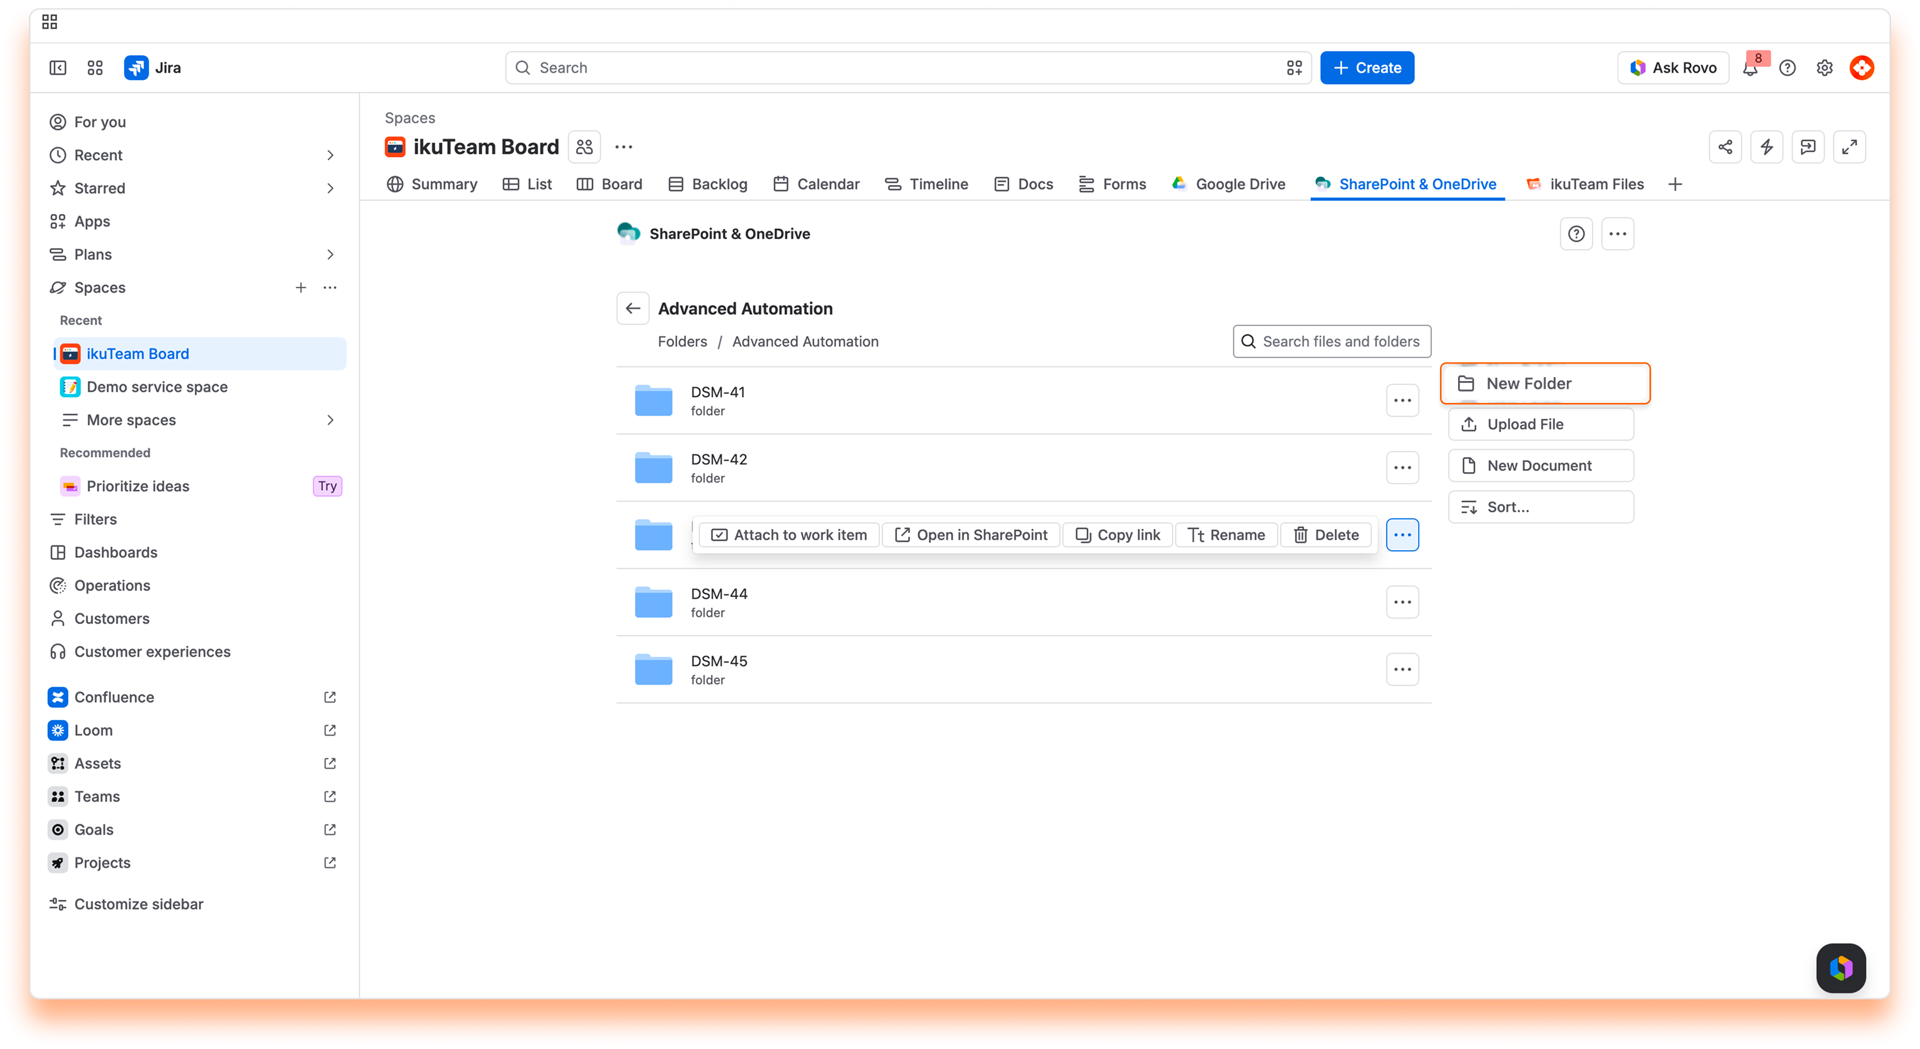
Instructions:
After a few moments, the view reloads, and your new folder will be listed and ready to use.
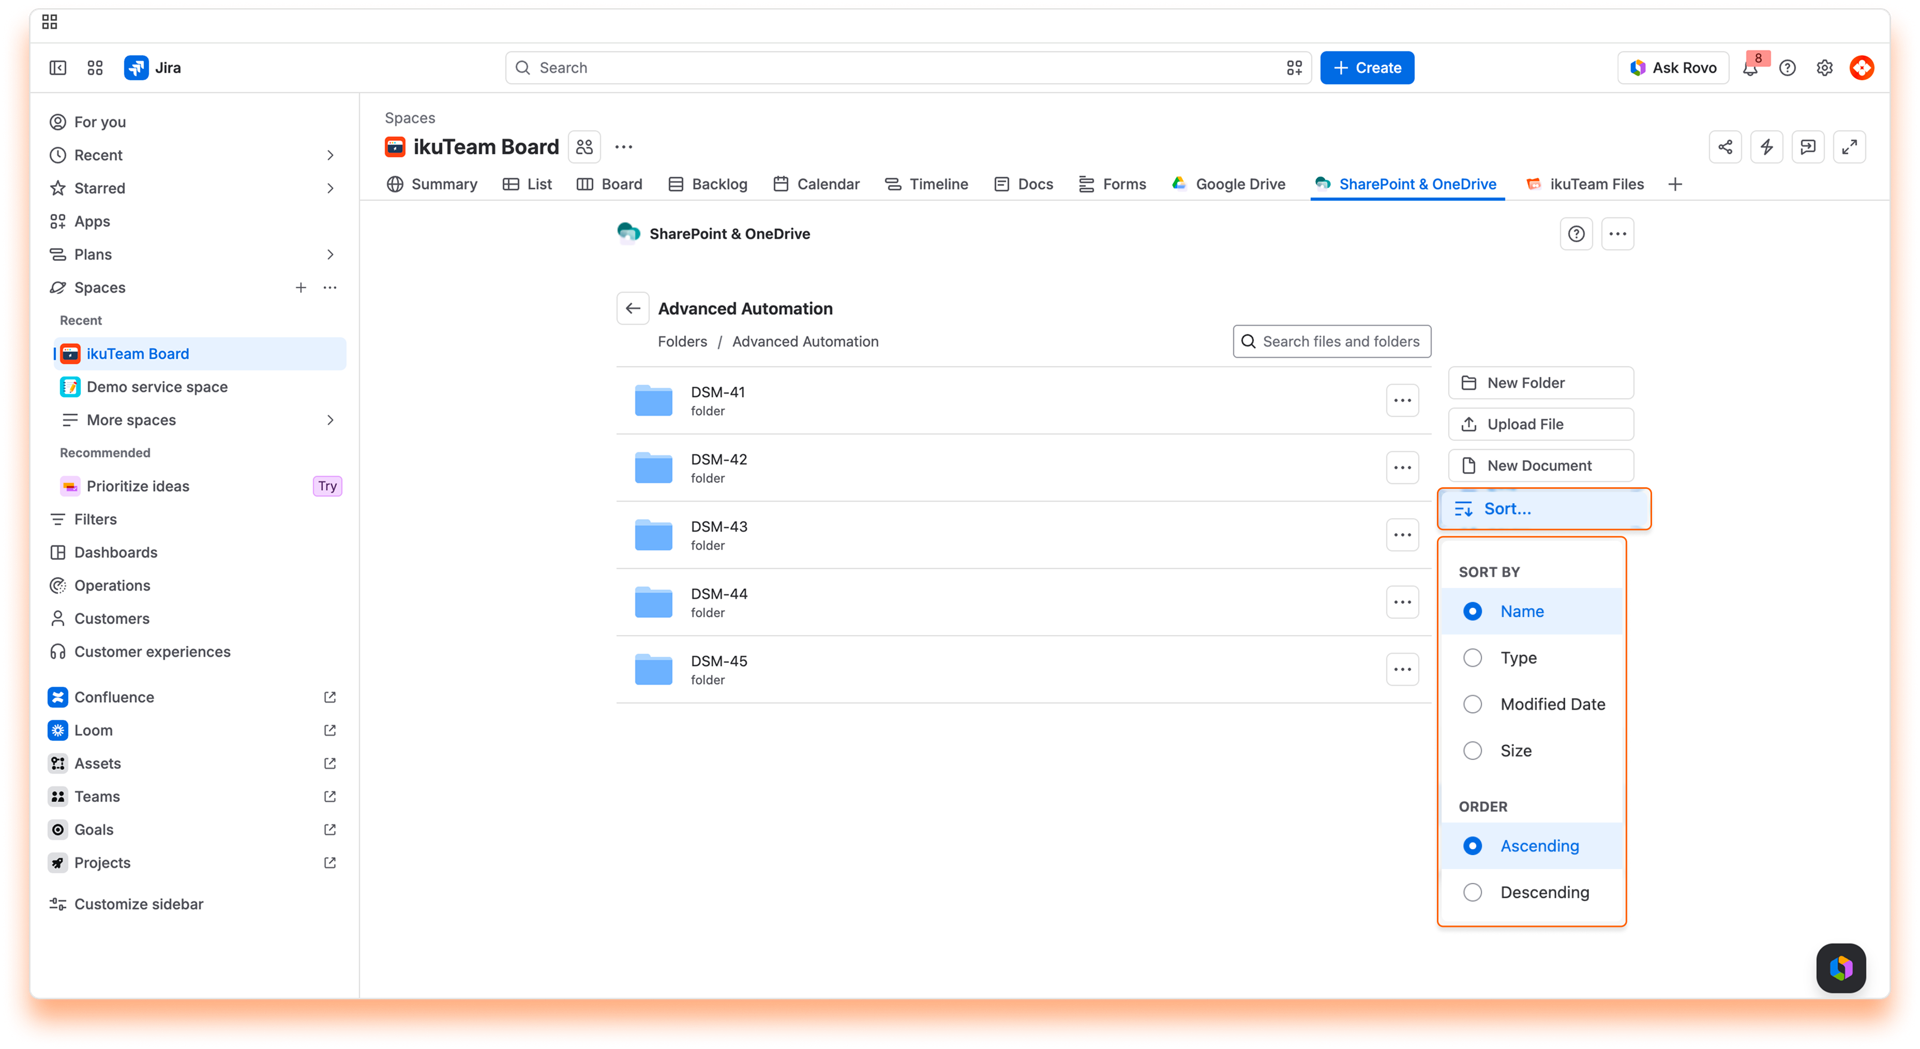
Sort
The content of your folders is ordered alphabetically by default.
You can change this by clicking the "Sort by name" button and selecting a sort of option and the order you prefer. You can sort content by name, type, modified date, and file size. The button will always reflect your selection.
Now you know all that you need to use the file manager. You can now learn more about previewing files, editing documents, or attaching files and folders to Jira Cloud Work Items.
If you still have questions about the topics covered on this page, visit our support portal and send them to us. Our team is always happy to help.
Learn how to preview files in Jira with the SharePoint Connector for Jira app.
On this page, we'll cover the different ways to preview your files on the SharePoint Connector for Jira app, expanding on the topics on the page about the file manager.
The app lets you preview files in the file manager and the attached files and folders in Jira. It supports the most common Office file formats, PDFs, and popular image formats.
This way, your Jira Work Items can easily serve as your one source of truth, with content that is always accessible and updated.
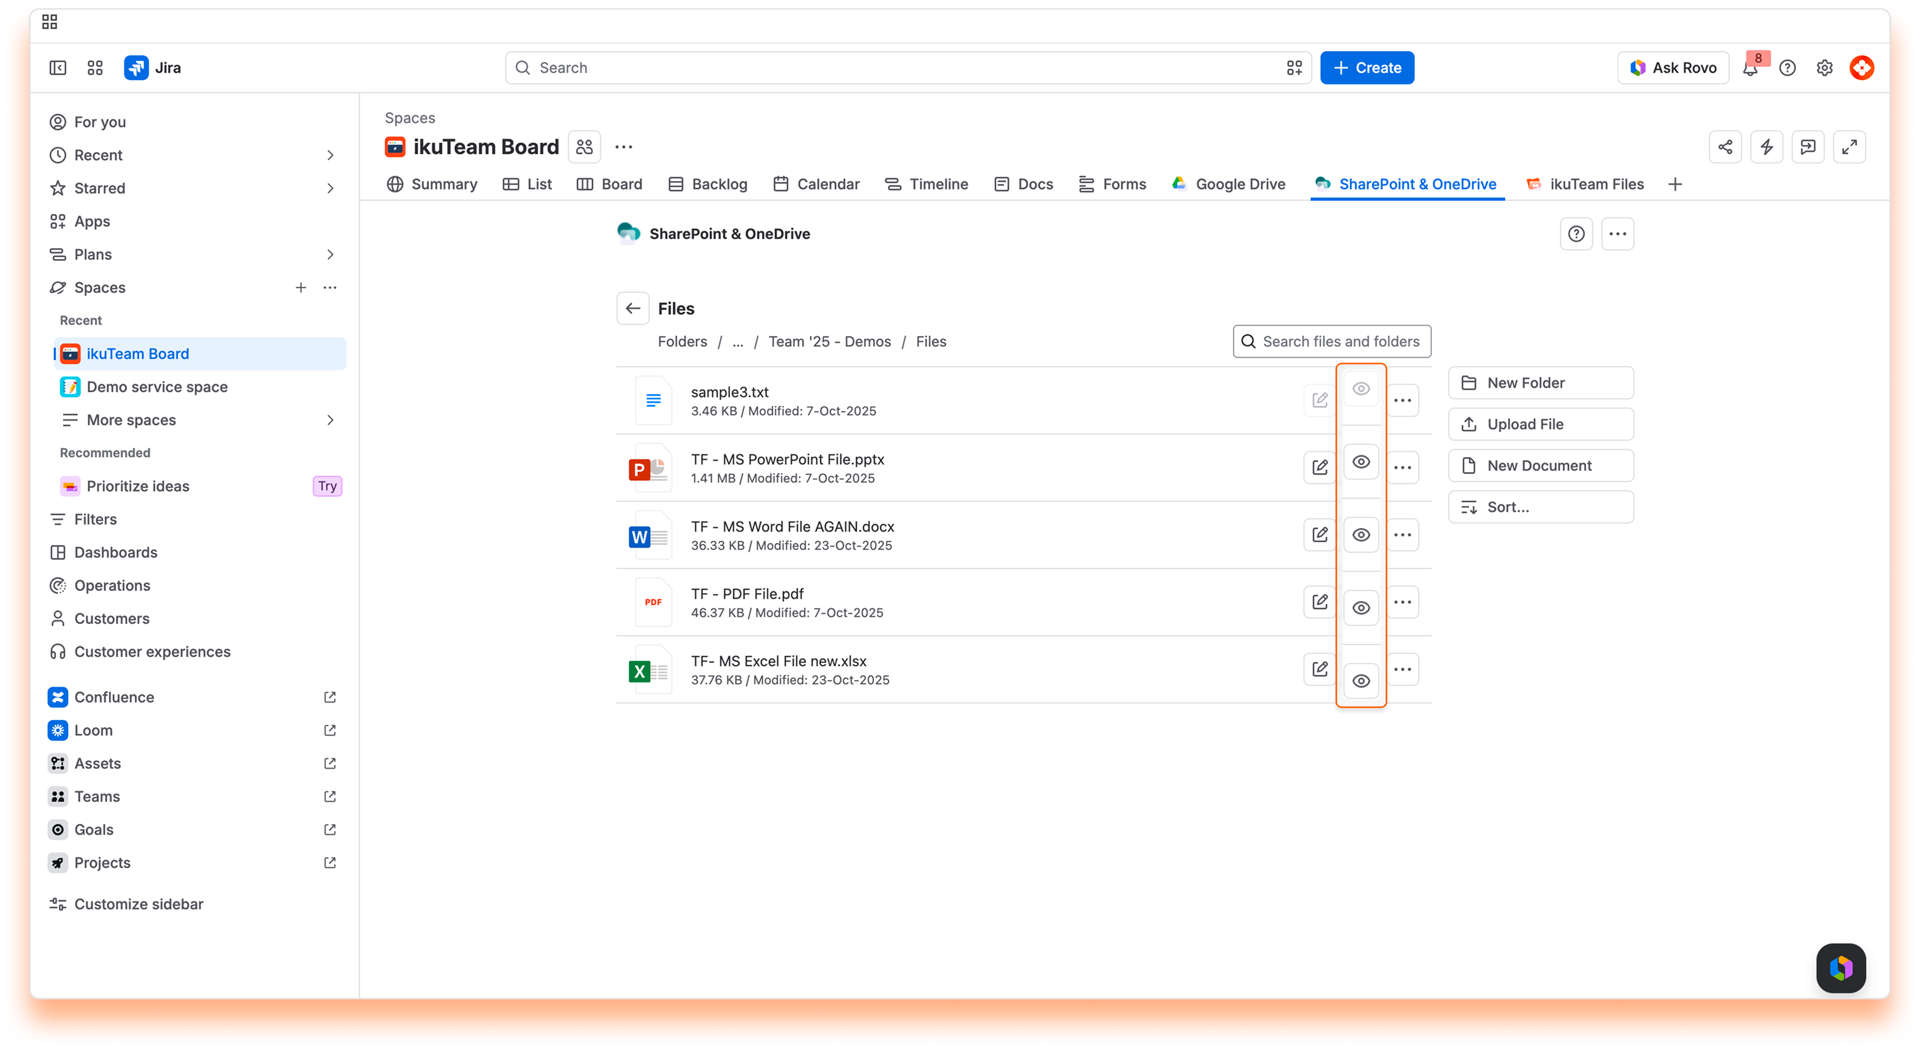
When using the File Manager, you can preview your files' content by clicking the “Preview” button to open the preview. The options available vary slightly depending on the kind of file.
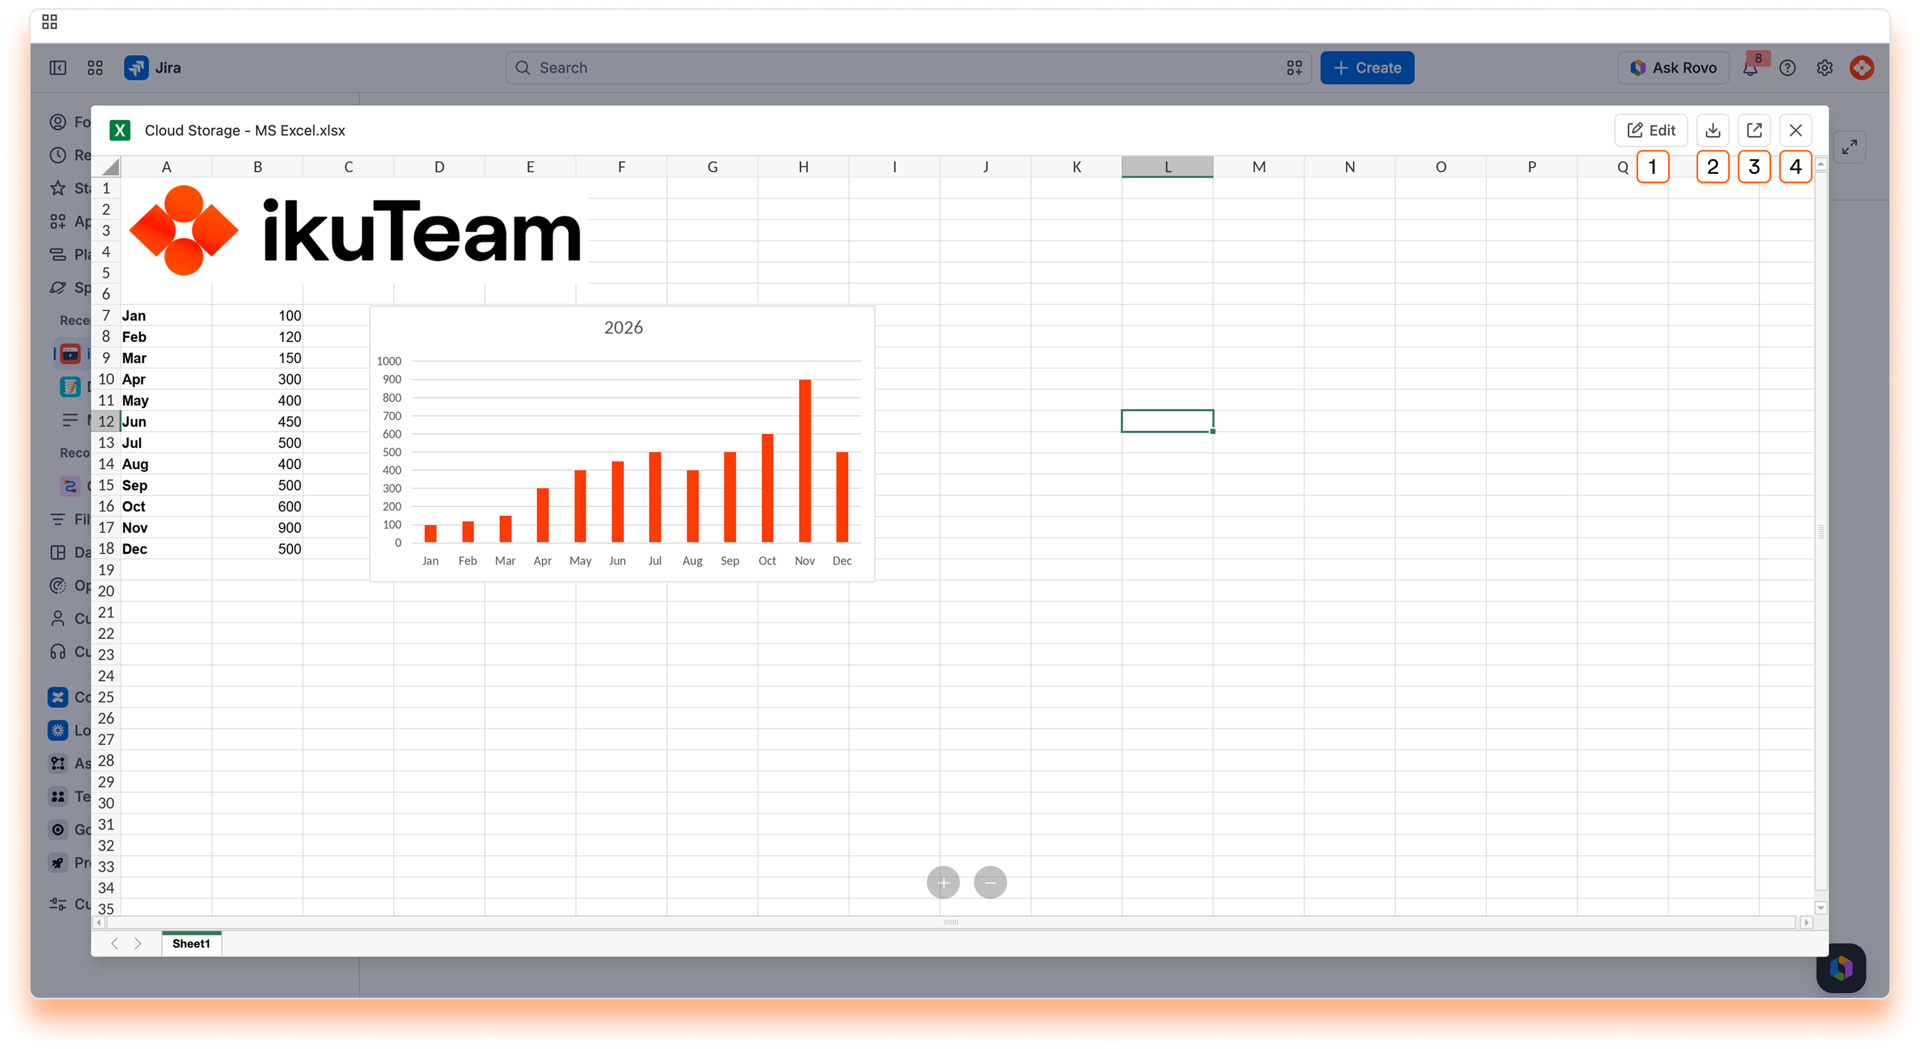
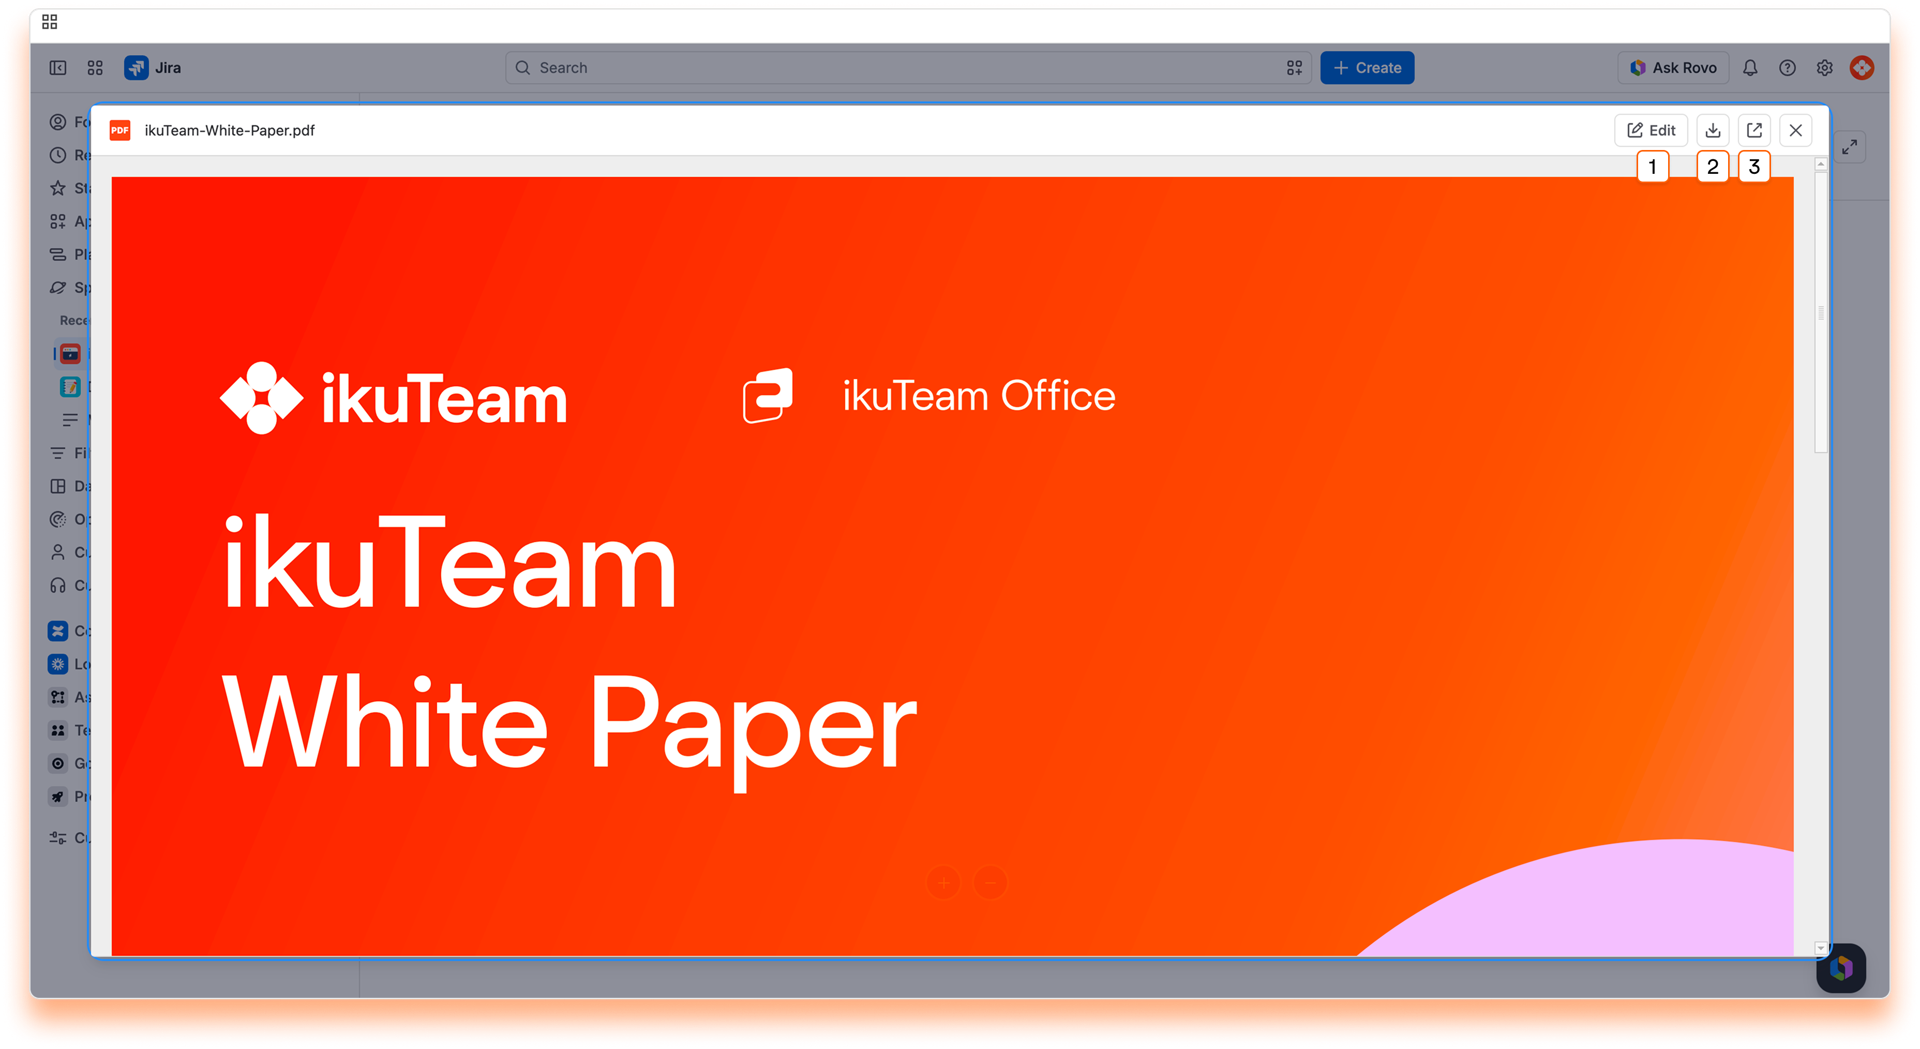
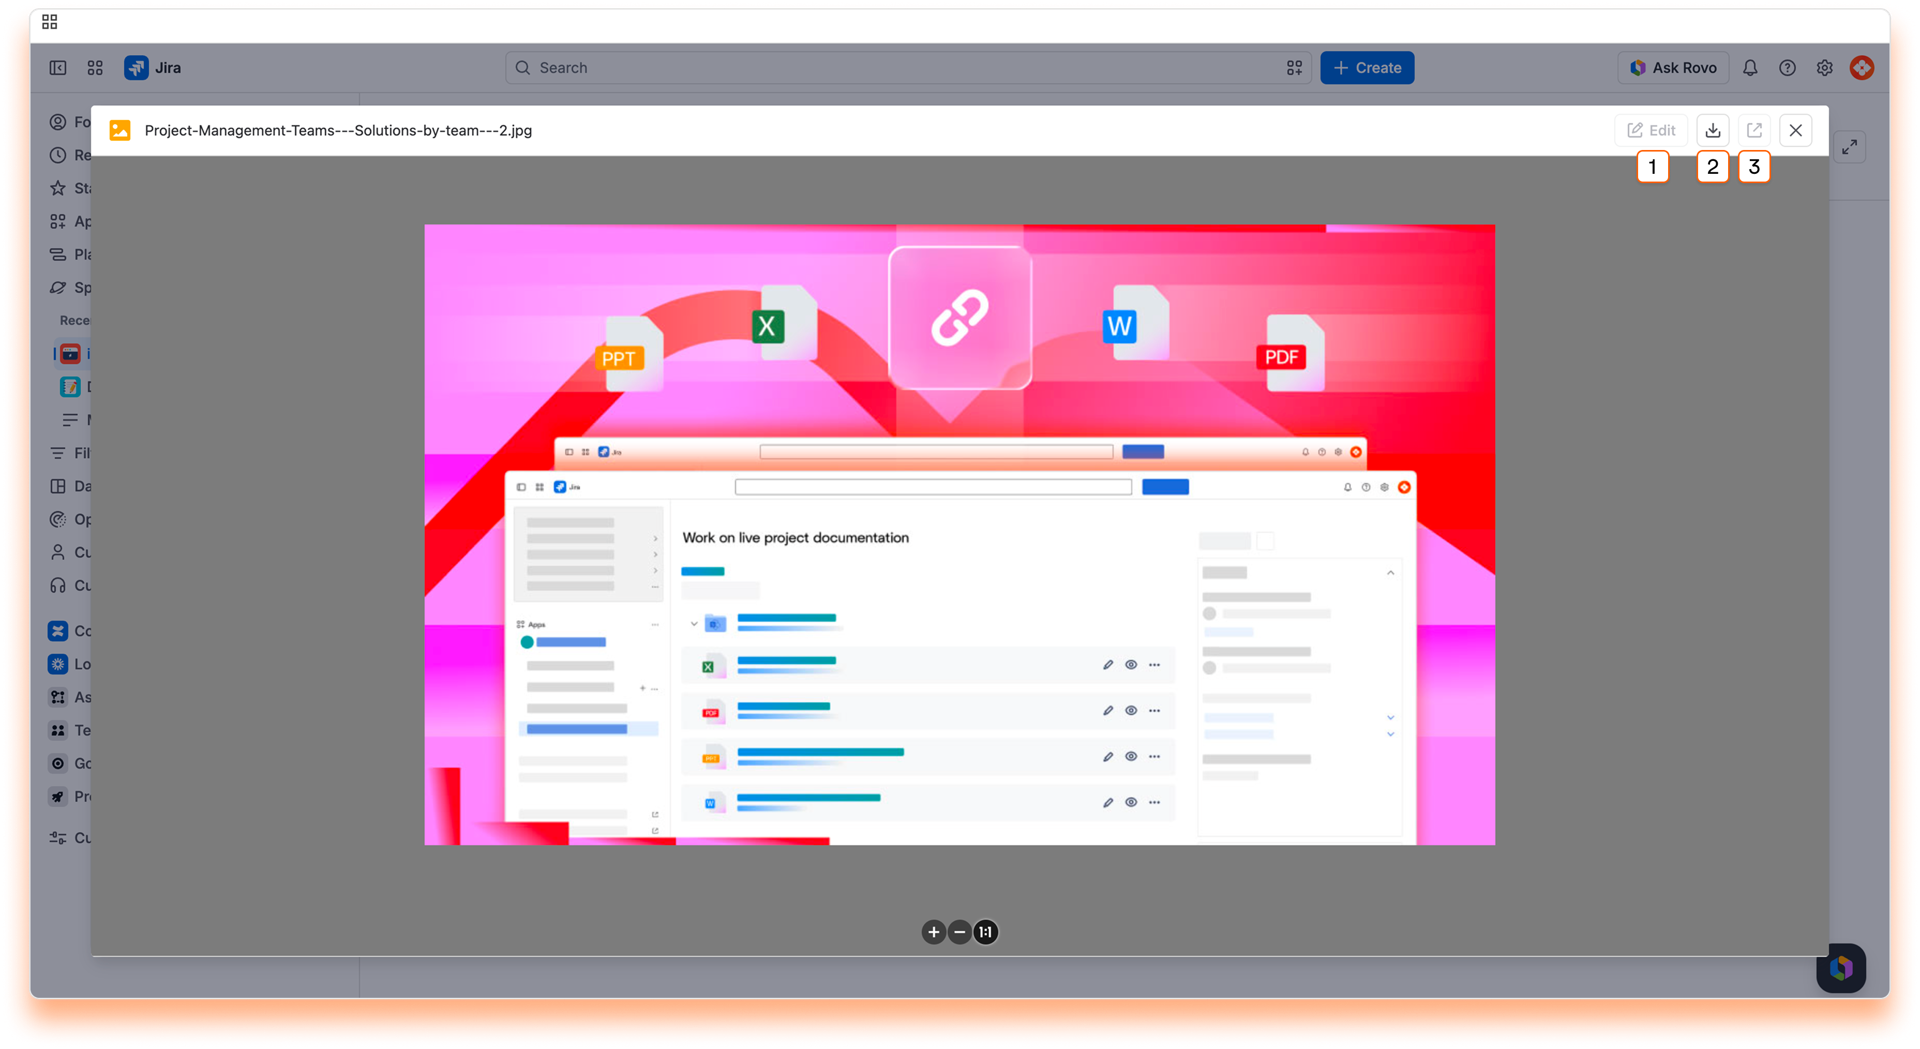
Click on the SharePoint Connector for Jira app by expanding the view app actions button on the work item to see the SharePoint Connector for Jira section.
Using the SharePoint Connector for Jira app, you can attach files and folders to your Jira Work Item preview.
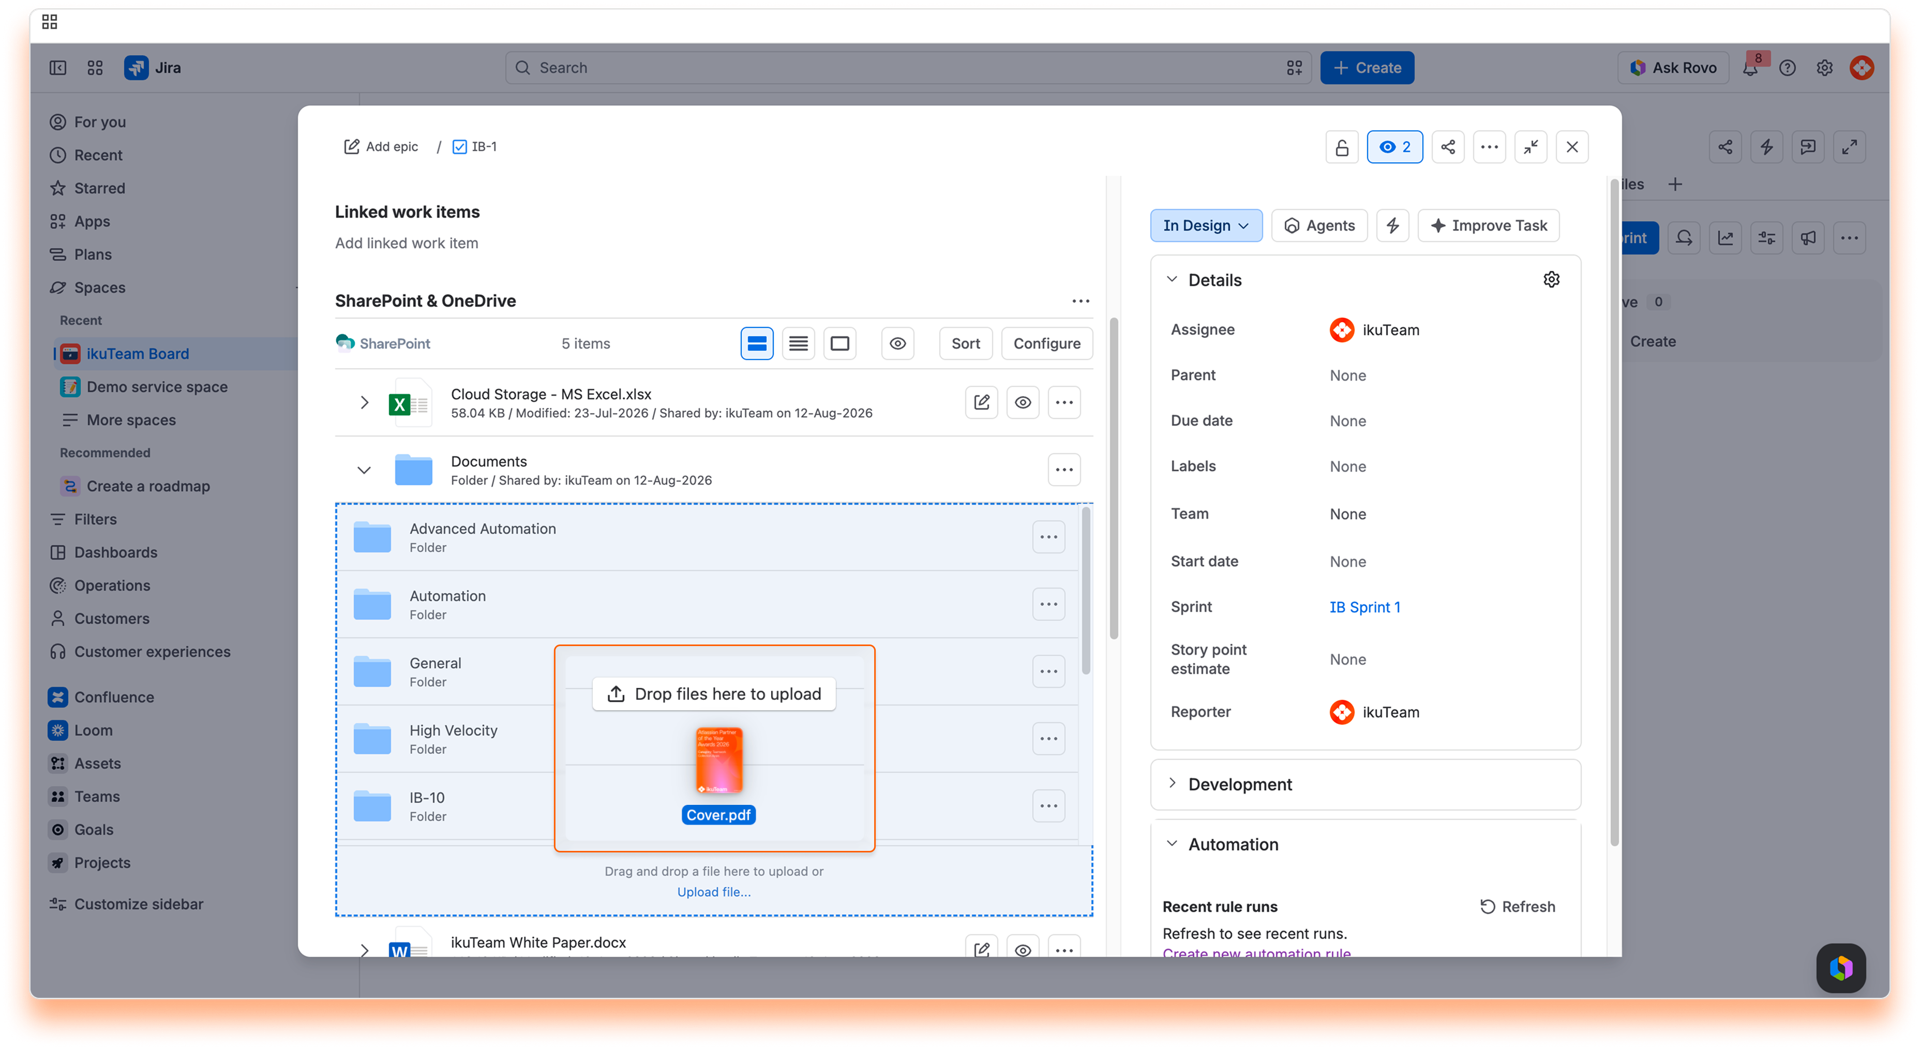
The full-screen preview for the files attached works the same way as described for the file manager. Click the preview icon and the full screen review will open.
You can expand attached folders similarly to see their content quickly and even navigate sub-folders. You can also preview the files' contents inside the attached folder by clicking on the preview icon.
When you have an attached folder on your work item, you can drag and drop a file from a local folder to upload it there. Doing this will save the file in the storage location containing the connected folder, helping you build your single source of truth.
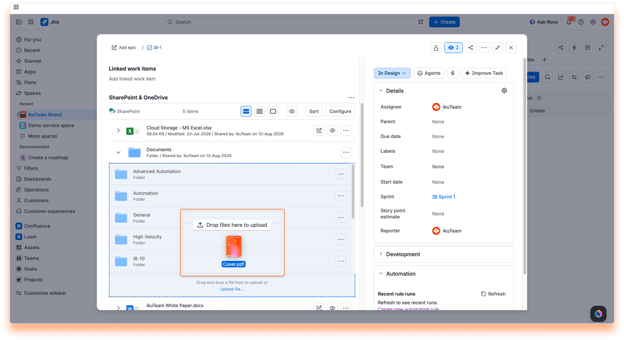
ℹ️ Depending on the size of the file, it may take a few moments for it to become available in the app.
ℹ️ 1 Partial support for WEBM, some browsers like Safari don’t support it.
That's all about previewing files. Did you know you can edit documents attached to your pages or create new documents in the file manager?
If you still have questions about the topics covered on this page, visit our support portal and send them to us. Our team is always happy to help.
Learn how to edit documents on Jira with the SharePoint Connector for Jira app.
We'll cover the different ways to edit your documents on Jira using the SharePoint Connector for Jira app, expanding on the topics presented on the page about the file manager.
While some files are preview-only, when it comes to Office files, you can also edit the most popular formats right inside Jira. You can edit documents on the file manager and issues in which you attached files and folders without downloading to edit and re-uploading multiple copies or locking other people out while editing the document.
ℹ️ With the Advanced Edition of the app, PDF files are supported for editing. Explained in detail here: Edit documents [SP-JC] | Editing a PDF document
This way, it's easy to use your Jira issues as your one source of truth, with content always accessible, updated, and editable.
You can edit an Office file from the file manager, including the full-screen preview, and when it’s attached to your pages.
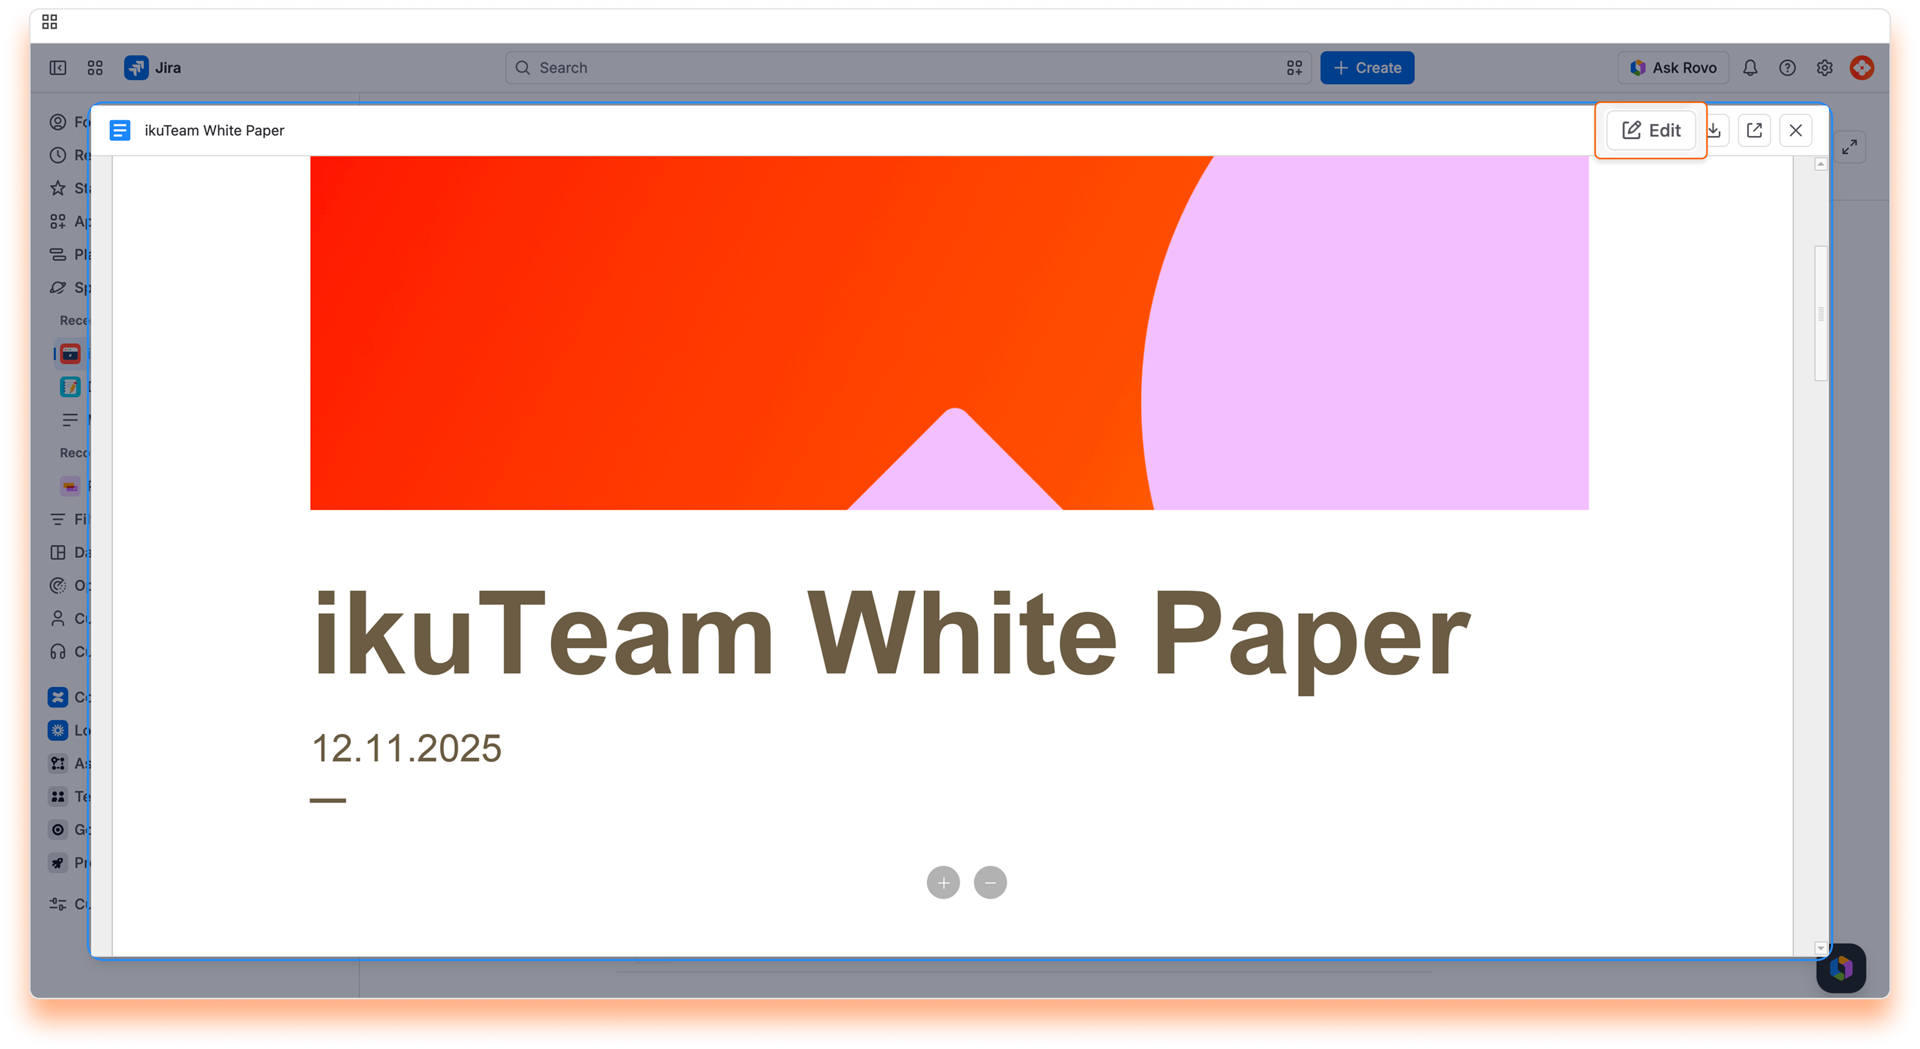
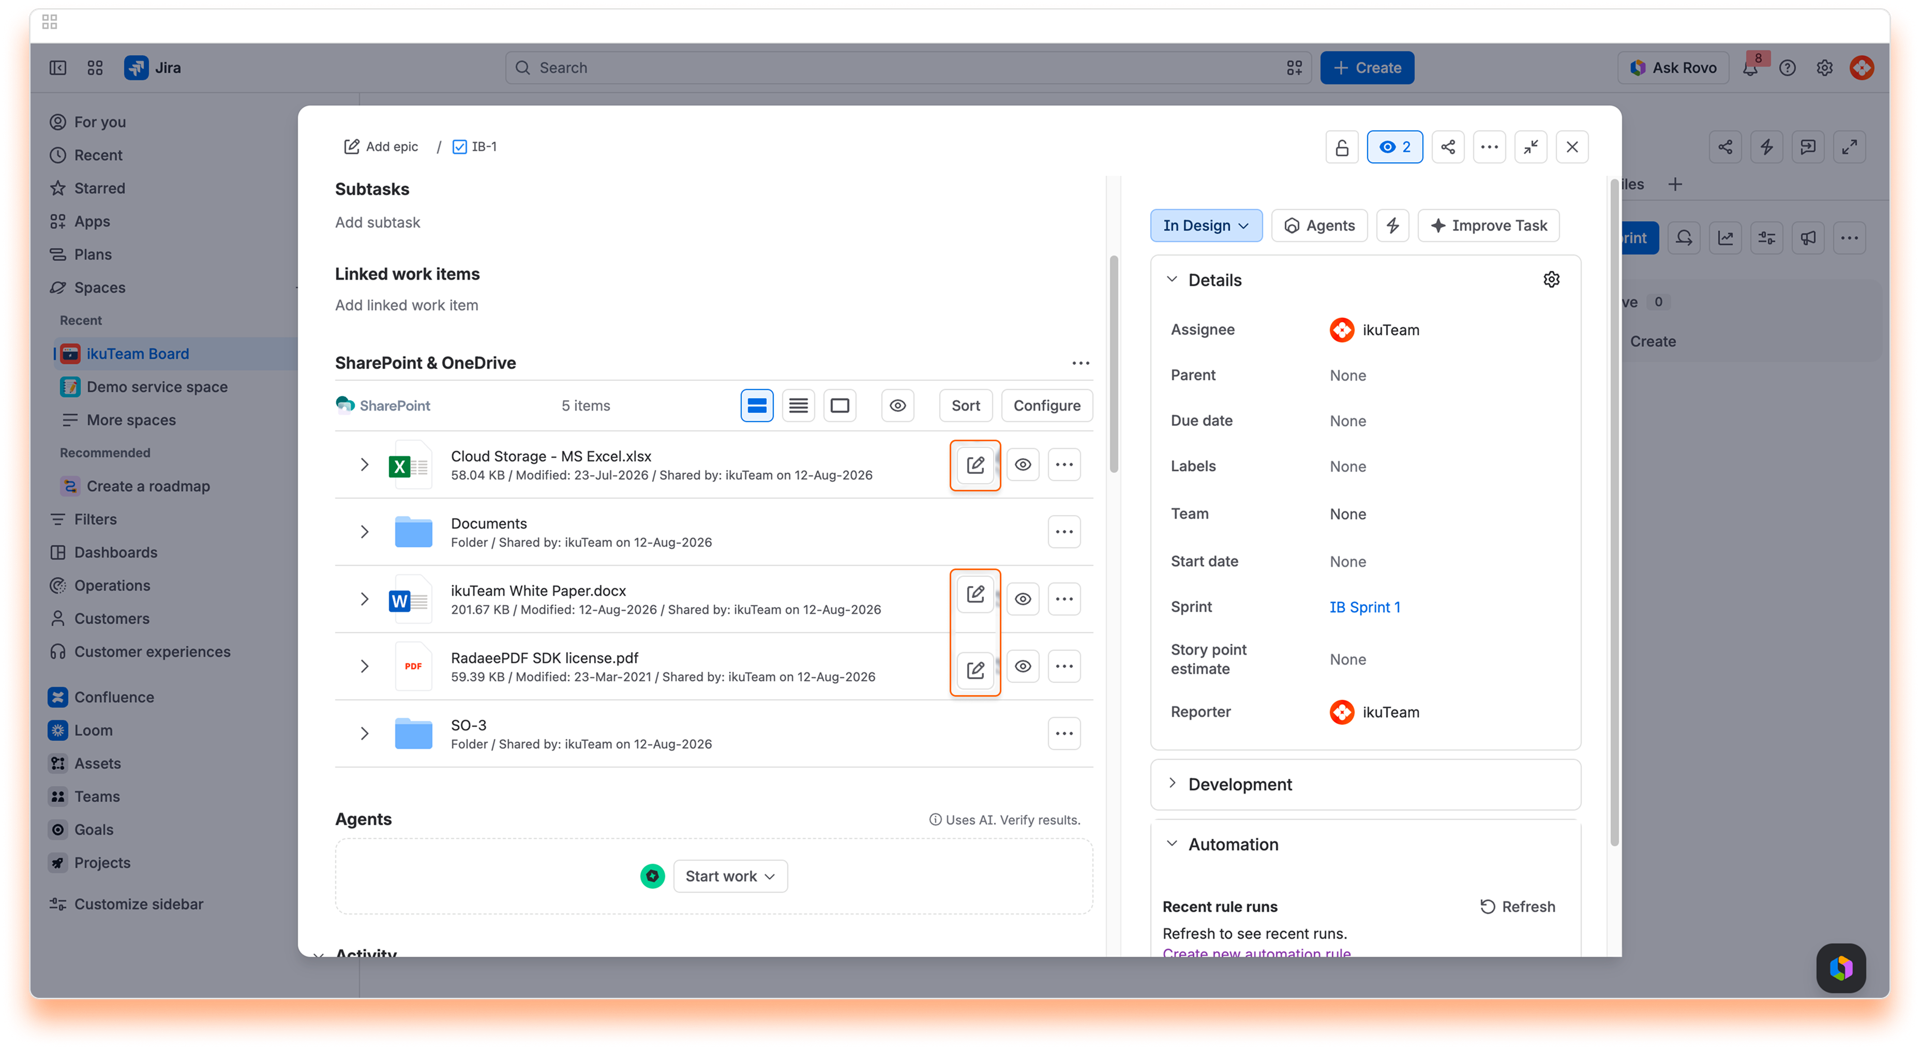
Regardless of the context, you can edit Office files by clicking the Edit button. A new tab opens, where the appropriate editor opens, and you can edit your file in a few seconds.
You and your team can work together when editing a Microsoft Office document, spreadsheet, or presentation. The Microsoft 365 editor supports real-time collaboration, so there are no file lockdowns. There's also an autosave feature, so you can close the tab when you finish.
OpenOffice files work the same way as Microsoft Office files, using the Microsoft 365 editor, and support real-time collaboration.
As mentioned before, Microsoft Office files support real-time collaboration.
You can start editing a document attached to a page or from the file manager. The editor seamlessly creates a collaboration session when another person clicks to edit the same document. You can continue to edit the document as before and leave it anytime by closing the browser tab.
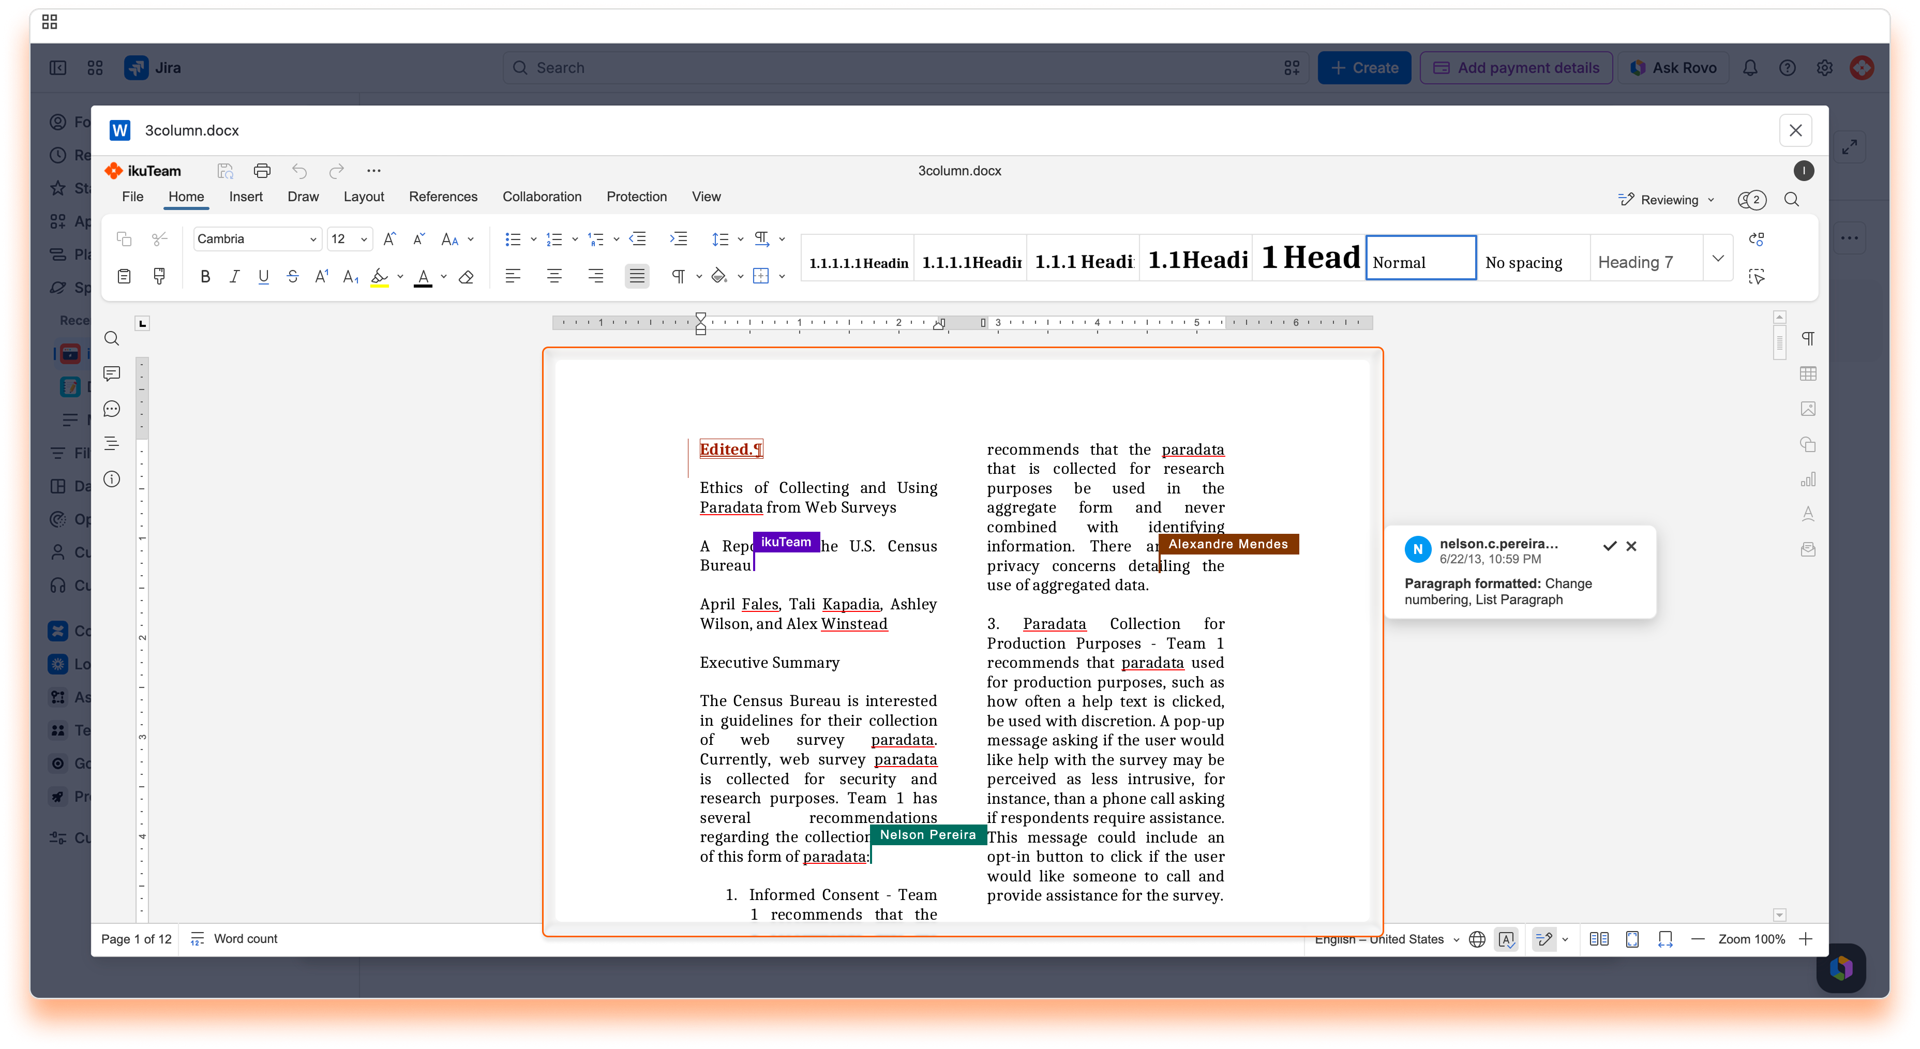
With the Advanced edition of the SharePoint Connector for Jira app, you can edit PDF files added to the folder by clicking the “Edit” button (also available in the full-screen preview) and edit the documents in a few seconds.
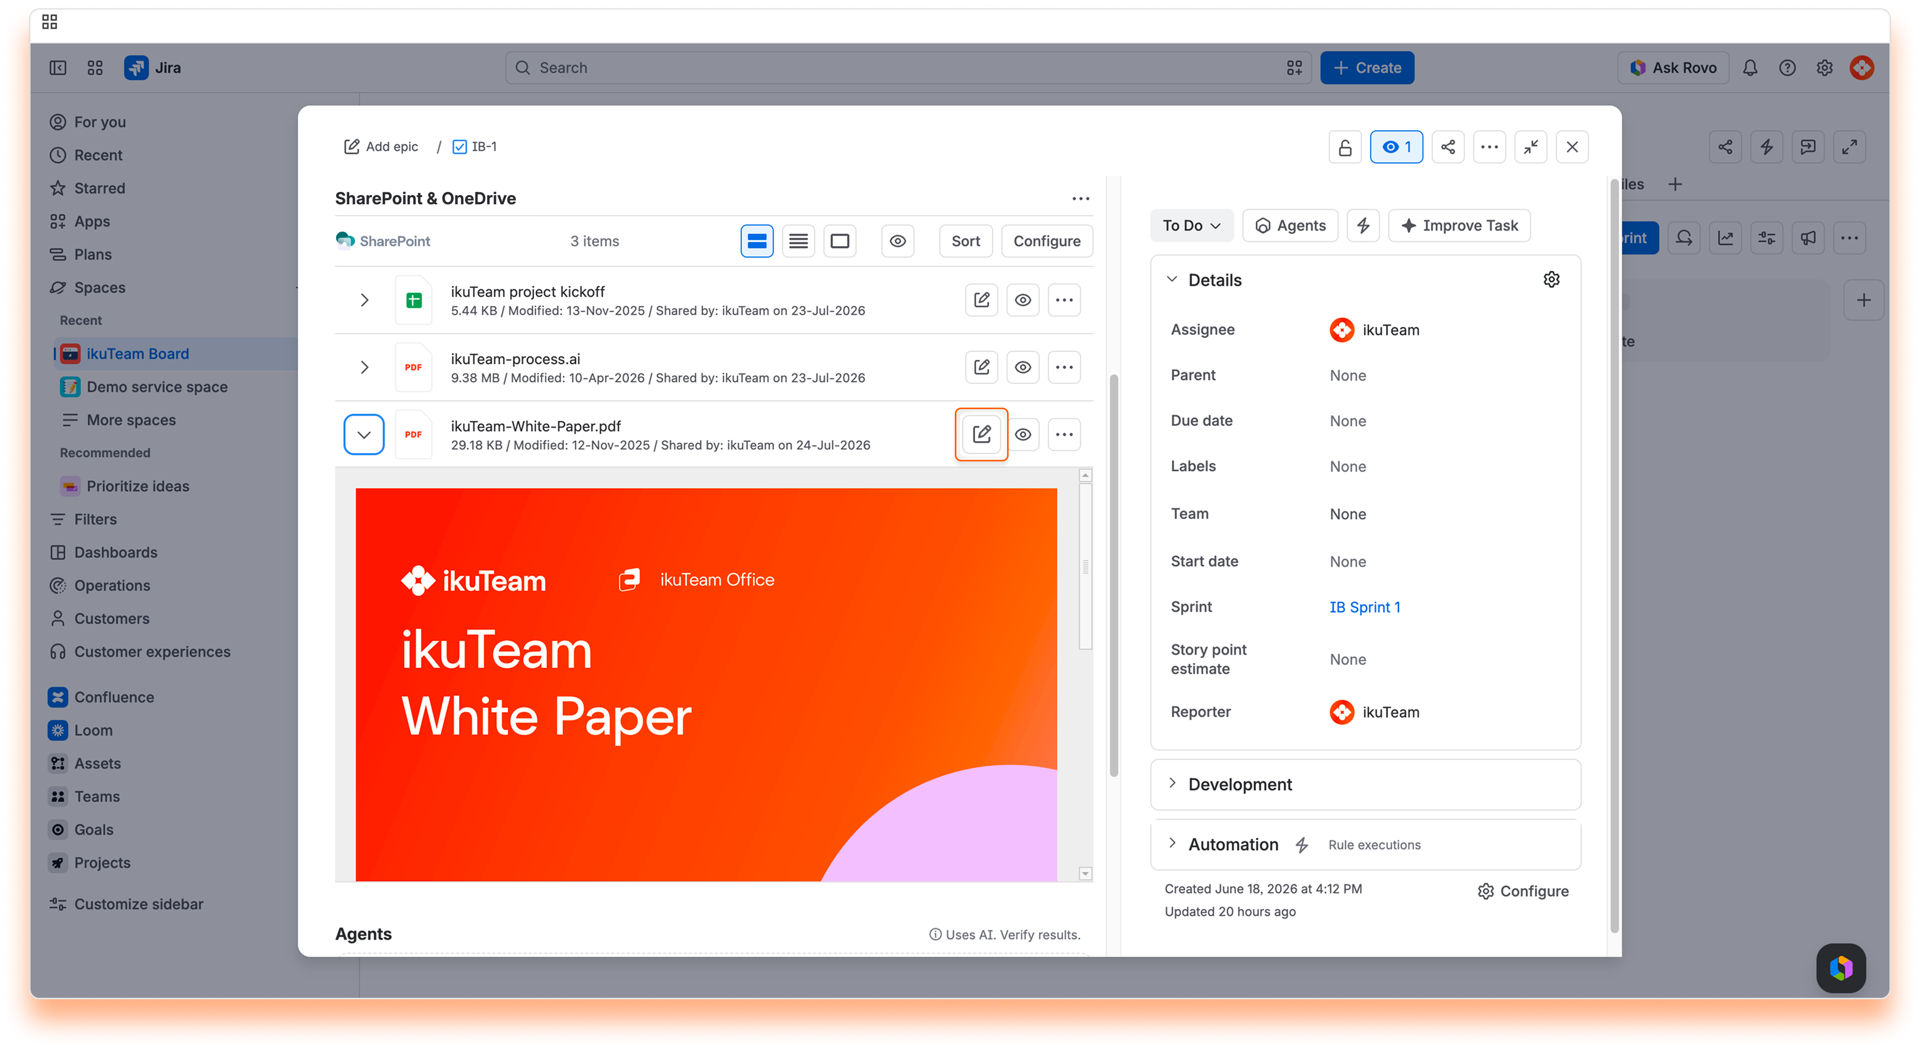
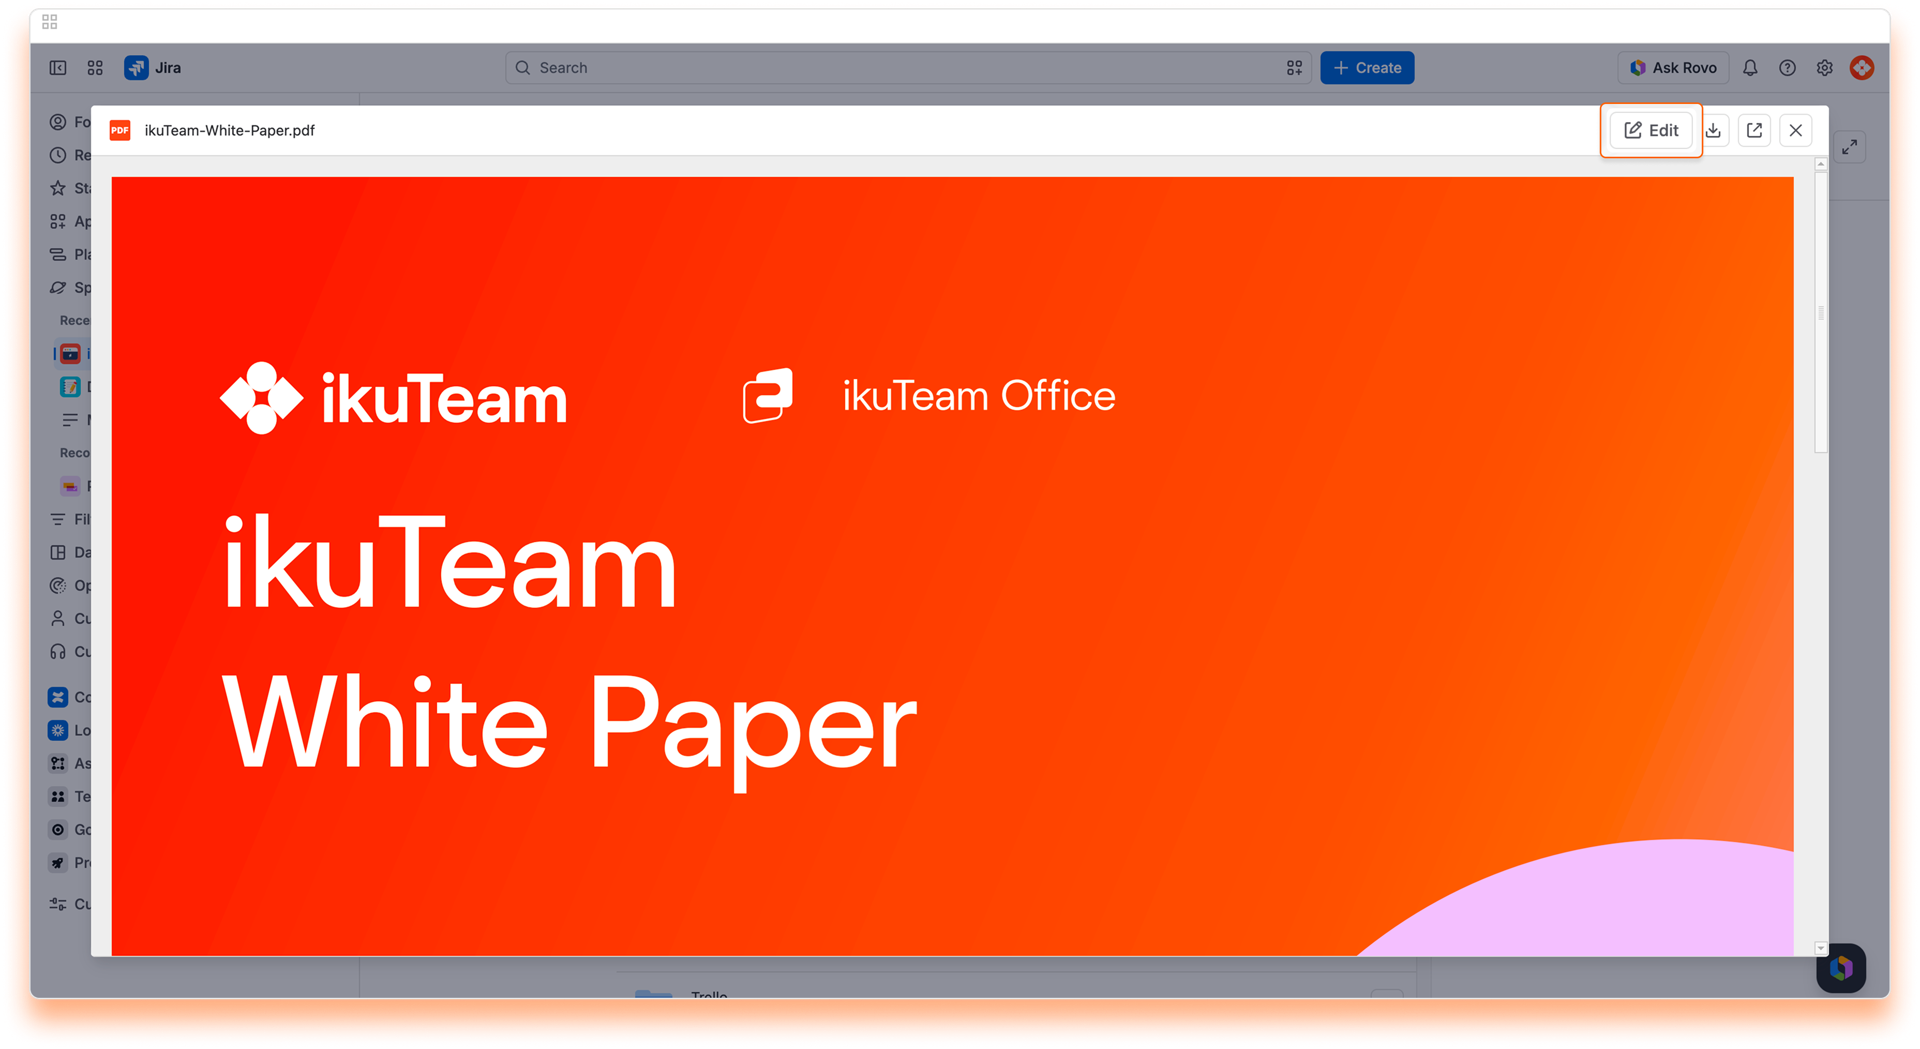
When editing a PDF file, you and your team can work together, as the editor supports real-time collaboration, so there are no file lockdowns. There's also an autosave feature, so you can close the tab when you finish.
As mentioned before, PDF Documents support real-time collaboration, and it's effortless to use.
Start editing a PDF file attached to a work item. When another person clicks to edit the same file, the editor seamlessly creates a collaboration session. You can continue to edit the file as before and leave it anytime by closing the browser tab.
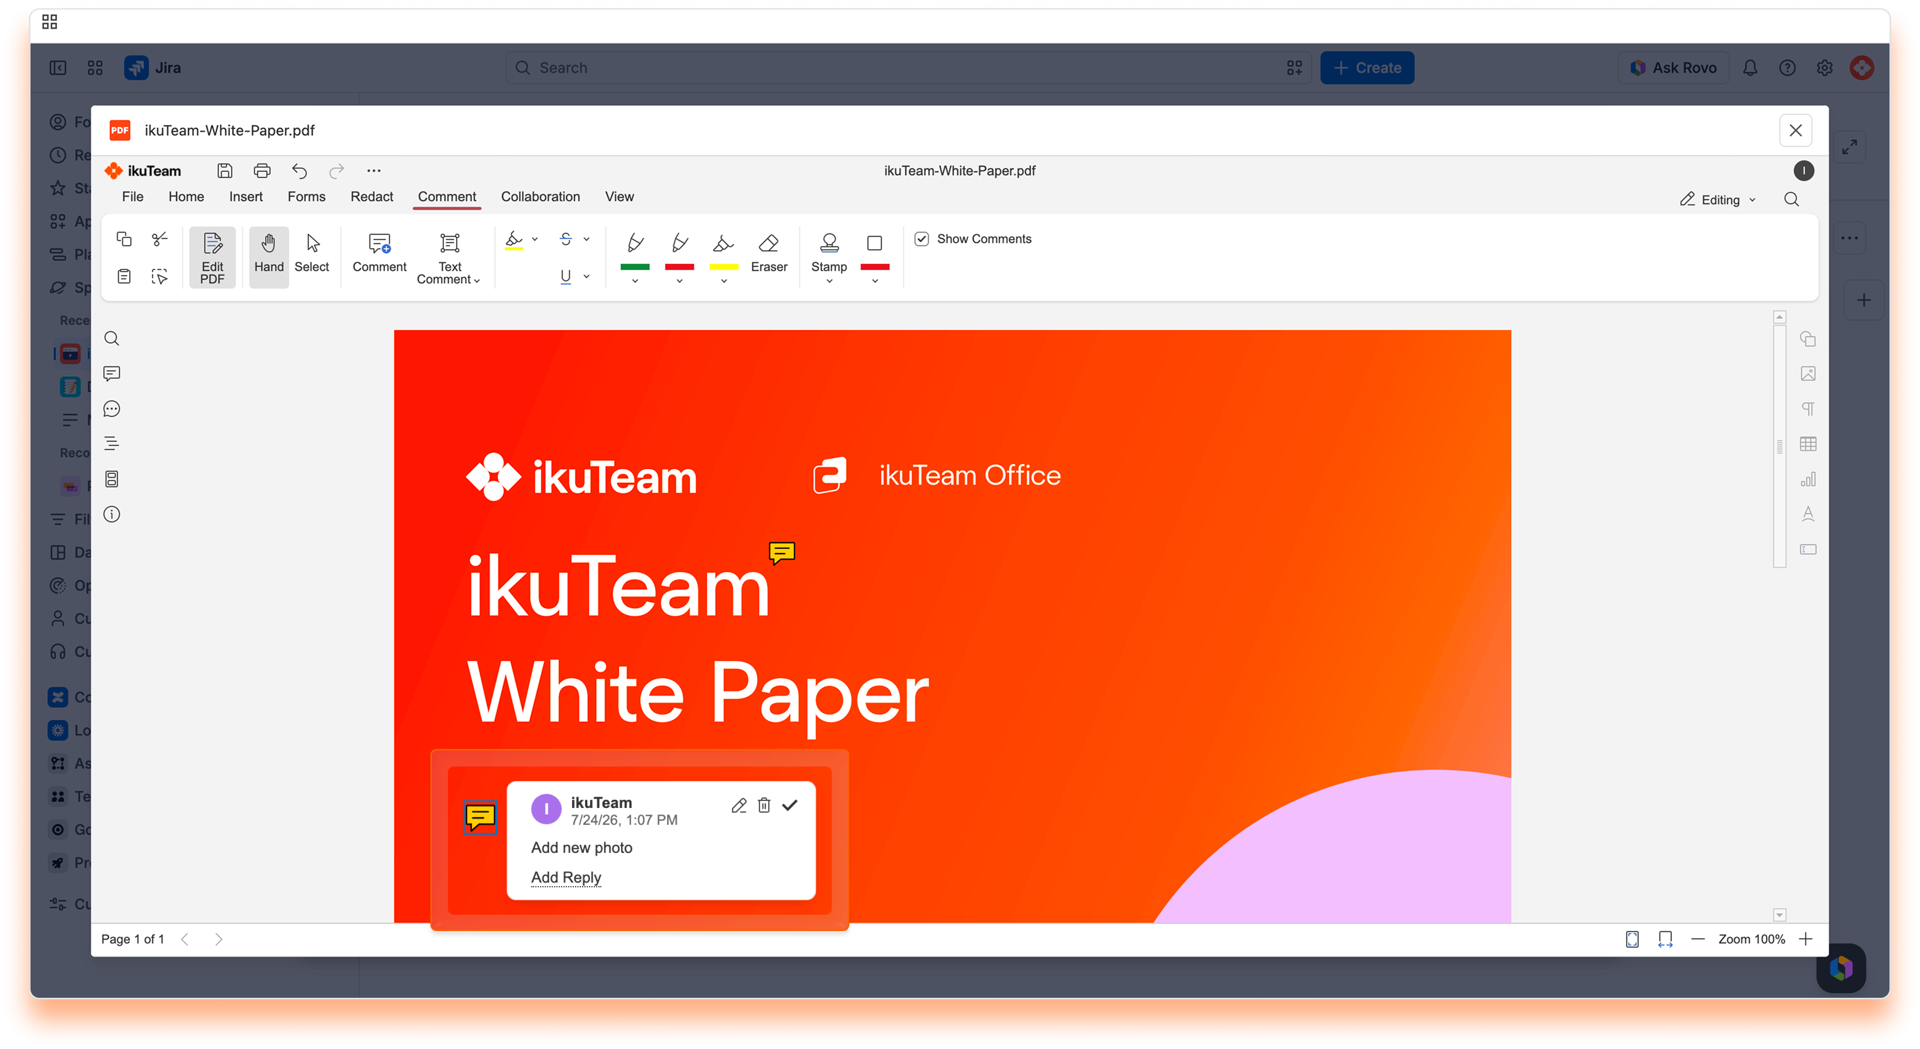
That's all for editing documents. Did you know you can also create new documents in the file manager?
If you still have questions about the topics covered on this page, visit our support portal and send them to us. Our team is always happy to help.
Learn how to attach files and folders to your work items with the SharePoint Connector for Jira app.
With the SharePoint Connector for Jira app, you can attach files and folders to your work items to share knowledge with your team.
On this page, we’ll show you how to do just that, from the work item view/issue view and the file manager, helping you and your team keep all the information updated and in one place. If you want to attach files and folders for your customers using JSM, check the Attach files and folders for customers
page.
By default, Jira hides installed apps. So, the first step is to add the SharePoint Connector for Jira app to your work item.
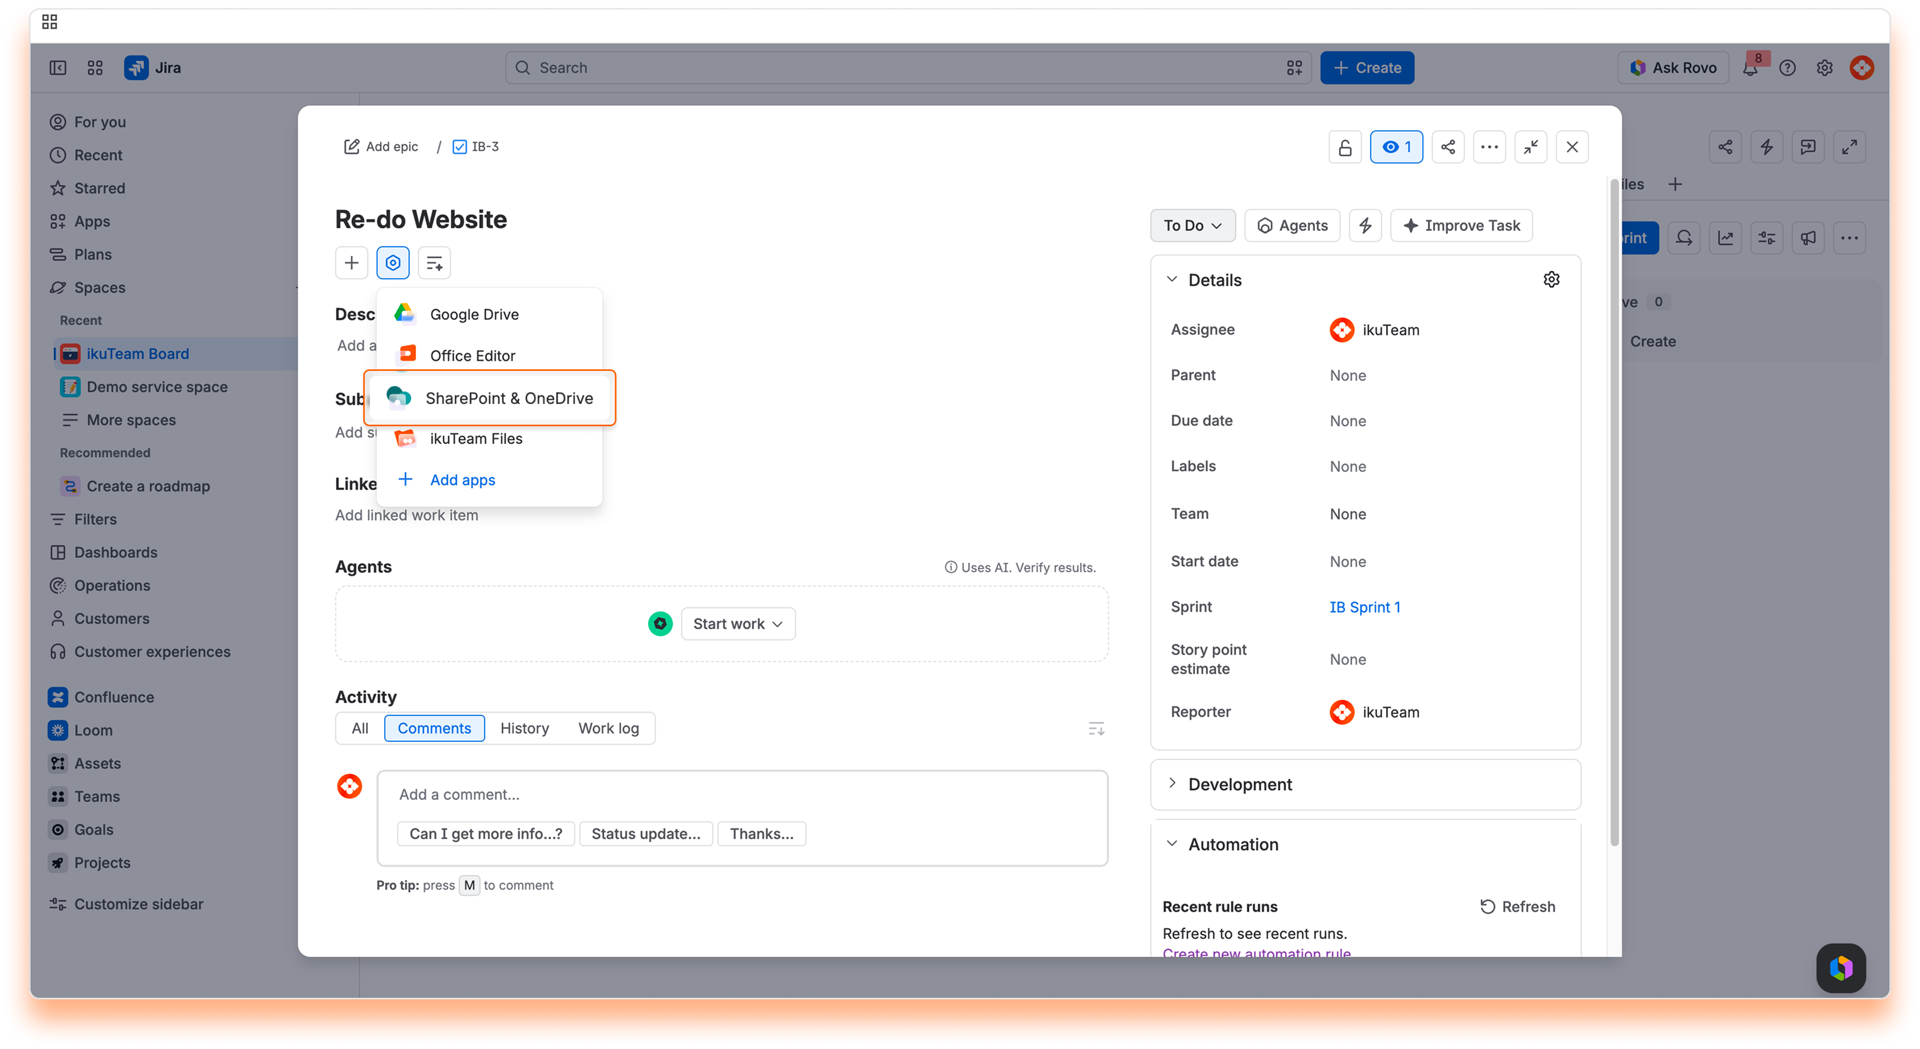
The app will load below the work item description and always appear when you return to that work item (but you can hide it again).
Instructions:
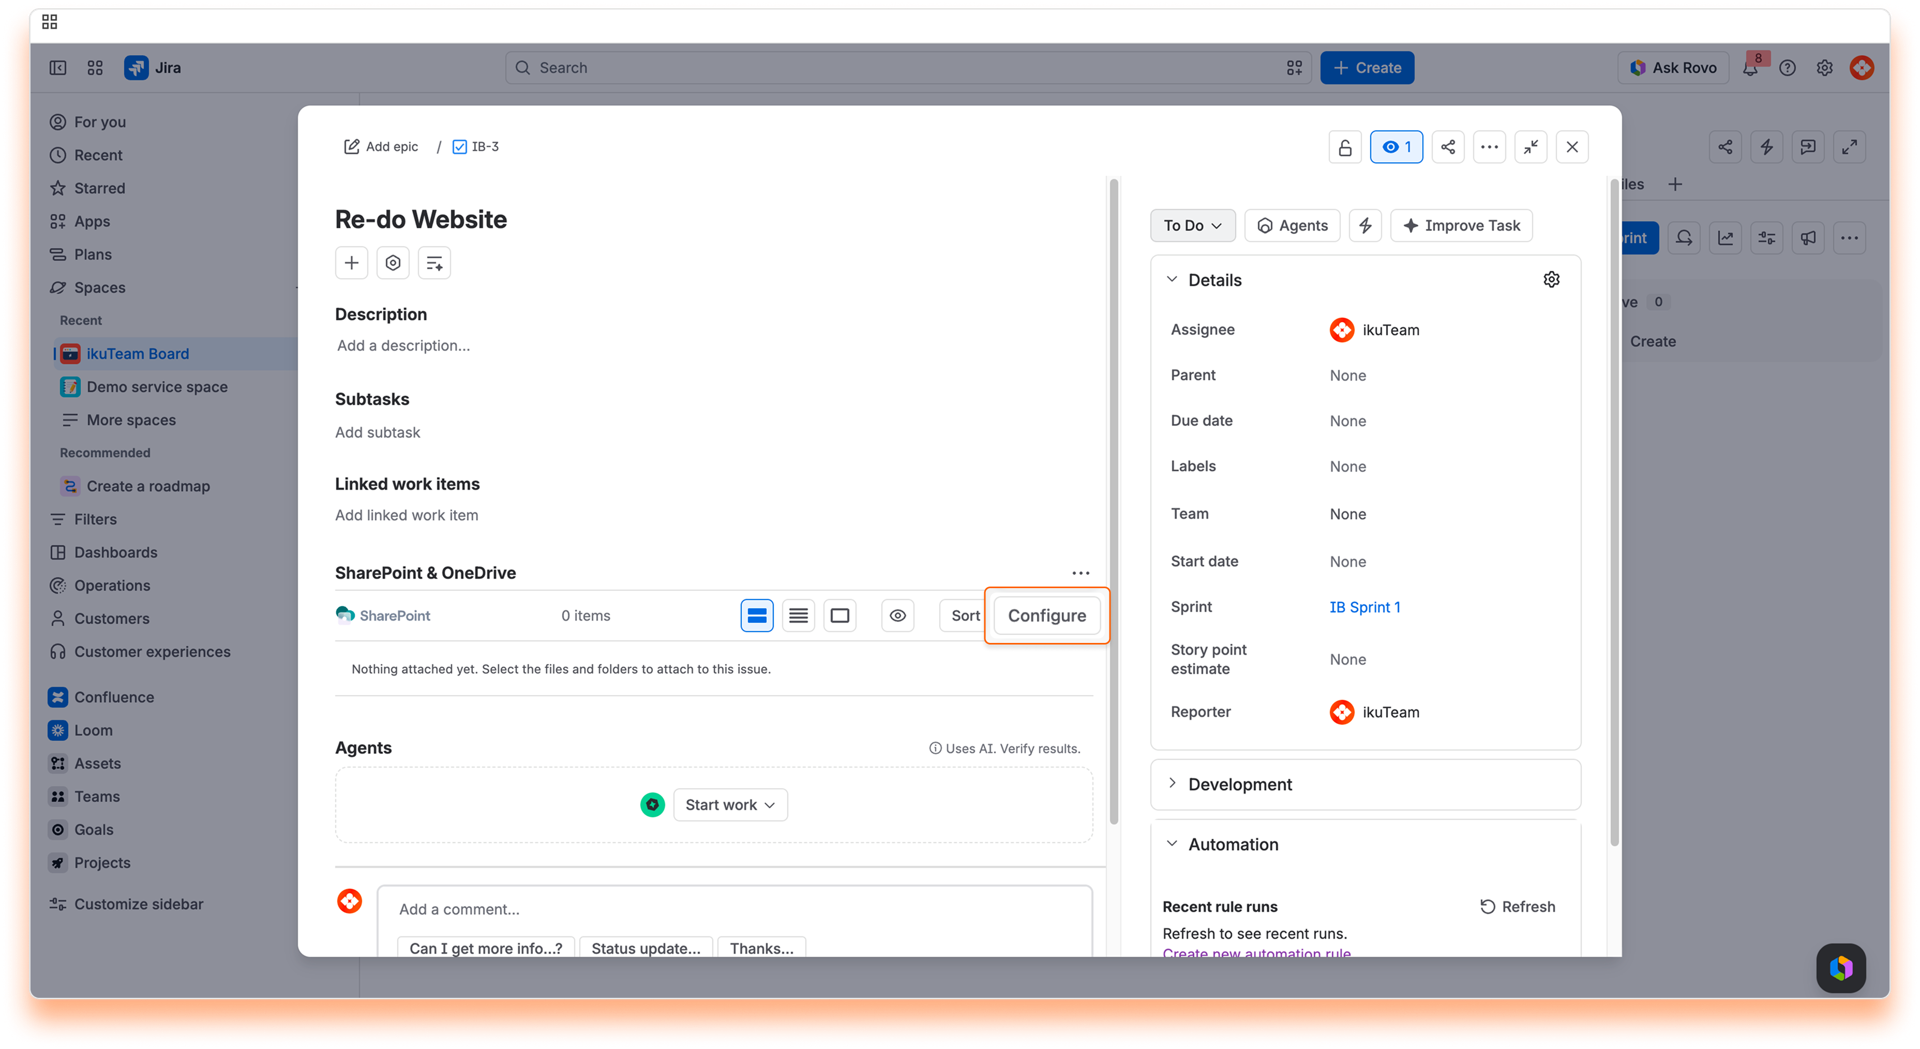
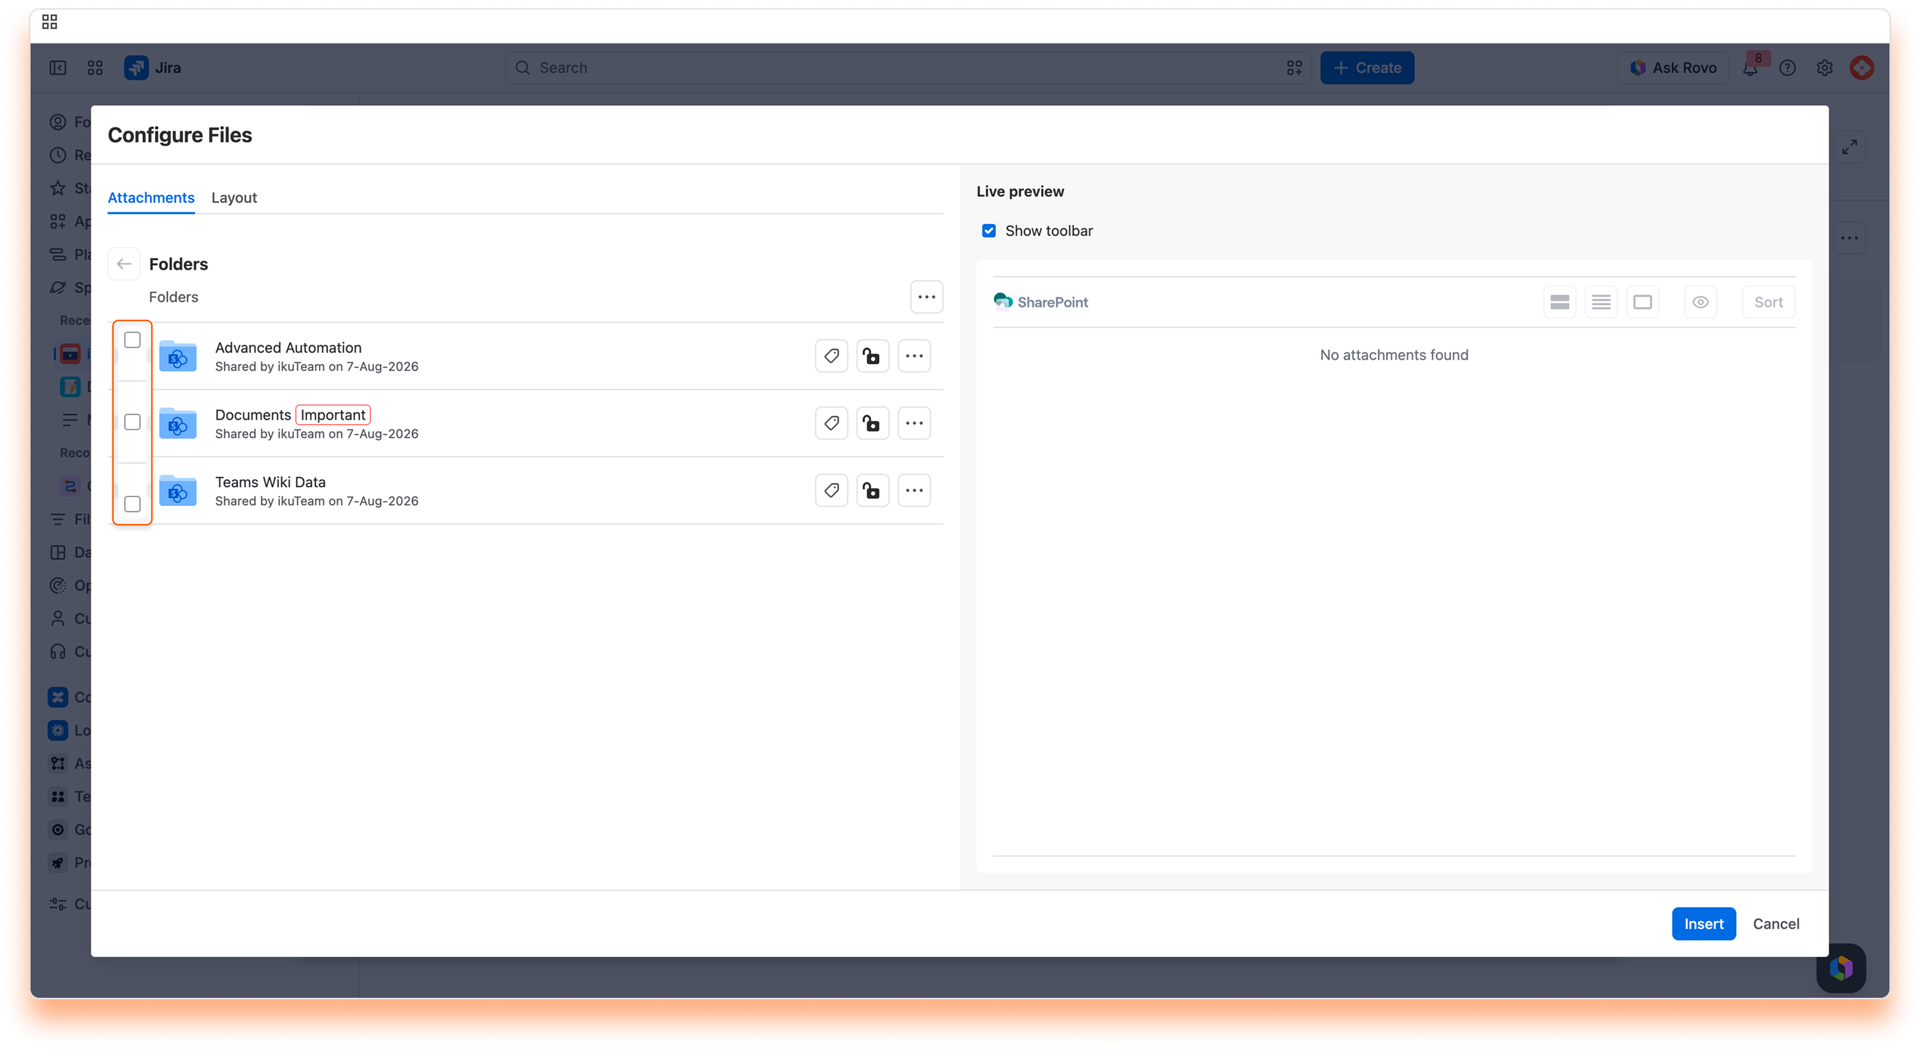
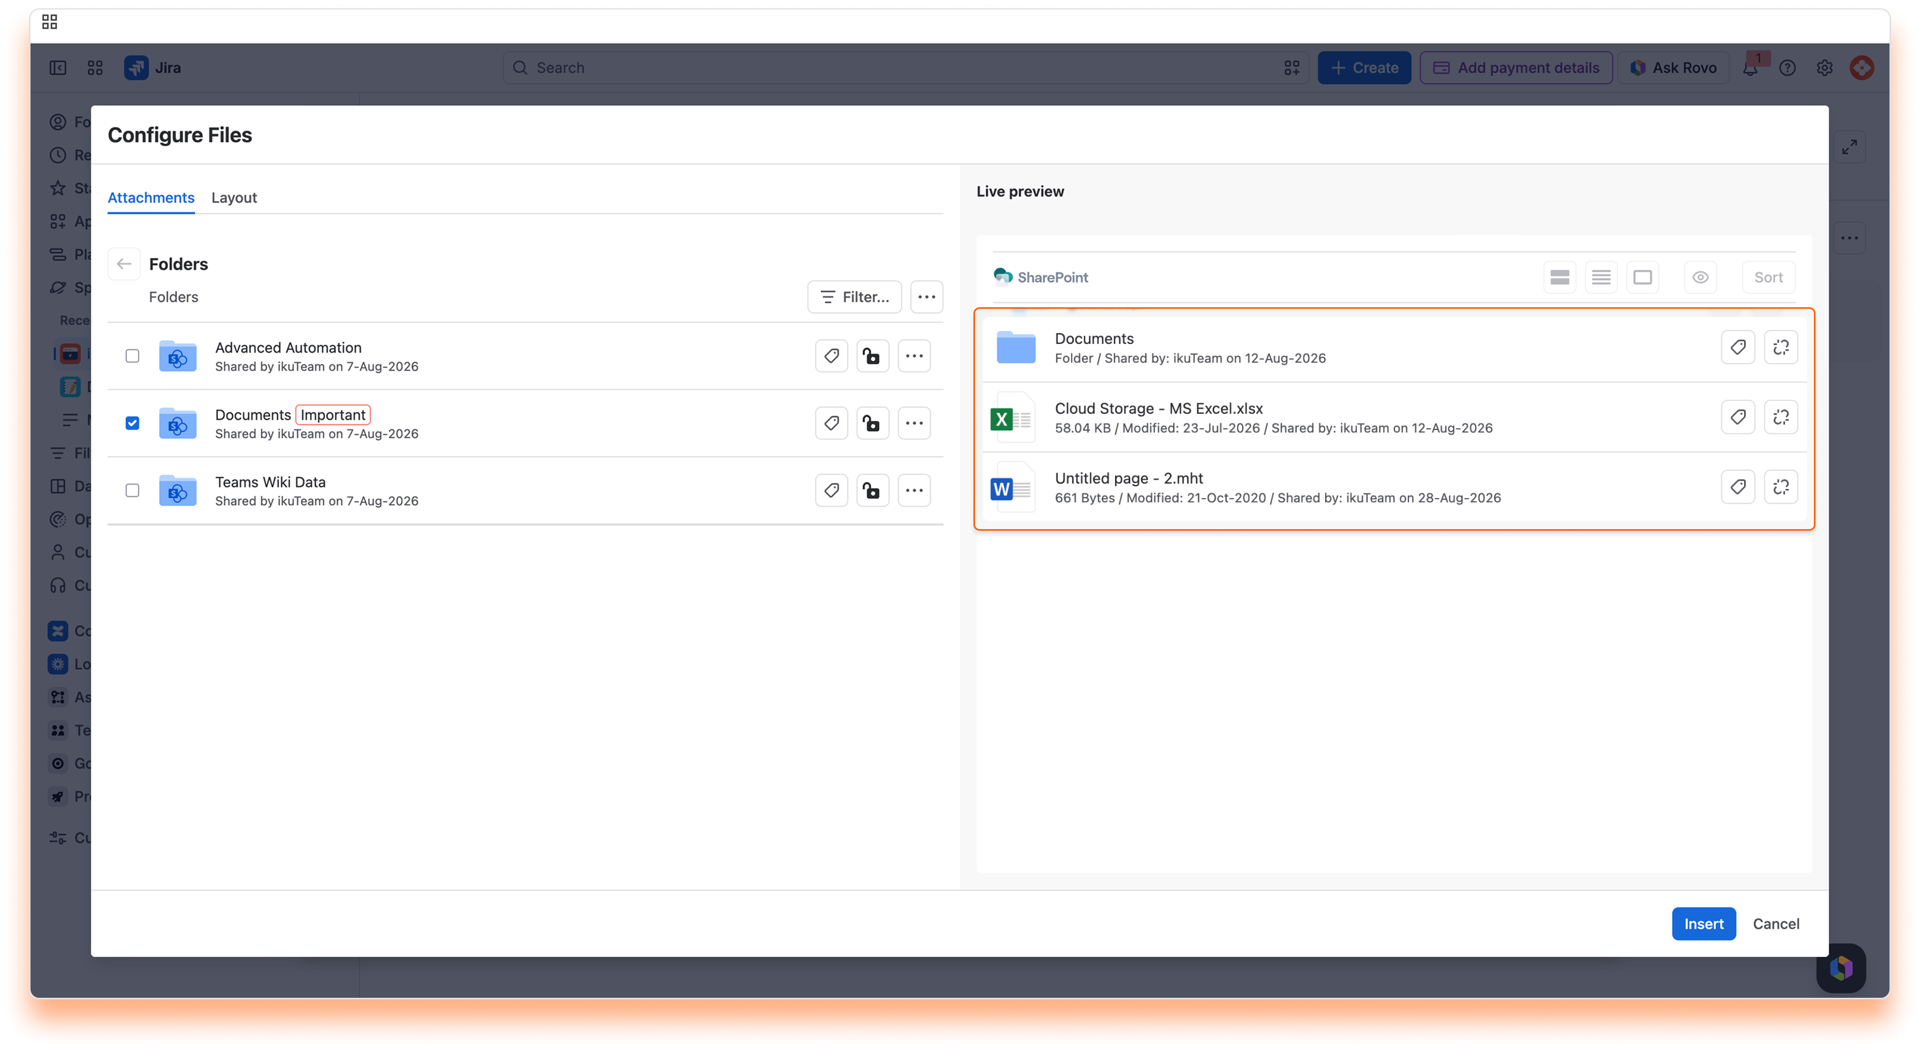
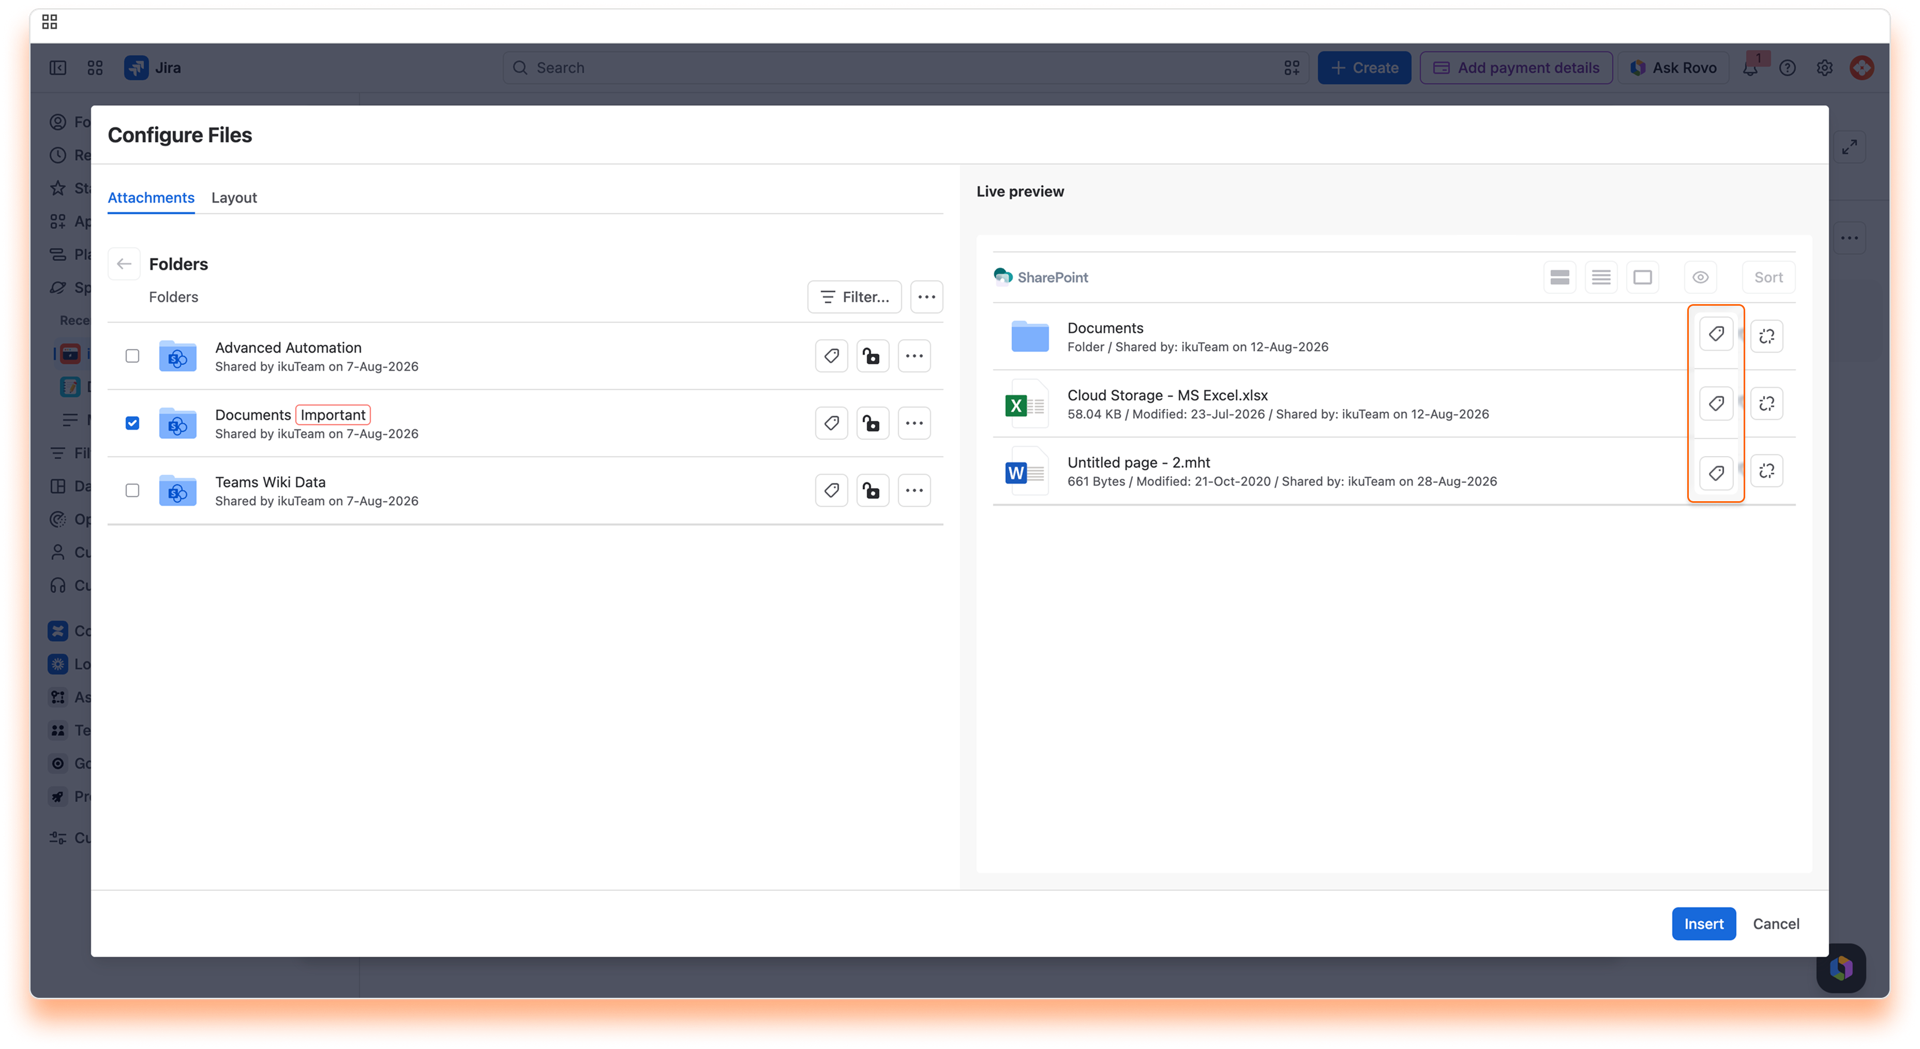
✅ All done. Your attached files and folders are now visible on the work item.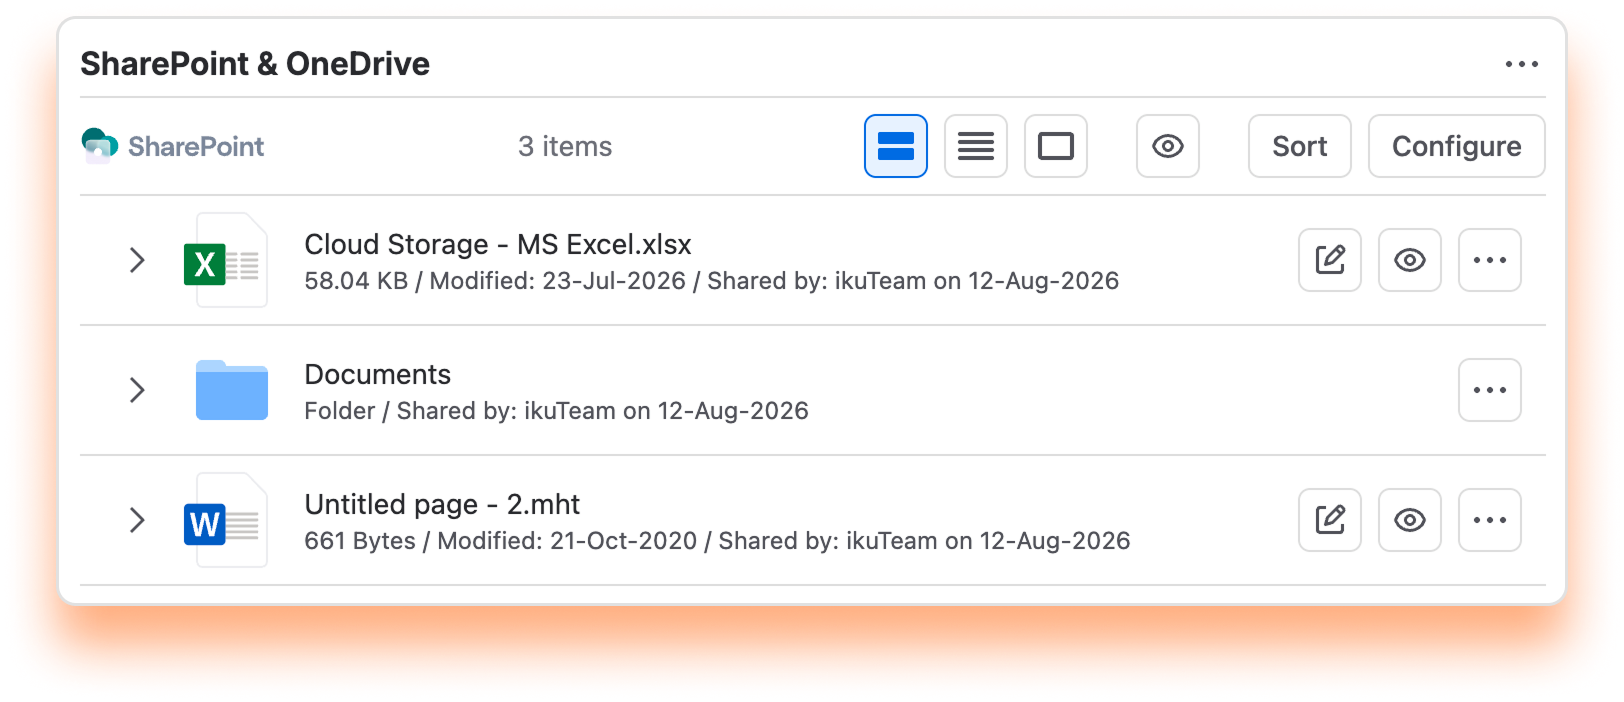
In Jira, you can attach files and folders to your work items directly from the file manager, accessible from your Jira Space board.
Instructions:
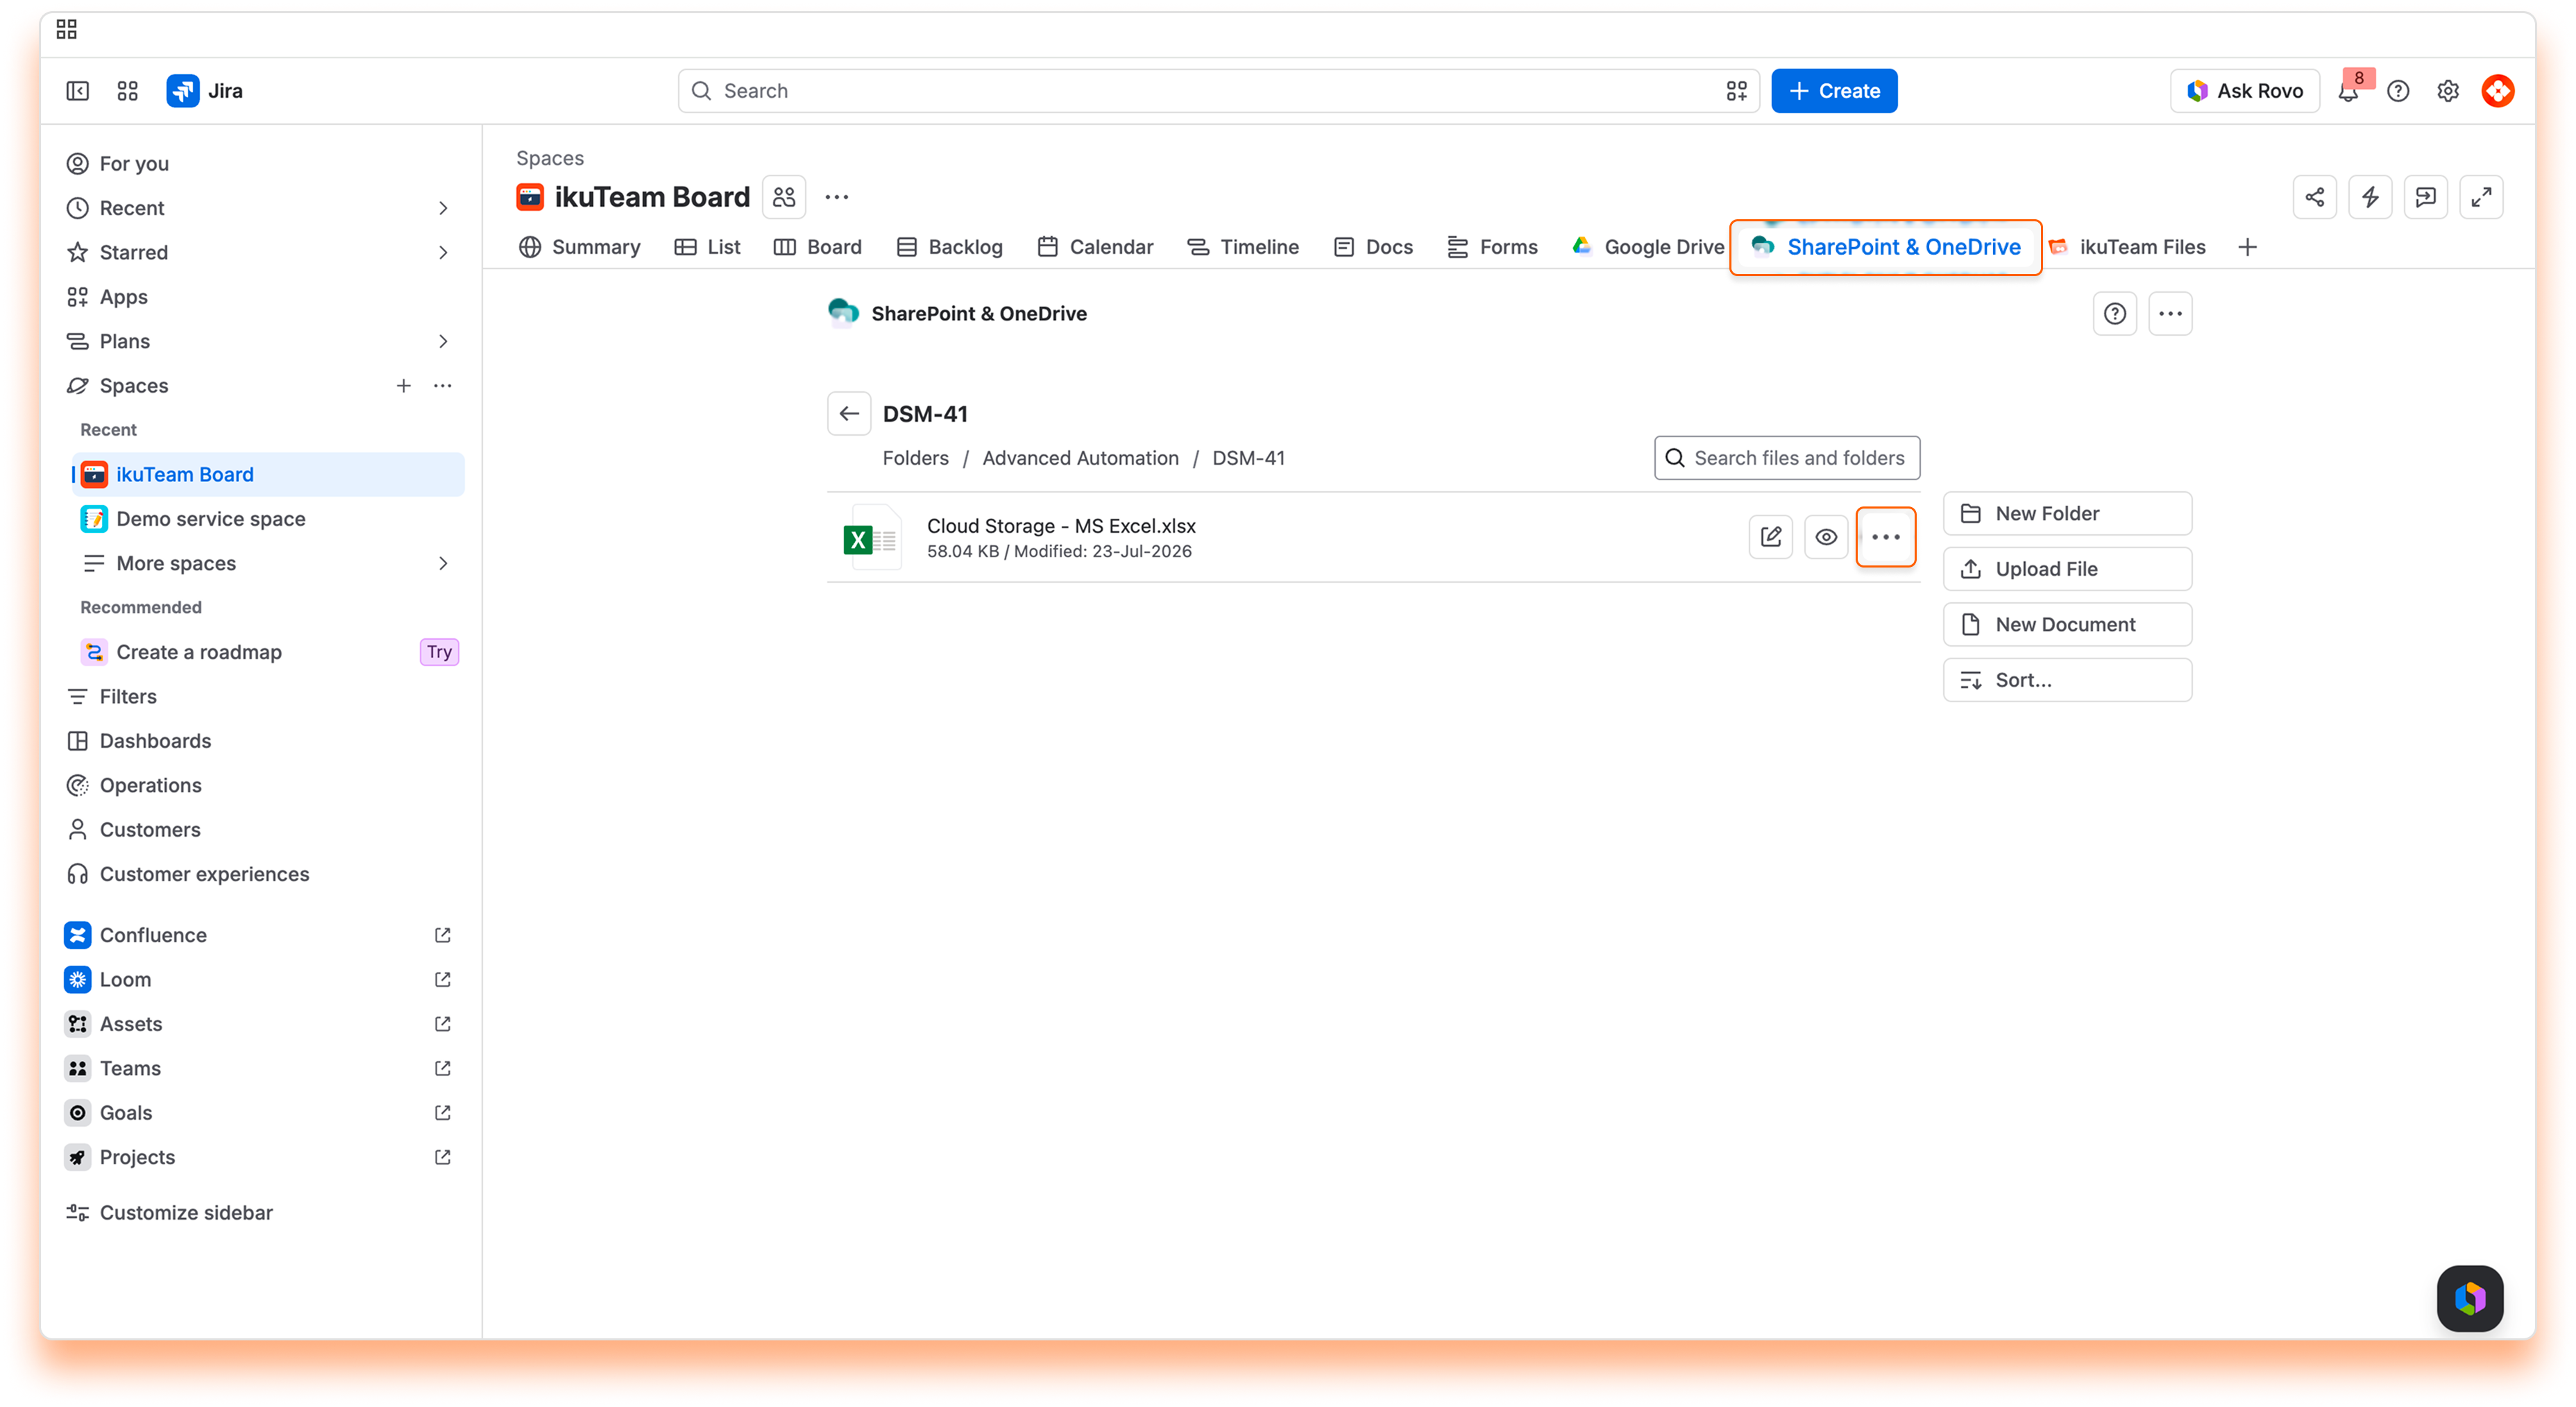
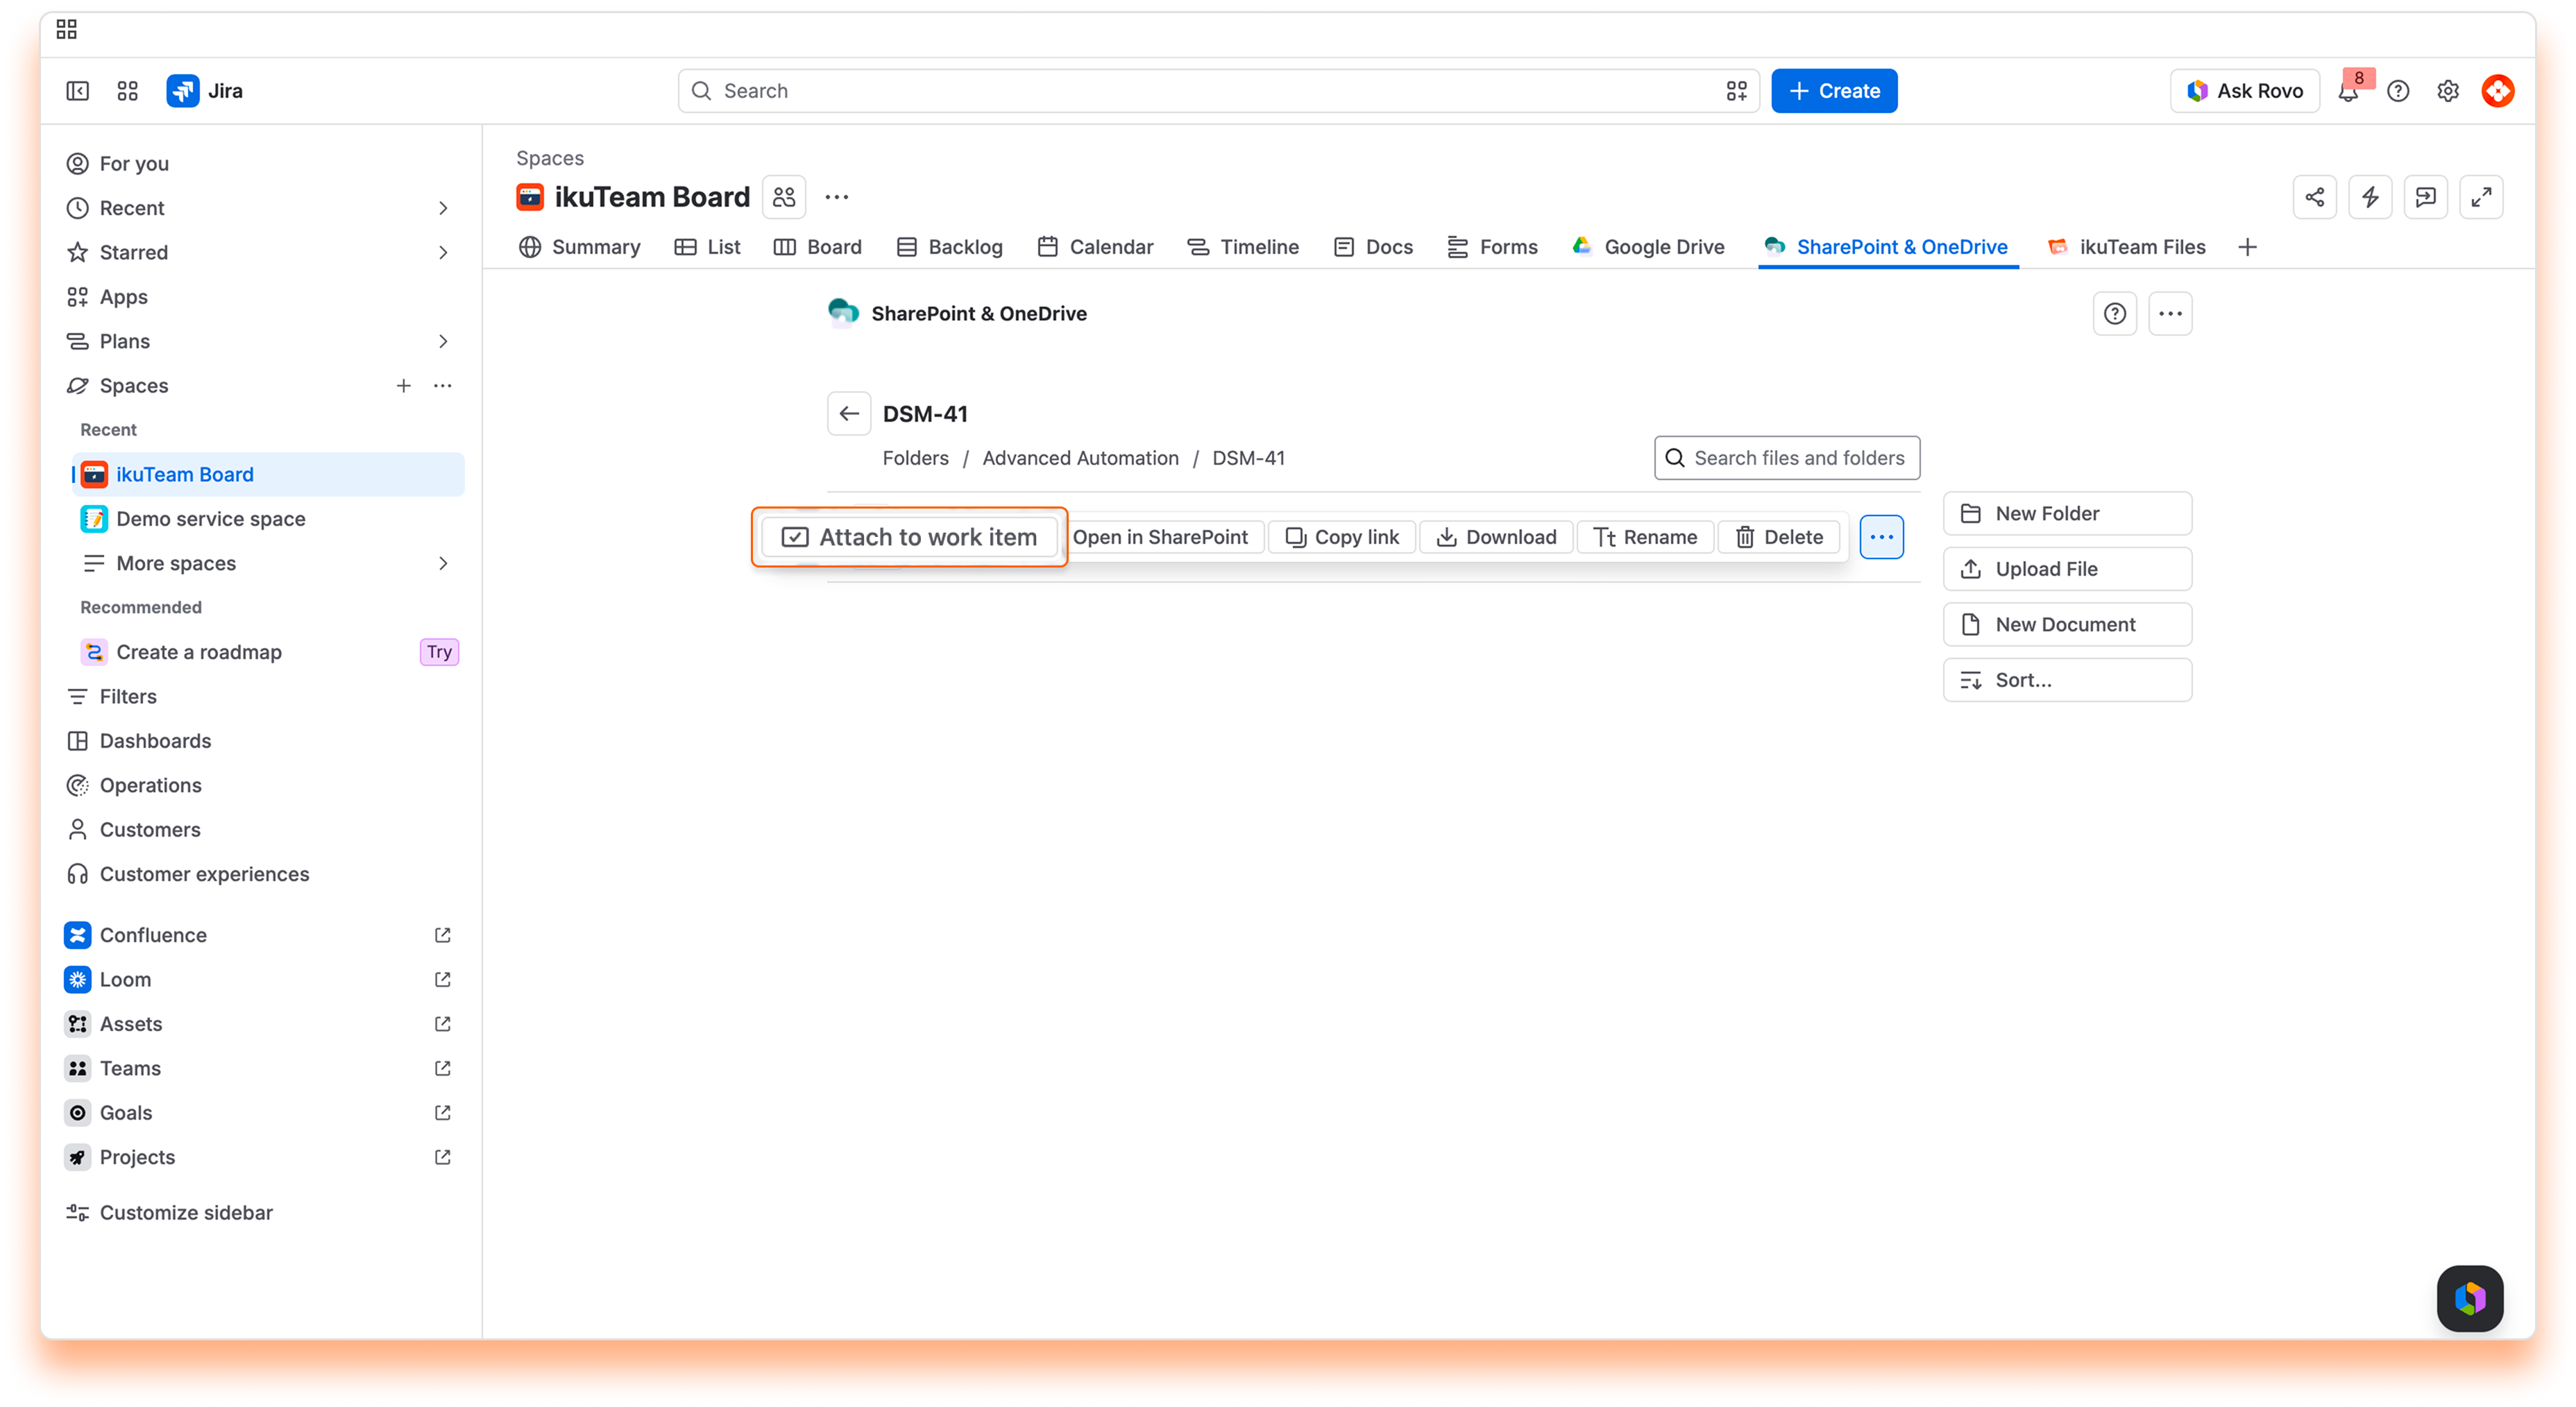
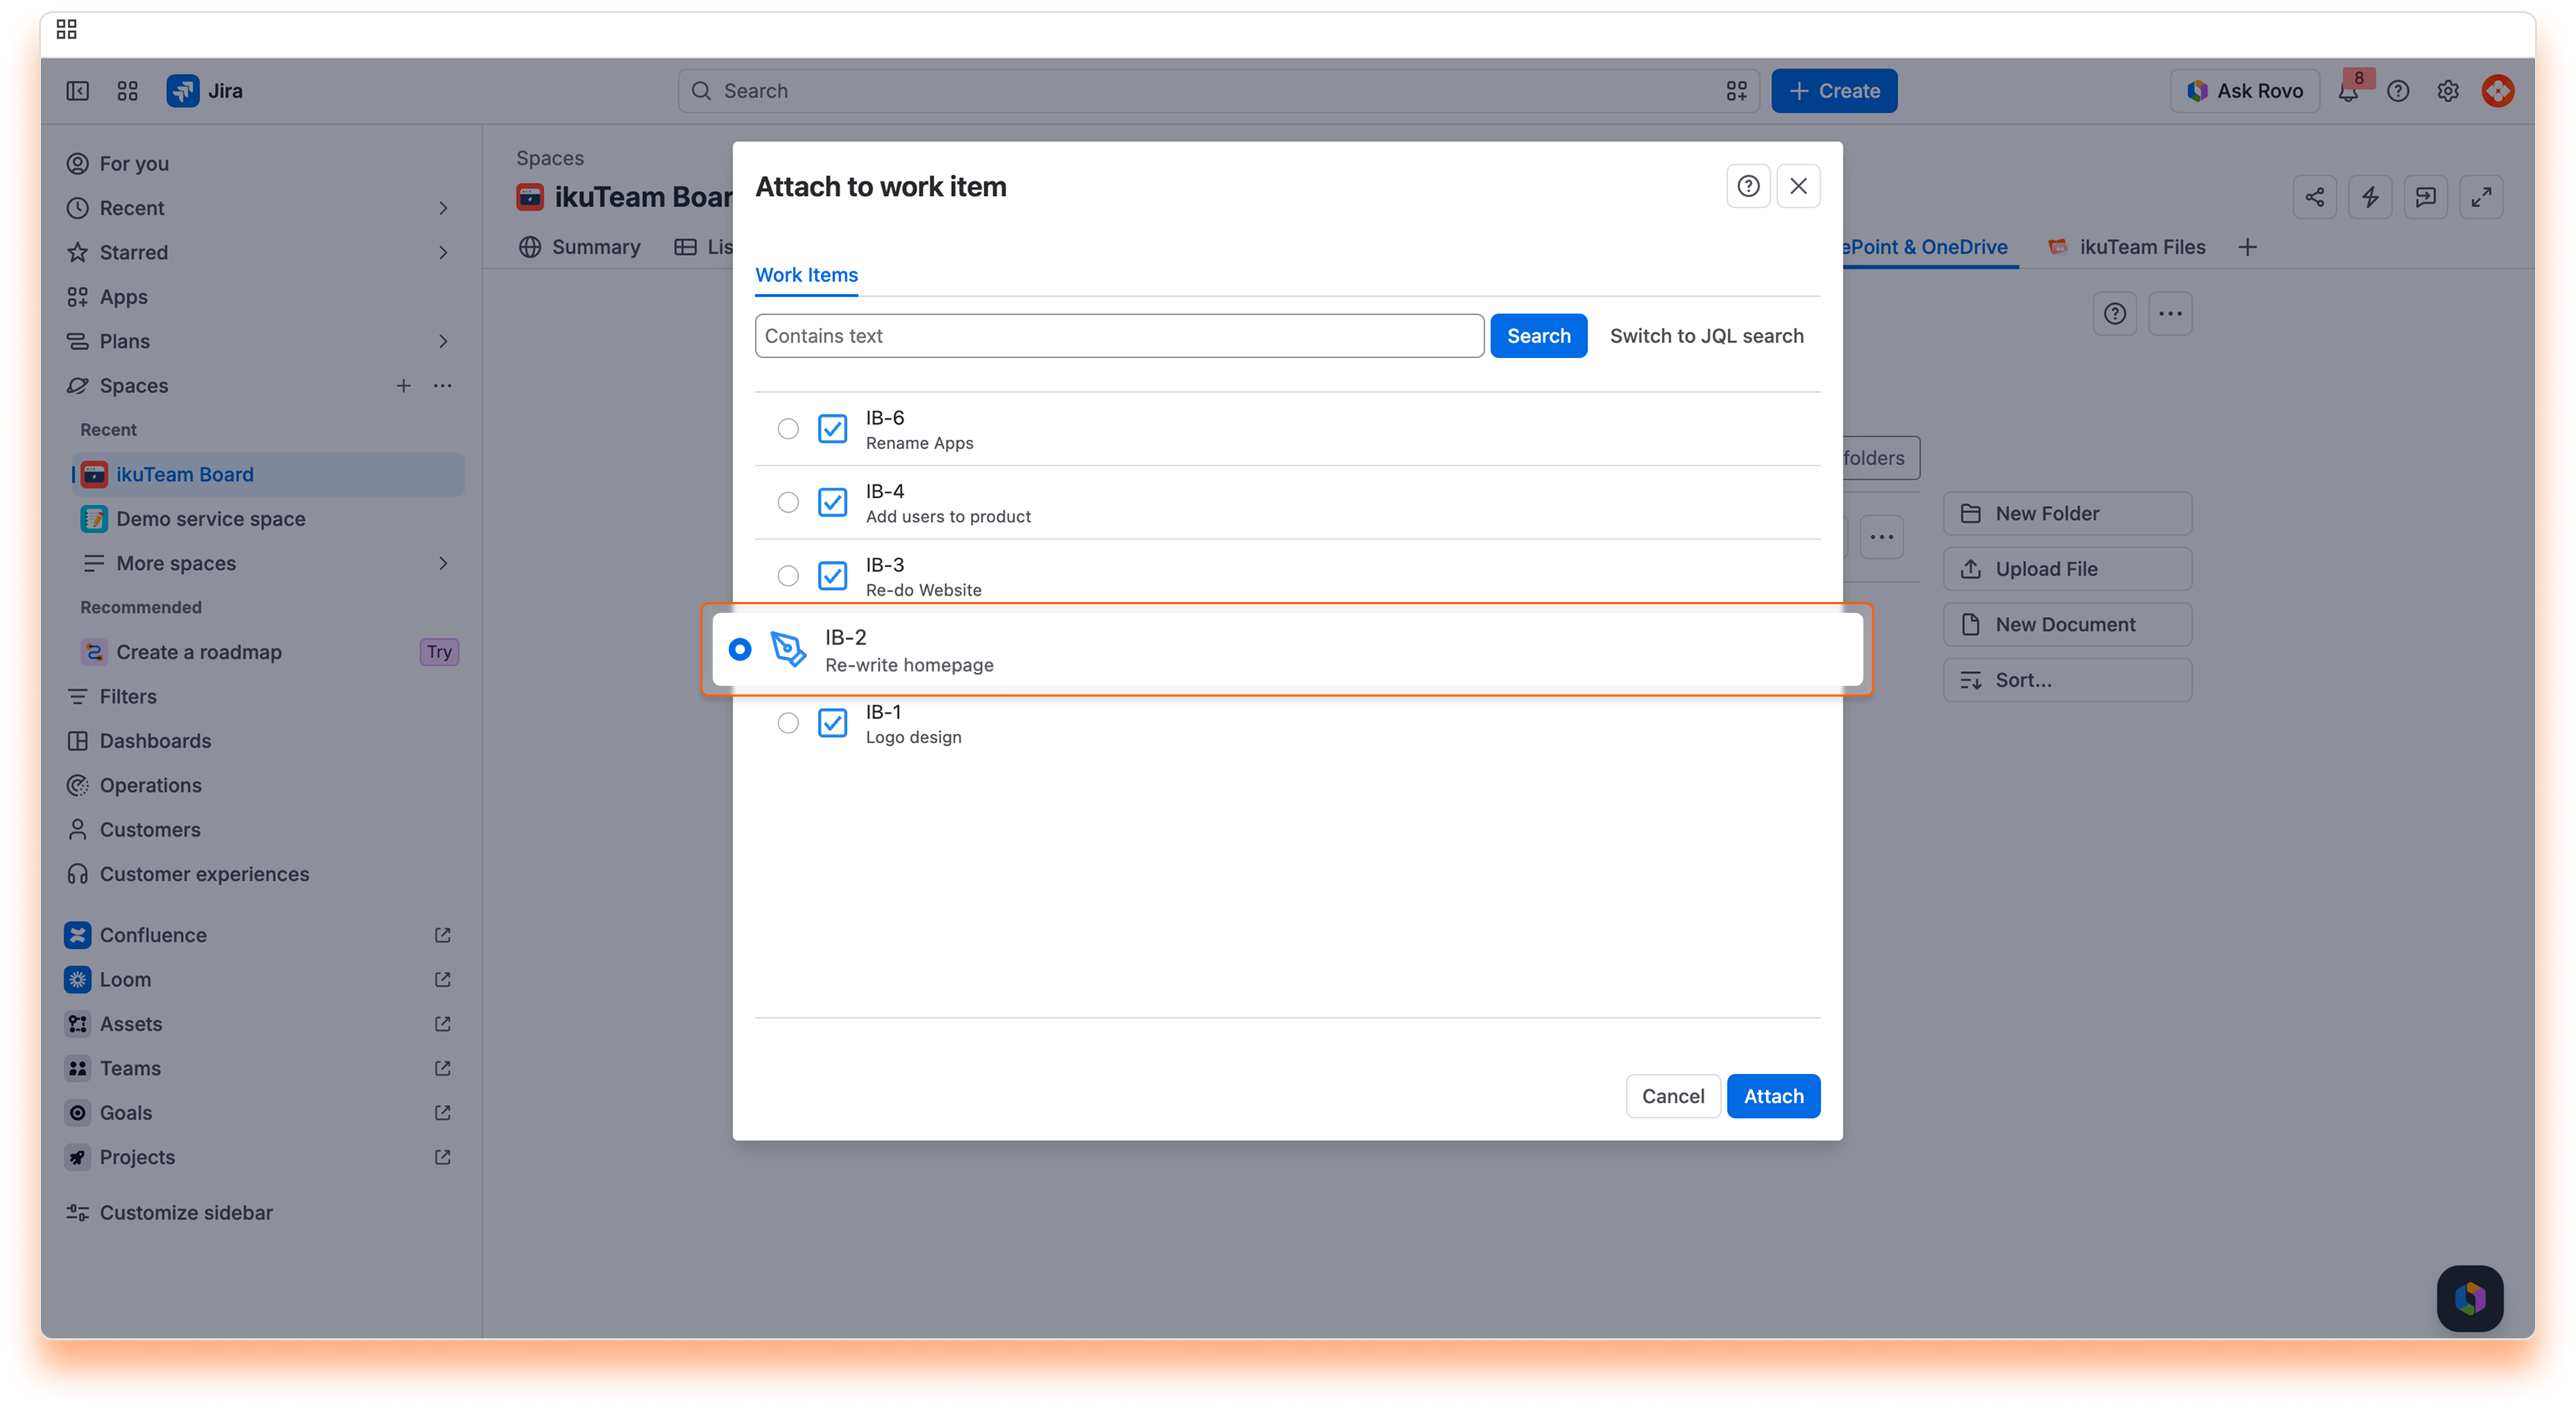
✅ All done. Your file or folder is now attached to the work item. Click the "View work item" button to jump to the work item page.
ℹ️ You need to add the app to the work item page to view the attached files and folders from the file manager.
By default, the files and folders attached to Jira work items use a regular header and appear in the collapsed view to use less space on the screen. It’s easy to preview the file by clicking the arrow to open the expanded view, which uses the width of the page and is 464px tall.
The Admin can set different defaults, and you can customize individual work items.
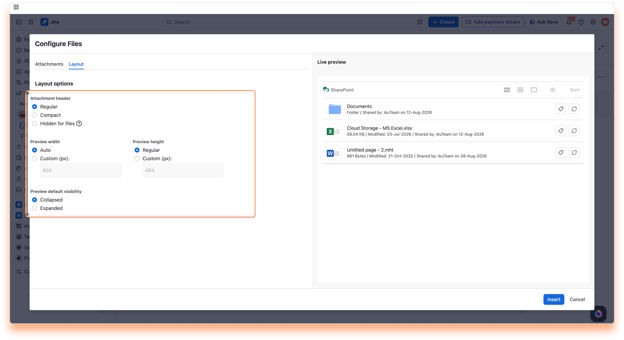
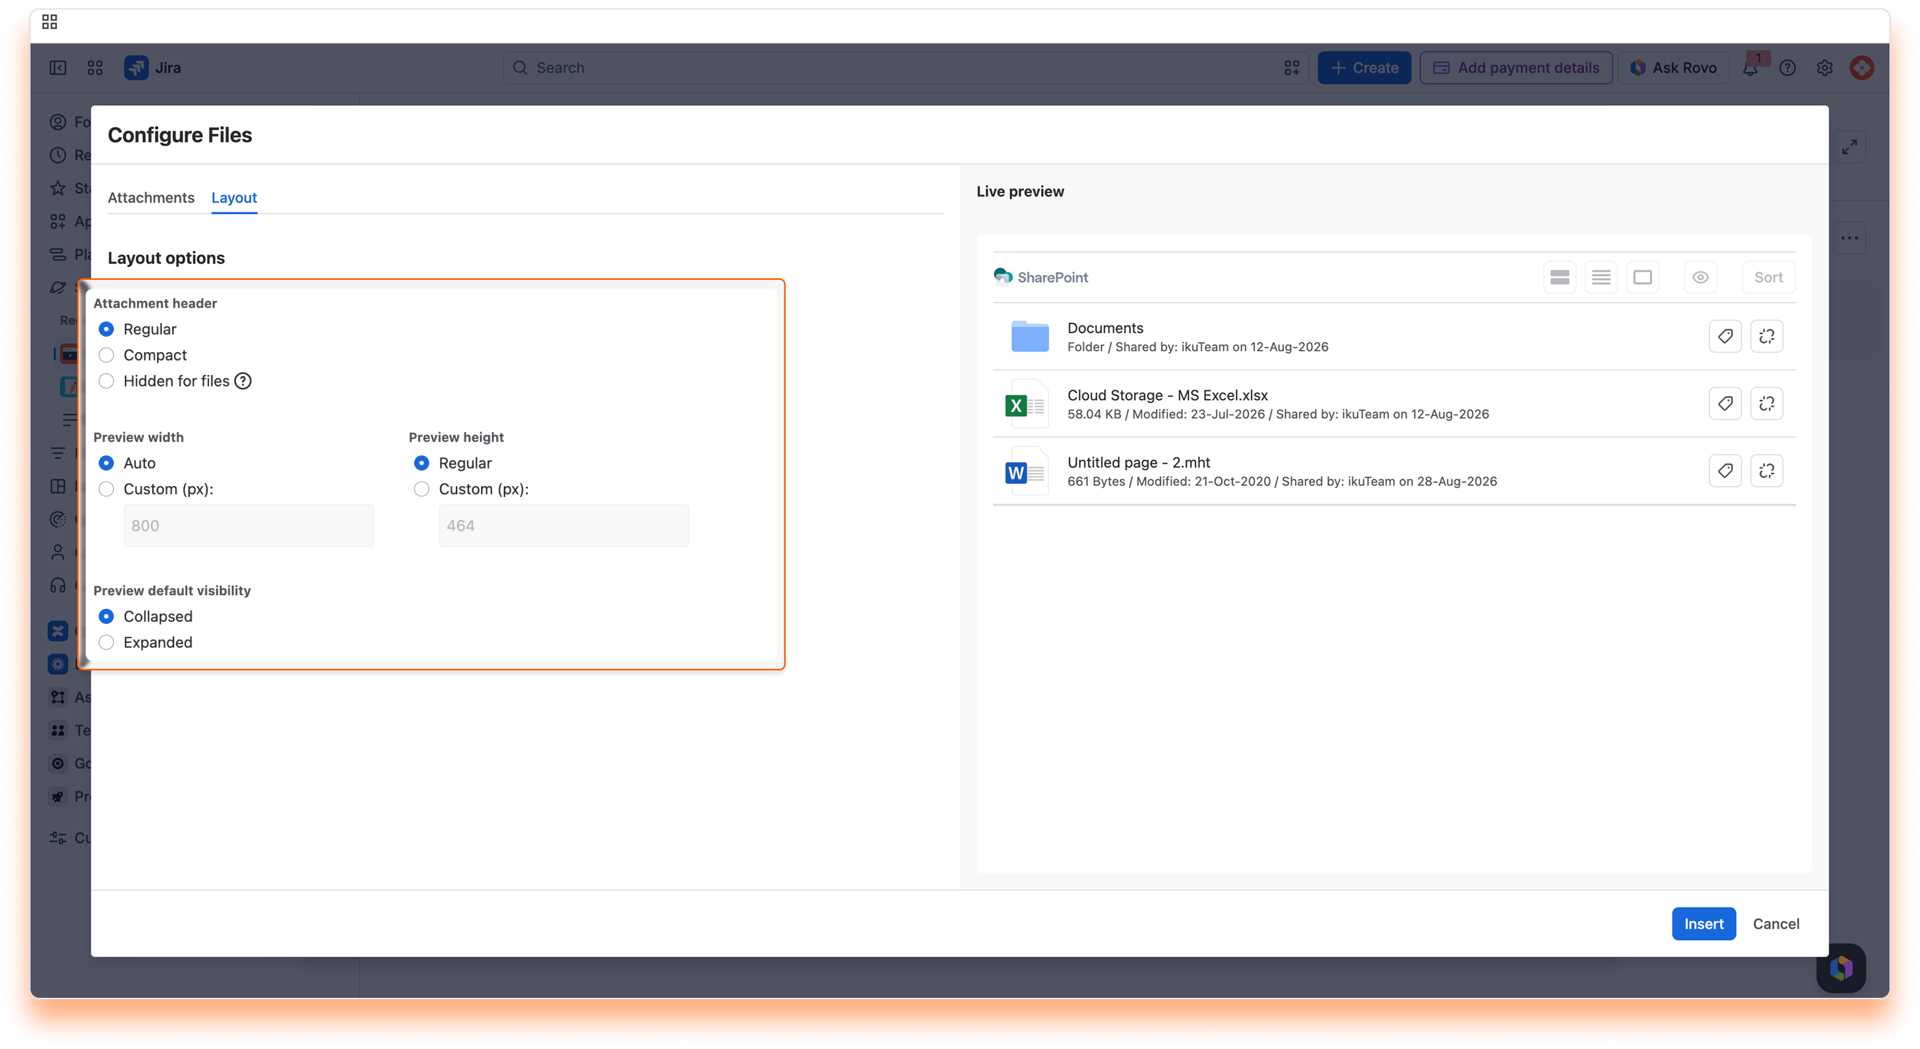
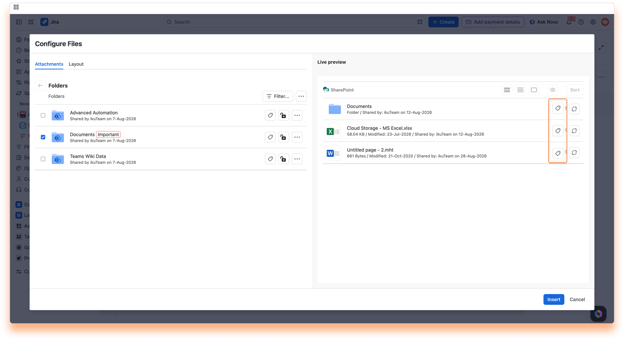
You can set different layout settings when attaching files and folders to your work item or by clicking the “Layout” button when you already have something attached. You can preview the changes in the “Live Preview” panel. When you save the changes, you’ll see the new layout applied to your work item page.
In “Live Preview“, you have an “Edit tag” button for files and folders. Select it to add a tag to any item, or to change or remove a tag you added earlier.
A tag is a short label that sits next to the file or folder. It gives an item context that its name alone does not carry, for example Approved, Draft, Invoices, or a client or team name.
You can also edit the layout of attached files and folders by clicking the “Layout” button in the app.
Select the size for the header of the attachment:
Select the height for the preview:
Select the width for the preview:
Select the behavior for the preview:
You can remove specific files and folders attached to a work item at any time.
Instructions:
✅ It's all done. Your files and folders are safe and sound in your storage place, but they are no longer connected to the work item.
⚠️ This action is undoable, but you can attach the files and folders again.
You can also hide the entire app on the work item page while keeping all the files and folders attached.
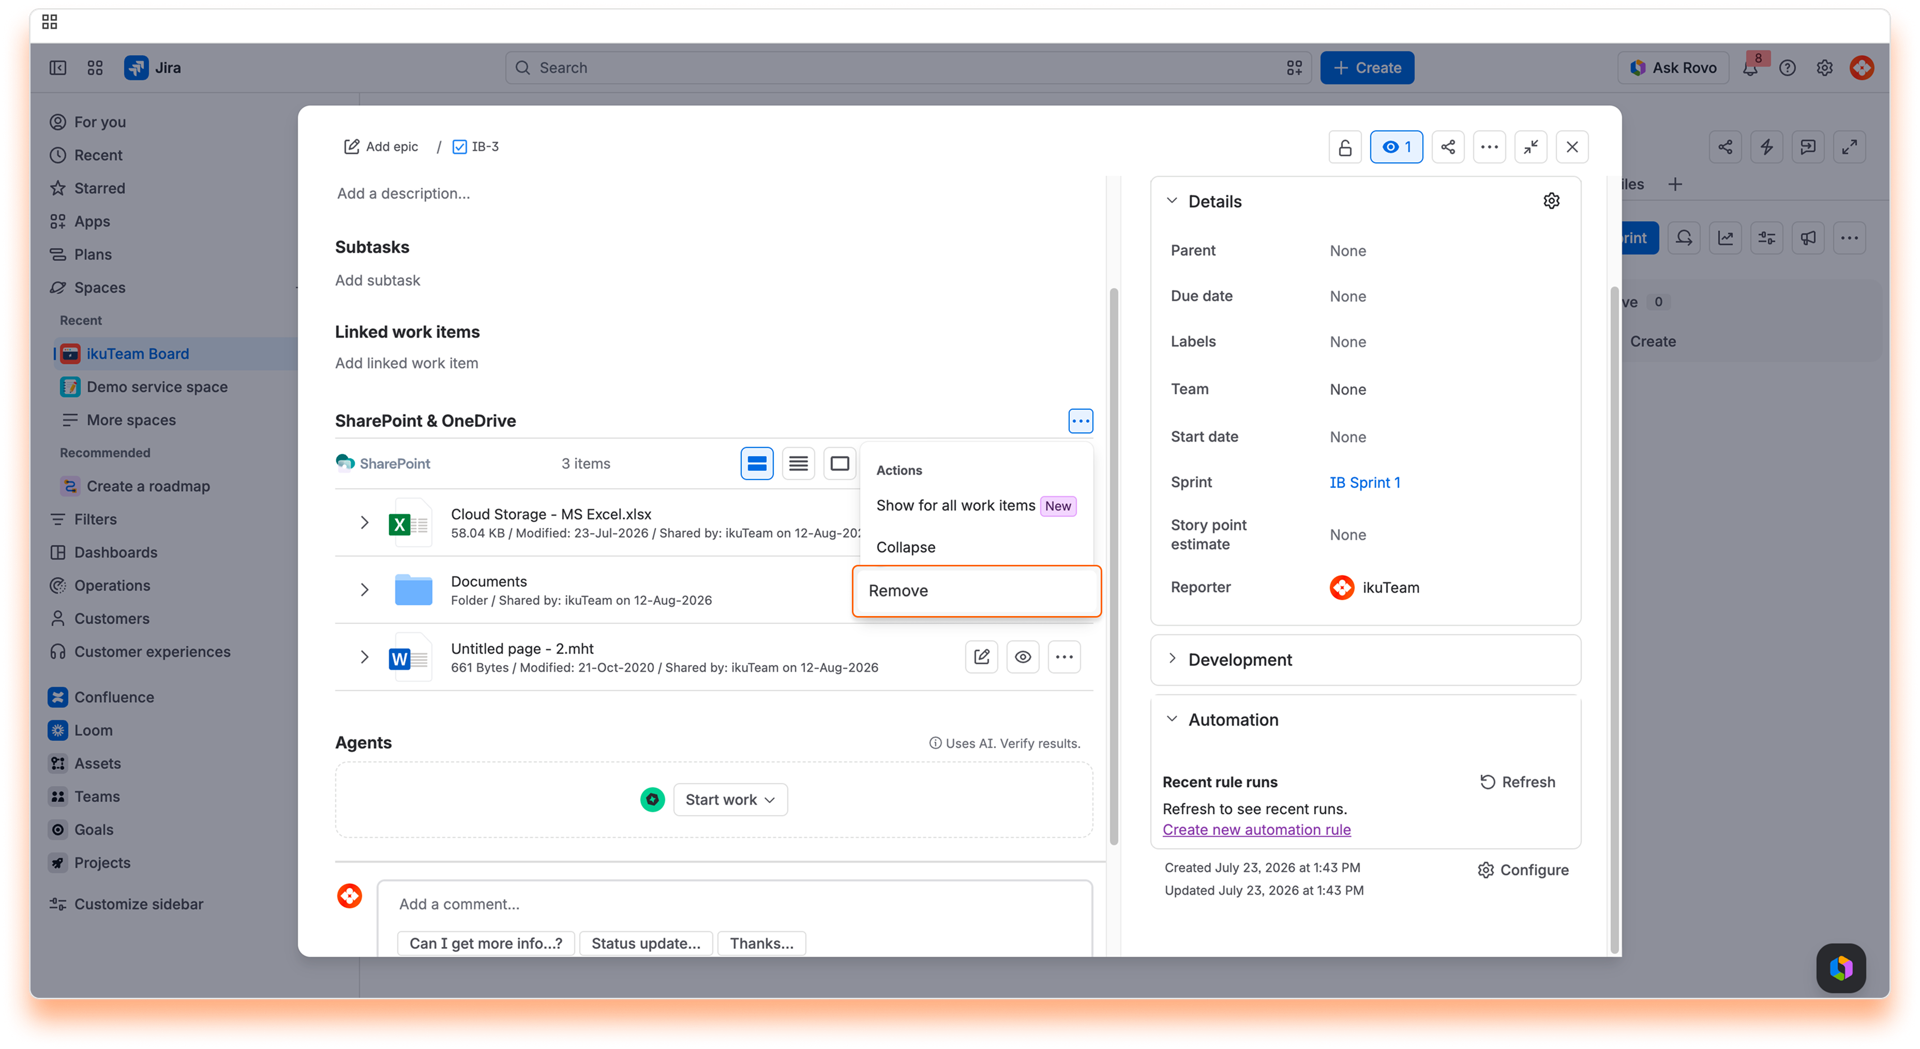
Instructions:
✅ All done. Your files and folders are still attached to the work item but not visible. To show them again, click on the view app actions button and select SharePoint & OneDrive.
Now you know how to attach files and folders to your work items. Don’t forget you can also attach files and folders for your customers (Jira Service Management projects only).
If you still have questions about the topics covered on this page, visit our support portal and send them to us. Our team is always happy to help.
Learn how to attach files and folders to your customers (JSM) using the SharePoint Connector for Jira app.
The SharePoint Connector for Jira app on Jira Service Management spaces works the same way as in the regular Jira spaces, with some extra features. You can attach files and folders to share knowledge with your team, and now you can also do it for your customers.
ℹ️ This feature is ONLY available in the Advanced version of the SharePoint Connector for Jira app.
ℹ️ The “Customer Access for Jira Service Management“ should be enabled from the app admin settings for the customer to be able to see the app section on the portal.
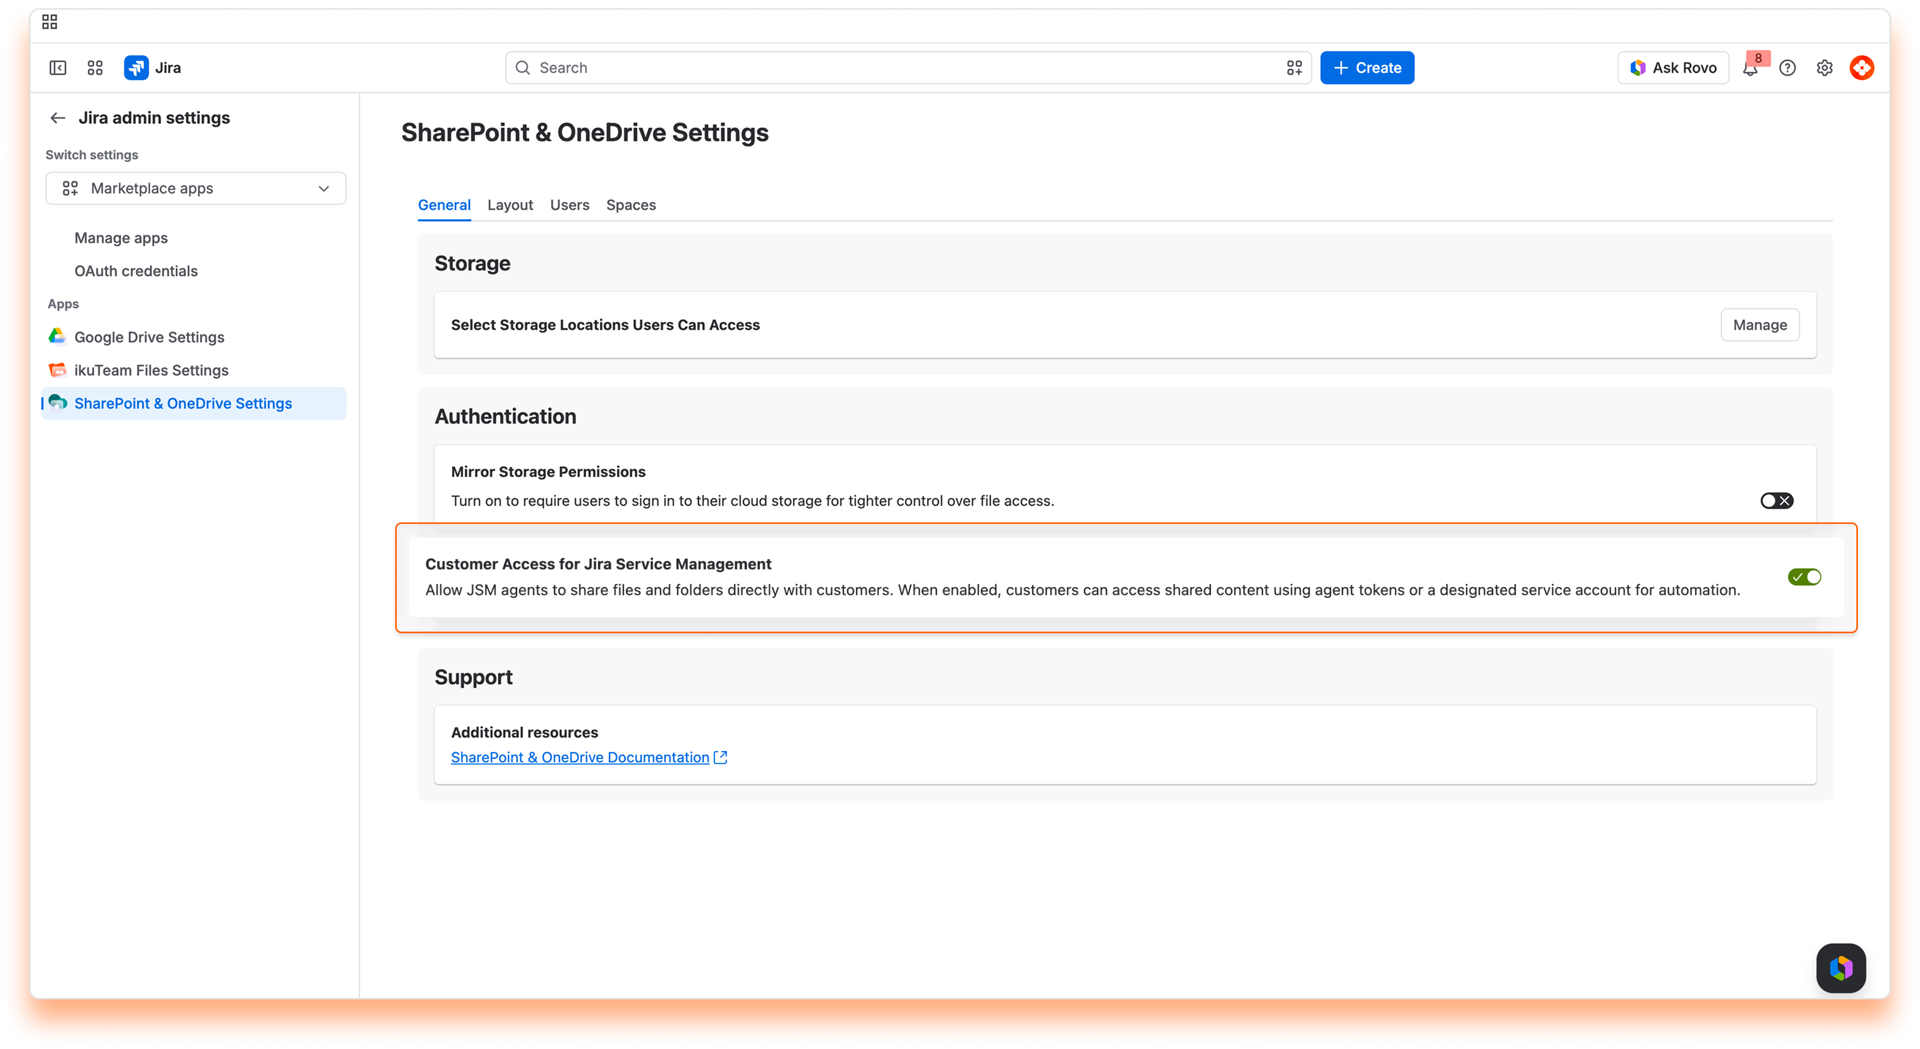
This page will show you how to do just that from the work item view and the file manager while setting the appropriate permissions. This will help you and your team keep all the information updated and in one place. If you only want to attach files and folders for your team, check the Attaching files and folders to work items page.
By default, Jira hides installed apps. So, the first step is to add the SharePoint Connector for Jira app to your work item.
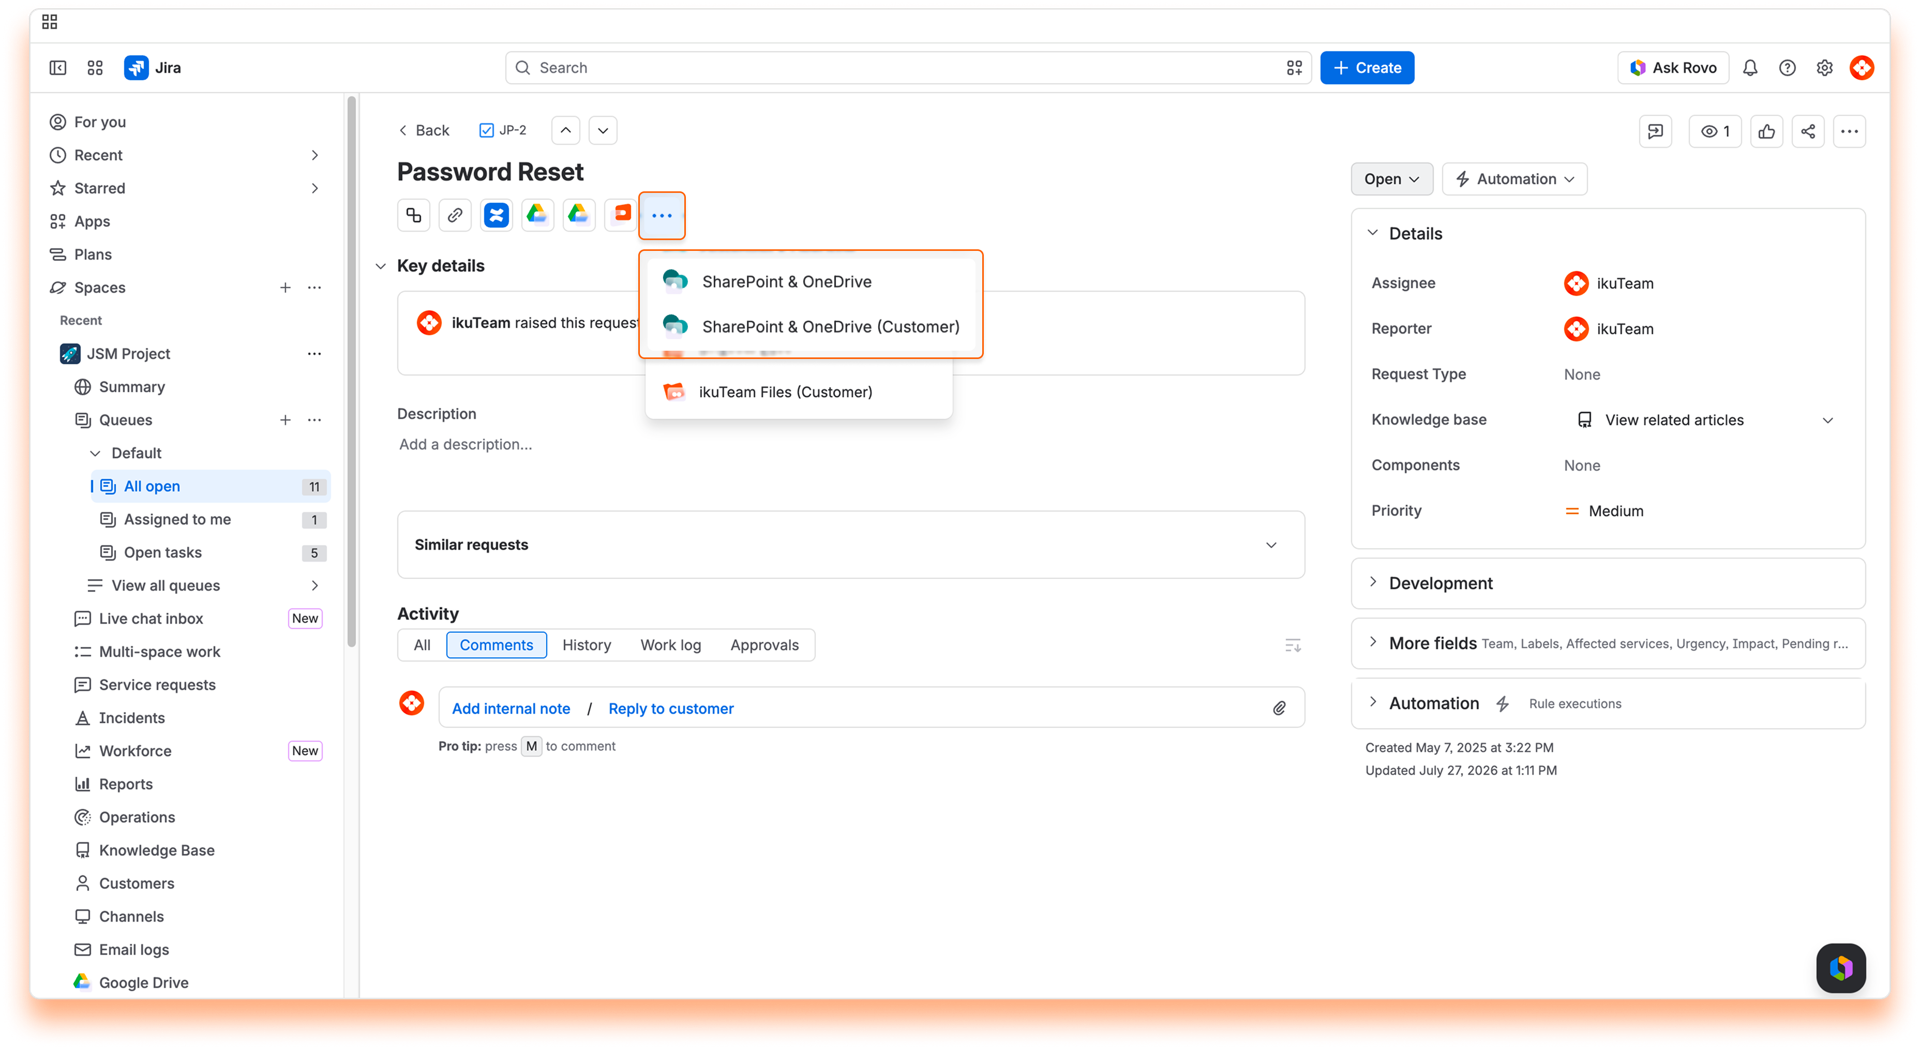
Instructions:
Click the “SharePoint & OneDrive (Customer)” button below the work item summary.
✅ And that's it. The app will load below the work item description and always appear when you return to that work item (but you can hide it again).
ℹ️ Remember to add the app to the work item when you attach files and folders from the file manager.
With the app in place, you can now start attaching files and folders. Click on the Configure button and get started.
Instructions:
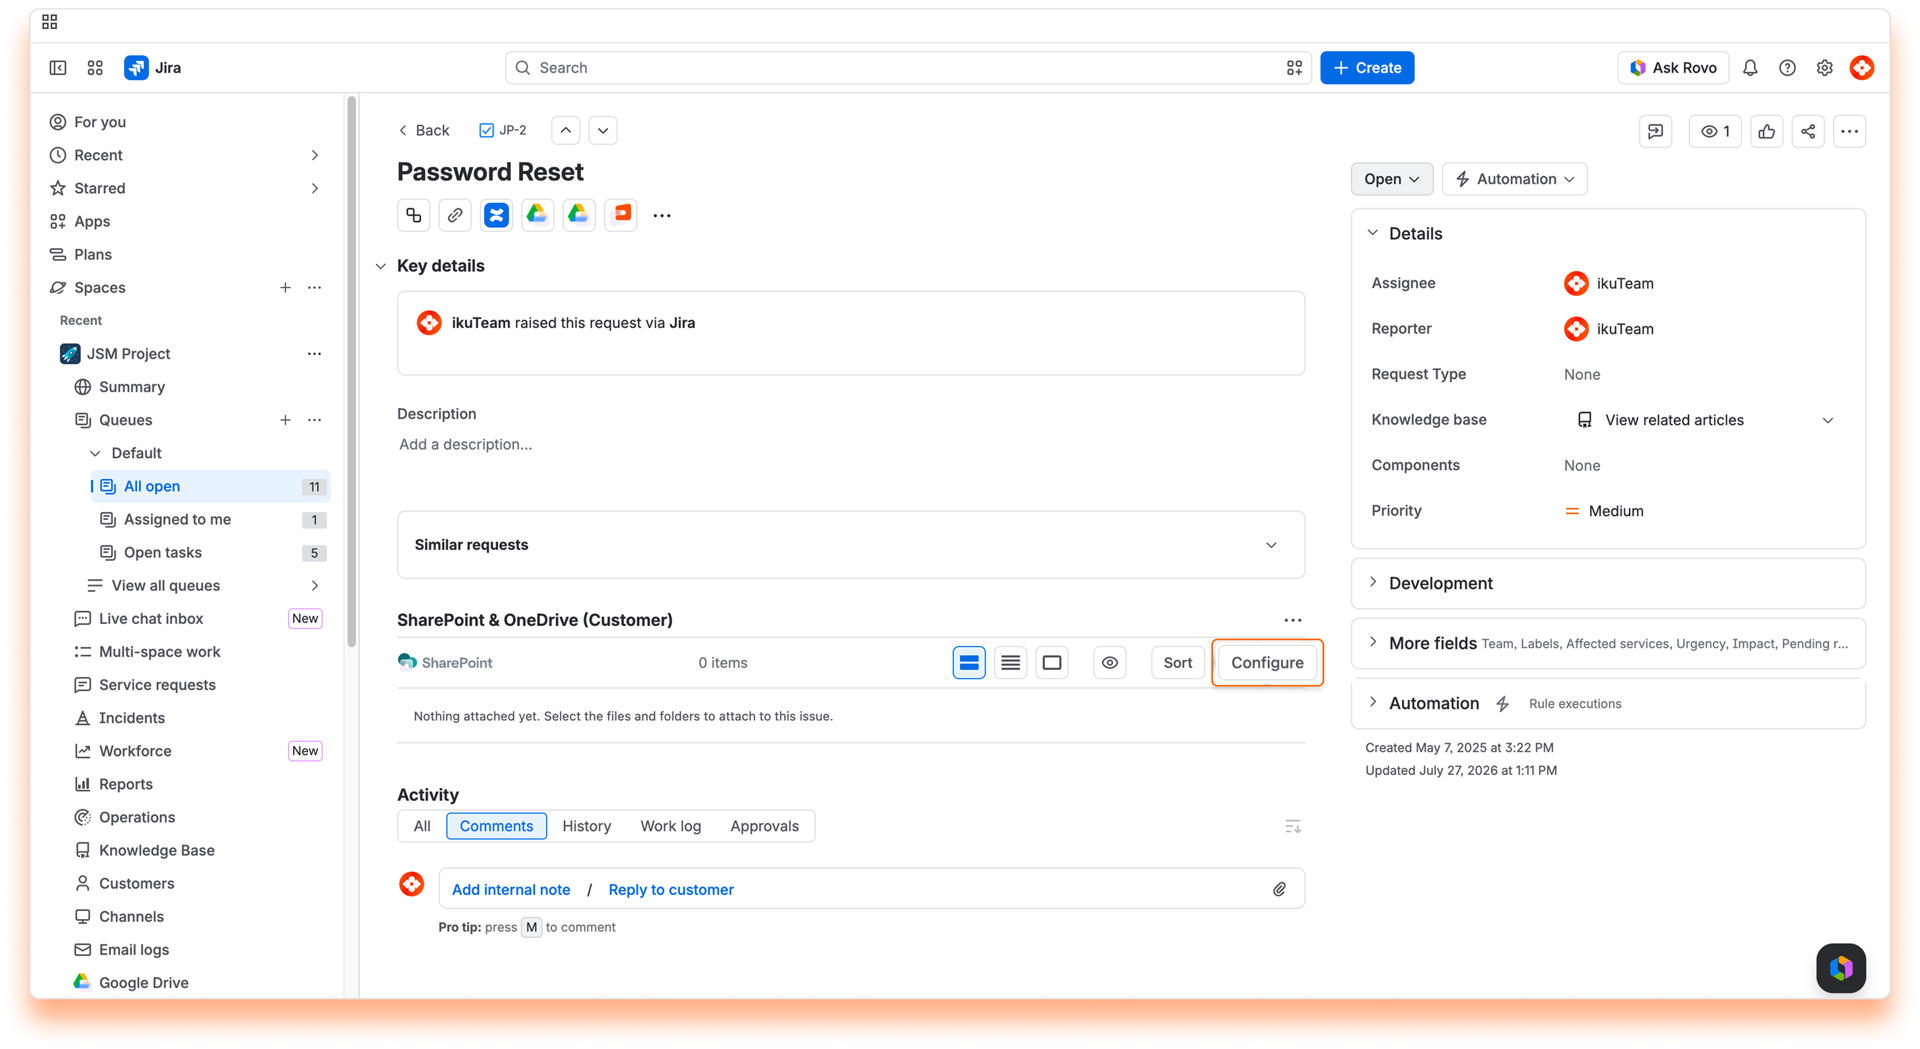
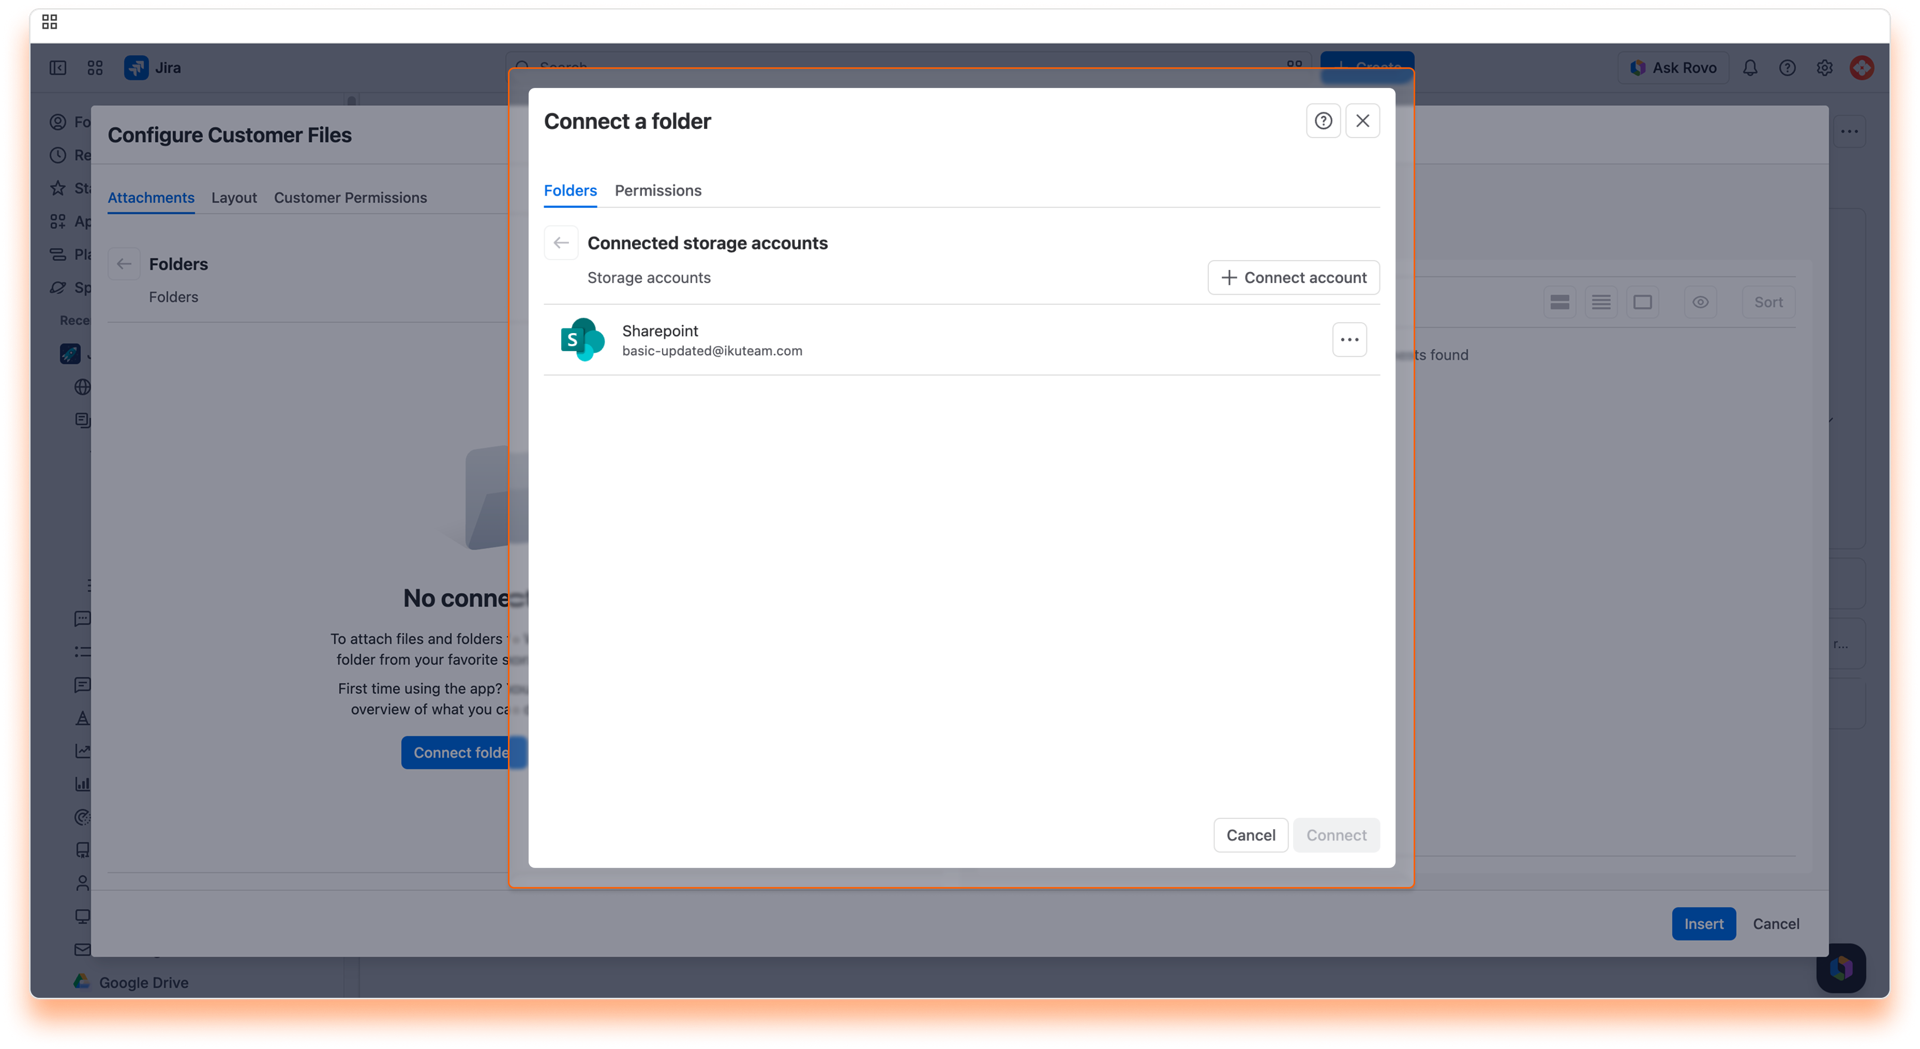
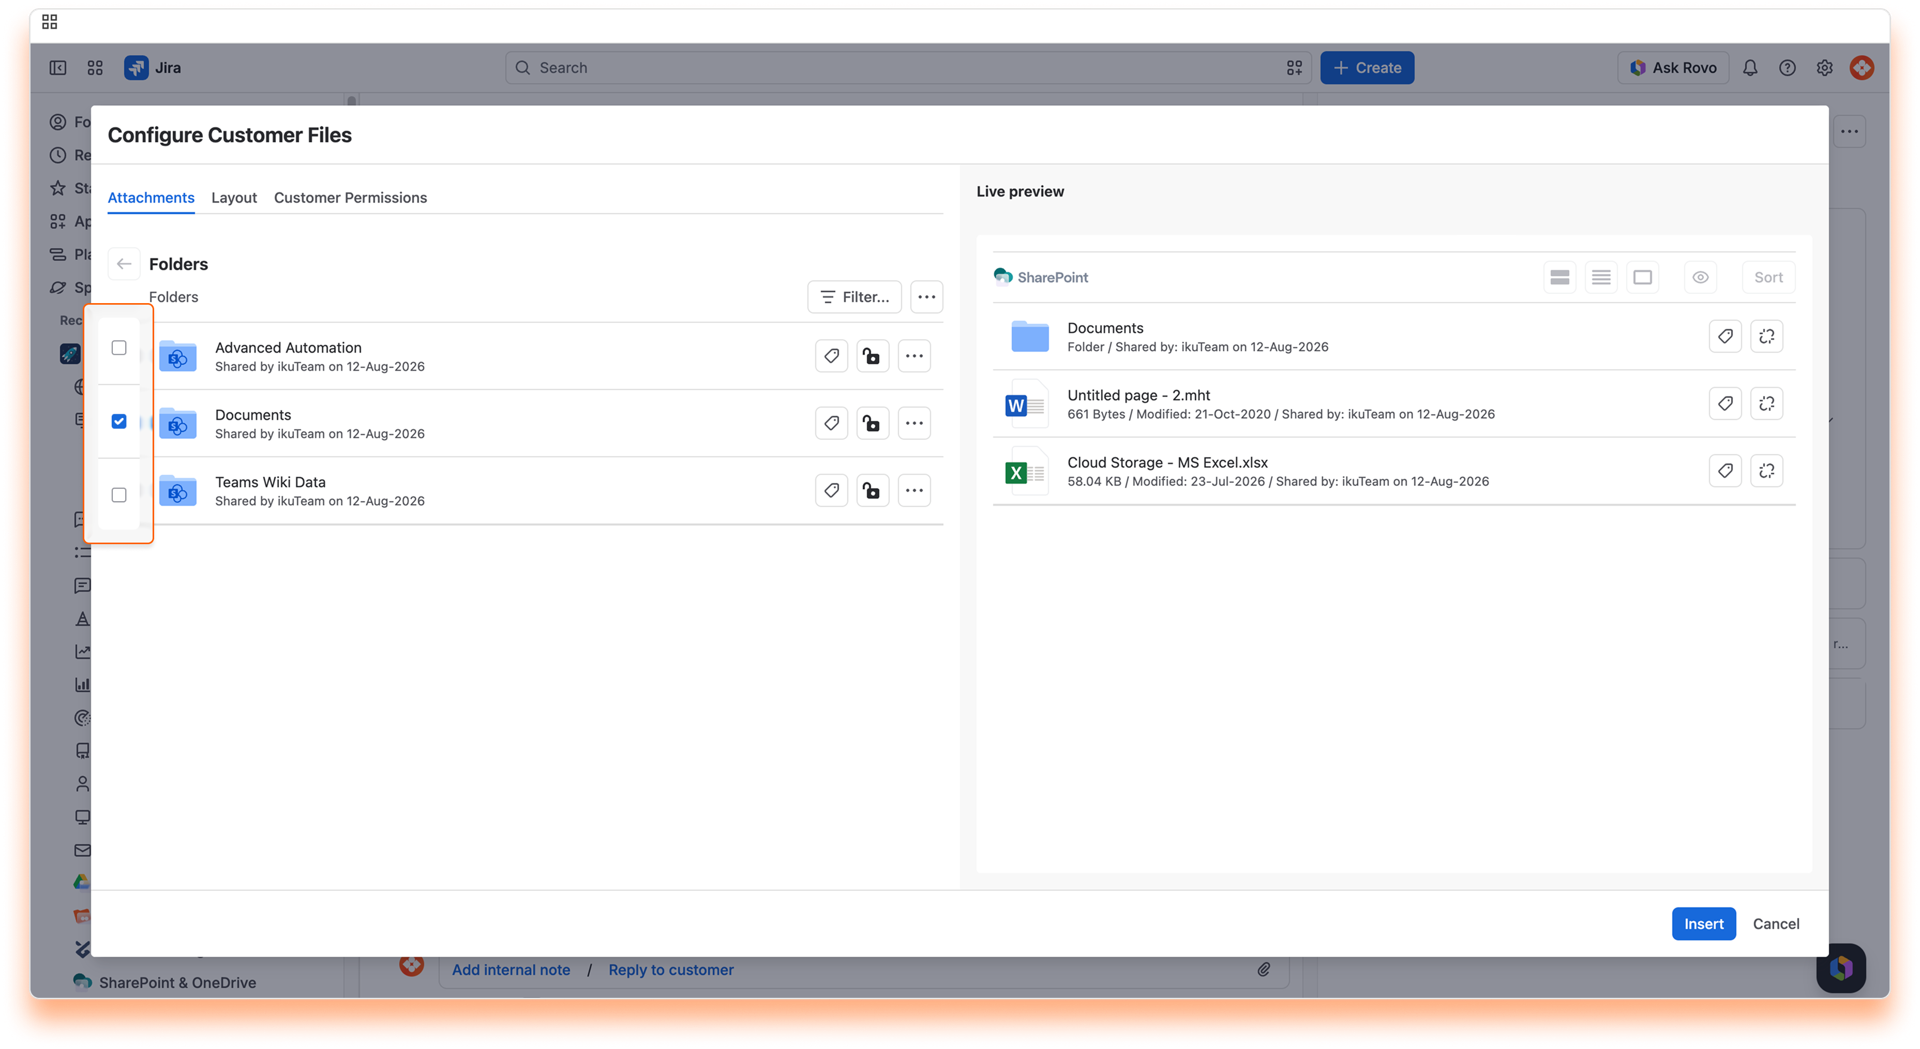
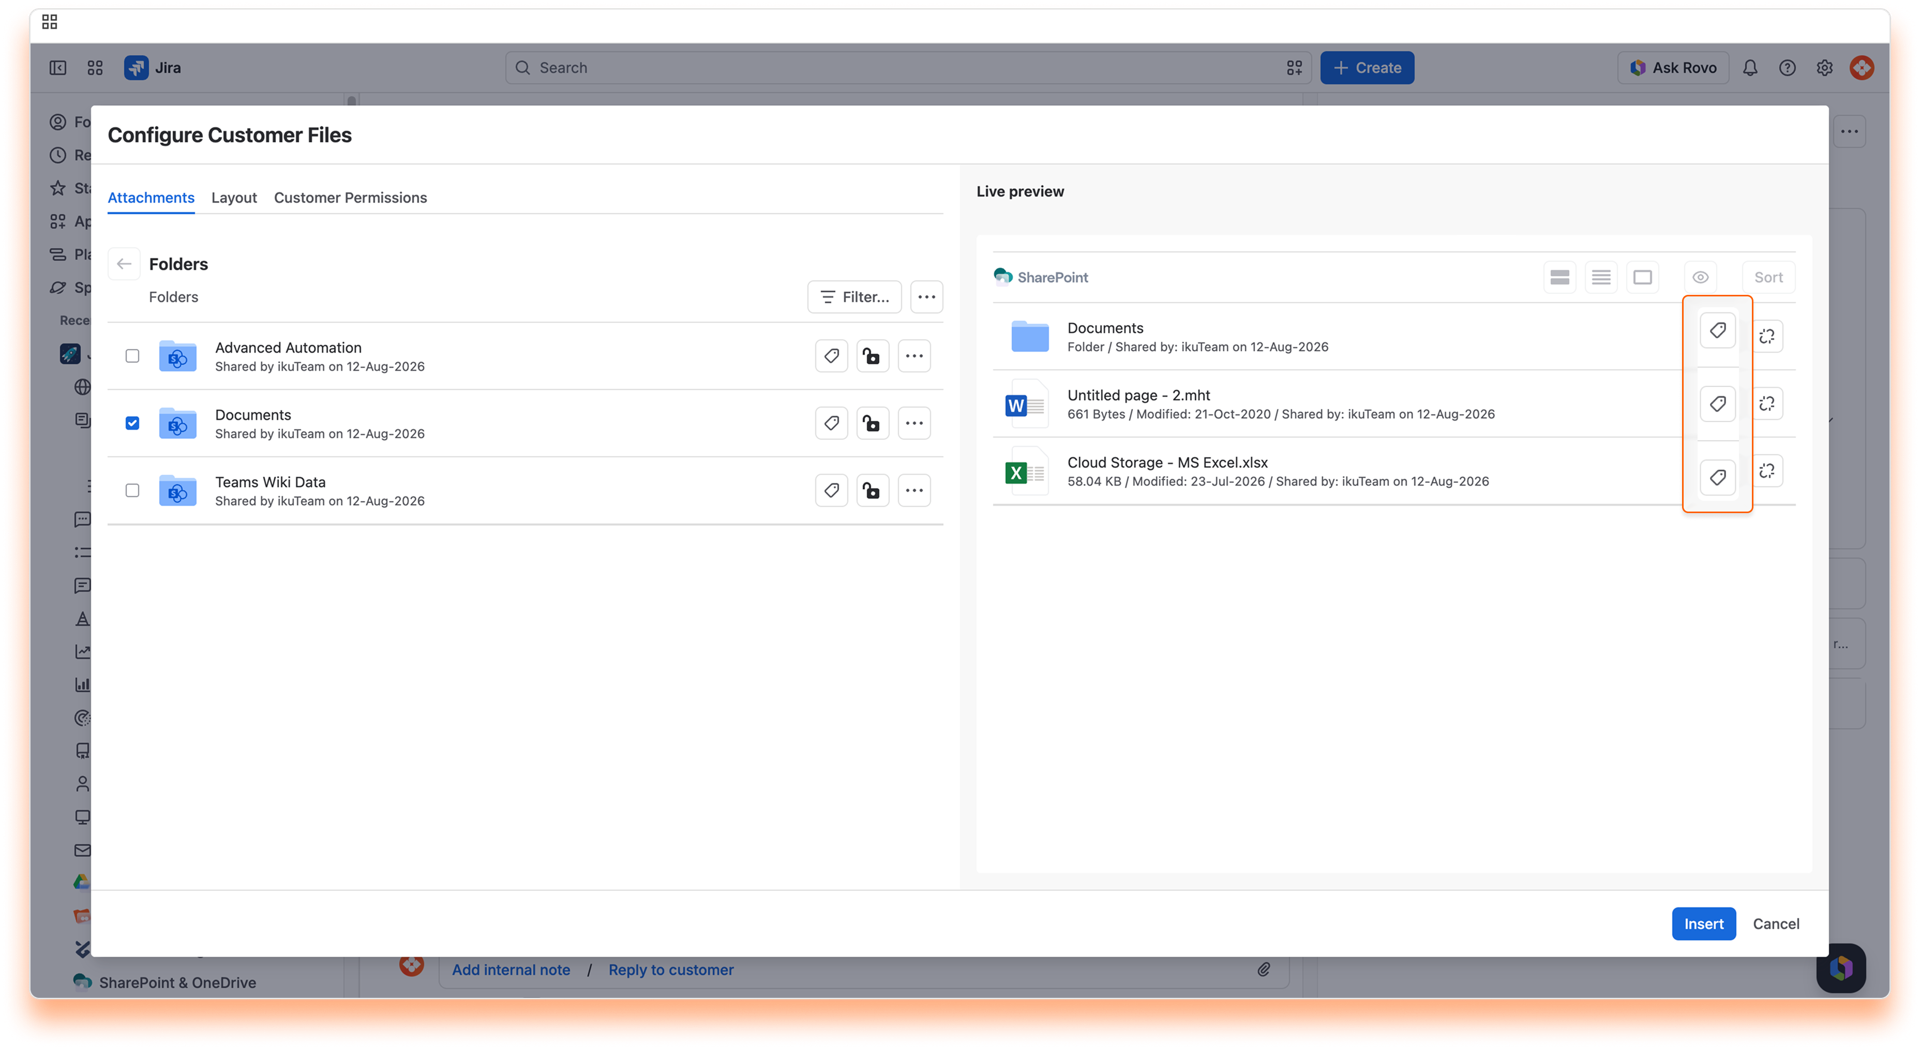
ℹ️ Customers can't download or edit files attached to the work item by default.
Instructions:
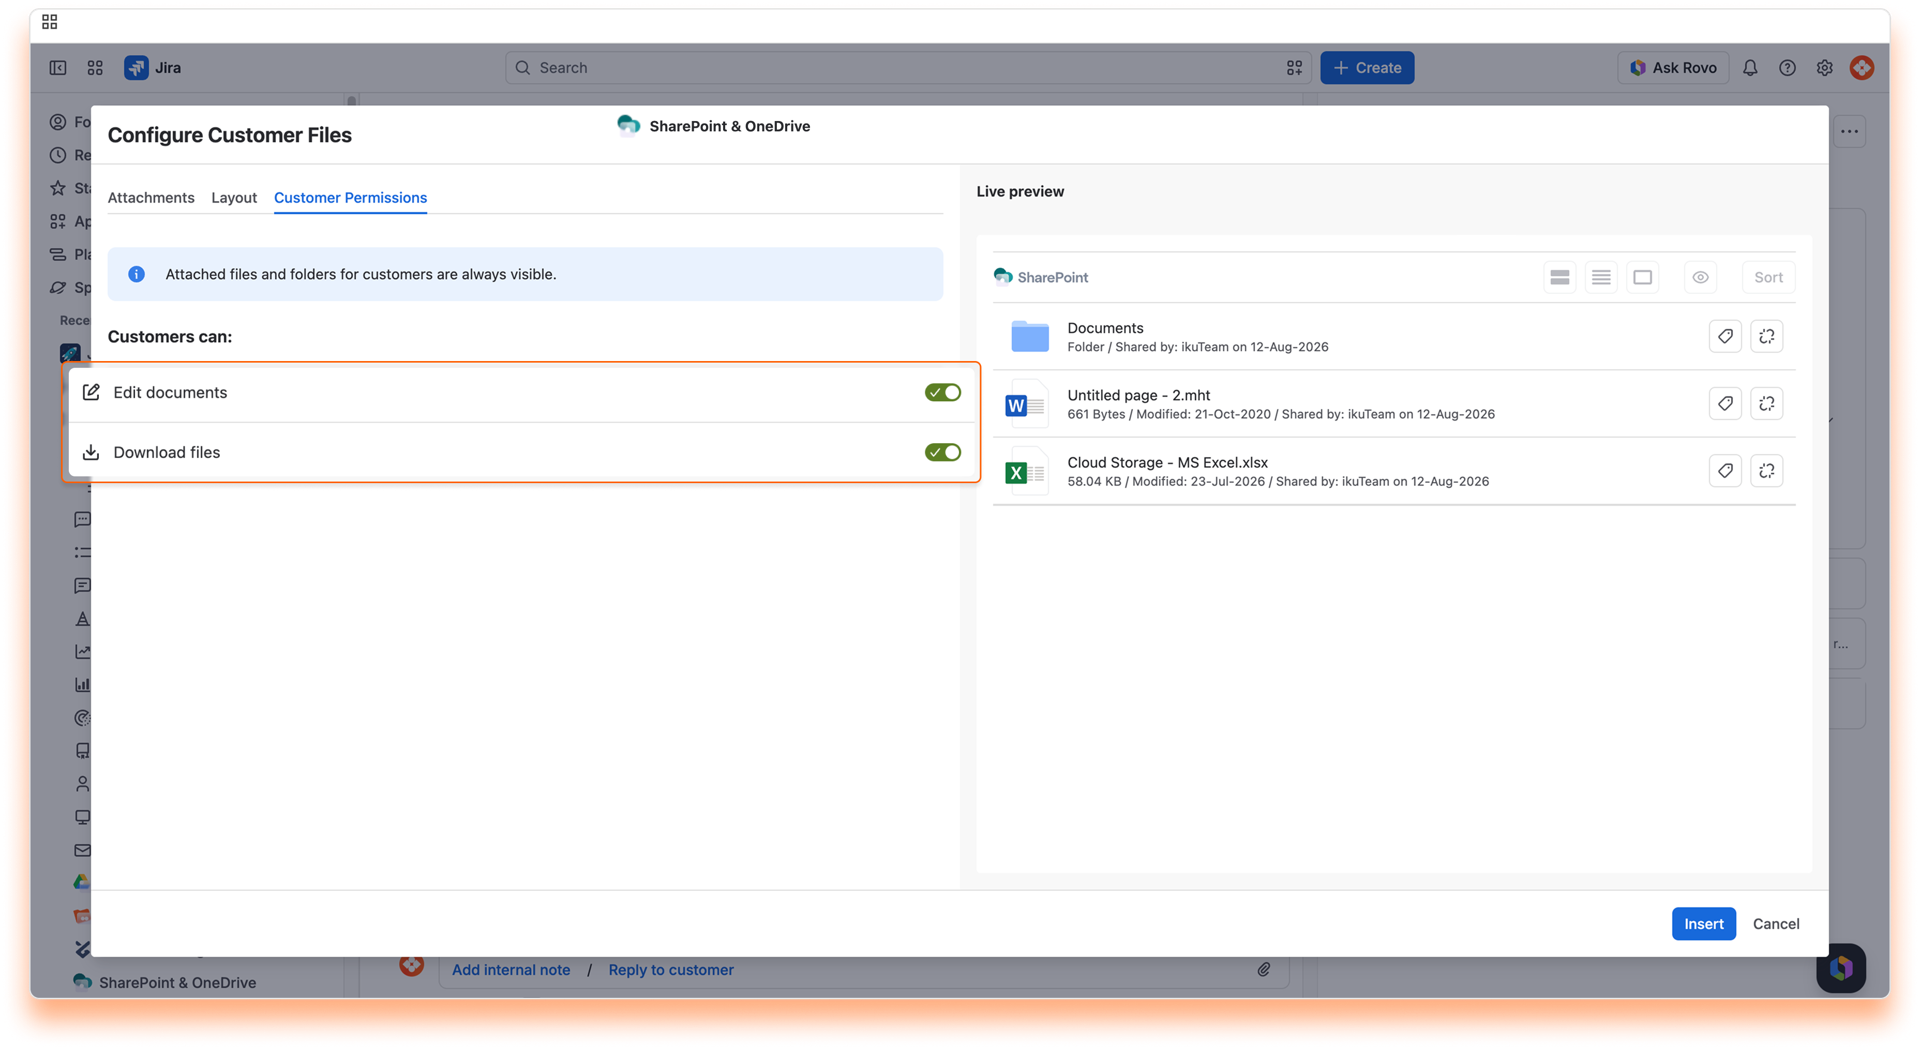
✅ All done. Your attached files and folders are now visible on the work item page and the customer portal.
ℹ️ The attached files and folders for customers have a white background. In contrast, the files and folders shared with the team have a light yellow background to help you distinguish them, the same way Jira differentiates messages for the customer and internal notes.
In Jira Service Management, you can attach files and folders to your work items directly from the SharePoint & OneDrive file manager, accessible from the sidebar, whether for your team or customers.
Instructions:
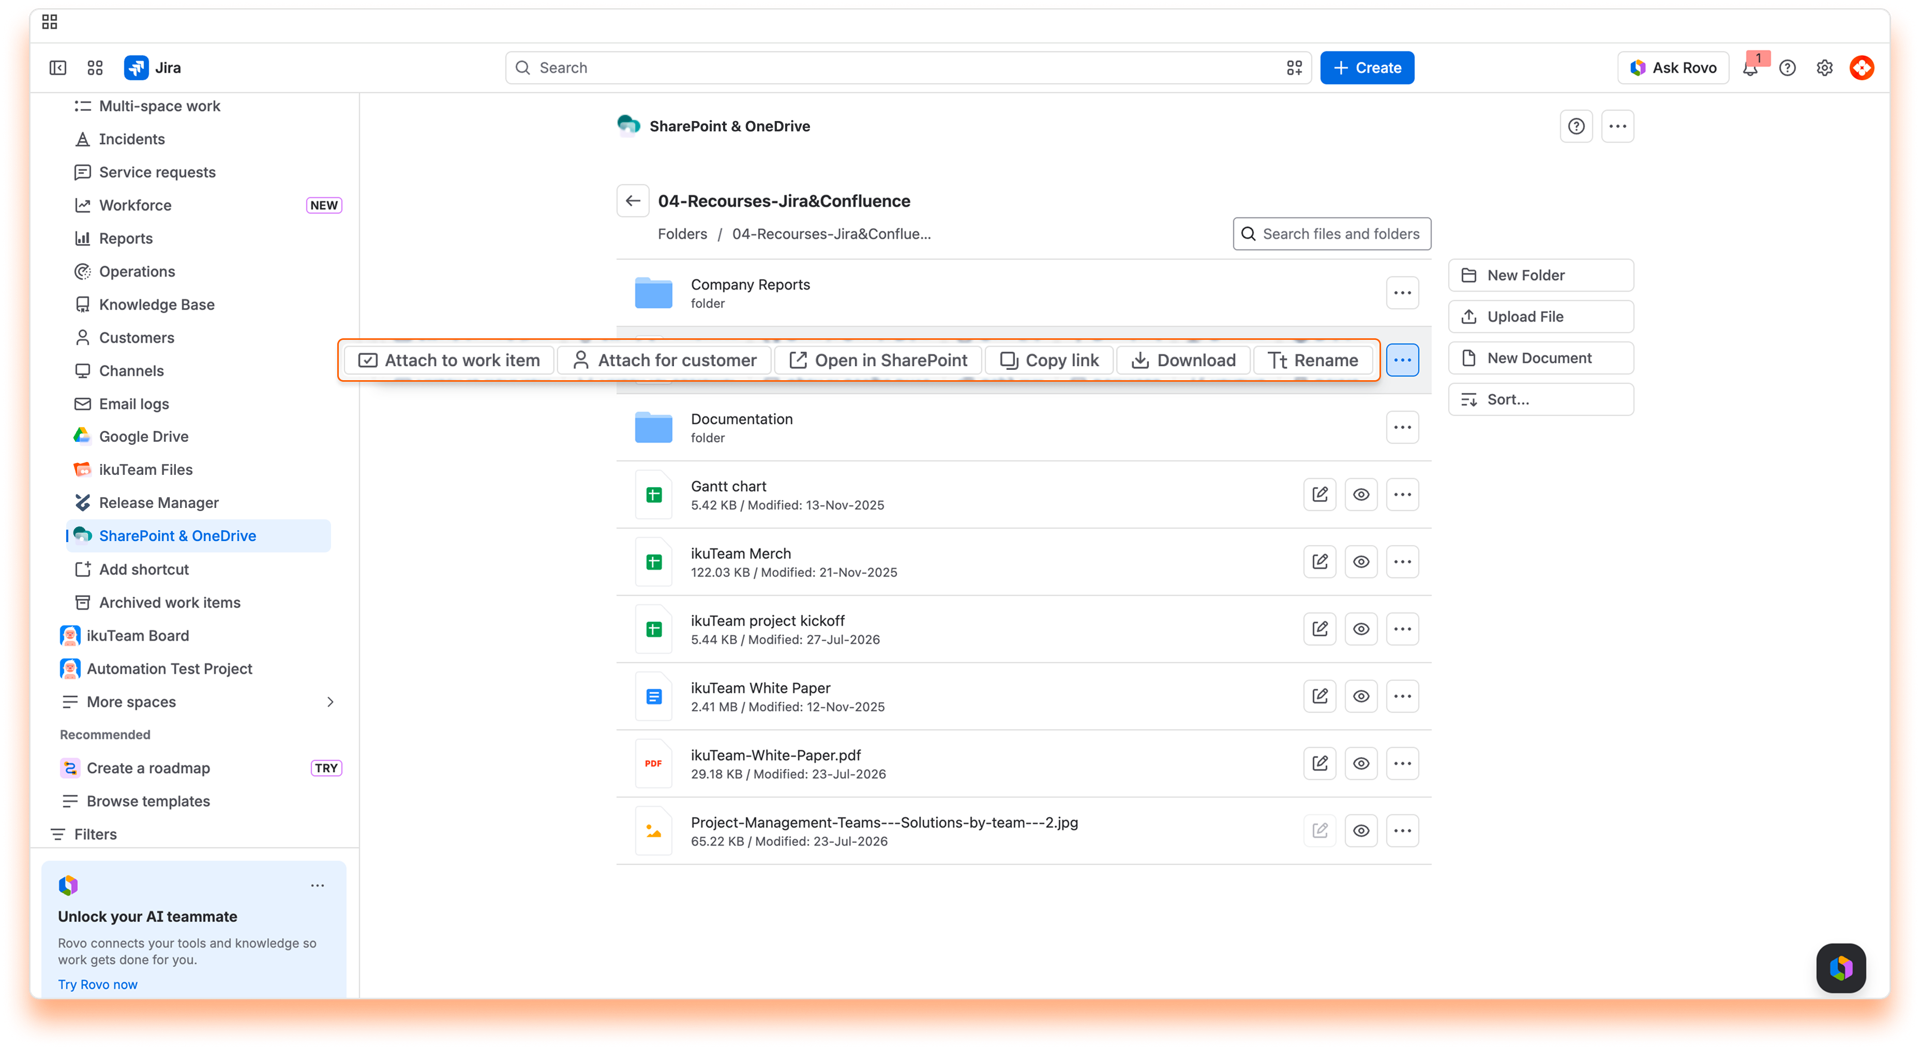
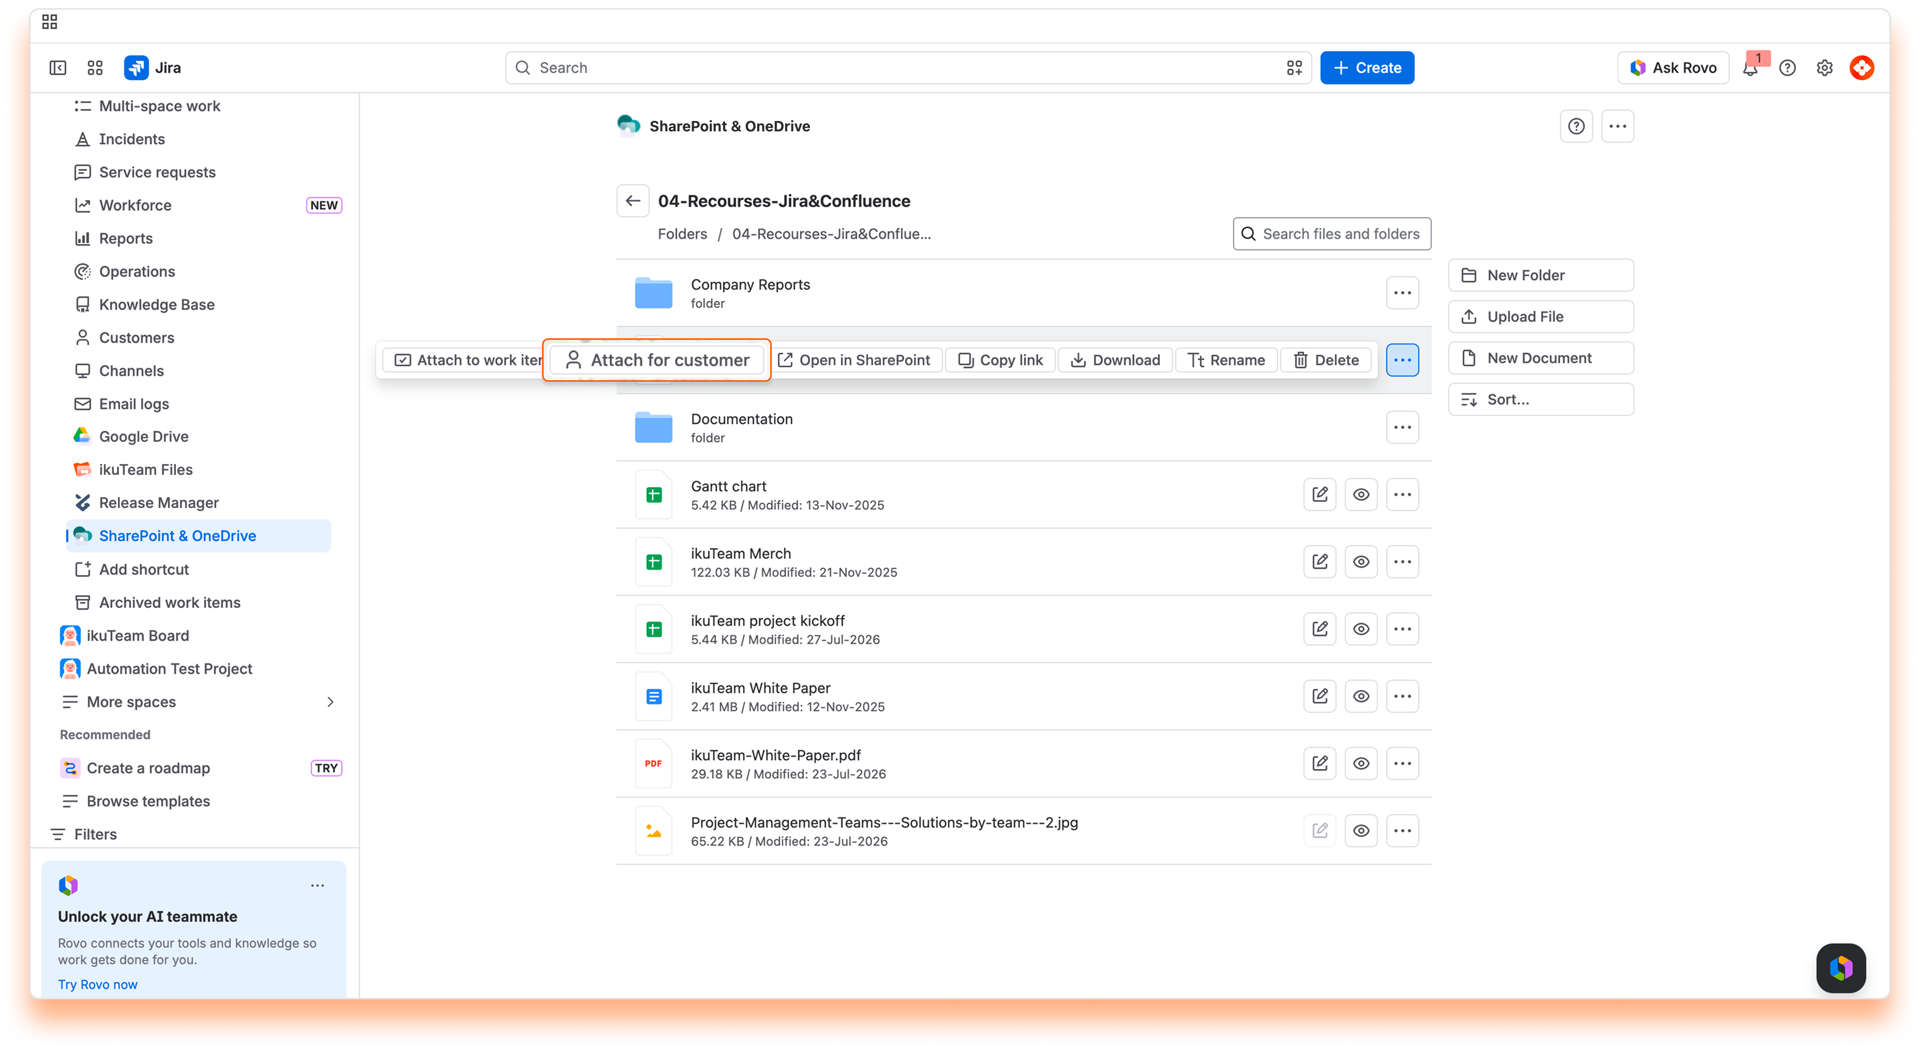
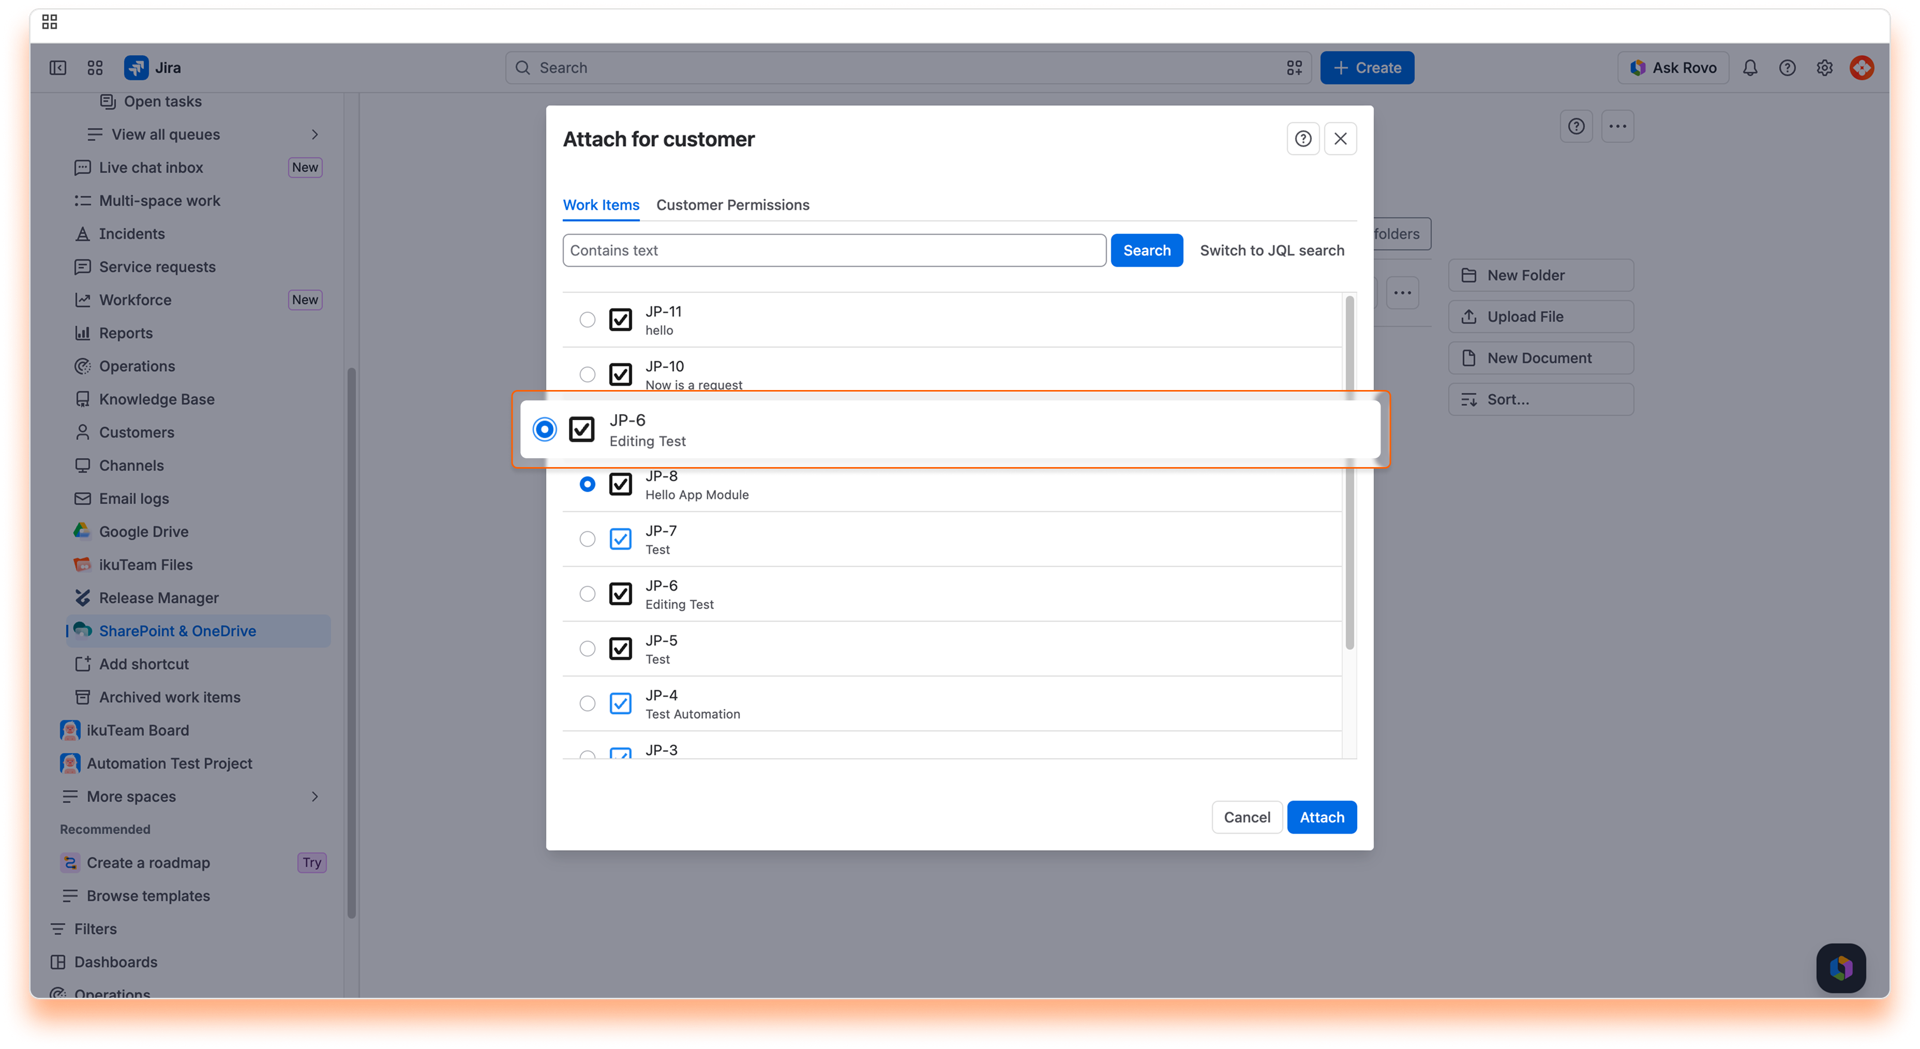
ℹ️ Customers can't download or edit files attached to the work item by default.
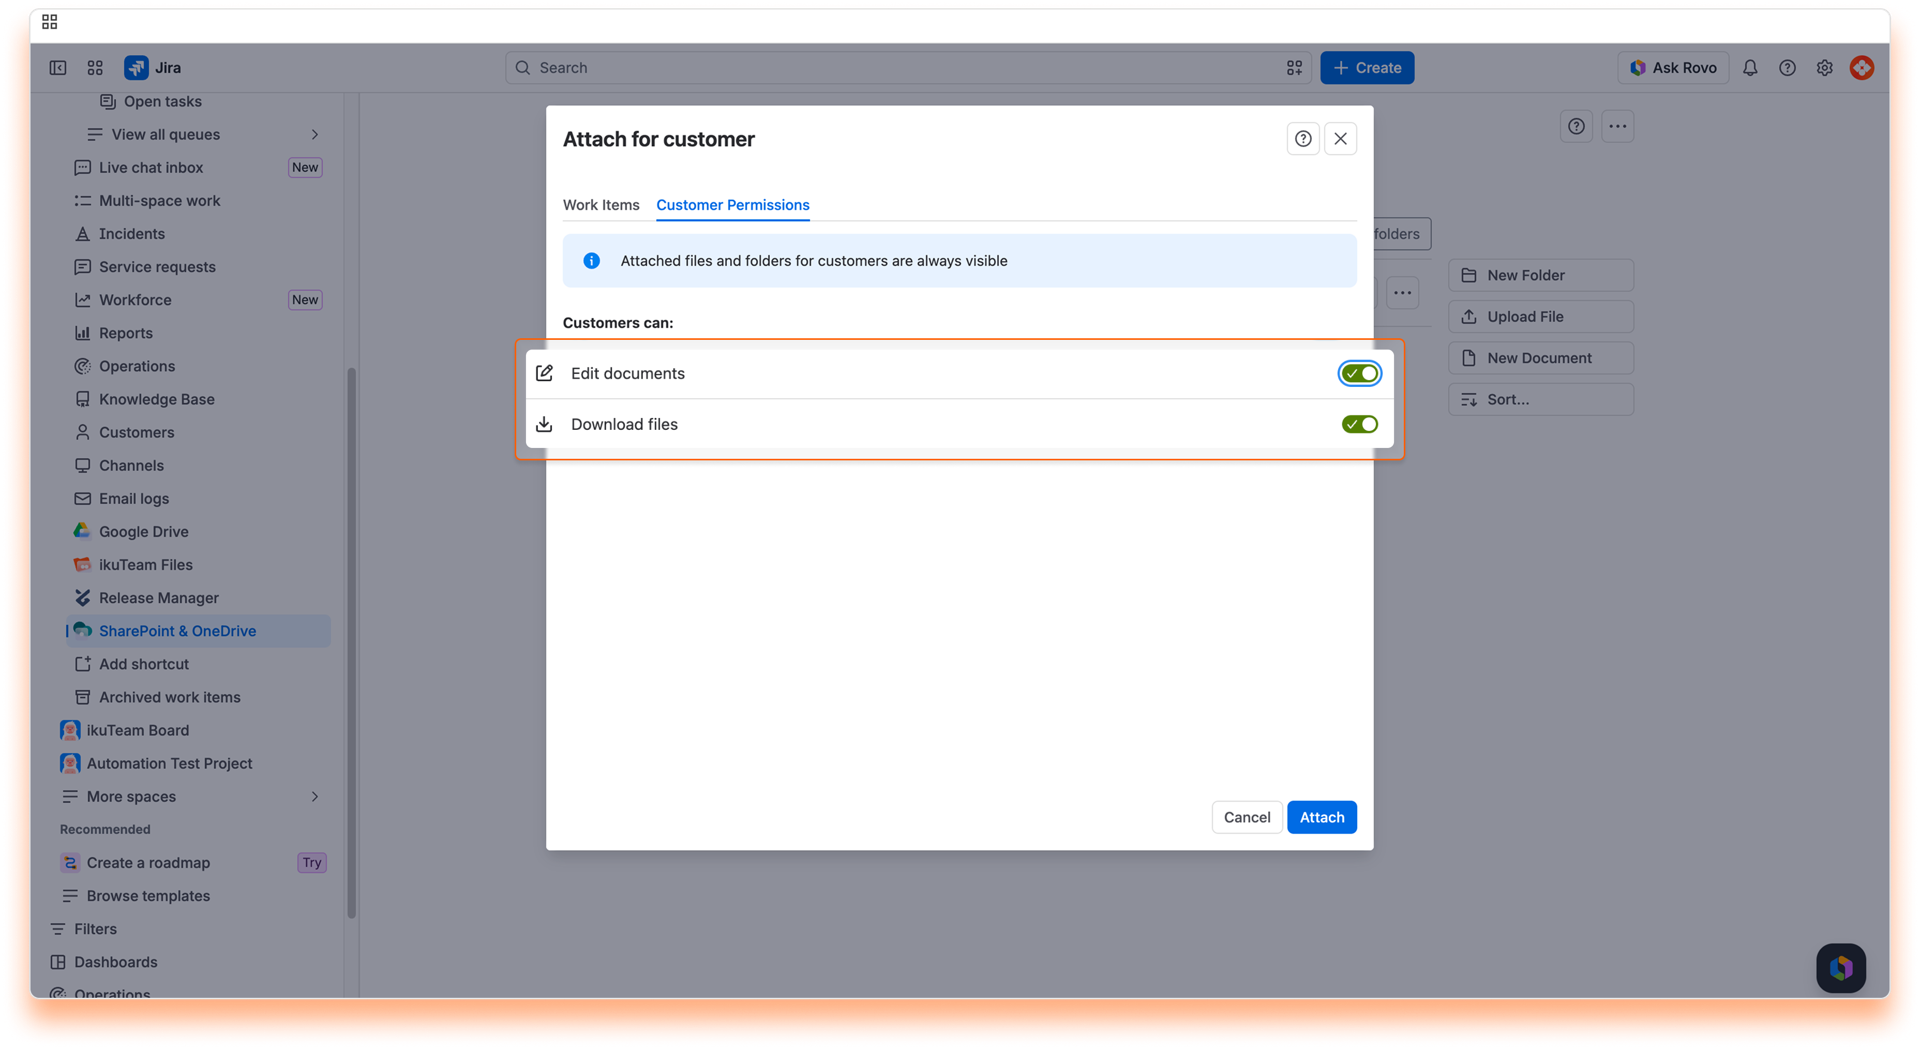
Instructions:
✅ All done. Your attached file or folder is now visible on the customer portal.
ℹ️️ The attached files and folders for customers have a white background. In contrast, the ones shared with the team have a light yellow background to help you distinguish them the same way Jira differentiates messages for the customer and internal notes.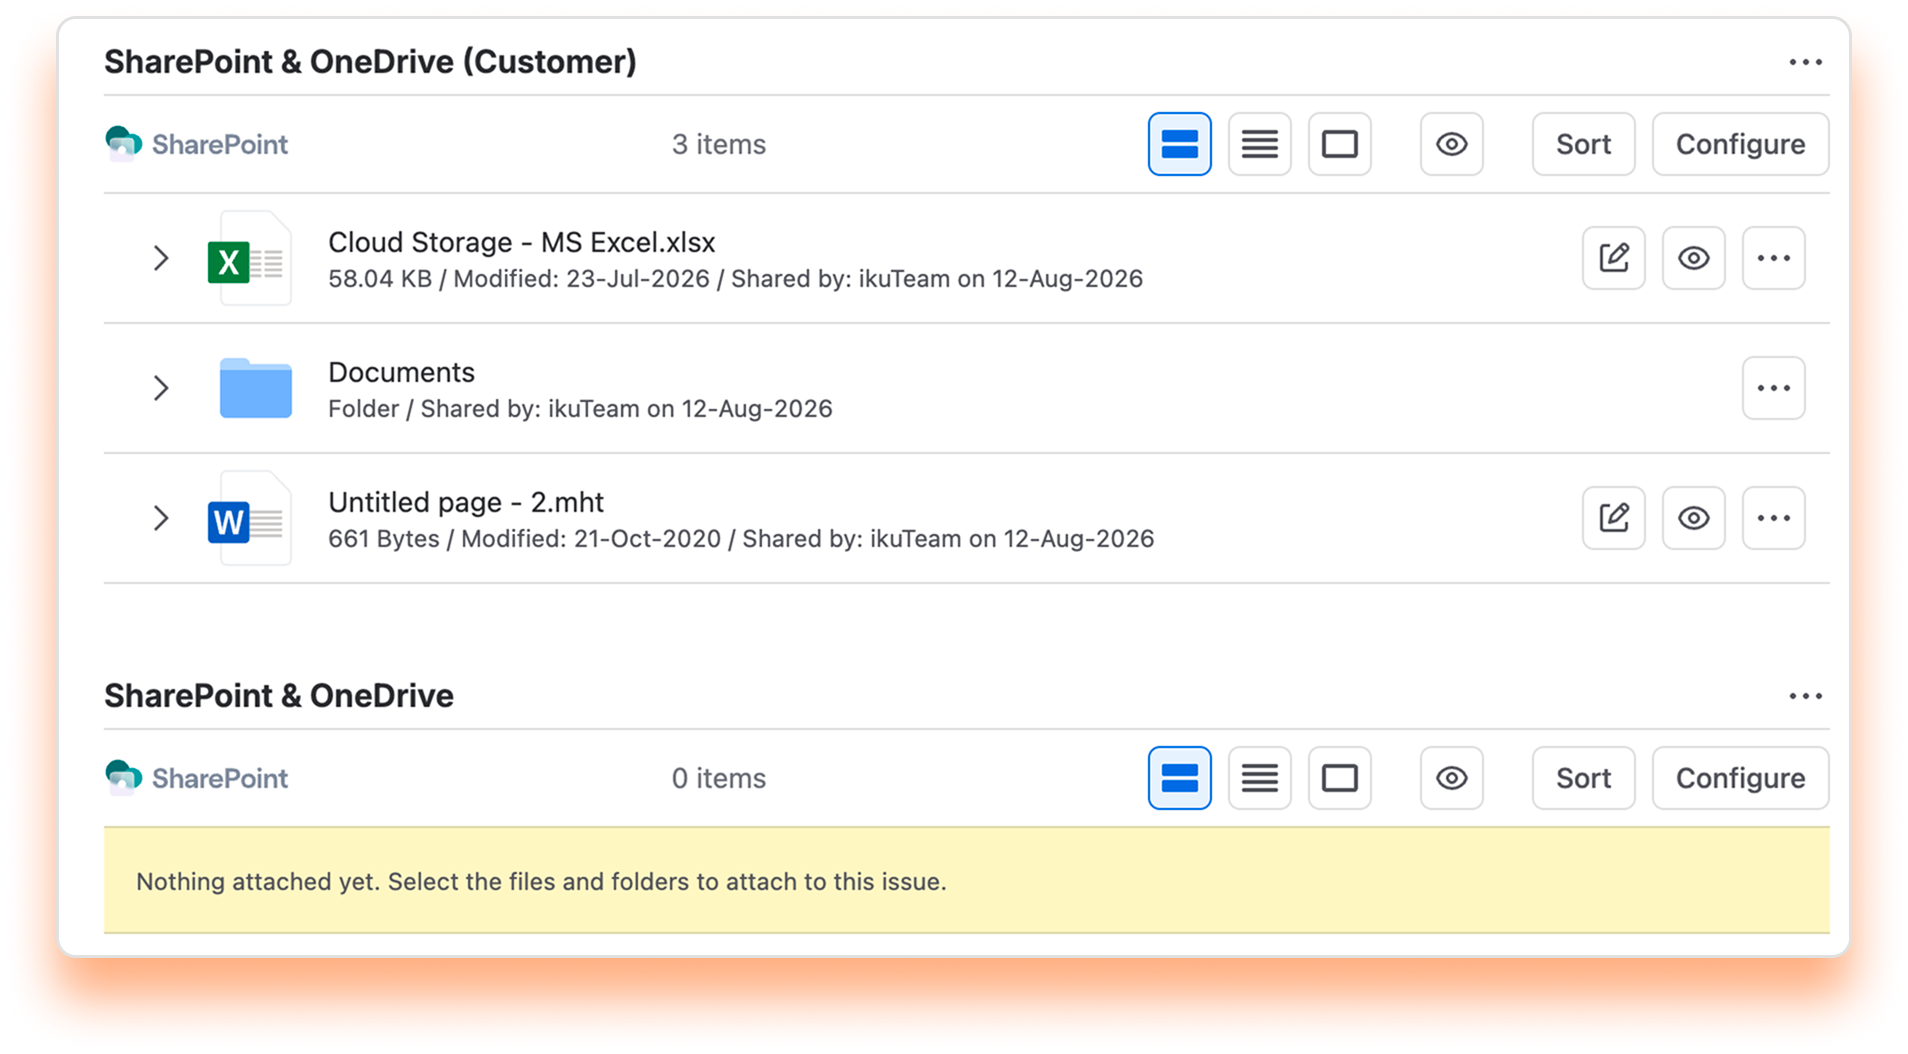
ℹ️ You need to add the app to the work item page to view the attached files and folders from the file manager.
You can remove specific files and folders attached to a work item at any time.
Instructions:
✅ All done. Your files and folders are safe and sound in your storage place but no longer connected to the work item.
⚠️ This action is undoable, but you can attach the files and folders again.
You can also hide the entire app on the work item page while keeping all the files and folders attached. Files and folders attached for customers are always visible in the customer portal.
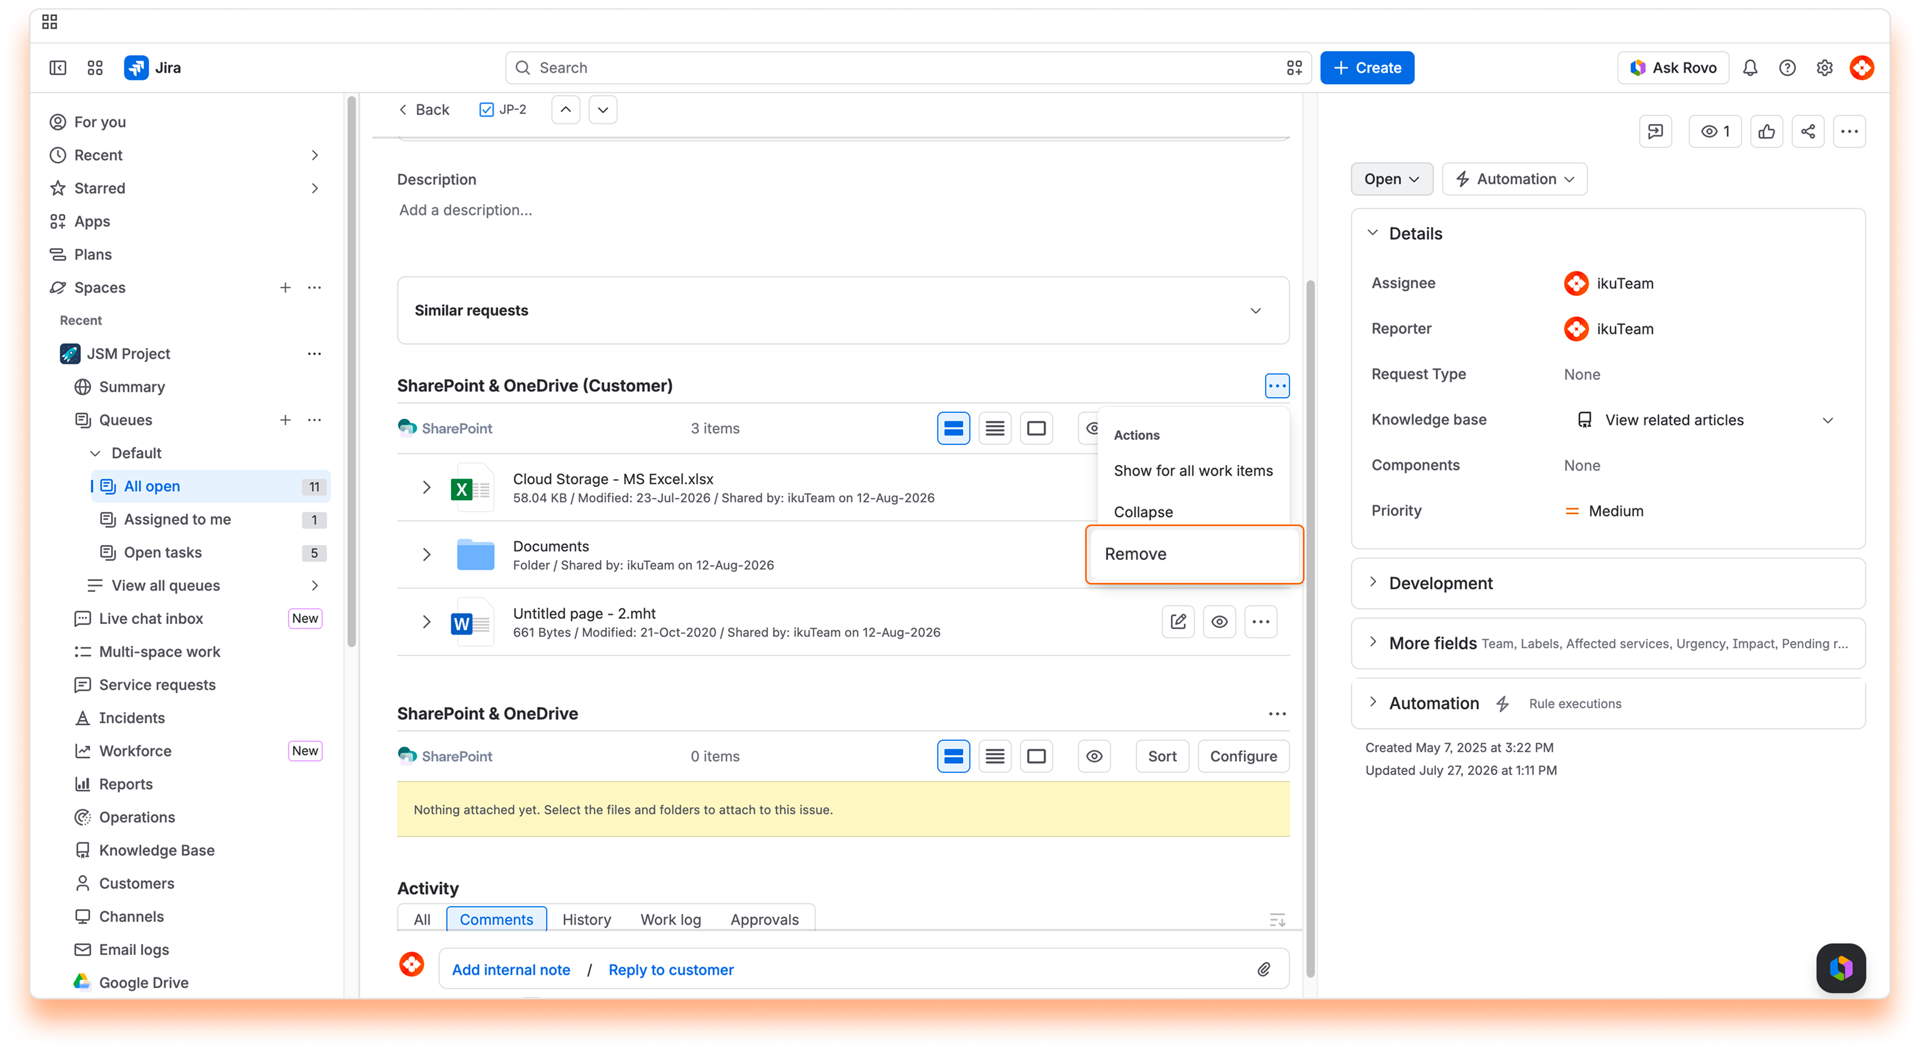
Instructions:
✅ All done. Your files and folders are still attached to the work item but not visible. To show them again, add the app back.
Now you know how to attach files and folders for your customers. Remember that you can also attach files and folders just for your team.
If you still have questions about attaching files and folders to your work items, visit our support portal and send us your questions. Our team is always happy to help.
Learn how to set permissions for connected folders.
You can set different permissions to the connected folders to tailor the app experience to your team's needs. You can decide whether other people can view the folders you connect to and whether they can edit the content or download files. If you are familiar with Jira's permissions for issues, you'll feel right at home.
You can set permissions when connecting a folder in the "Permissions" tab or from the File Manager at any moment by clicking the lock icon.
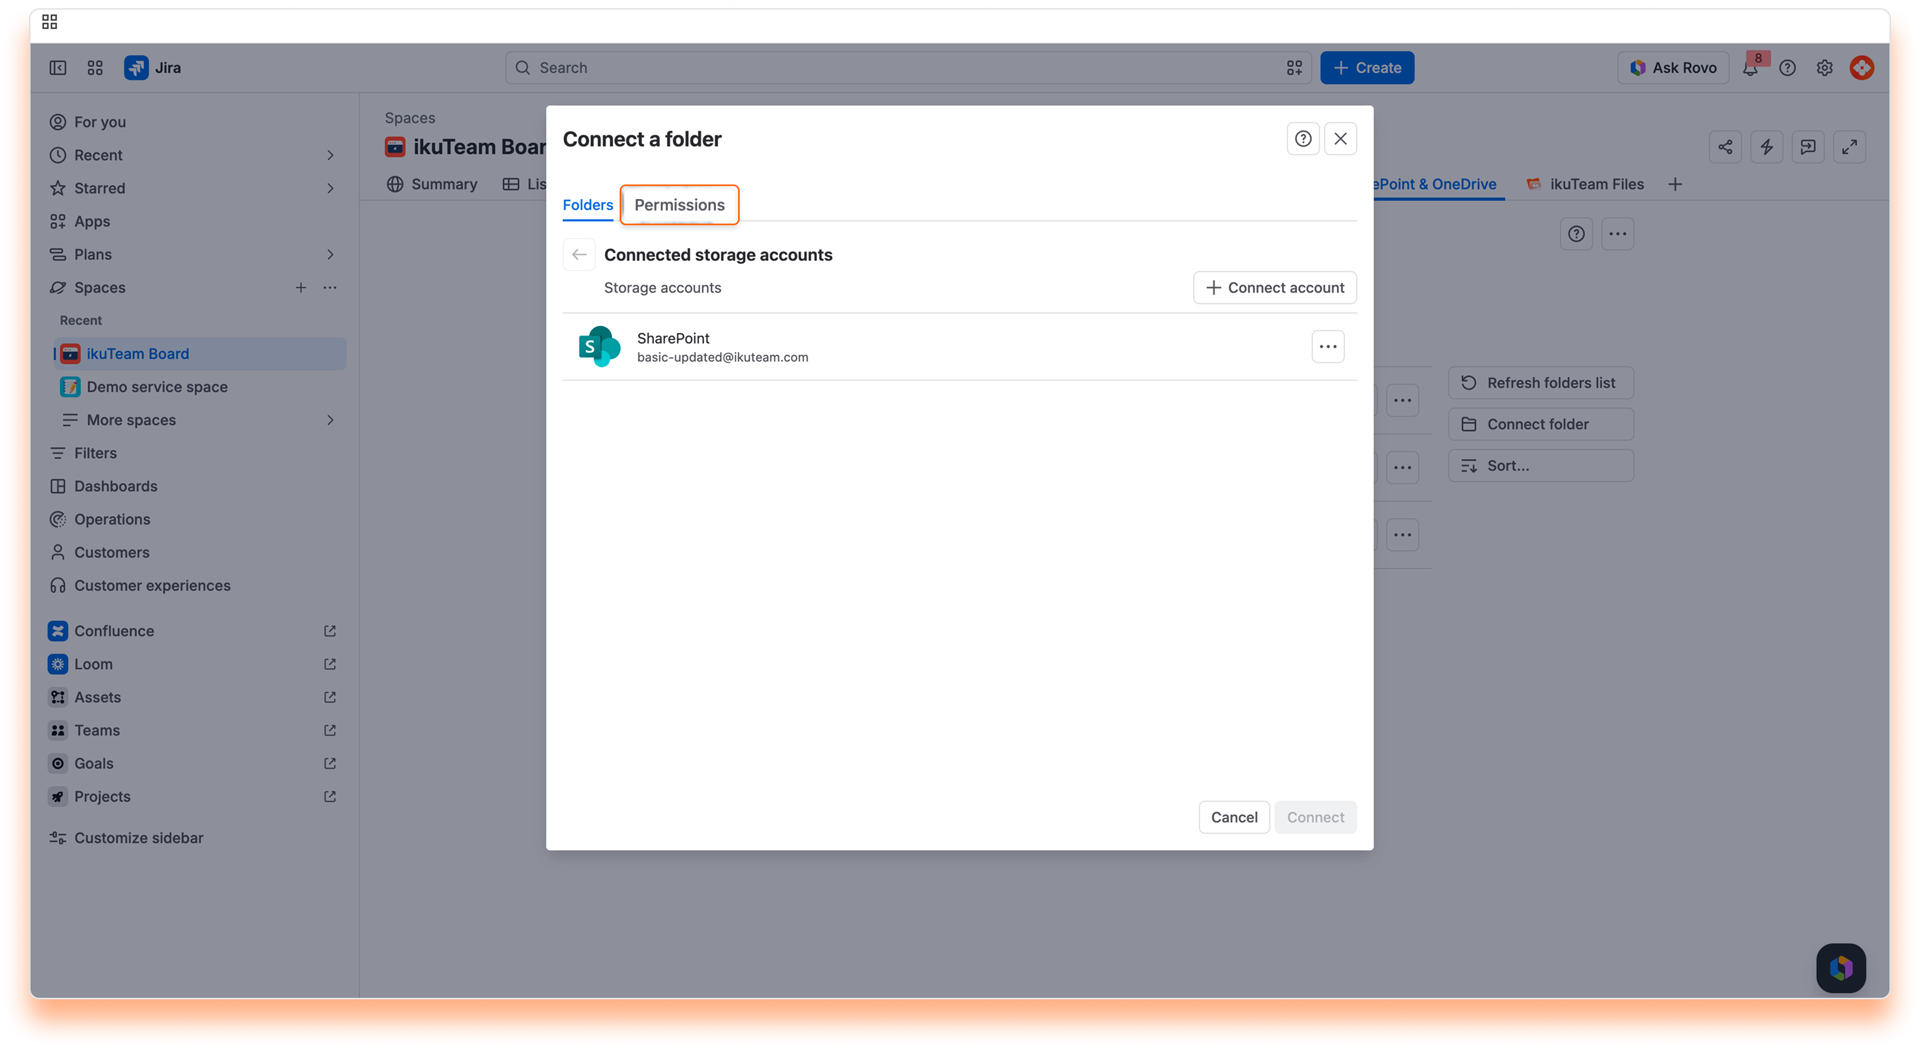
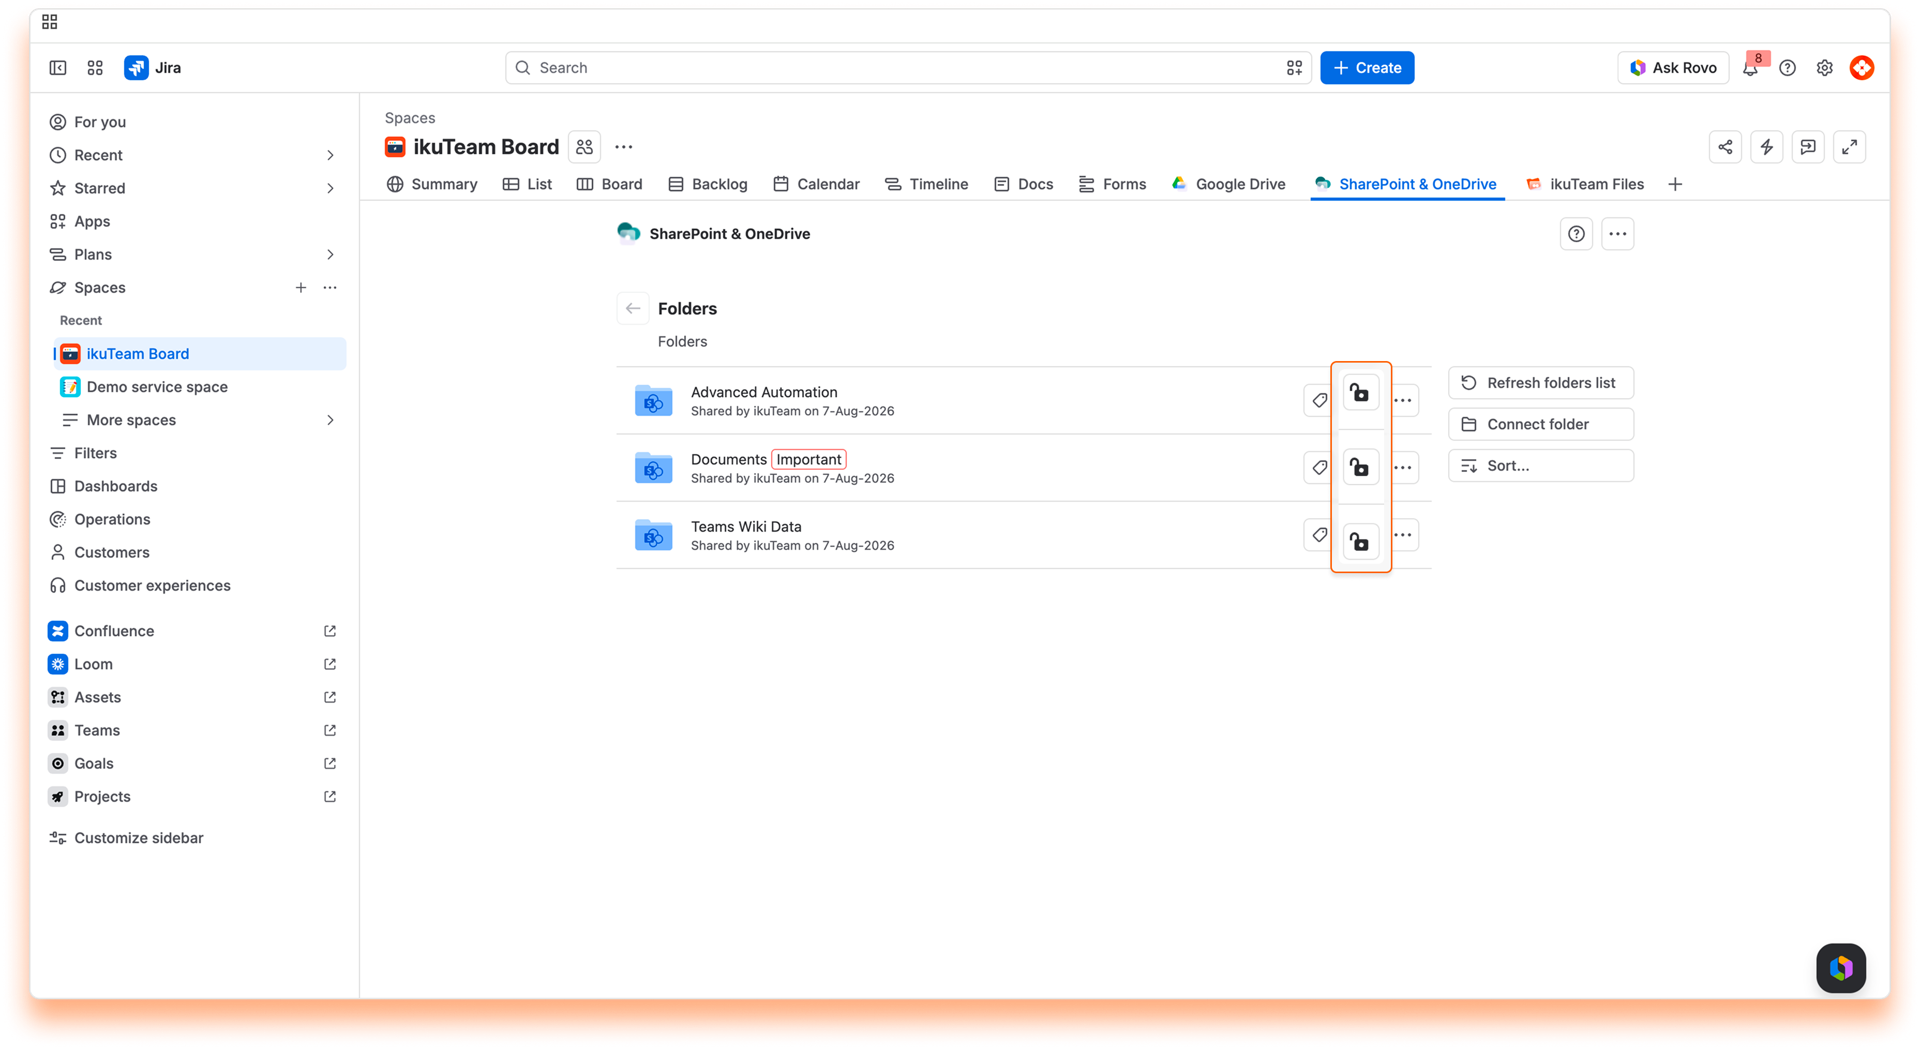
The "Permissions" tab shows the current settings and how they affect your connected folder.
There are three main options that you can select from the drop-down menu:
It is the default option, which means everyone with access to the Jira Project can view and edit the content of the connected folder.
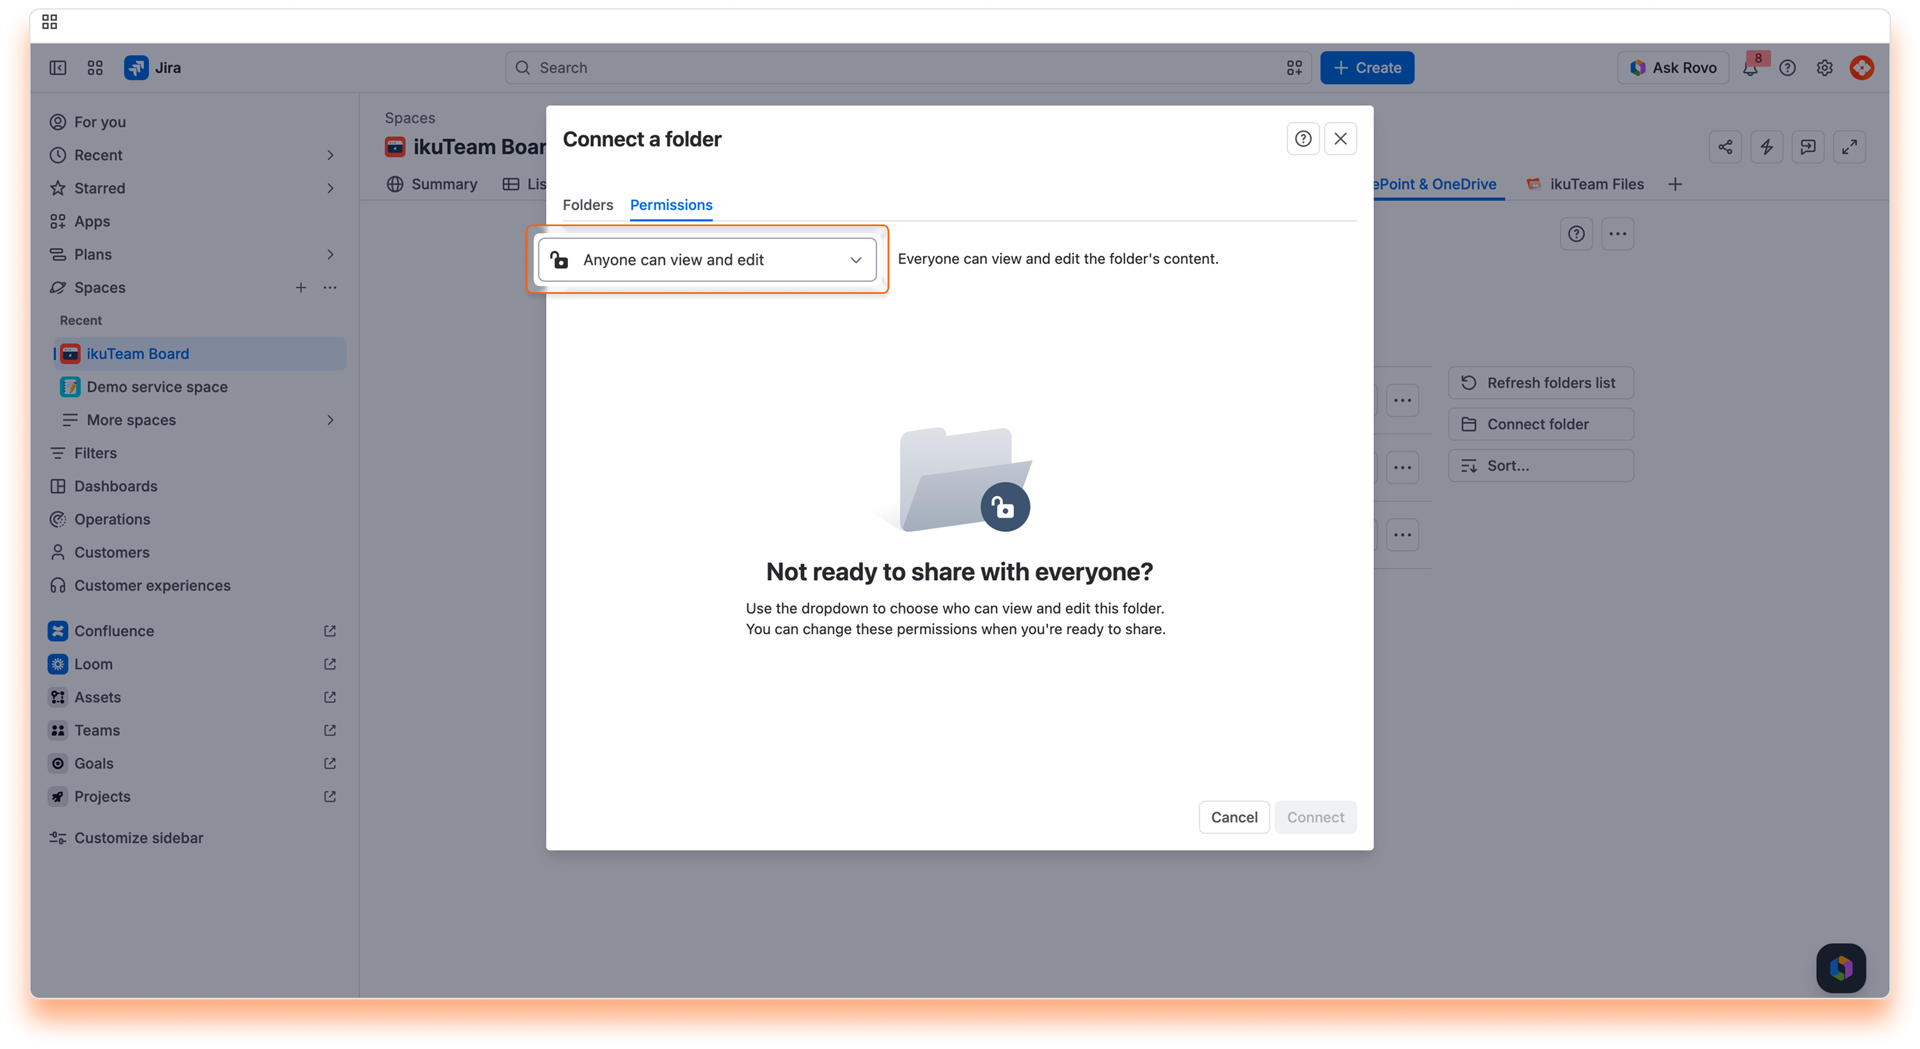
Everyone can view the folder and its content, but only the person who attached it (the owner) can edit it. The owner can also grant permission to download files or edit documents to specific people, groups, and roles.
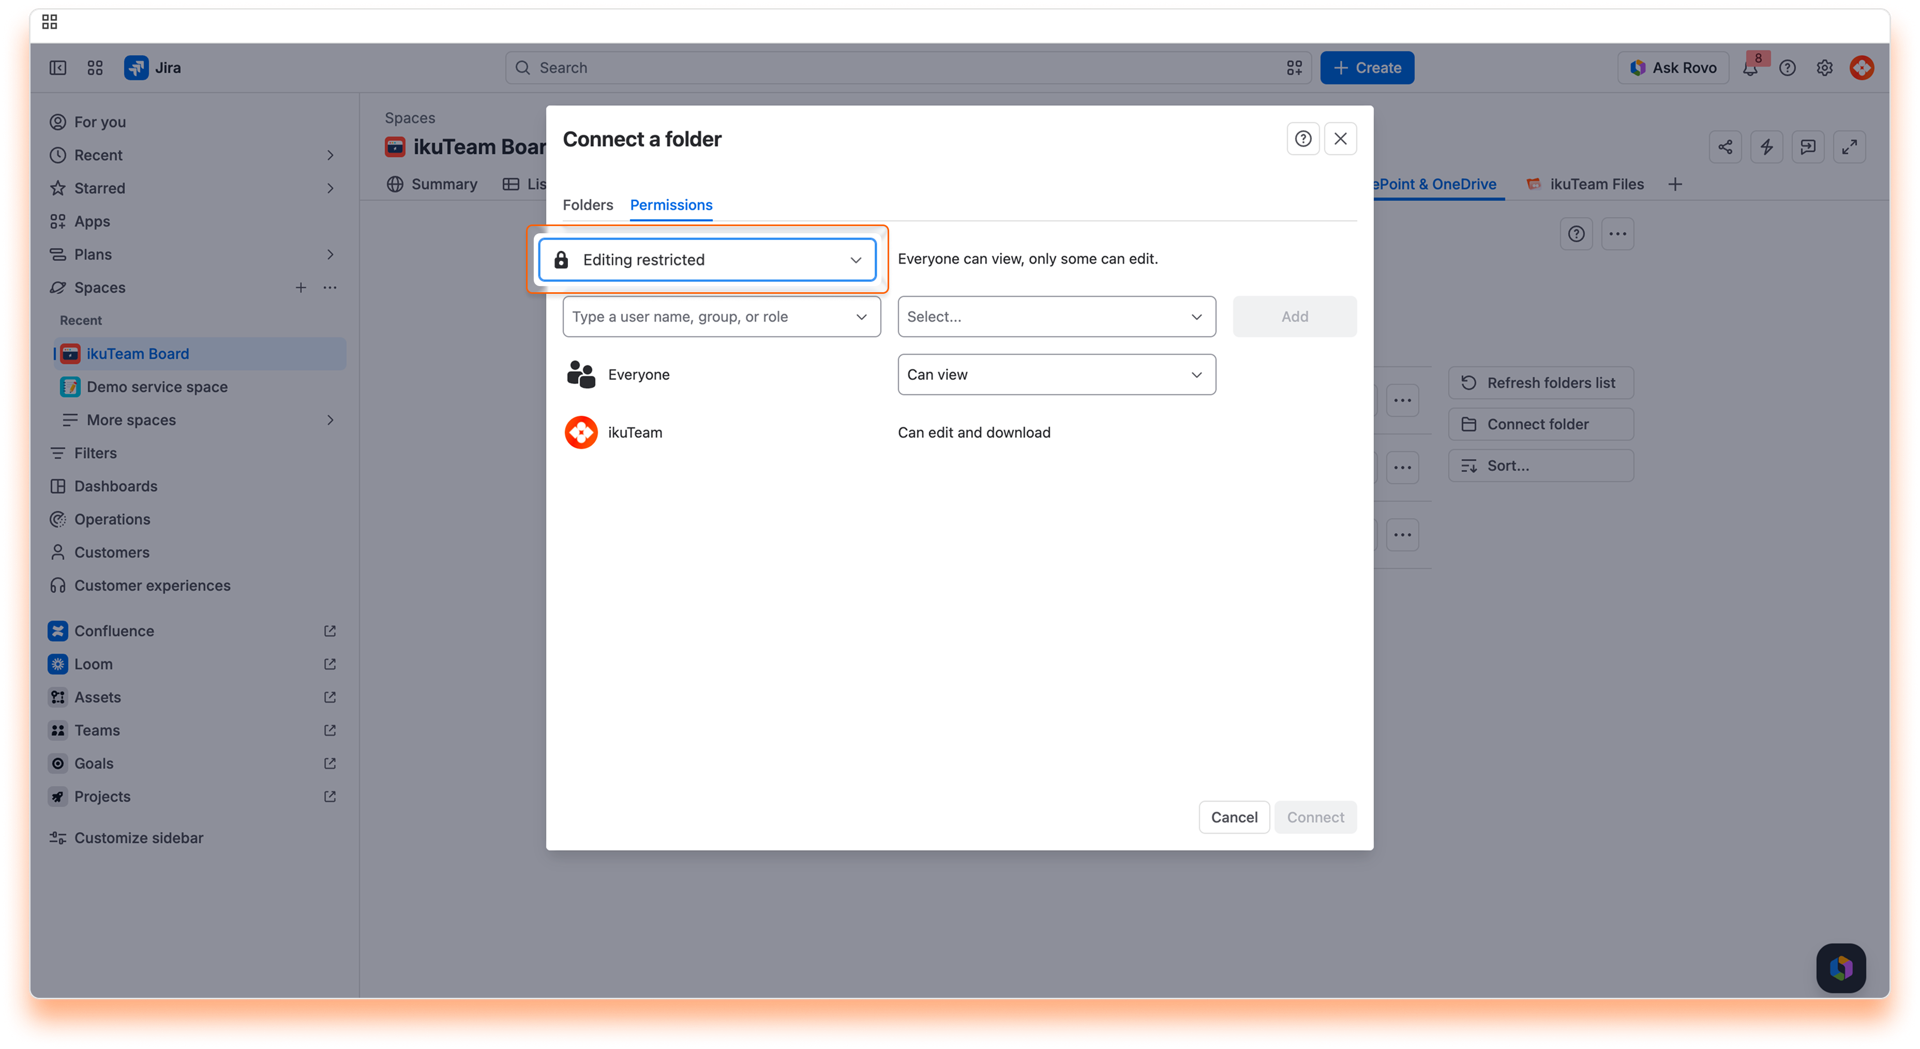
Everyone has no access to the folder; only the owner can view it and edit its content. Only people, groups, or roles added by the owner will have permission to view the folder or edit its content.
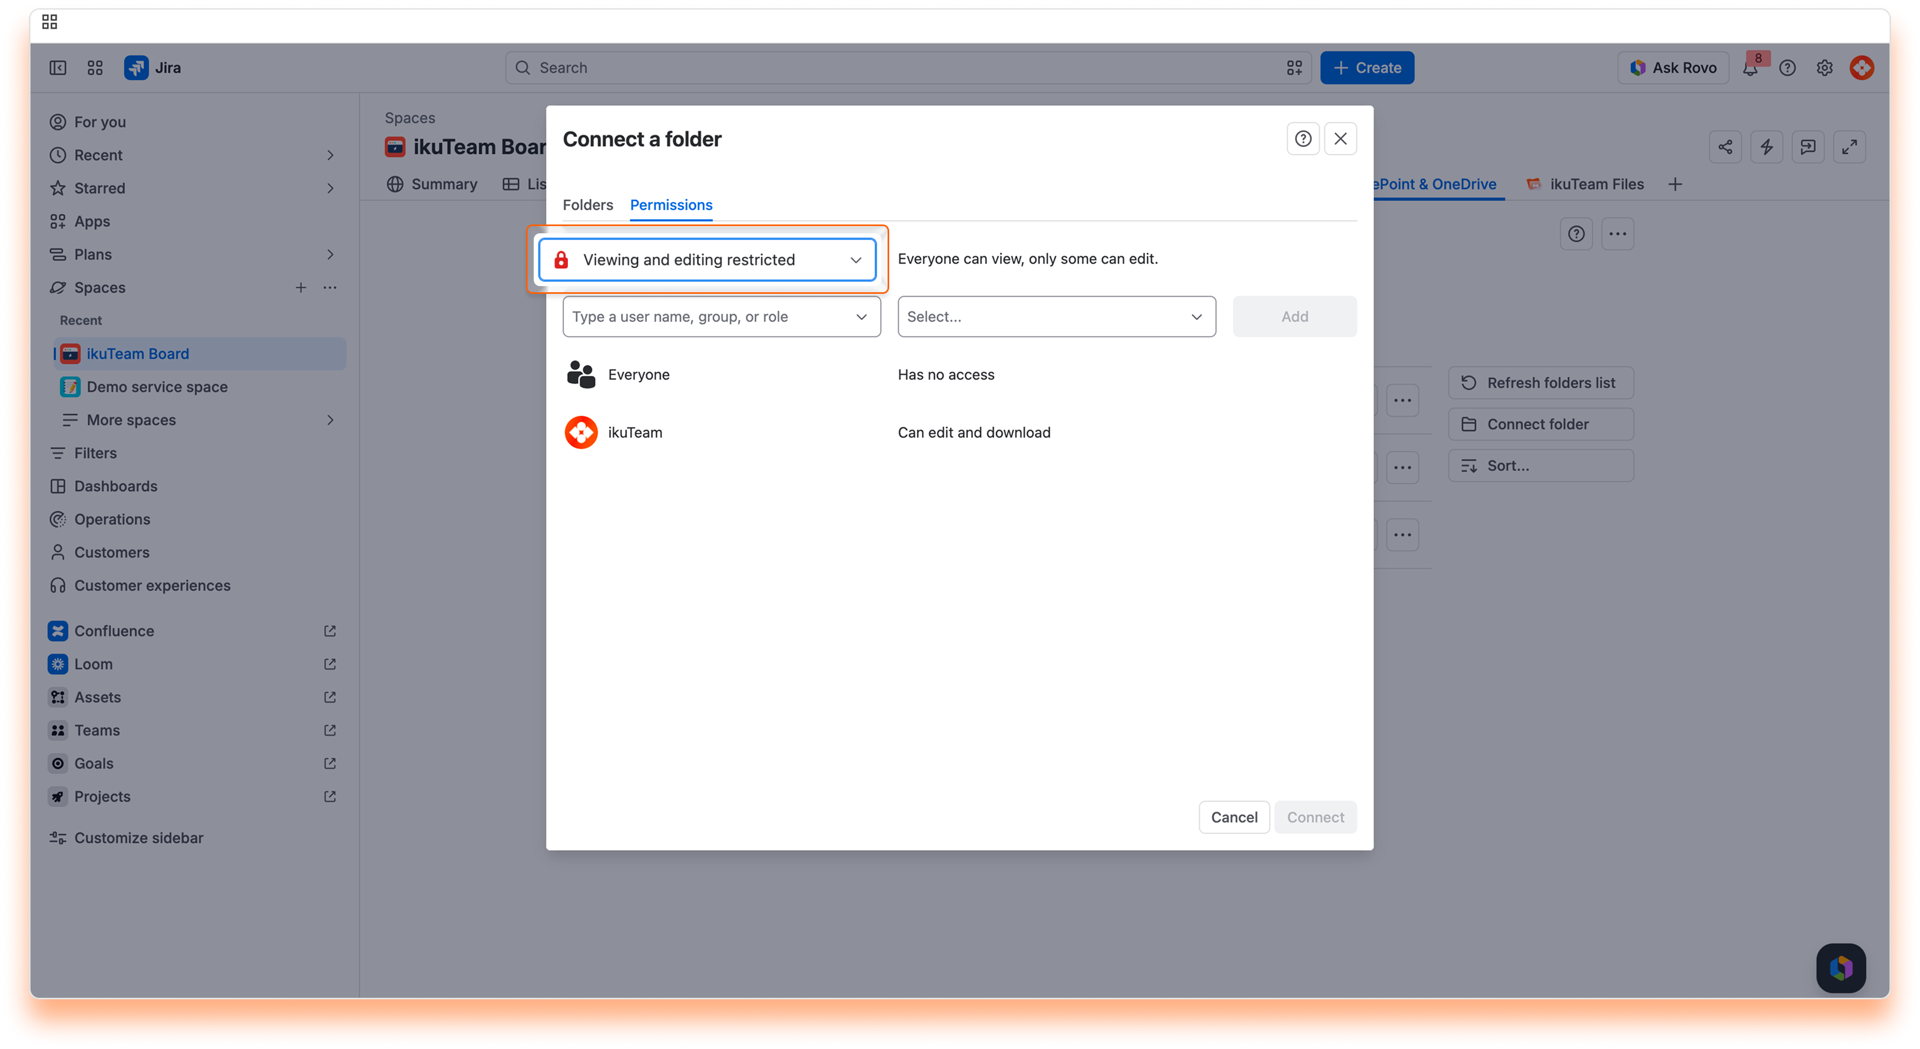
The list will be updated to include the new addition. You can add as many entries as you need and click the "Connect" button (when connecting a folder) or the "Apply" button (when editing permissions).
The permissions modal allows you to change any person's permissions, group, or role. The connected folder owner can change the permissions anytime by returning to the permissions modal. The owner can add more people and groups or revoke granted permissions by clicking the "Remove" button.
Please keep in mind that permissions are additive. If a person can only view a folder as an individual and is part of a group that can edit, this person will be able to edit the folder, as SharePoint Connector for Jira combines all the permissions.
ℹ️ Files and folders attached to a work item will only be visible to people with appropriate permission for the folder.
⚠️ When you use the SharePoint Connector for Jira app to attach files and folders to a work item, the app uses the connected folder's permissions at that moment. If you change the folder's permissions, the folders will not get the updated permissions. You must attach them again if you need them to use the new permissions.
The SharePoint Connector for Jira app simplifies access to shared content by default, favoring ease of use with simplified permissions. This default overrides file permissions set in SharePoint or OneDrive. The original storages are unchanged and keep the permissions set.
Admins can require users to authenticate with an account with access to the connected folders to respect the set permissions in the storage. Use the "Mirror storage permissions" setting with folder permissions to control better how files are shared, viewed, and edited.
ℹ️ NOTE: When “Mirror Storage Permissions” is enabled, access to files follows the permissions set in your SharePoint.
However, Jira's permission scheme always takes final precedence. If a user doesn't have access to a Jira space or work item, they won't be able to see or interact with the files attached to it, regardless of their cloud permissions in SharePoint or OneDrive.
In short, cloud storage permissions control what files are accessible, but Jira decides who can see them.
Now you know how to set permissions for the folders you connect to your projects. Don't forget you can connect more folders from the file manager.
If you still have questions about the topics covered on this page, visit our support portal and send them to us. Our team is always happy to help.
Project managers can adjust the SharePoint Connector for Jira space settings to the team’s needs.
Project managers/Space Manager can find the space settings in the “Apps” section of the space settings, accessible from the space sidebar or menu in Jira.
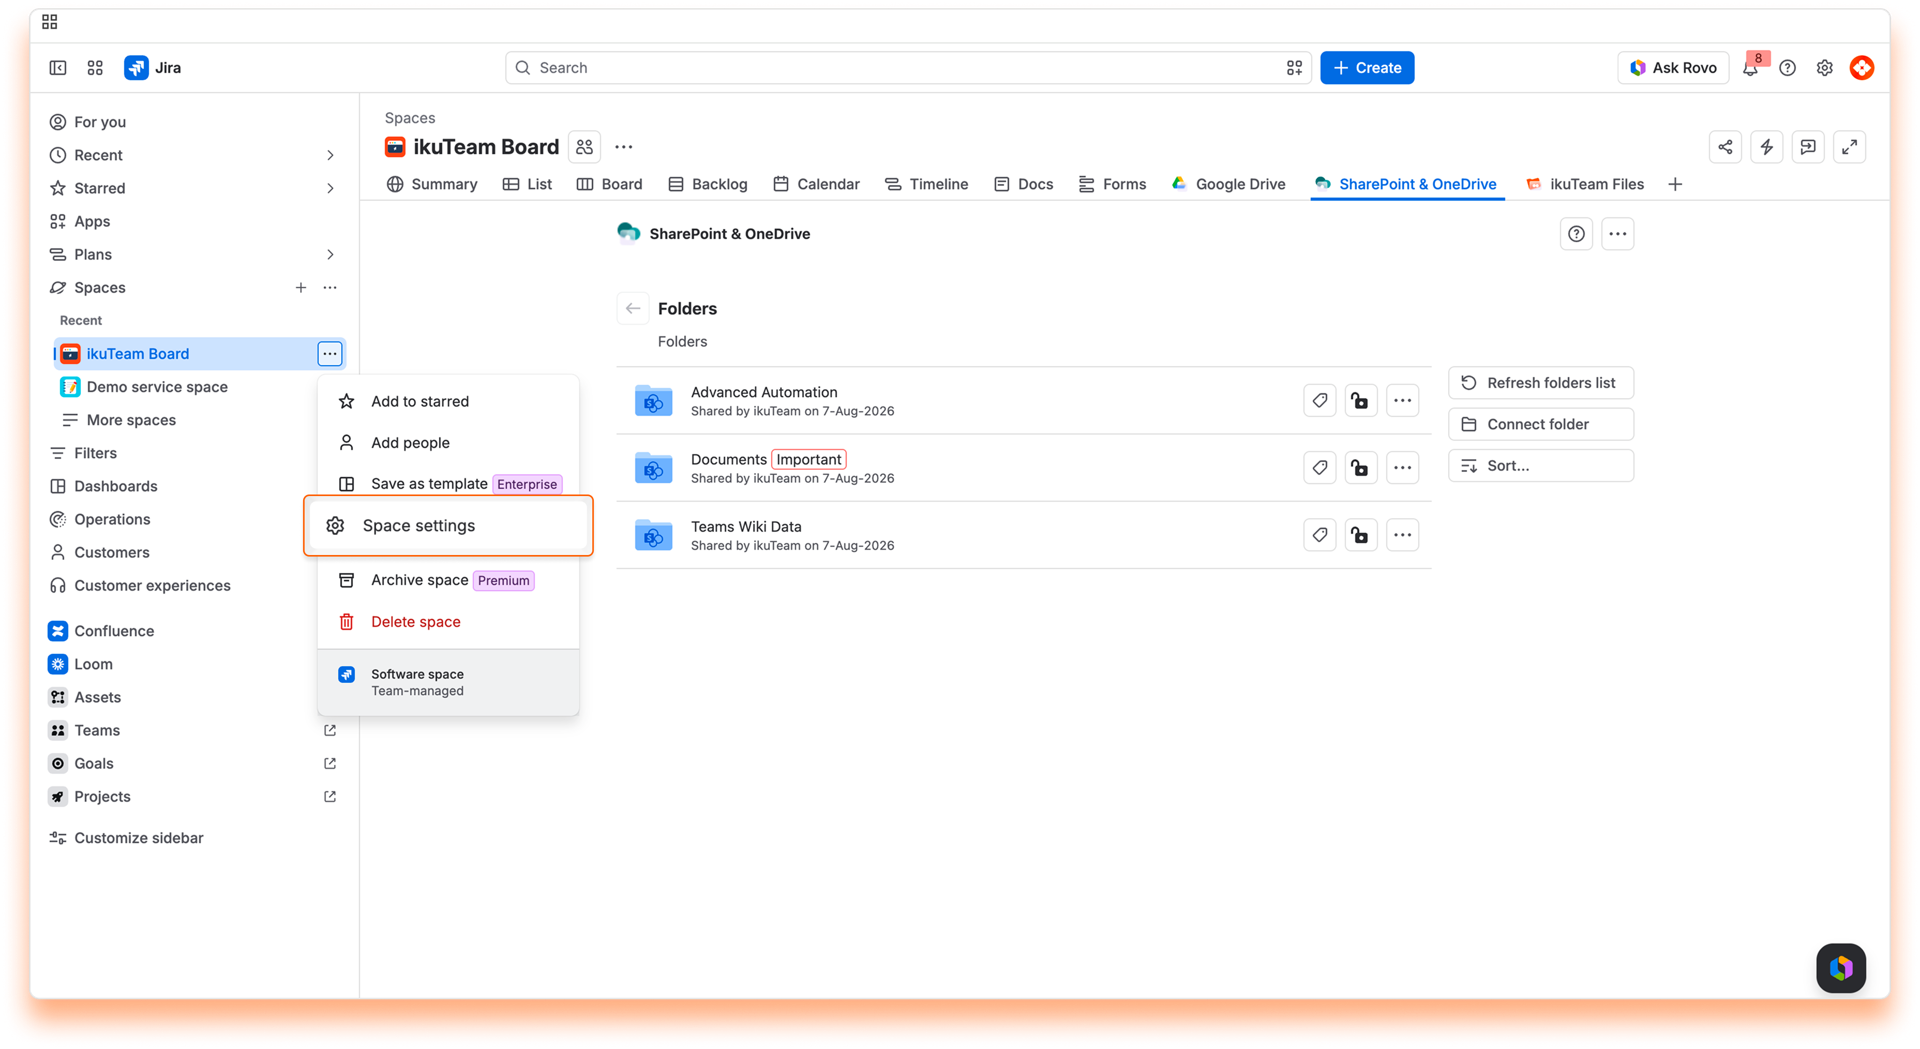
The SharePoint & OneDrive app is available by default for every space. Project managers/Space Managers can deactivate it in the space settings if it isn’t required in that space.
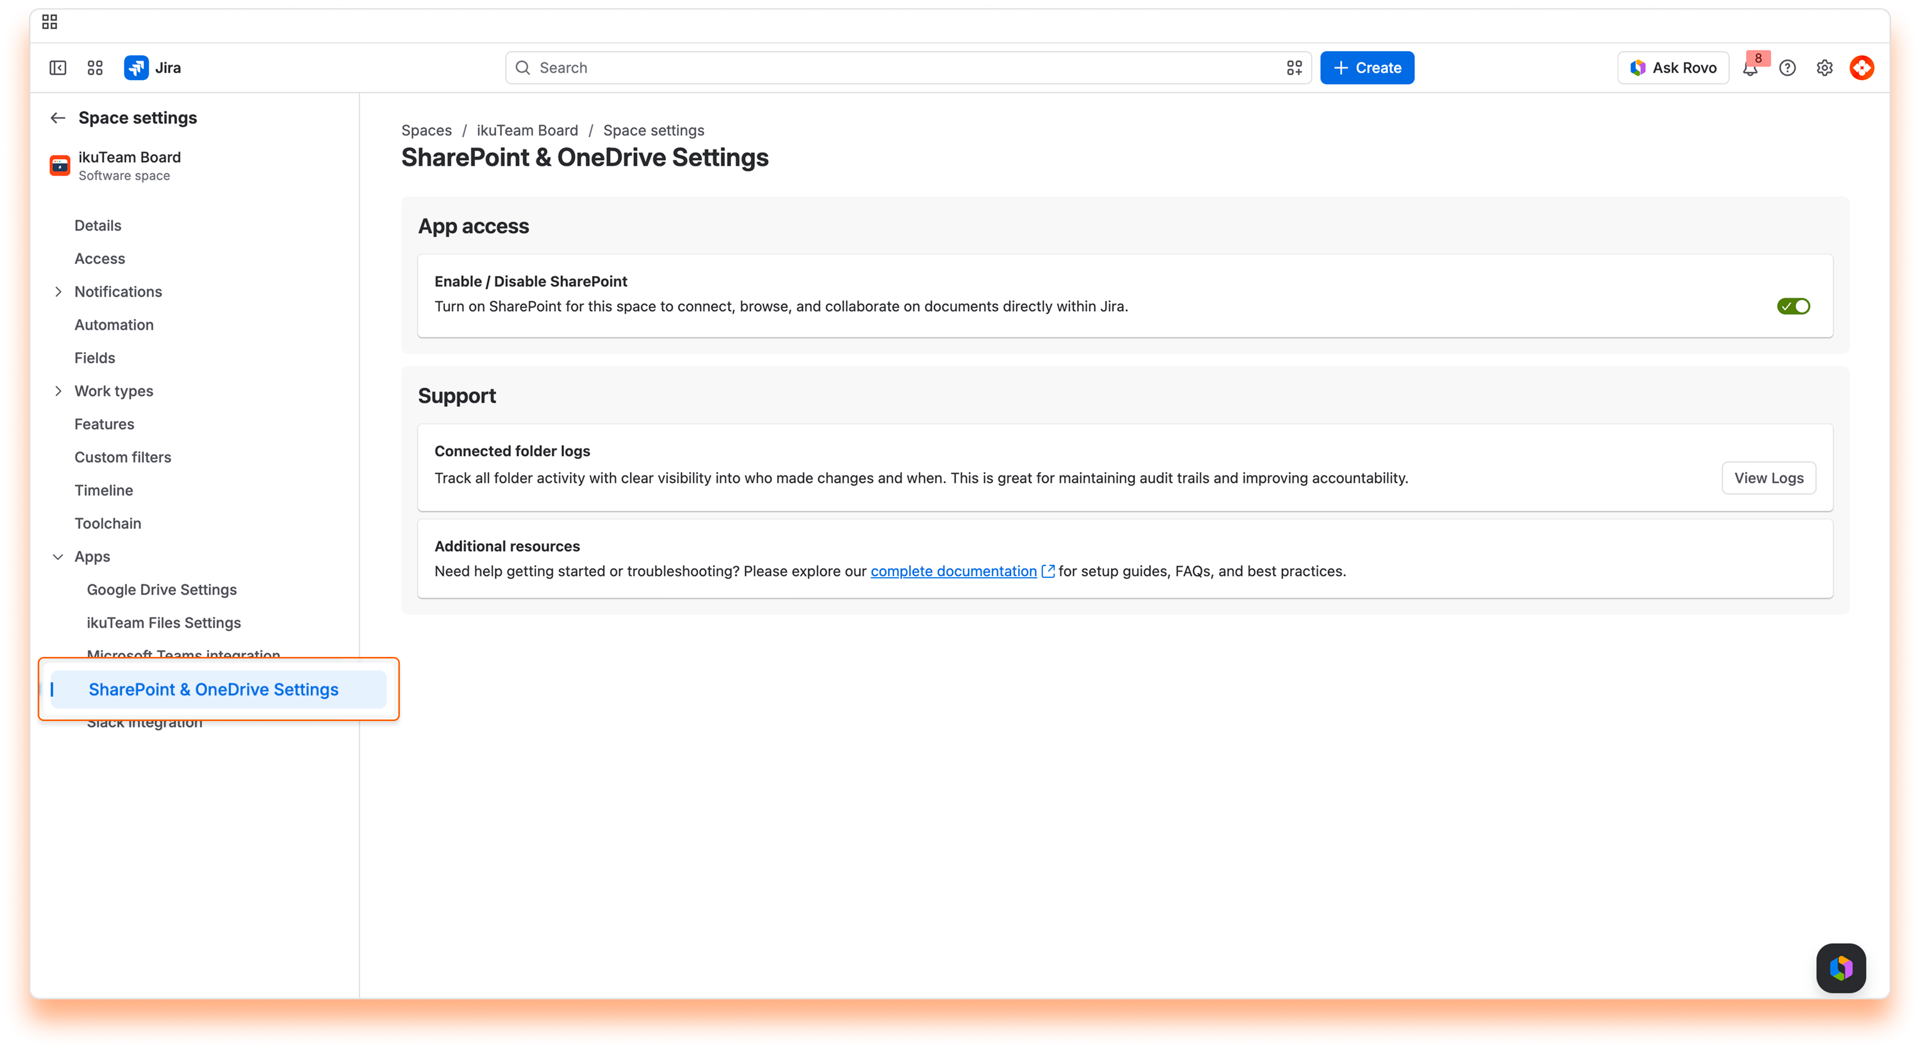
To deactivate the SharePoint Connector for Jira app, click the toggle to turn it off. You can reactivate it anytime by clicking the toggle again to turn it on.
ℹ️ Changing this setting saves automatically and applies immediately.
If you're having issues with a connected folder, you can check the “Connected folders log” at any time. The log will give you details on when a user connected it or if someone disconnected it.
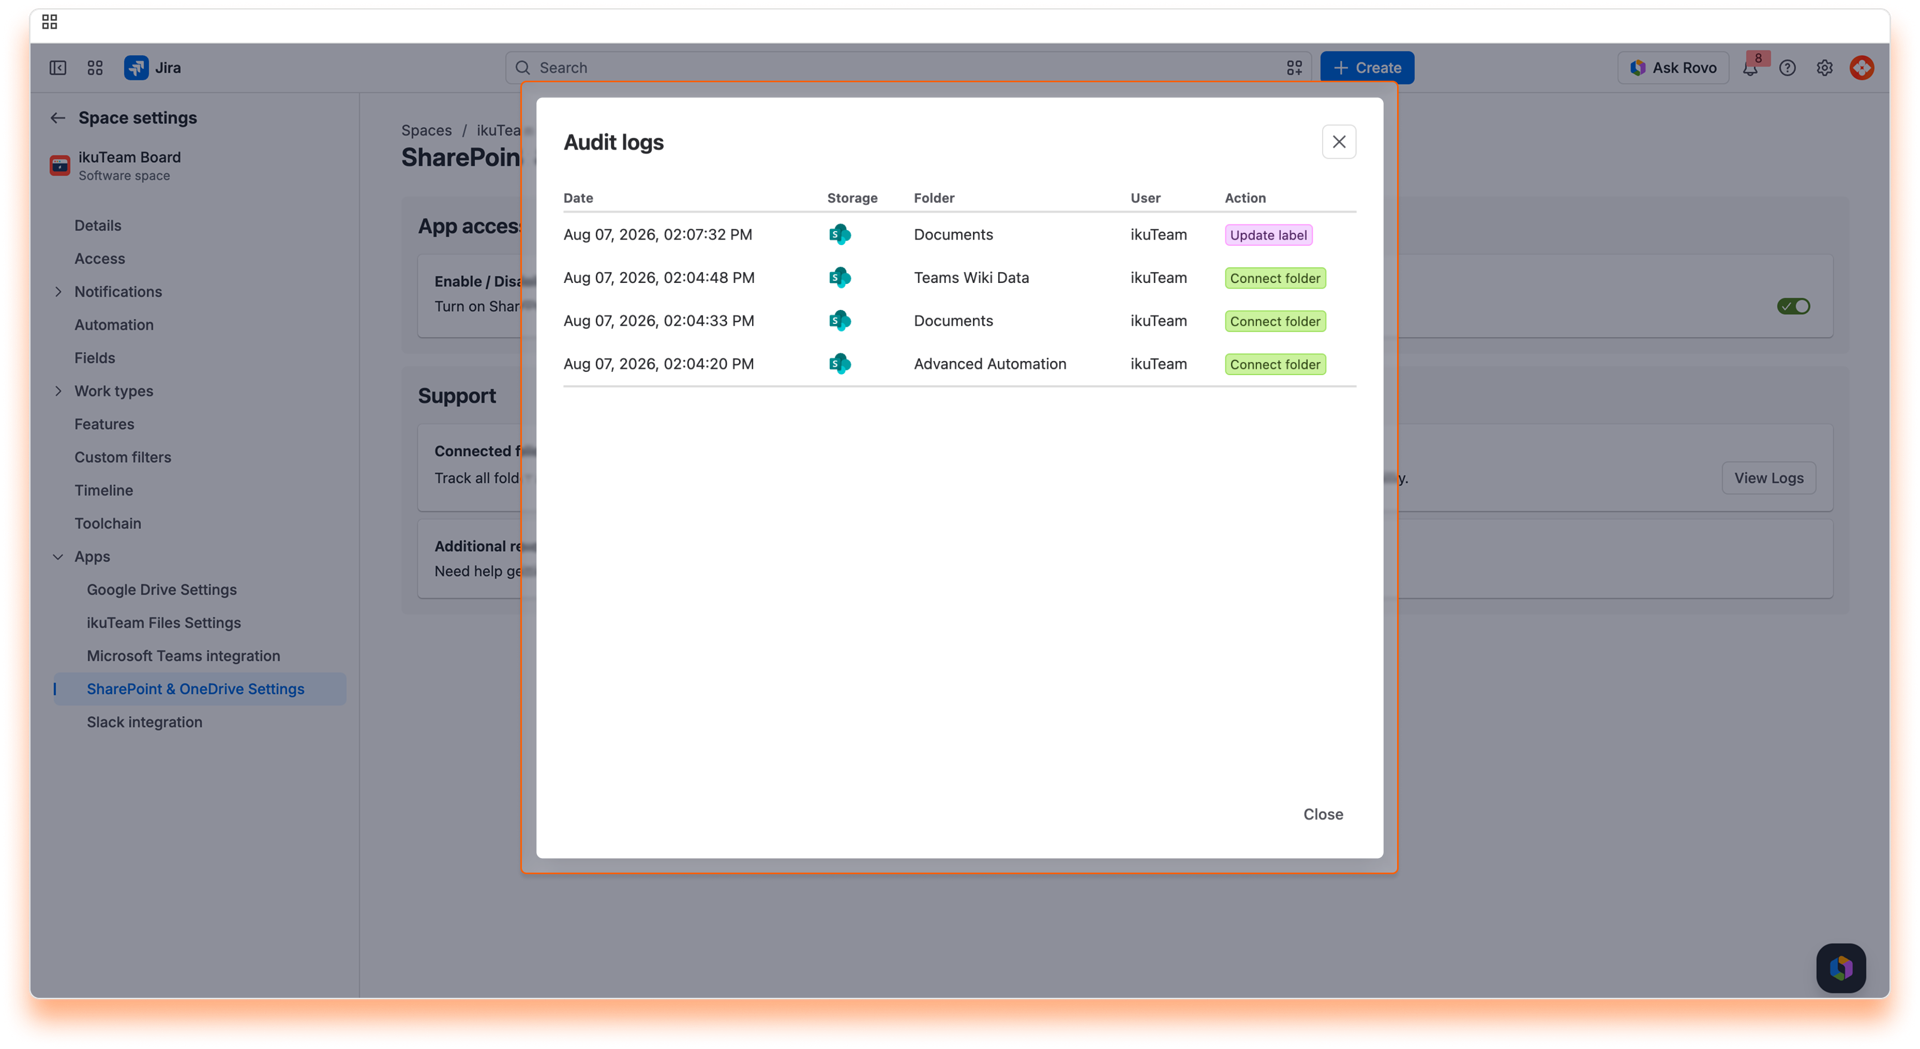
On this page, you learned about all the Project settings available.
If you still have questions about the topics covered on this page, visit our support portal and send them to us. Our team is always happy to help.
Adjust the SharePoint & OneDrive Connector app settings to your needs.
The SharePoint Connector for Jira app settings are accessible from the file manager by clicking the SharePoint & OneDrive tab available on the space board.
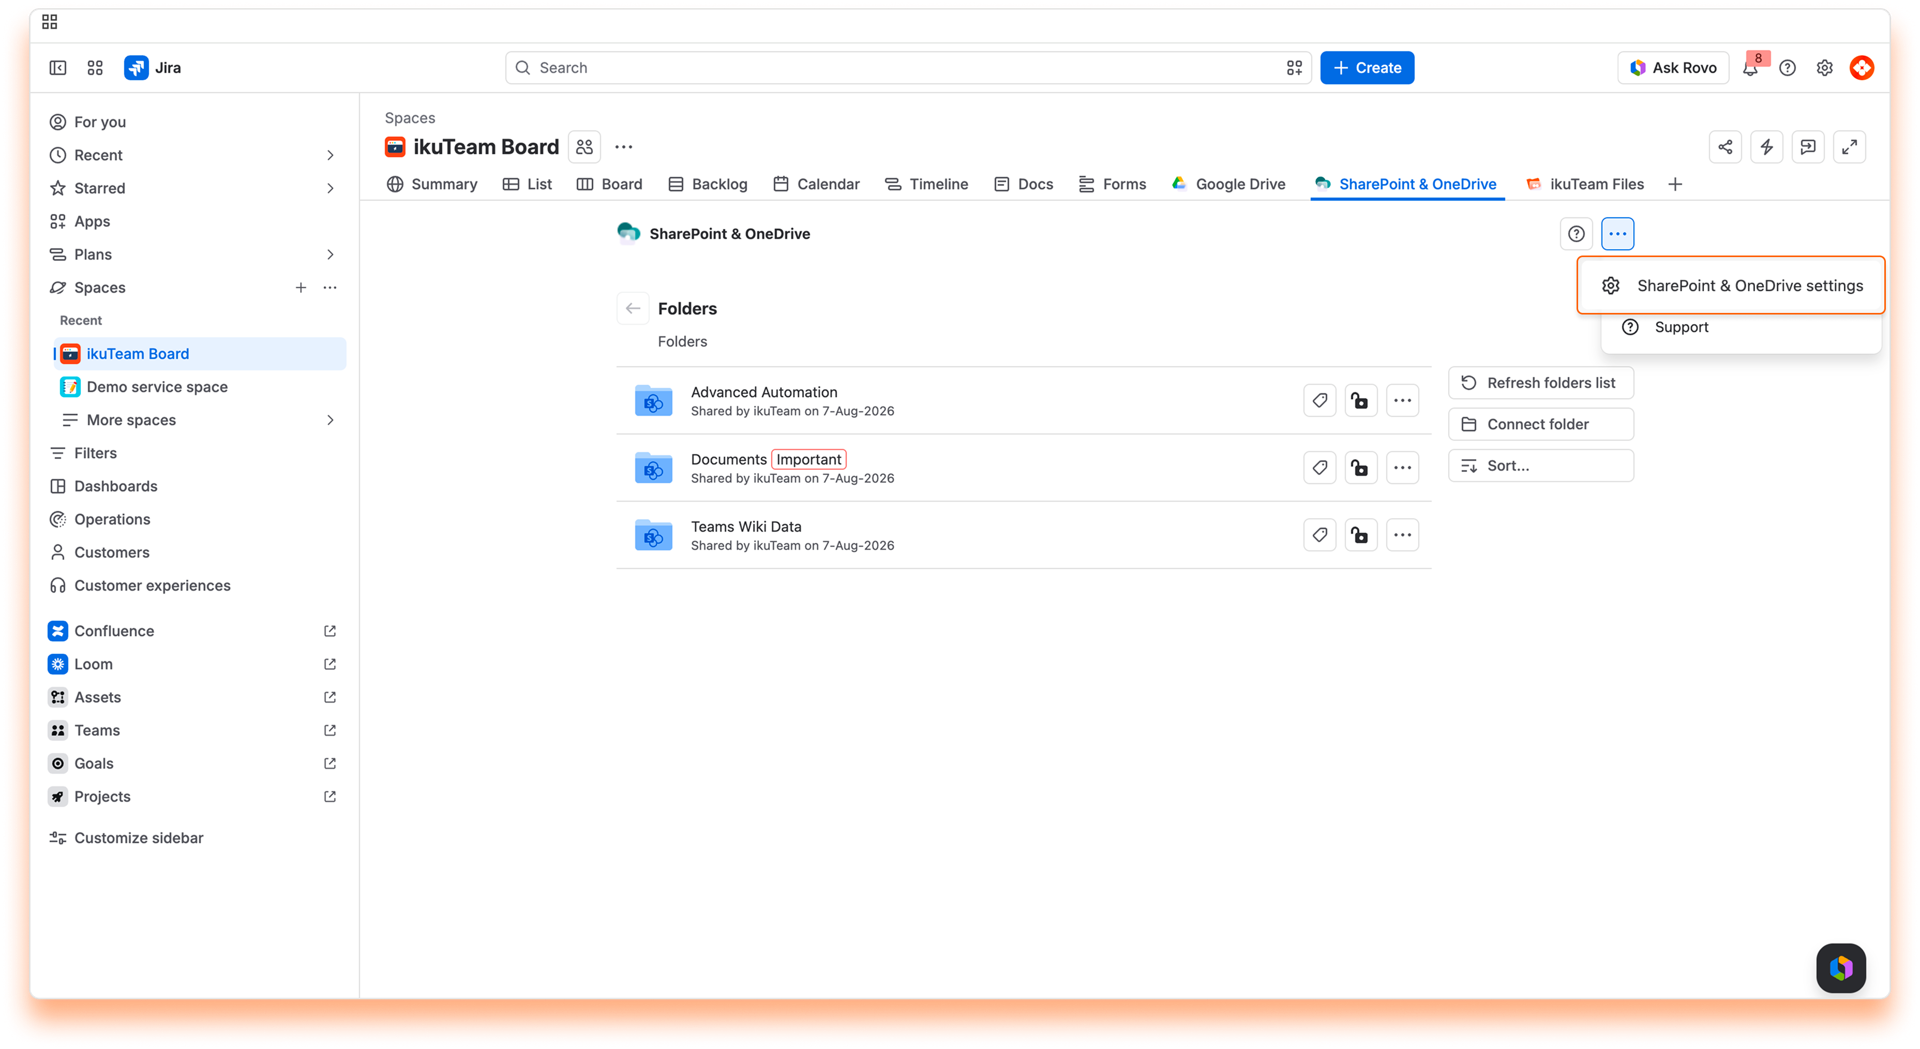
You can manage your connected places from the "Accounts" tab inside the SharePoint & OneDrive settings. You're in control of your storage places: only you can see the places you are allowed, and you, and only you, can disconnect them. 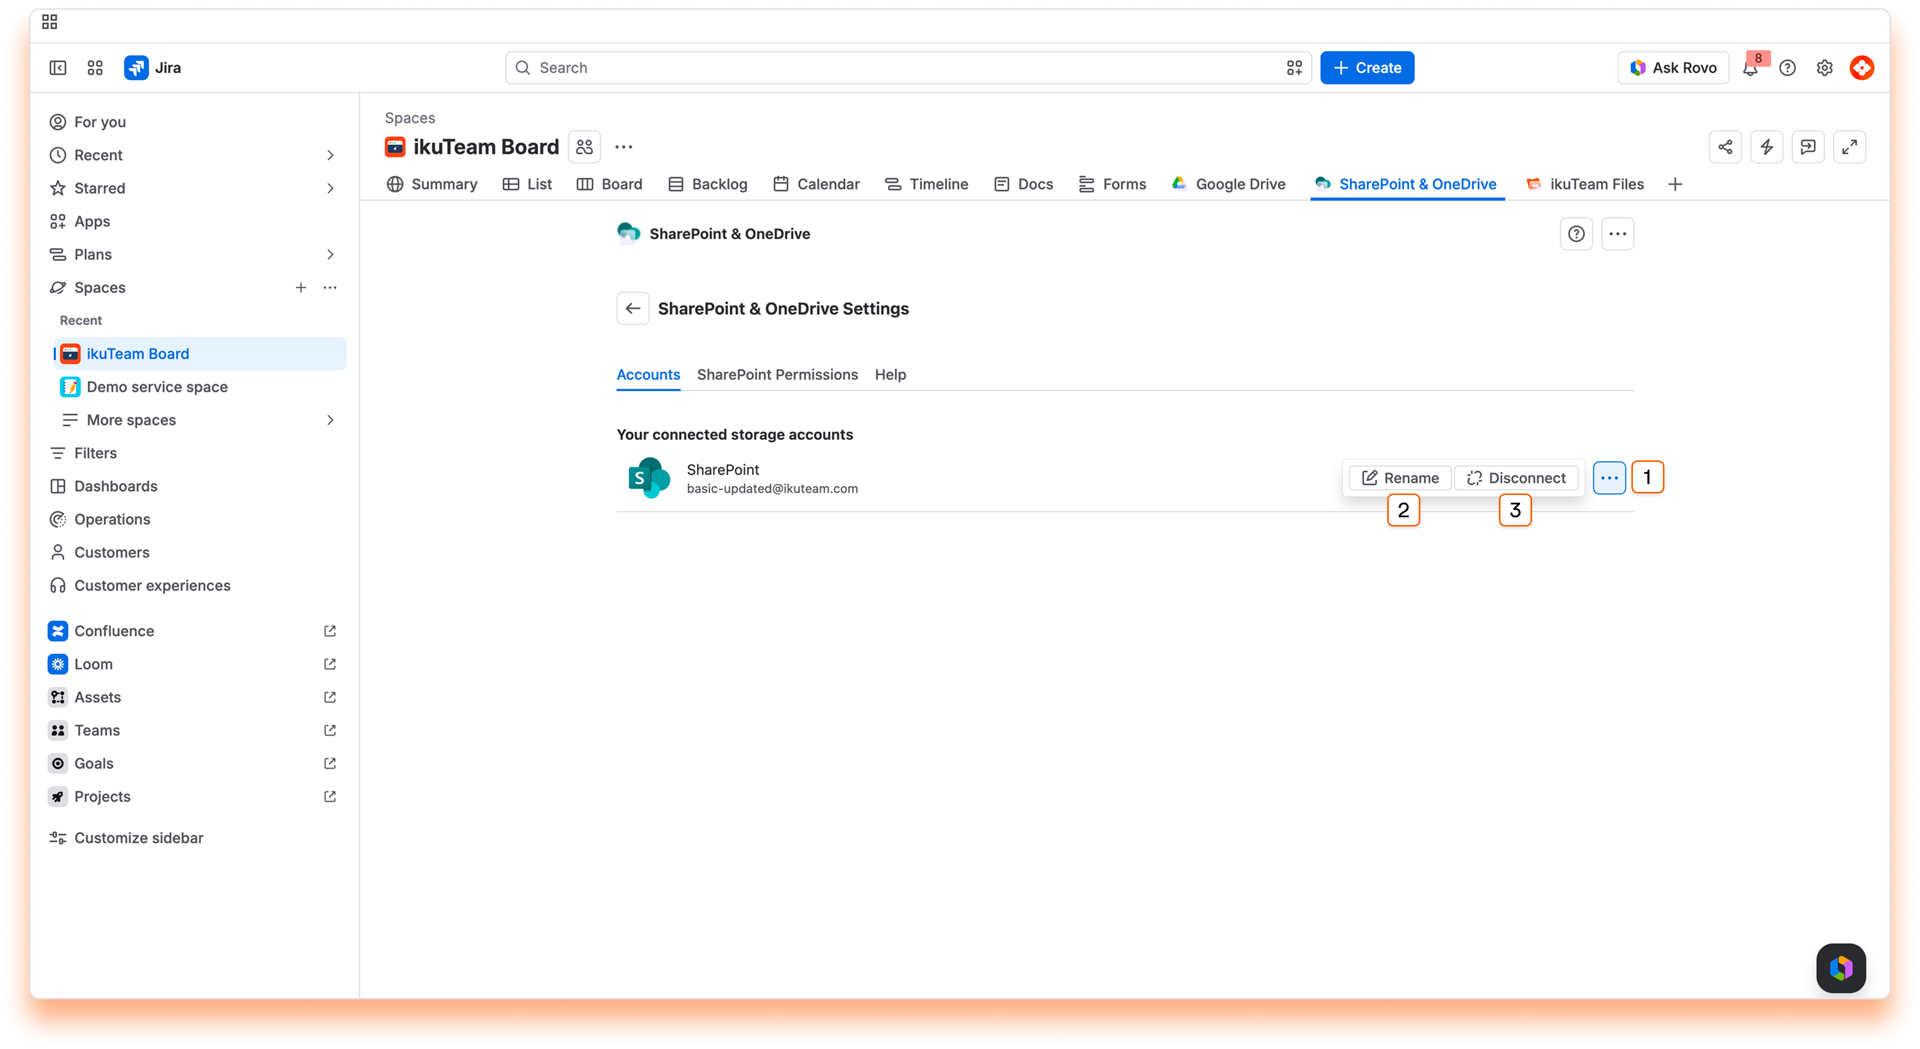
Accounts tab:
List of your connected places.
You can connect several accounts from the same service, and by default, we add a number at the end when you do it to differentiate them. To help you keep things organized, you can rename your places to something more meaningful to you.
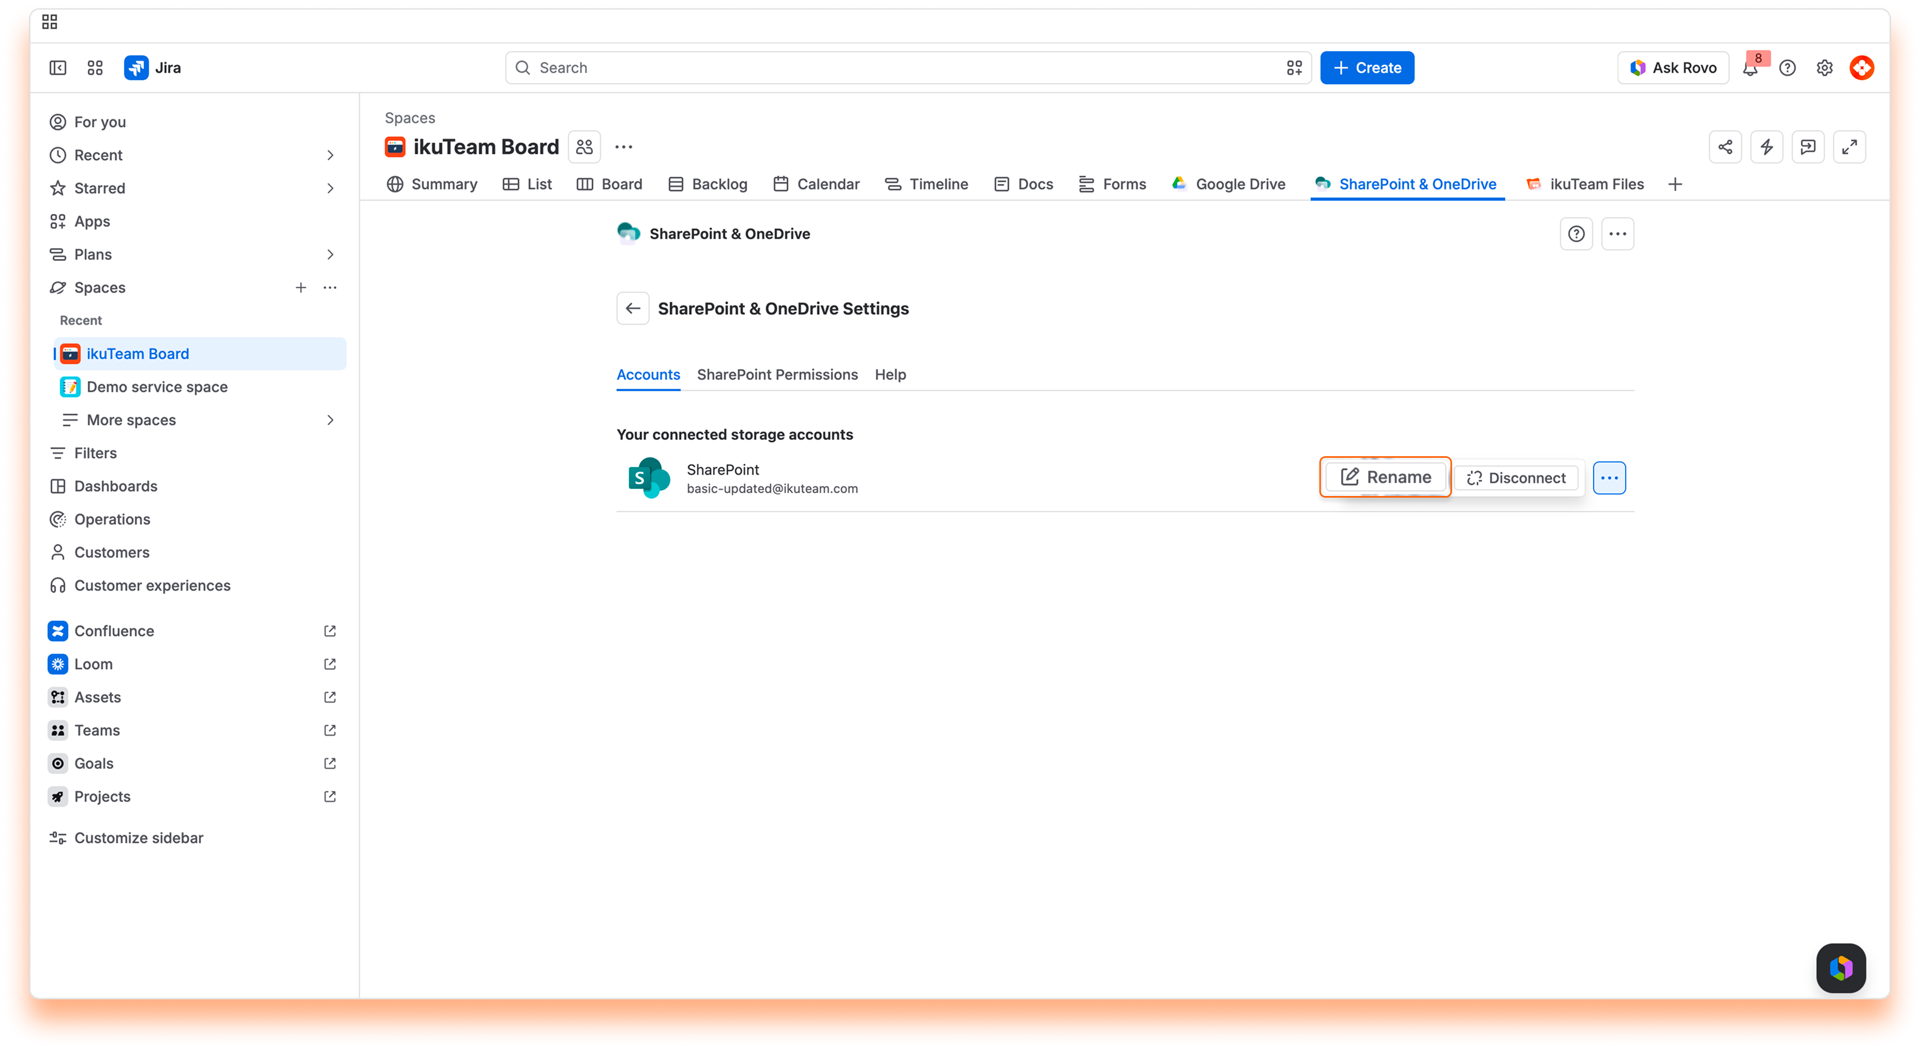
Instructions:
✅ That's it. Updating the name just takes a few moments, and it's ready to use.
ℹ️ You can also rename and manage your places from the "Connect a Folder" dialog.
Before getting into how to do it, it's relevant to know that you're only breaking the link in the SharePoint Connector for Jira app to the original storage when you disconnect a place. All your content is safe, but any folders you have connected from that place will also be disconnected. Consequently, files and folders that you or your team attached to Jira work items from the disconnected folders also lose the link to the original storage and become unavailable.
⚠️ If you accidentally disconnect a place, you can connect it again within 30 days to restore the connected folders and attachments. After this period, it’s no longer possible to restore the existing attachments.
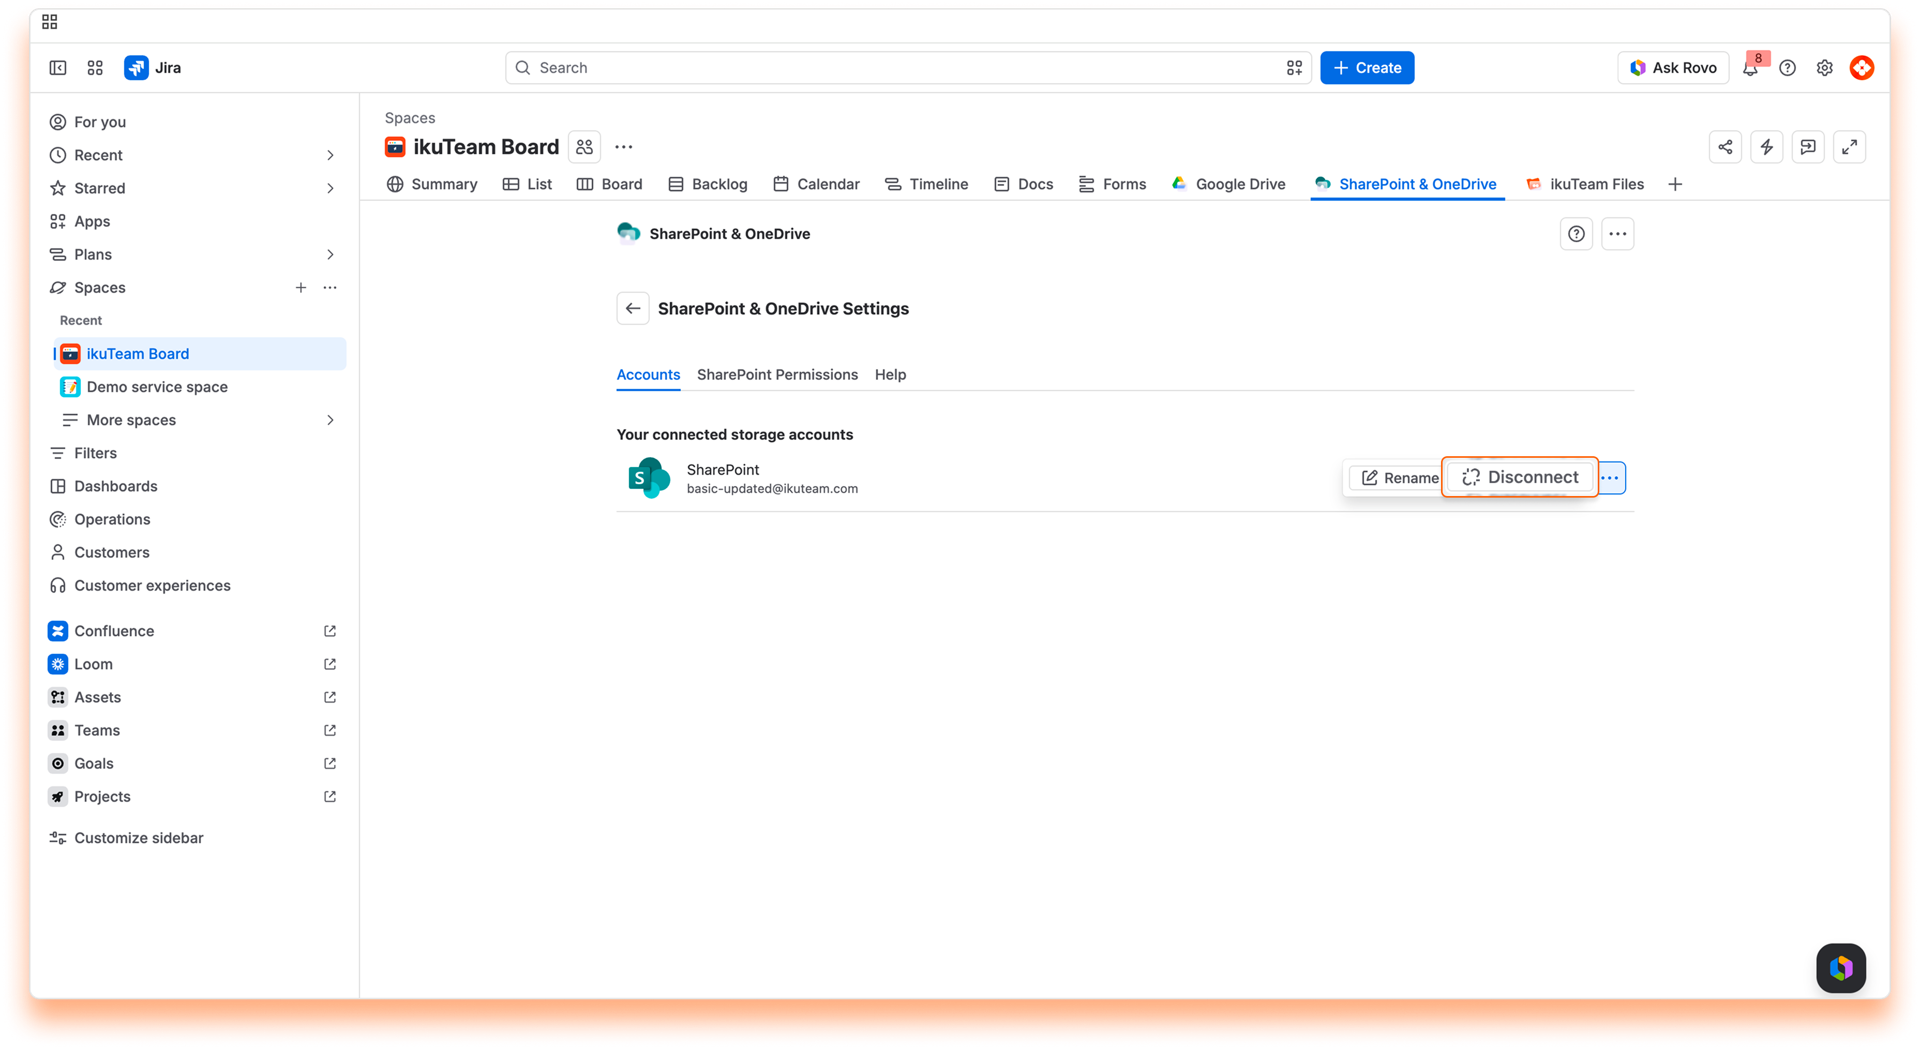
Instructions:
✅ All done. Your storage place is safe and sound but no longer accessible in the SharePoint Connector for Jira app.
ℹ️ You can also disconnect and manage your places from the "Connect a Folder" dialog.
The Help tab contains a brief description of the app, information about the team that developed it, and links to learn more.
You also find the links to contact the support team and to this documentation.
On this page, you learned about all the settings available at the moment. As we introduce new features, we'll add additional settings so you can further customize your experience.
If you still have questions about the topics covered on this page, visit our support portal and send them to us. Our team is always happy to help.
Learn how to use advanced features included in the SharePoint Connector for Jira app.
The SharePoint Connector for Jira app now includes a custom field to call with JQL to search for issues or apply workflow rules using the following queries.
To find issues with no items attached:
"Sharepoint & OneDrive attachments" = "false"
To find issues with items attached:
"Sharepoint & OneDrive attachments" = "true"
To find issues with no items attached or that never had any SharePoint items attached:
"Sharepoint & OneDrive attachments" is EMPTY OR "Sharepoint & OneDrive attachments" = "false"
⚠️ IMPORTANT: Only attachments added after v1.2.15-AC (mid-October 2022 release) appear in the JQL search.
Those are all the advanced features included until now.
You can check our public roadmap to see what’s coming next. If you can’t find the feature you’re looking for, you can create a feature request. We’re always looking for ways to improve our apps.
Administrators can adjust how the SharePoint Connector for Jira app works to meet your team's needs and comply with company policies.
As the name implies, these settings are only visible to users with Administrator privileges. All the settings on this page are accessible by entering the “Apps” section in Jira settings and then clicking the "SharePoint & OneDrive Settings" link on the sidebar.
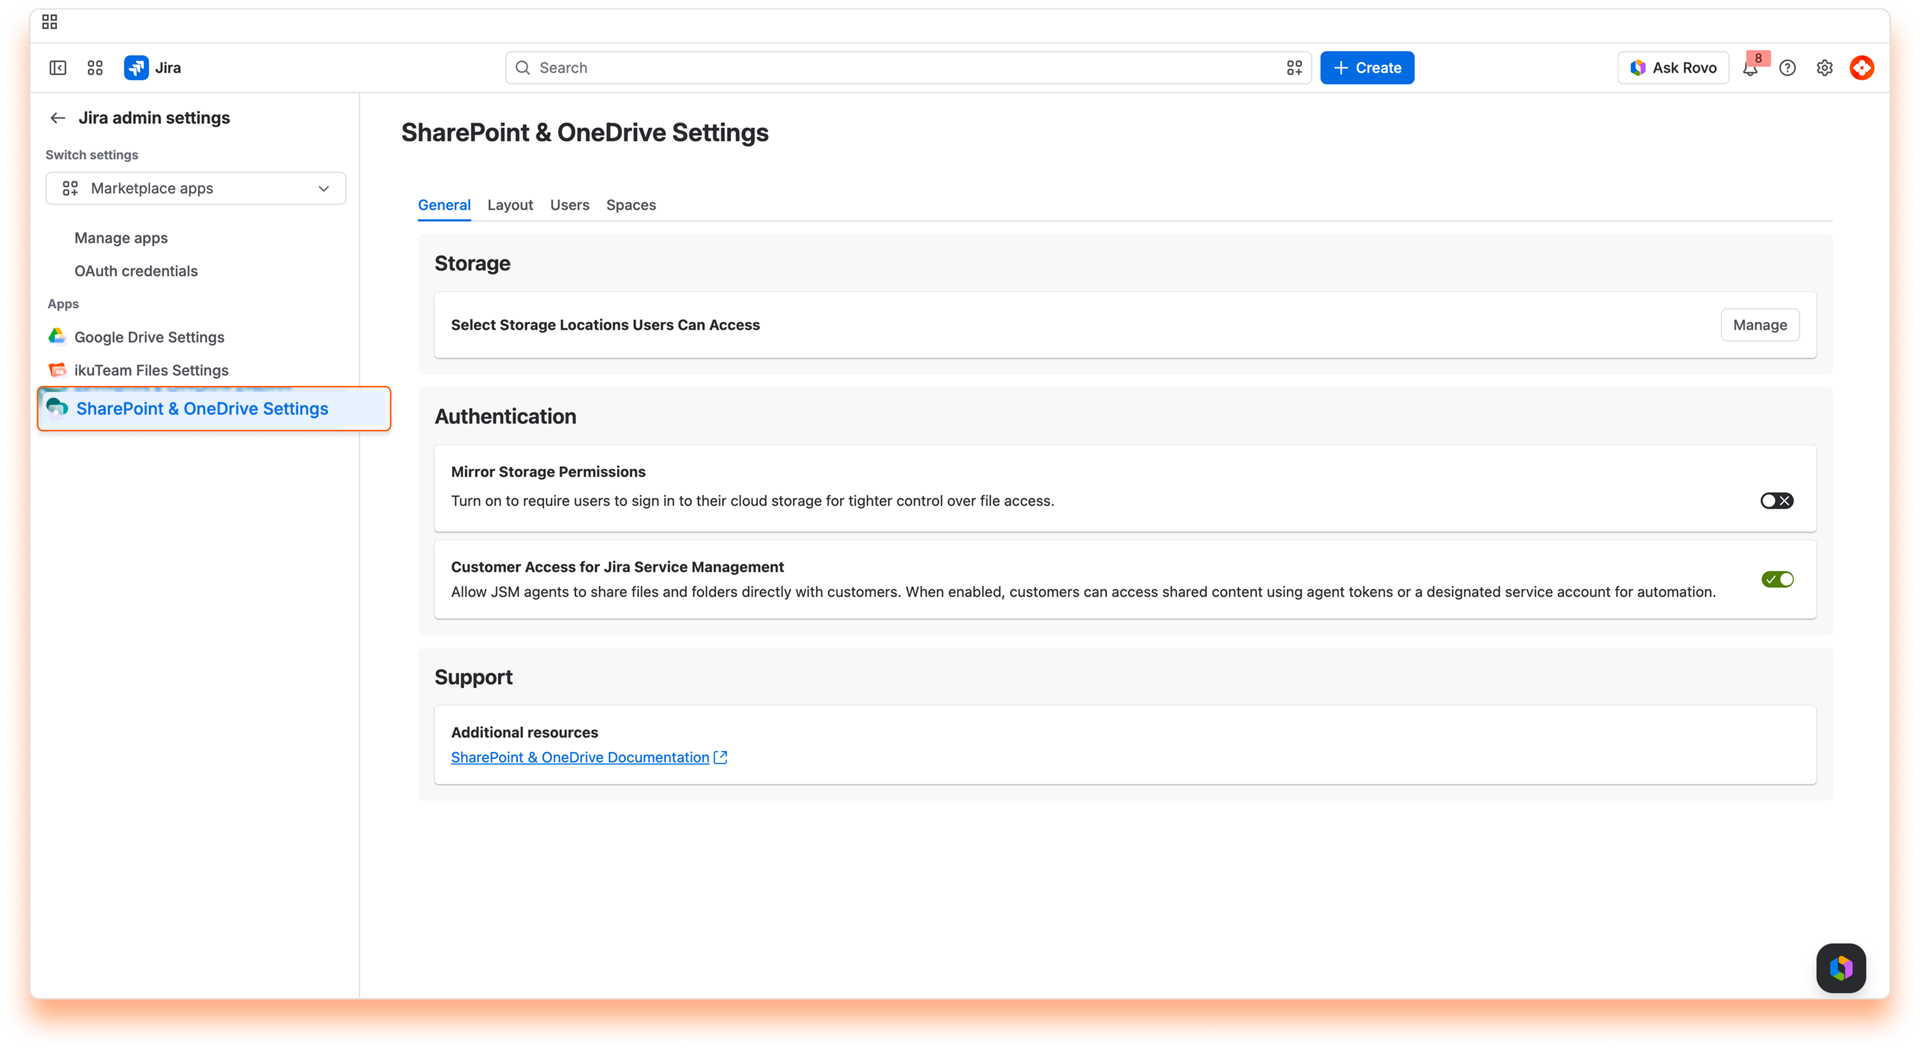
By default, users can connect folders from all the storage places supported by the SharePoint Connector for Jira app.
Administrators can easily restrict specific storage places to ensure that the SharePoint Connector for Jira use aligns with company policies. Click on the Manage button next to Select Storage Locations Users Can Access.
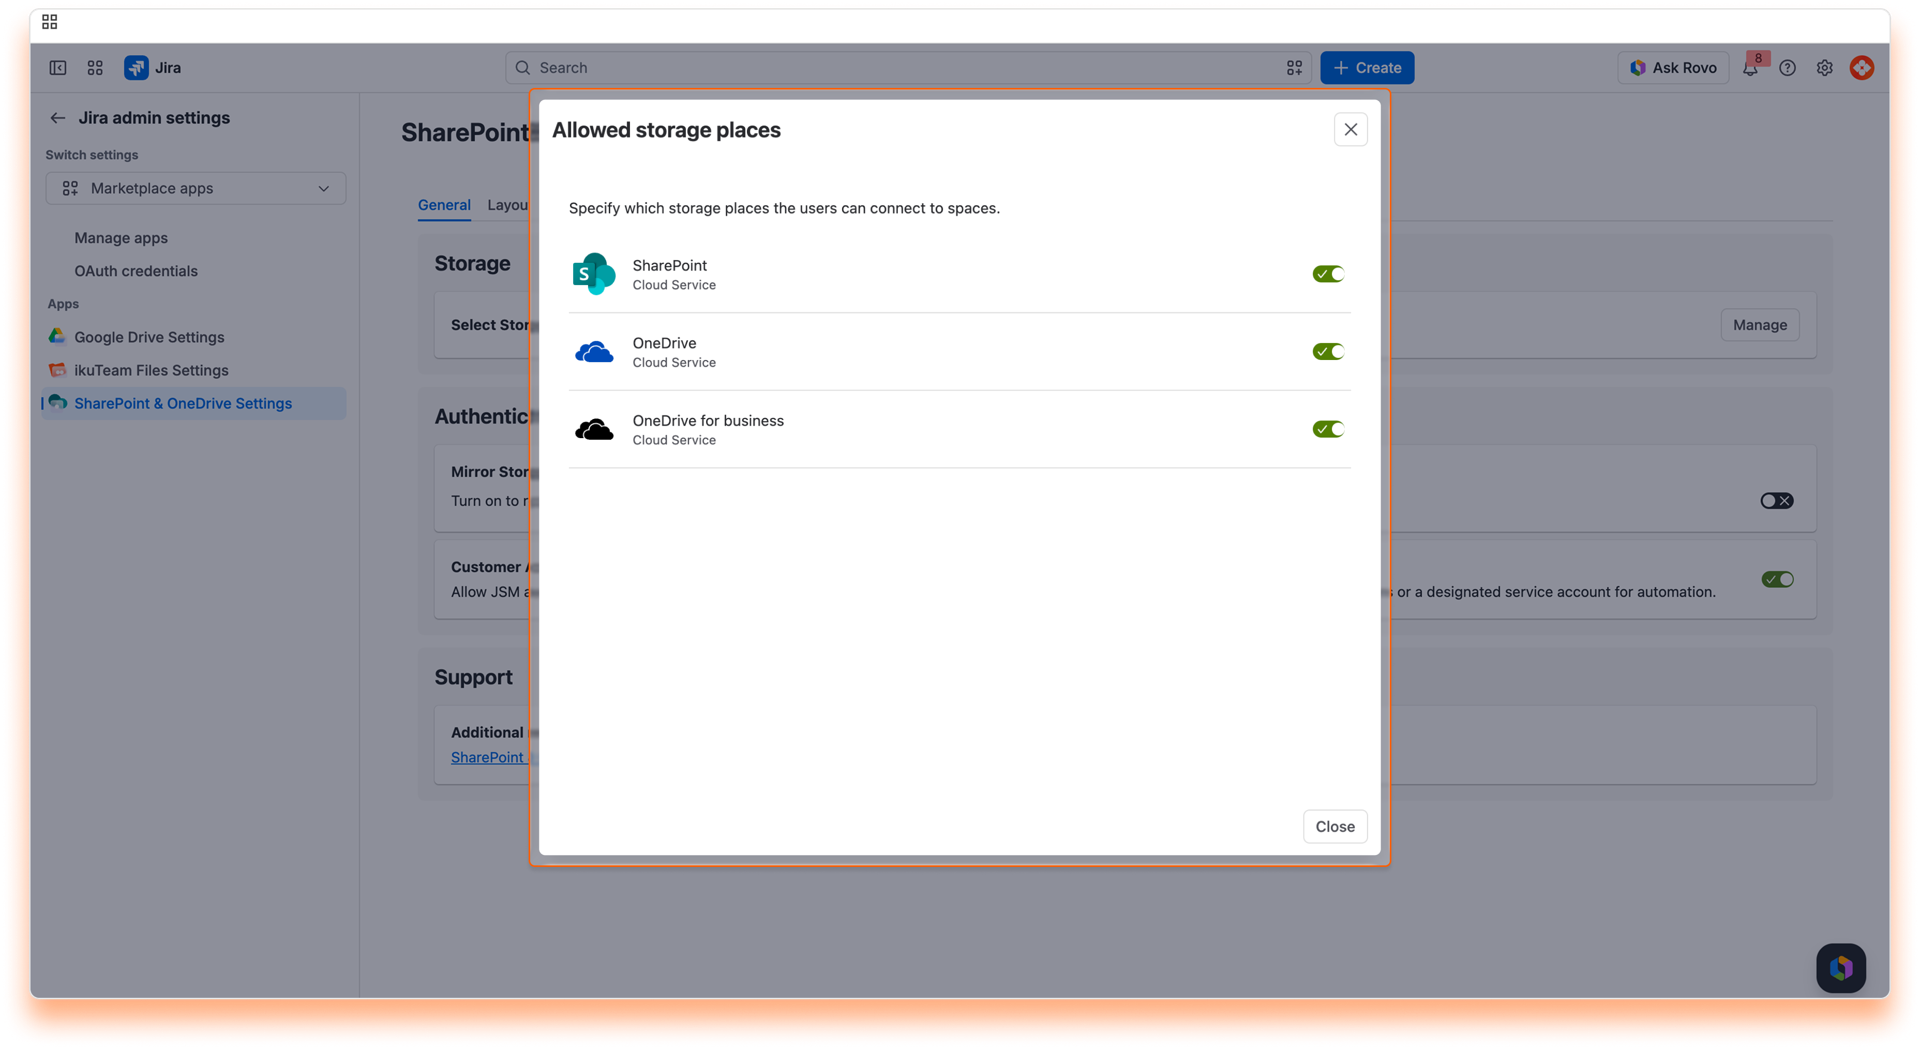
ℹ️ Changes to these settings are saved automatically and applied immediately.
If a user connected a folder from a storage place that the Admin later turns off, it becomes blocked inside the SharePoint Connector for Jira app. All connected folders from that place are blocked too, and if there are attached folders and files from a blocked storage place, the content won't be visible, and they'll display a warning mentioning the Admin blocked the access.
ℹ️ Changes to these settings are saved automatically and applied immediately.
The SharePoint Connector for Jira app simplifies the authentication by default, favoring ease of use with simplified permissions. Admins can require users to authenticate with an account with access to connected folders to better control how files are shared, viewed, and edited. 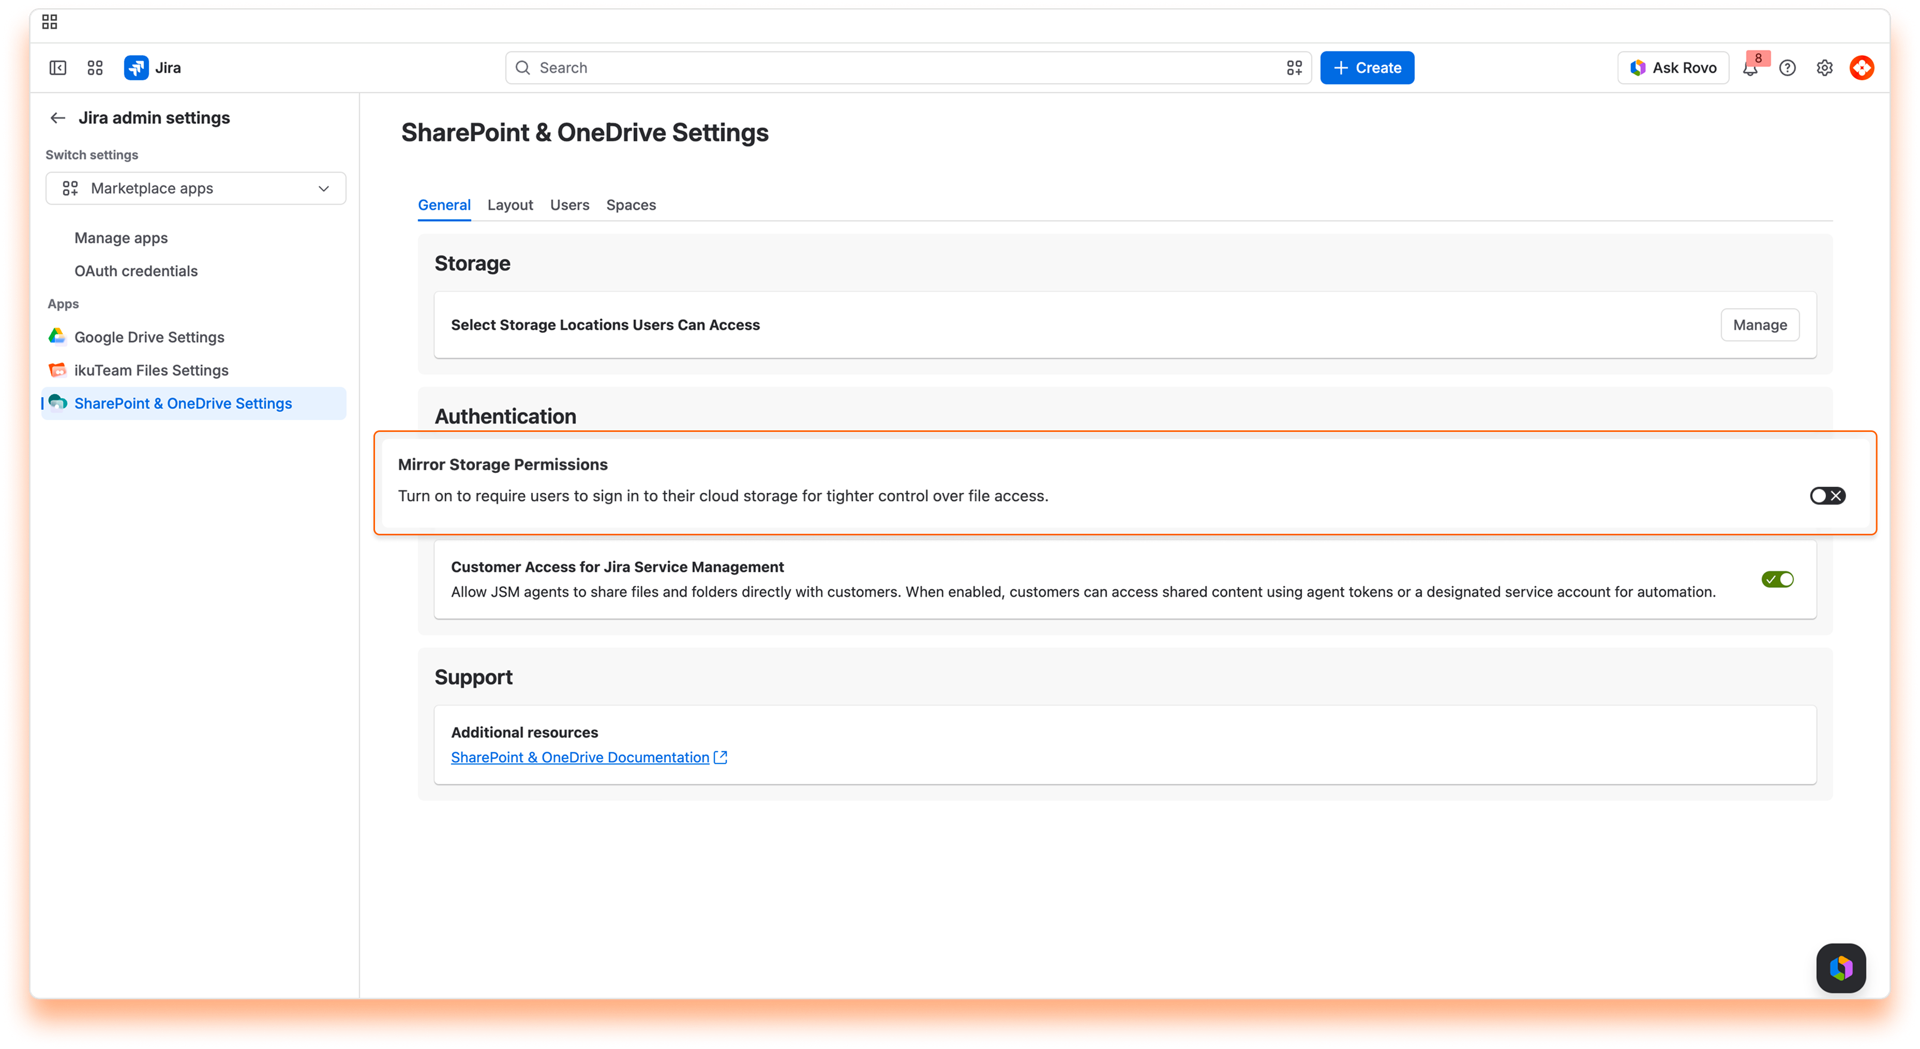
Remember that this option requires users to sign in to each connected folder to view and edit the files so the correct permissions are applied for each user. Learn more
ℹ️ Changes to these settings are saved automatically and applied immediately.
ℹ️ Changing this setting saves automatically and applies immediately.
This is part of the Advanced version of the App which supports JSM agents to share files and folders directly with customers.
When enabled, customers can access shared content using agent tokens or a designated service account for automation via customer portal.
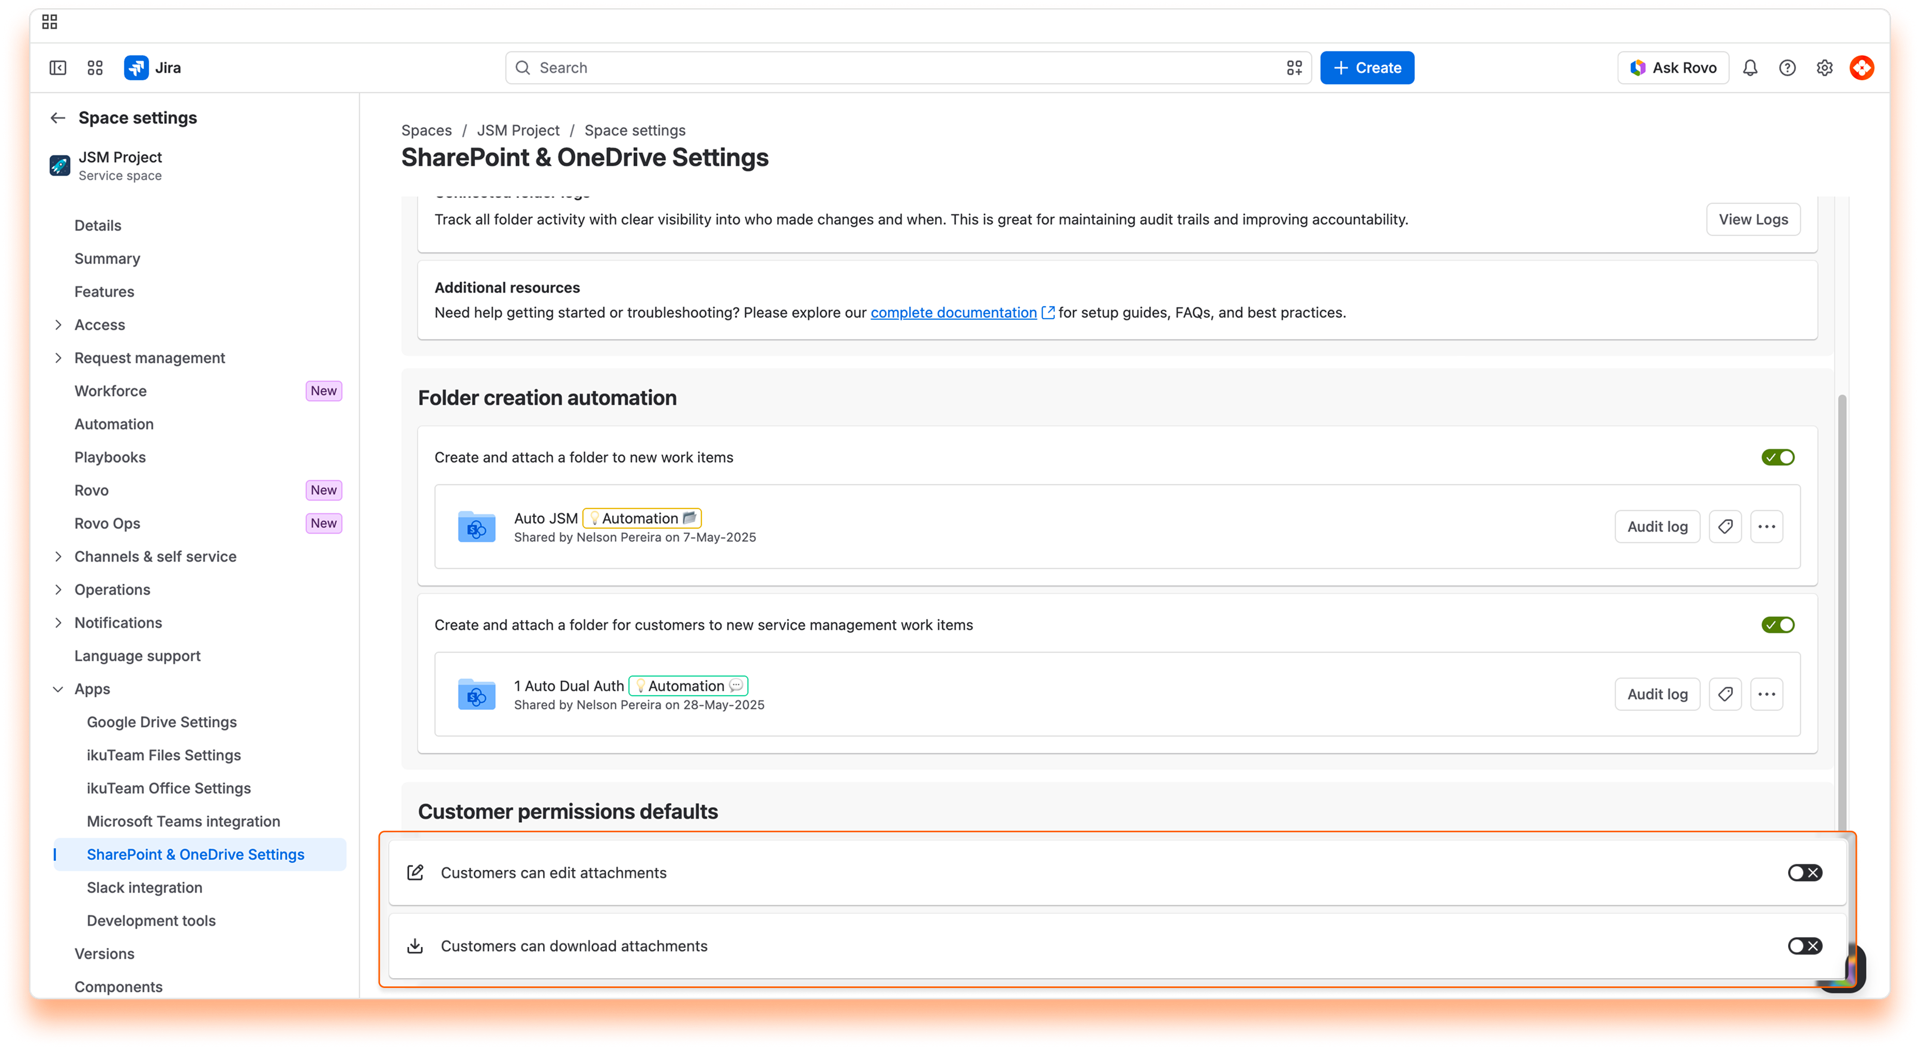
Customer permissions defaults
This can be configured from the JSM space setting to allow/restrict the customers to edit and download attachments.
By default, the files and folders attached to Jira issues use a regular header and appear in the collapsed view to use less space on the screen. It’s easy to preview the file by clicking the arrow to open the expanded view, which uses the width of the page and is 464px tall by default, or clicking the file name (or preview button) to open the full-screen preview.
The Admin can set different defaults for new issues in the Admin settings section dedicated to the preview options.
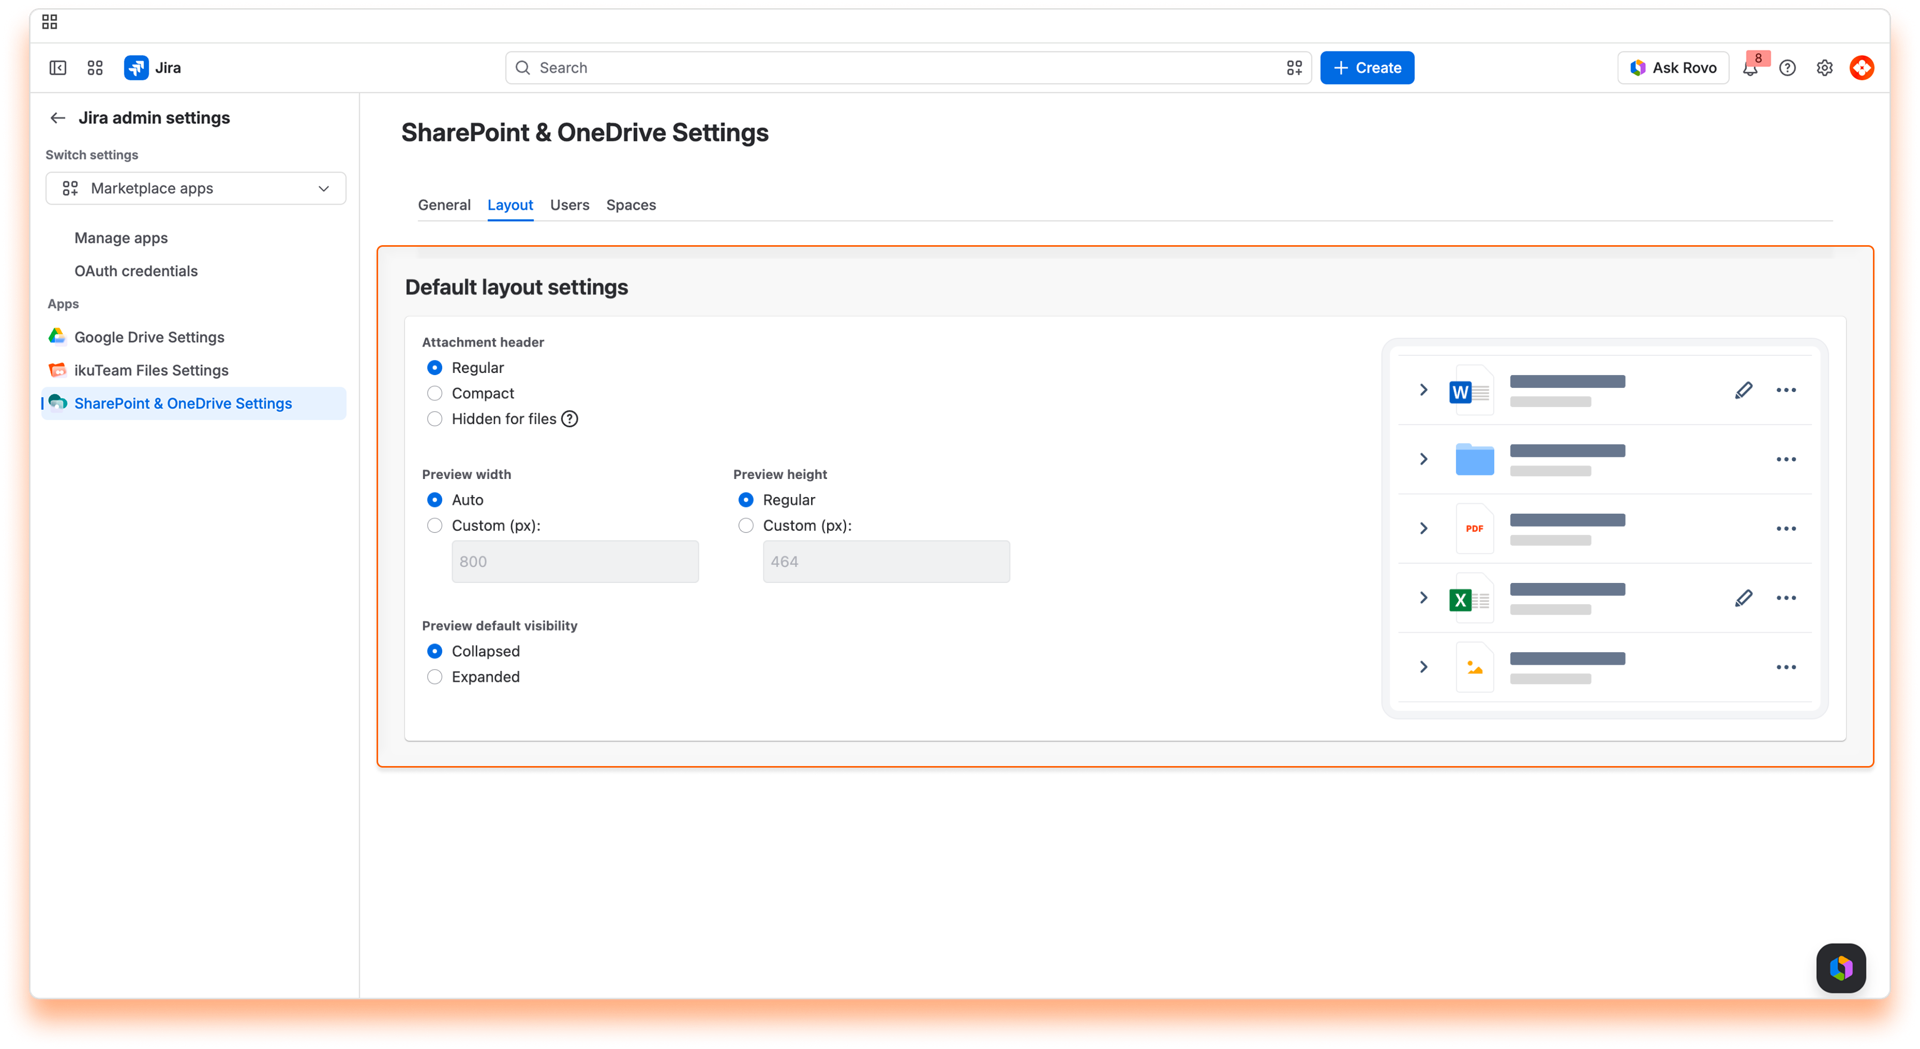
Select the default size for the header of attachments:
Select the default width for the preview:
Select the default height for the preview:
Select the default behavior for the preview:
ℹ️ Changes to these settings are saved automatically and applied immediately.
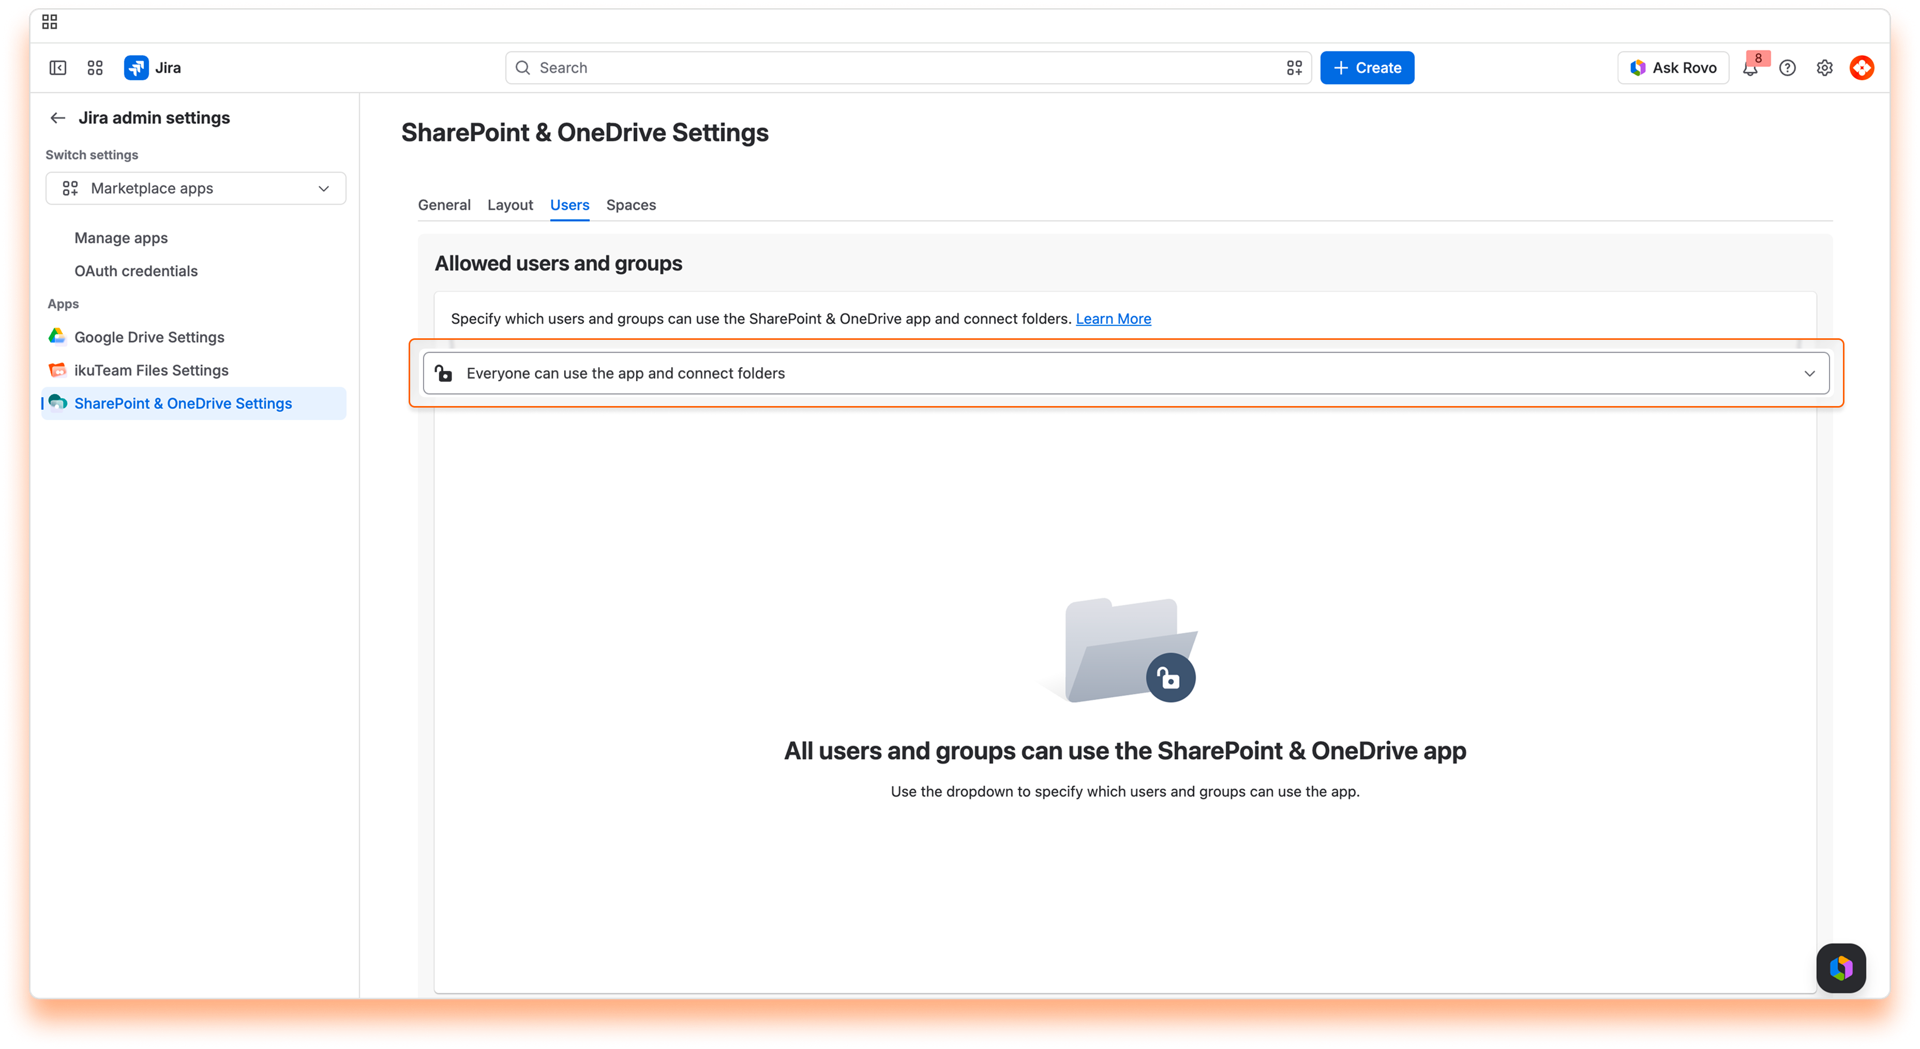
By default, all users and groups can use the SharePoint Connector for Jira app. It’s accessible with a link on the space sidebar.
However, an Admin can specify which users and groups can use the SharePoint Connector for Jira app.
The current settings are in the "Users & Groups" section. There are three main options that you can select from the drop-down menu:
All users and groups can access the SharePoint Connector for Jira app using the default option.
Select this option if everyone should be able to use the SharePoint Connector for Jira app, but only some users and groups can connect folders.
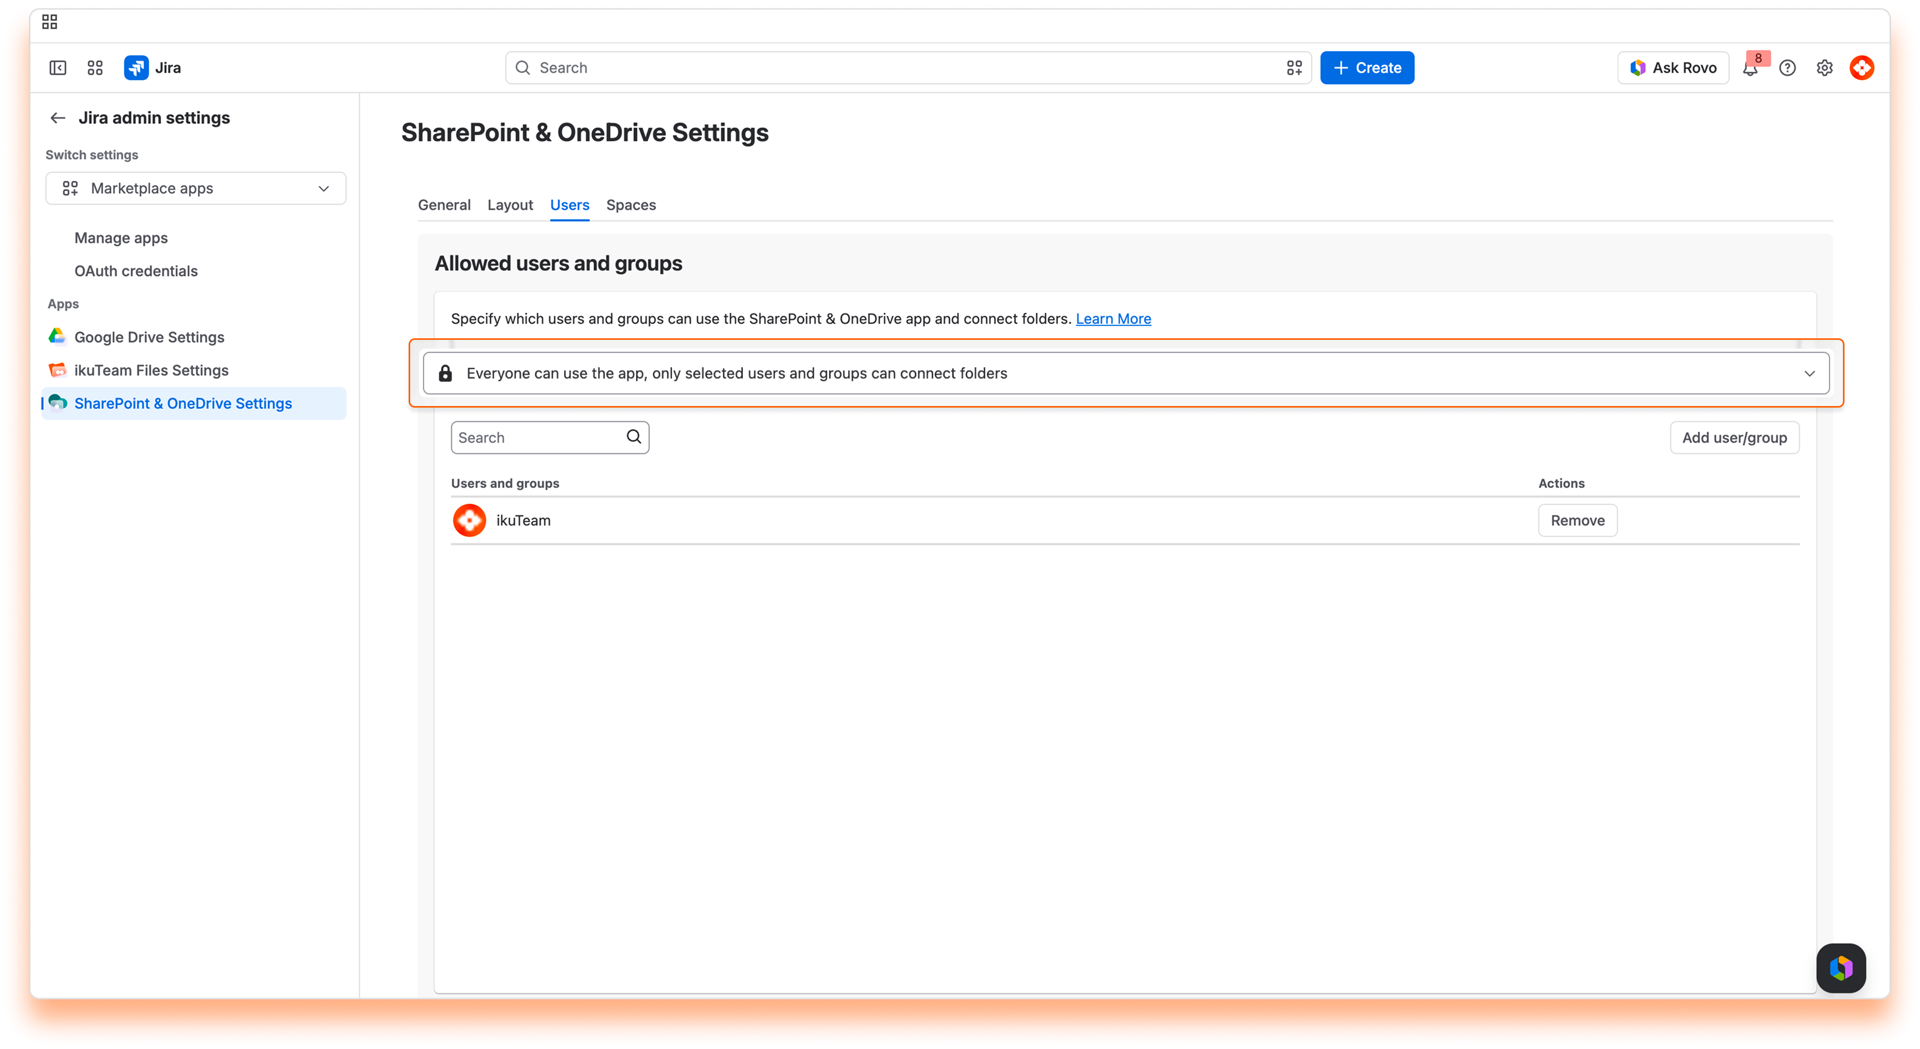
Adding a user or group:
Click the “Add User/Group” button, start typing to select a name, and click the “Add” button. The user or group gets access to connect folders immediately.
Removing a user or group:
Search for the user or group you want to remove, click the “Remove” button, and confirm. The option to connect folders will be hidden from the user or group immediately.
Select this option if you only want some users and groups to use the SharePoint Connector for Jira app, and specify who can connect folders.
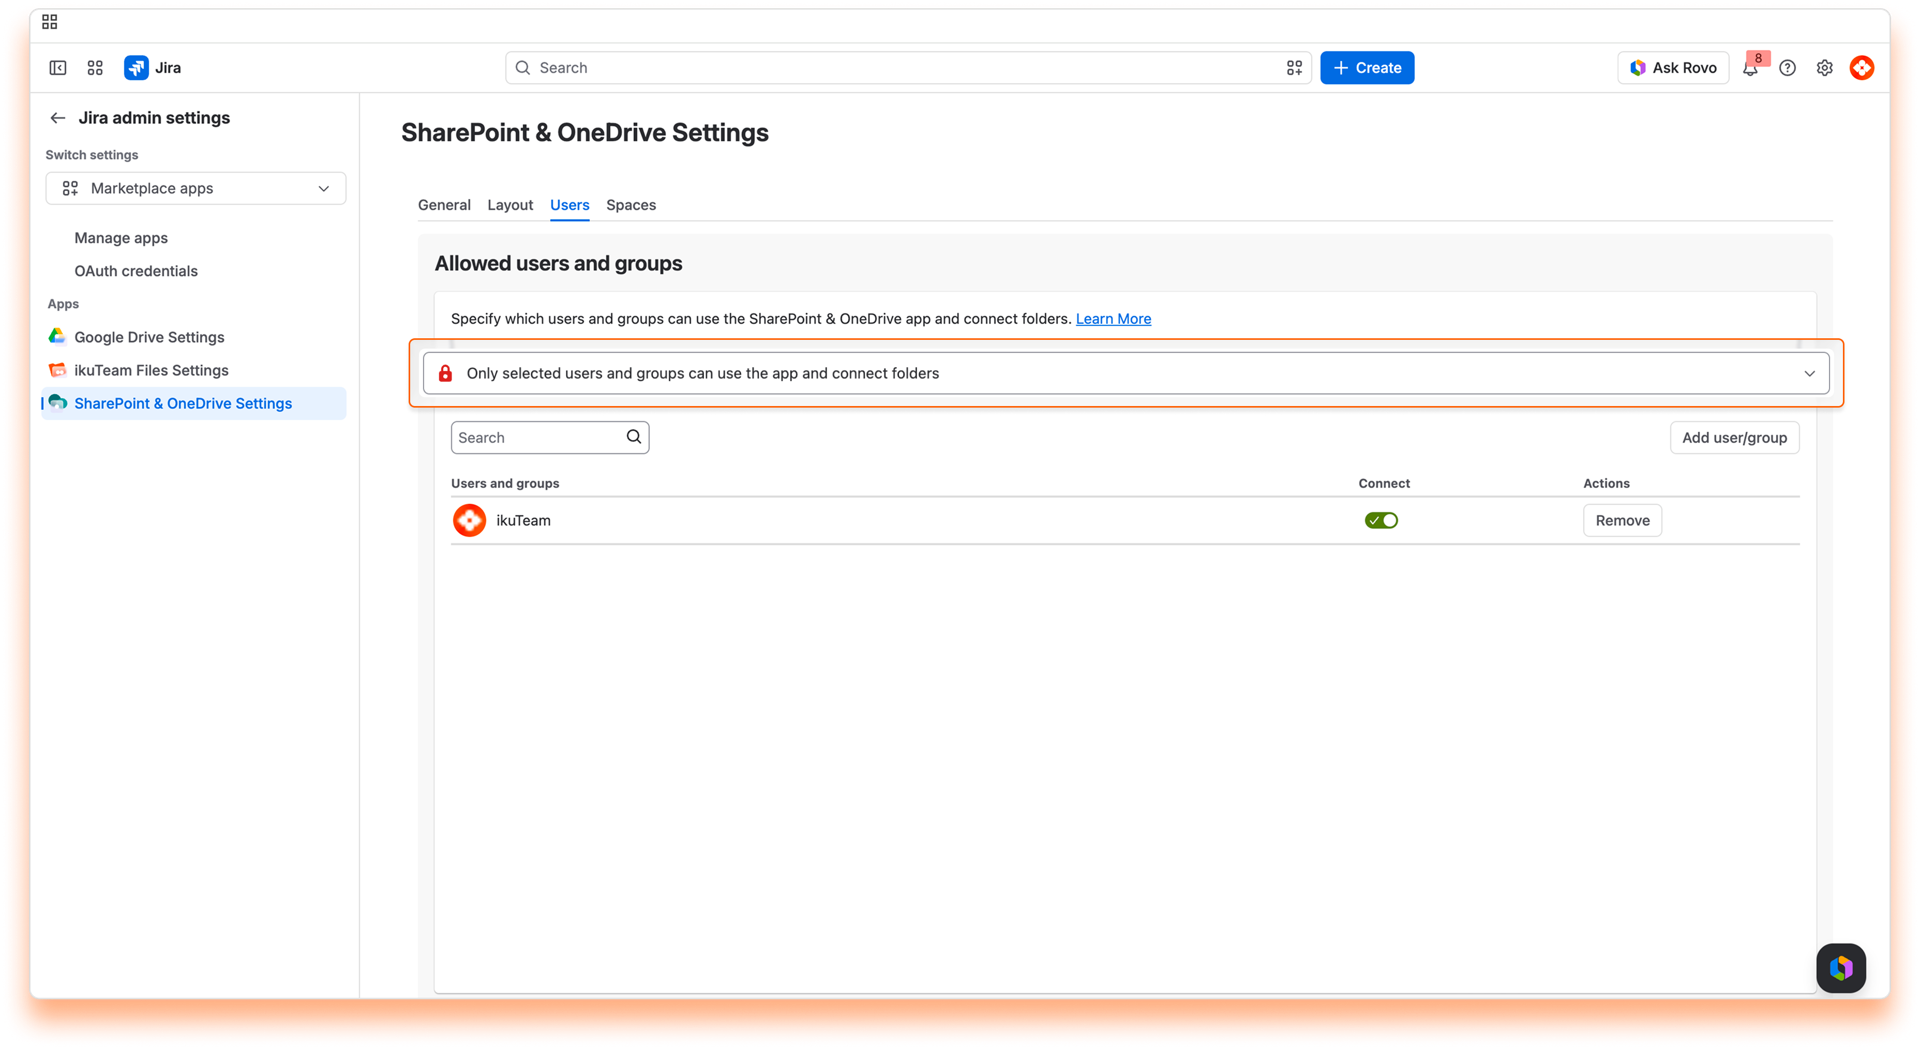
Adding a user or group:
Click the “Add User/Group” button, start typing to select a name, and click the “Add” button again. The user or group will have immediate access to the app.
Connect folder permission:
Use the toggle button to determine if a user or group can connect folders.
Removing a user or group:
Search for the user or group you want to remove, click the “Remove” button, and confirm. The app will be blocked for that user or group immediately.
The SharePoint Connector for Jira app can be used on all spaces by default. It’s accessible through a link in the space sidebar and a button on the issues to attach files and folders.
However, an Admin can specify which Jira spaces can use the SharePoint Connector for Jira app. The file manager and the attach button are hidden when a space doesn’t have permission to use the app.
In the "Spaces" section, you can see the current settings. There are three main options that you can select from the drop-down menu:
This is the default option, meaning every space can access the SharePoint Connector for Jira app.
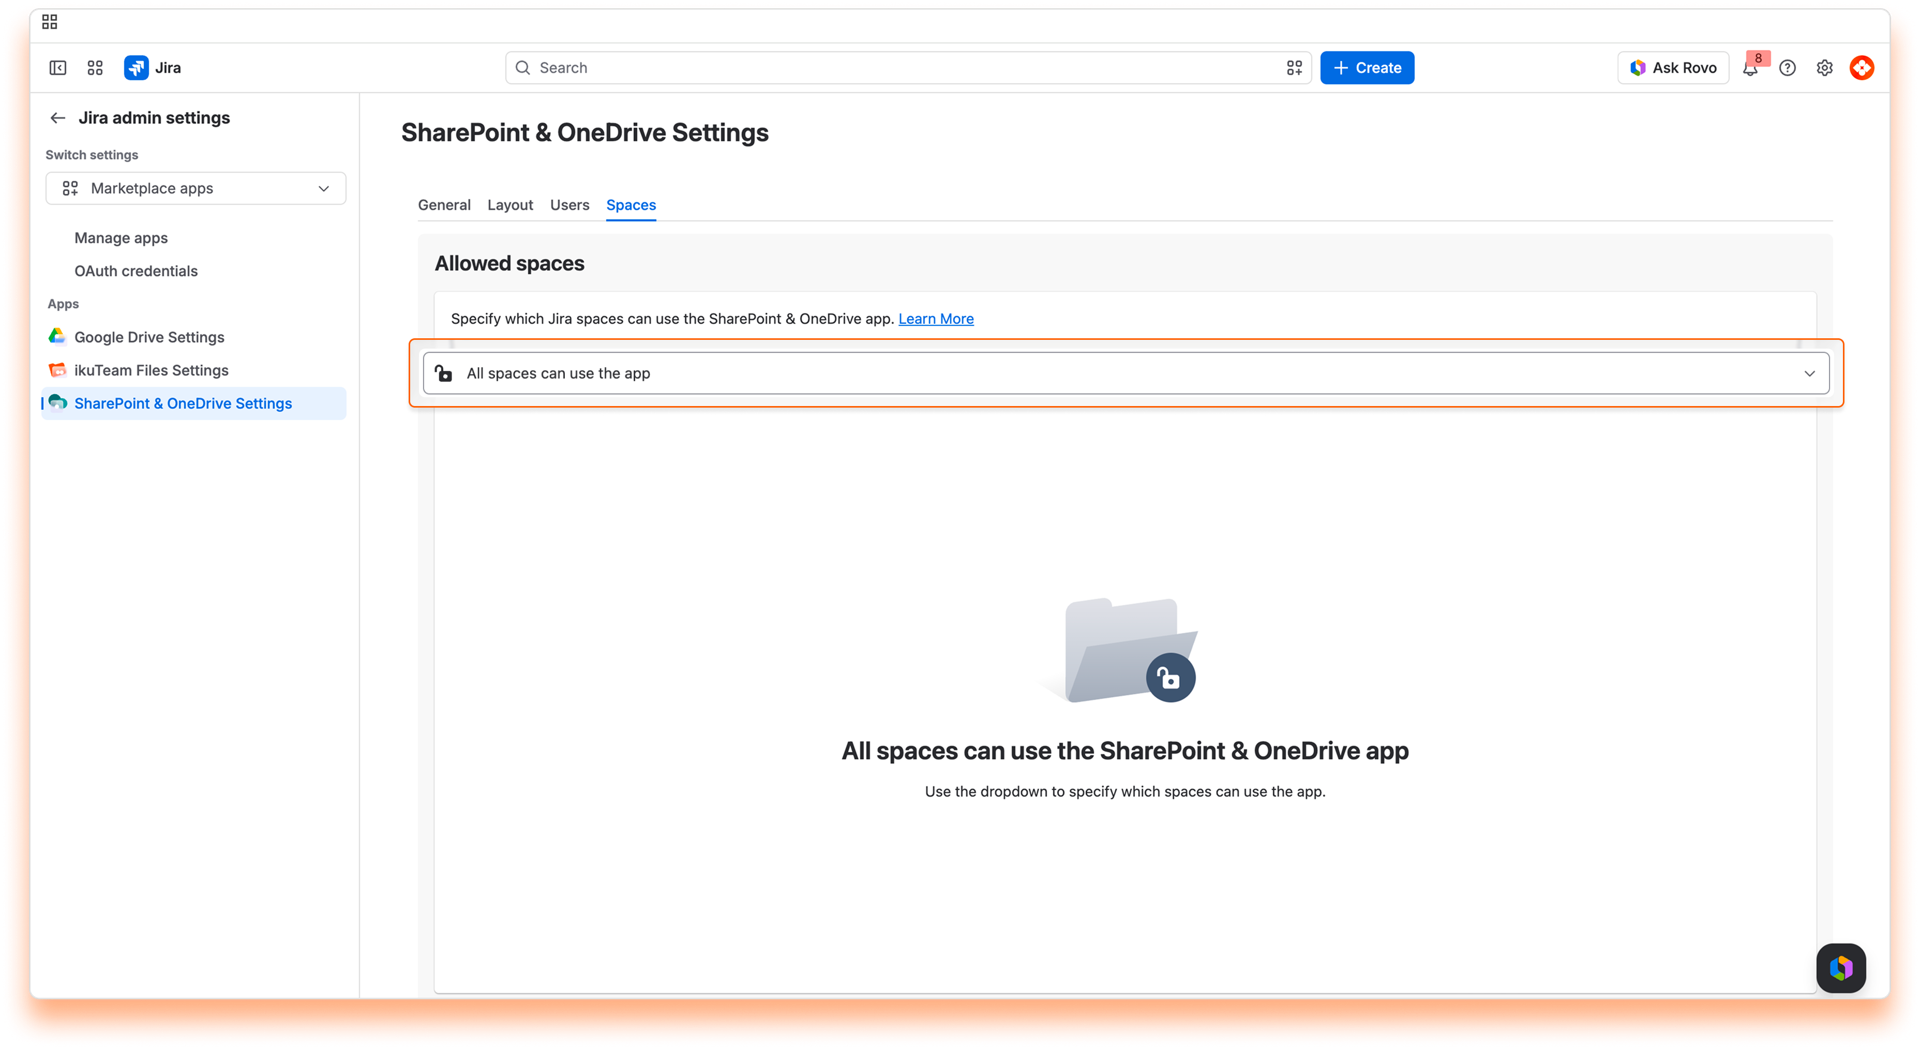
Select this option if you only want to allow the SharePoint Connector for Jira app for some spaces.
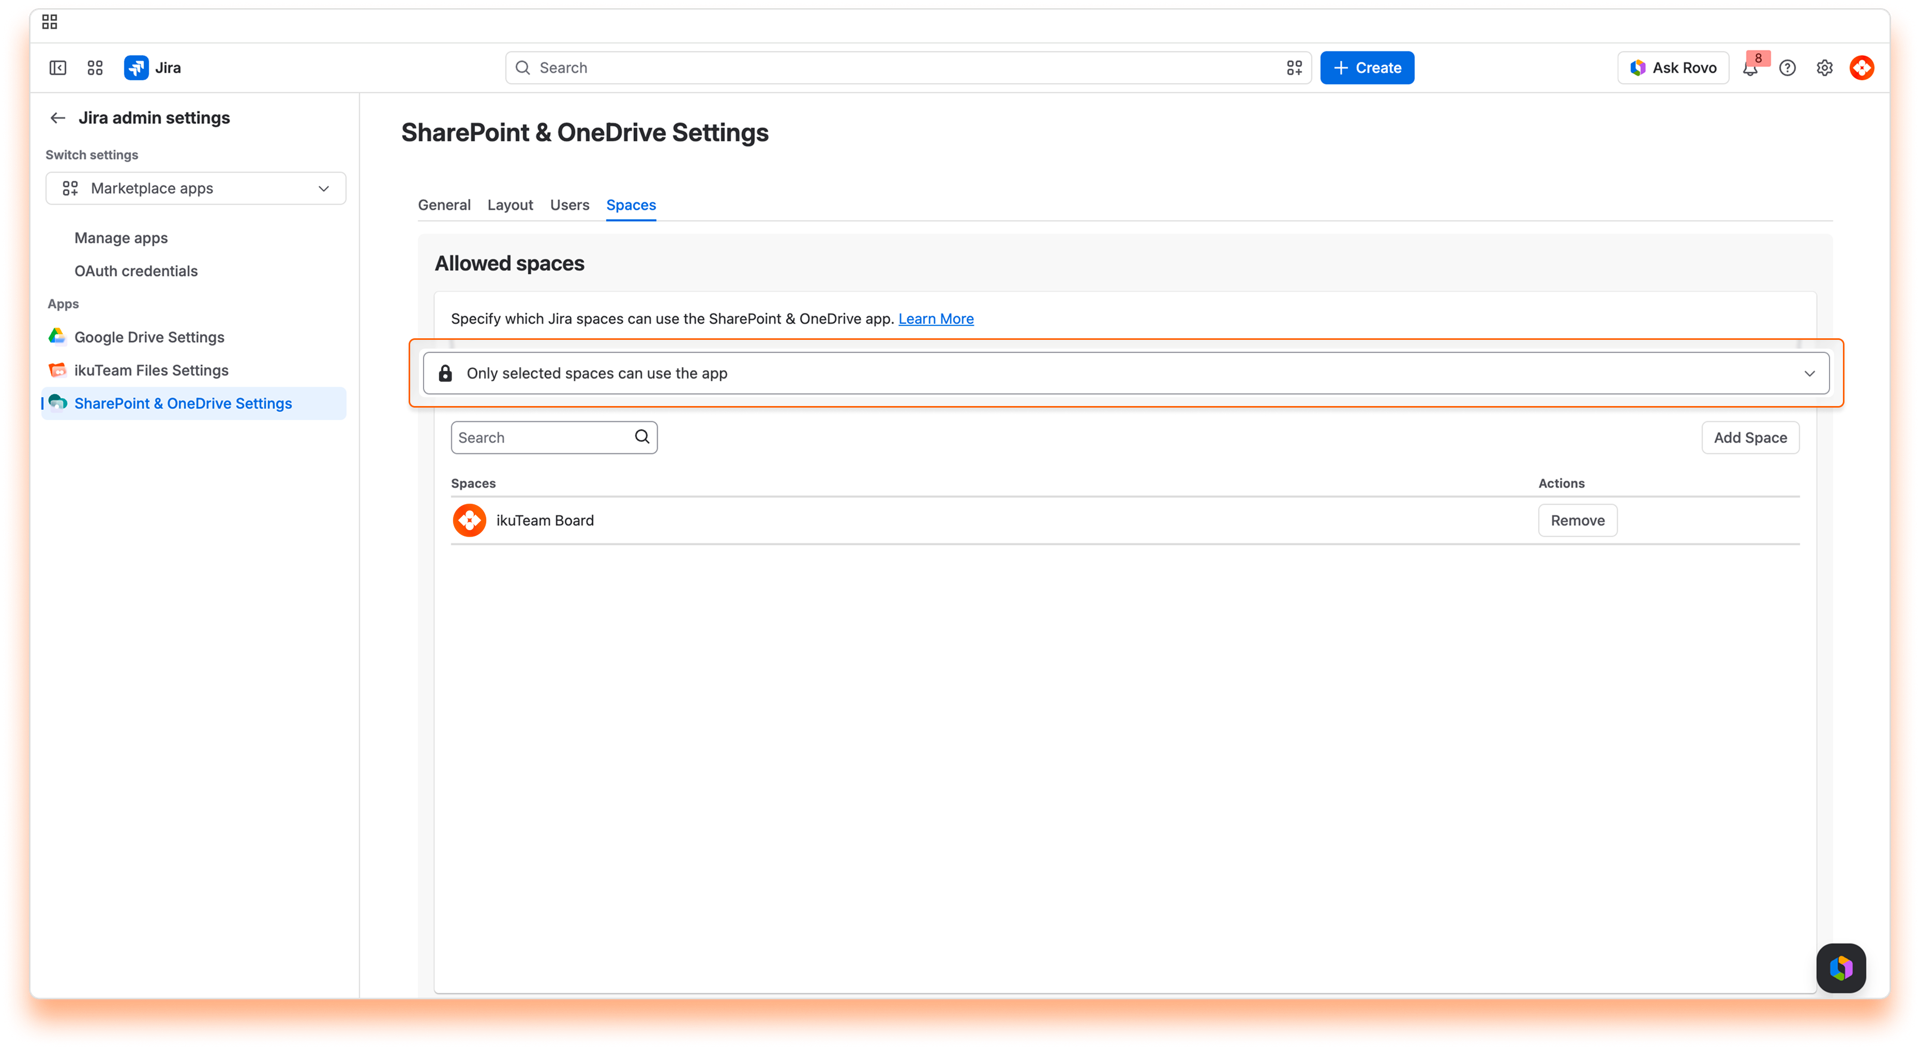
Adding a space:
Click the “Add Space” button, start typing to select a space, and click the “Add” button. The spae gets access to the app immediately.
Removing a space:
Search for the space you want to remove, click the “Remove” button, and confirm. The app is hidden from the space immediately.
Select this option if you only want to hide the SharePoint Connector for Jira app for some spaces.
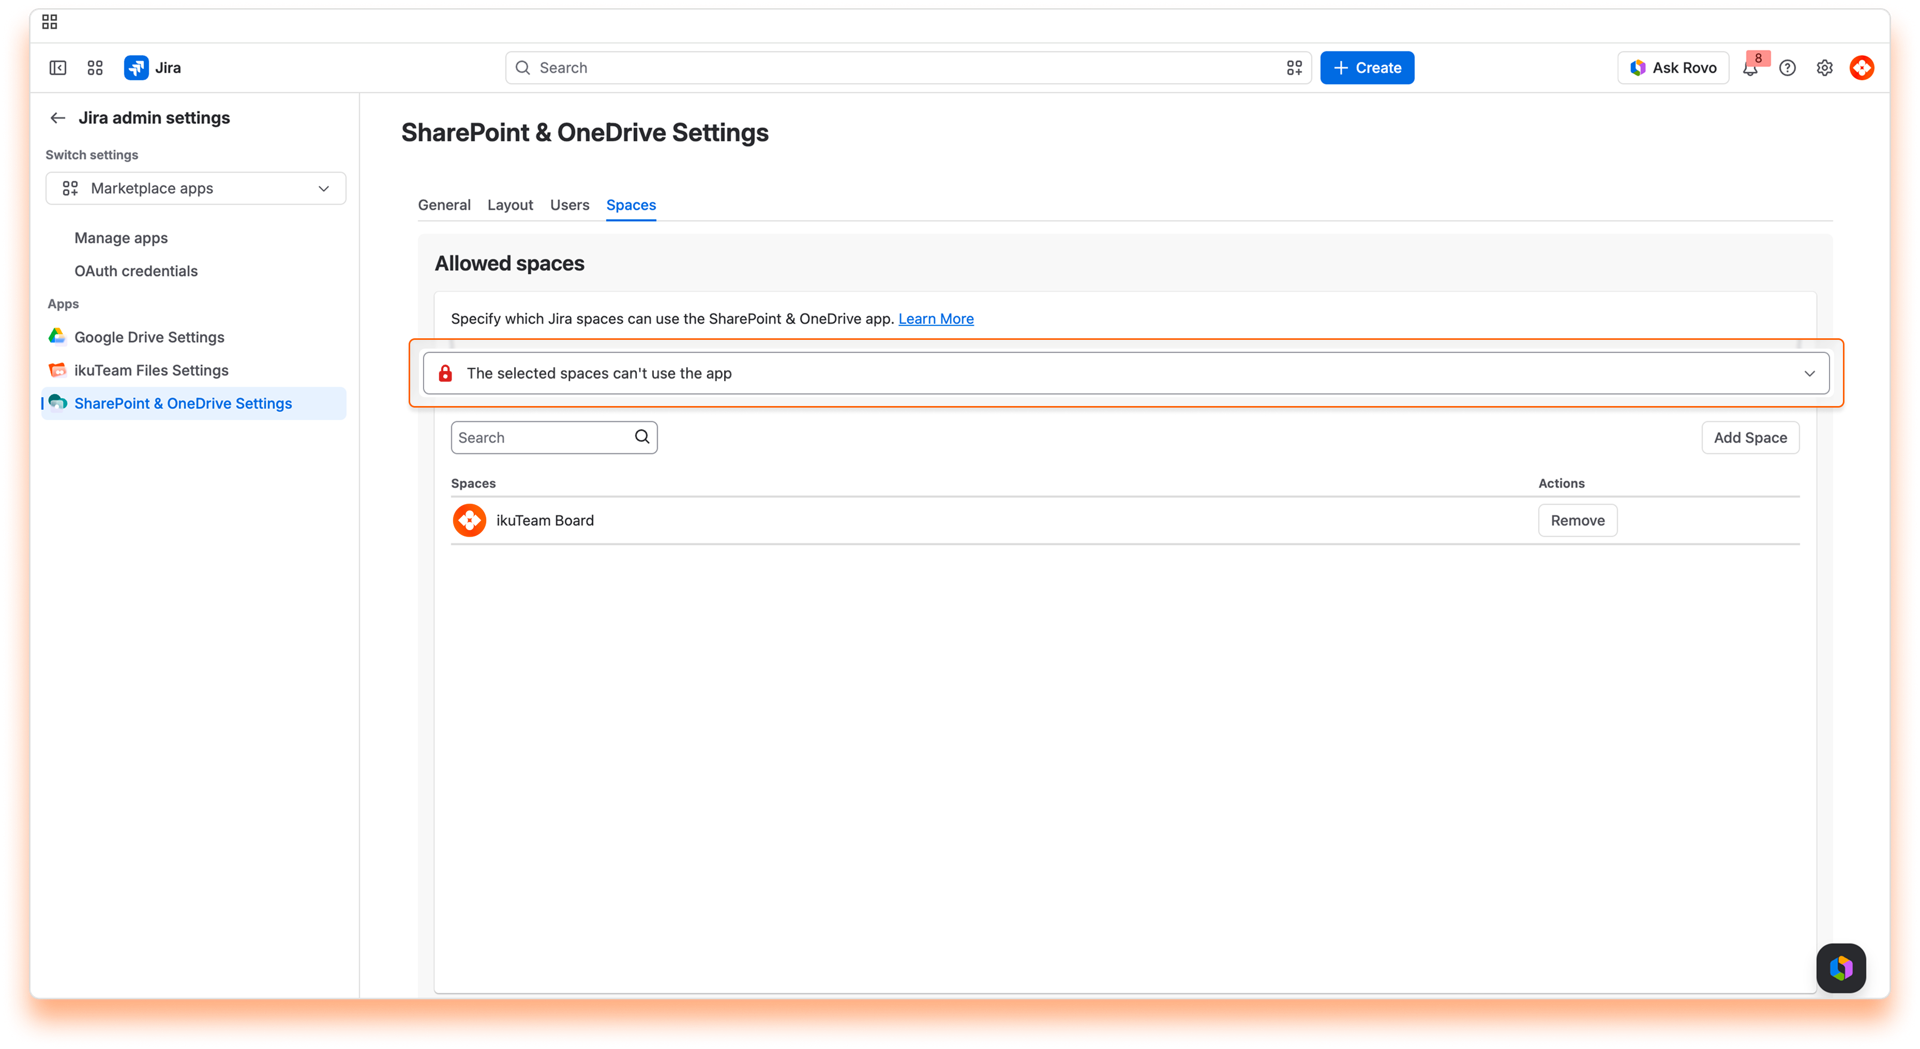
Adding a space:
Click the “Add space” button, start typing to select a space, and click the “Add” button. The app is hidden from the space immediately.
Removing a space:
Search for the space you want to remove, click the “Remove” button, and confirm. The space will immediately gain access to the app.
⚠️ Blocking the SharePoint Connector for Jira app for a space already using it hides the file manager link and all the attached files and folders to work items. The attachments will be there if the app is allowed again.
ℹ️ Space owners can also toggle on/off the SharePoint Connector for Jira app in the Space Settings, as long as the Admin allows it.
On this page, you learned about all the Admin settings currently available.
If you still have questions or require help with other global settings, visit our support portal to send us your questions or feature requests. Our team is always happy to help.
When the "Mirror storage permissions" option is active, users must authenticate to each folder connected by other users to browse folders and preview and edit documents. This applies to the file manager and the work item view too.
The connected folders will show an "Authenticate" button for every folder that the user hasn't connected yet, and they won't be able to open the folder or make changes until they do.
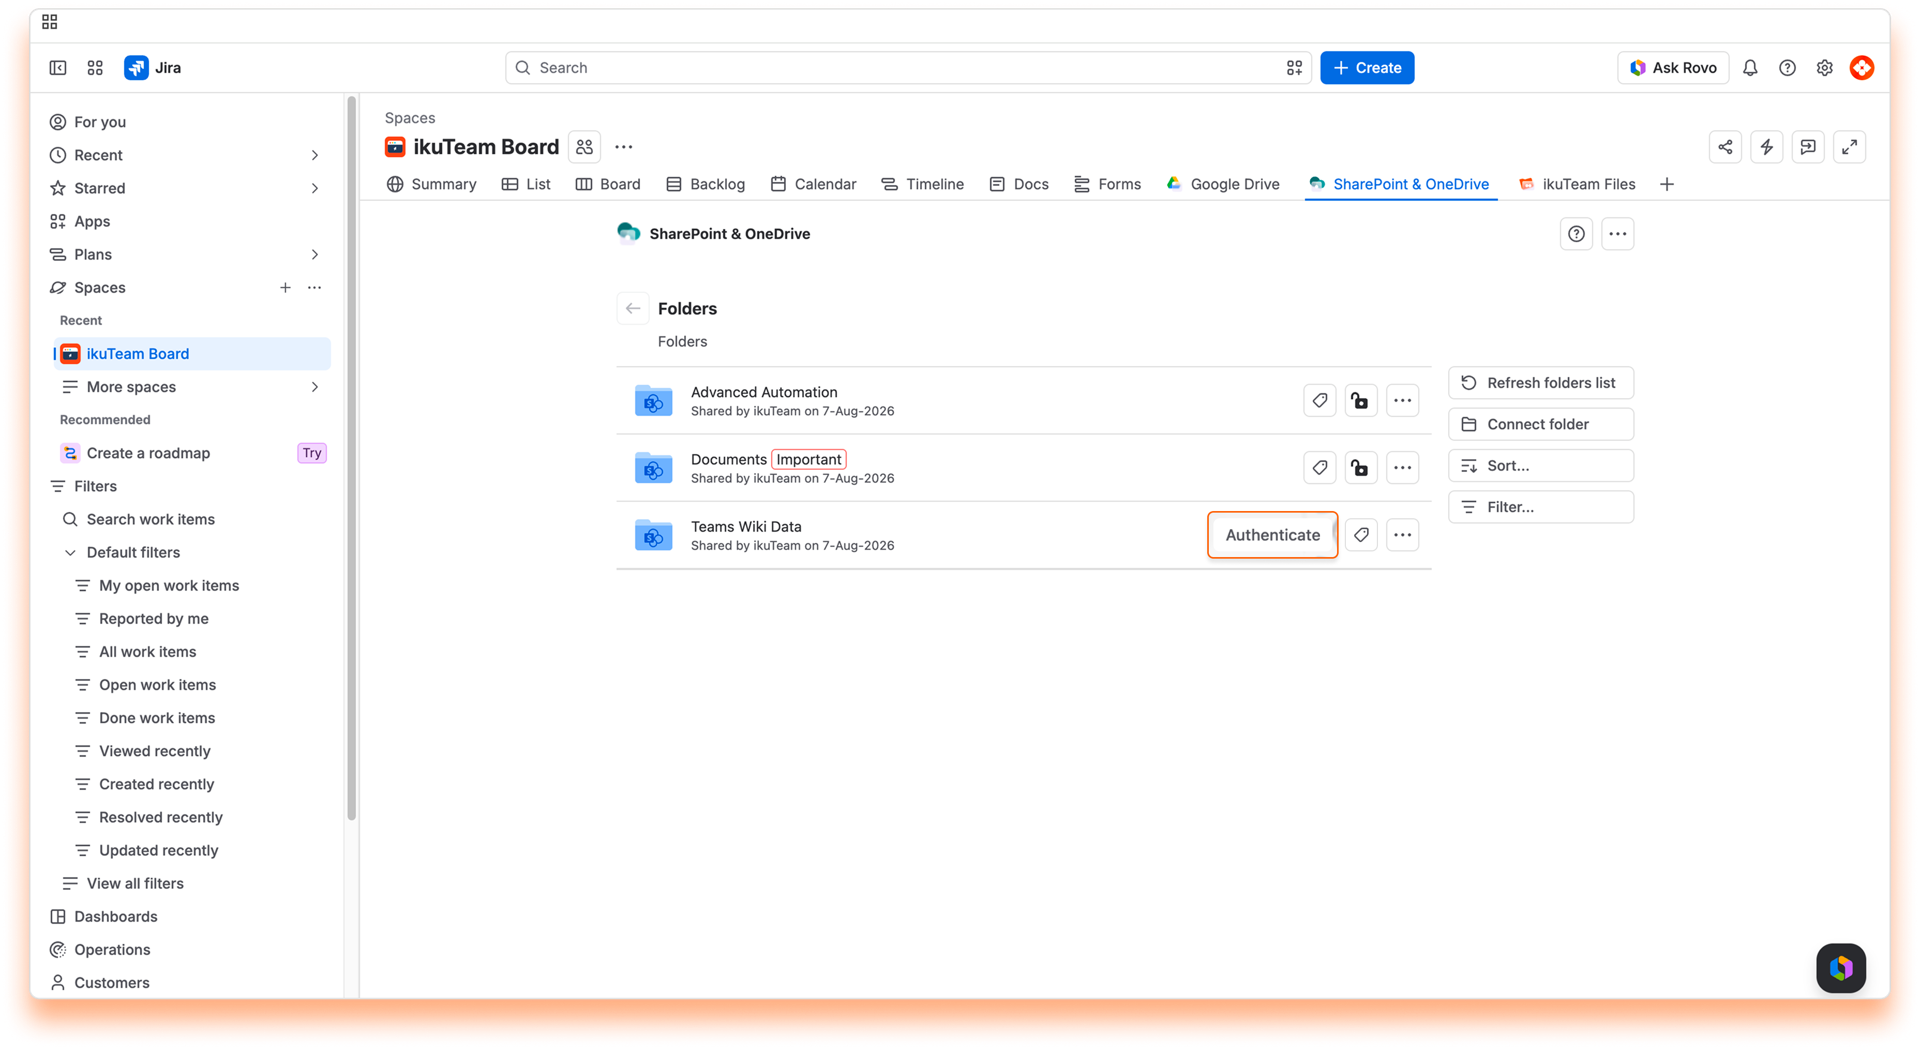
✅ All done. You can now use the folder according to the permissions set for it.
⚠️ If the account selected doesn't have access to the folder, an error will be shown with the option to connect to a different account.
After authenticating to a folder with an account, it's possible to remove the access if needed (e.g., authenticating with a different account).
✅ All done. To view the folder's content, you'll need to authenticate again.
The attached files and folders on work items will show an "Authenticate" button for every item that the user hasn't connected yet. They won't be able to open folders or view and edit files until they do.
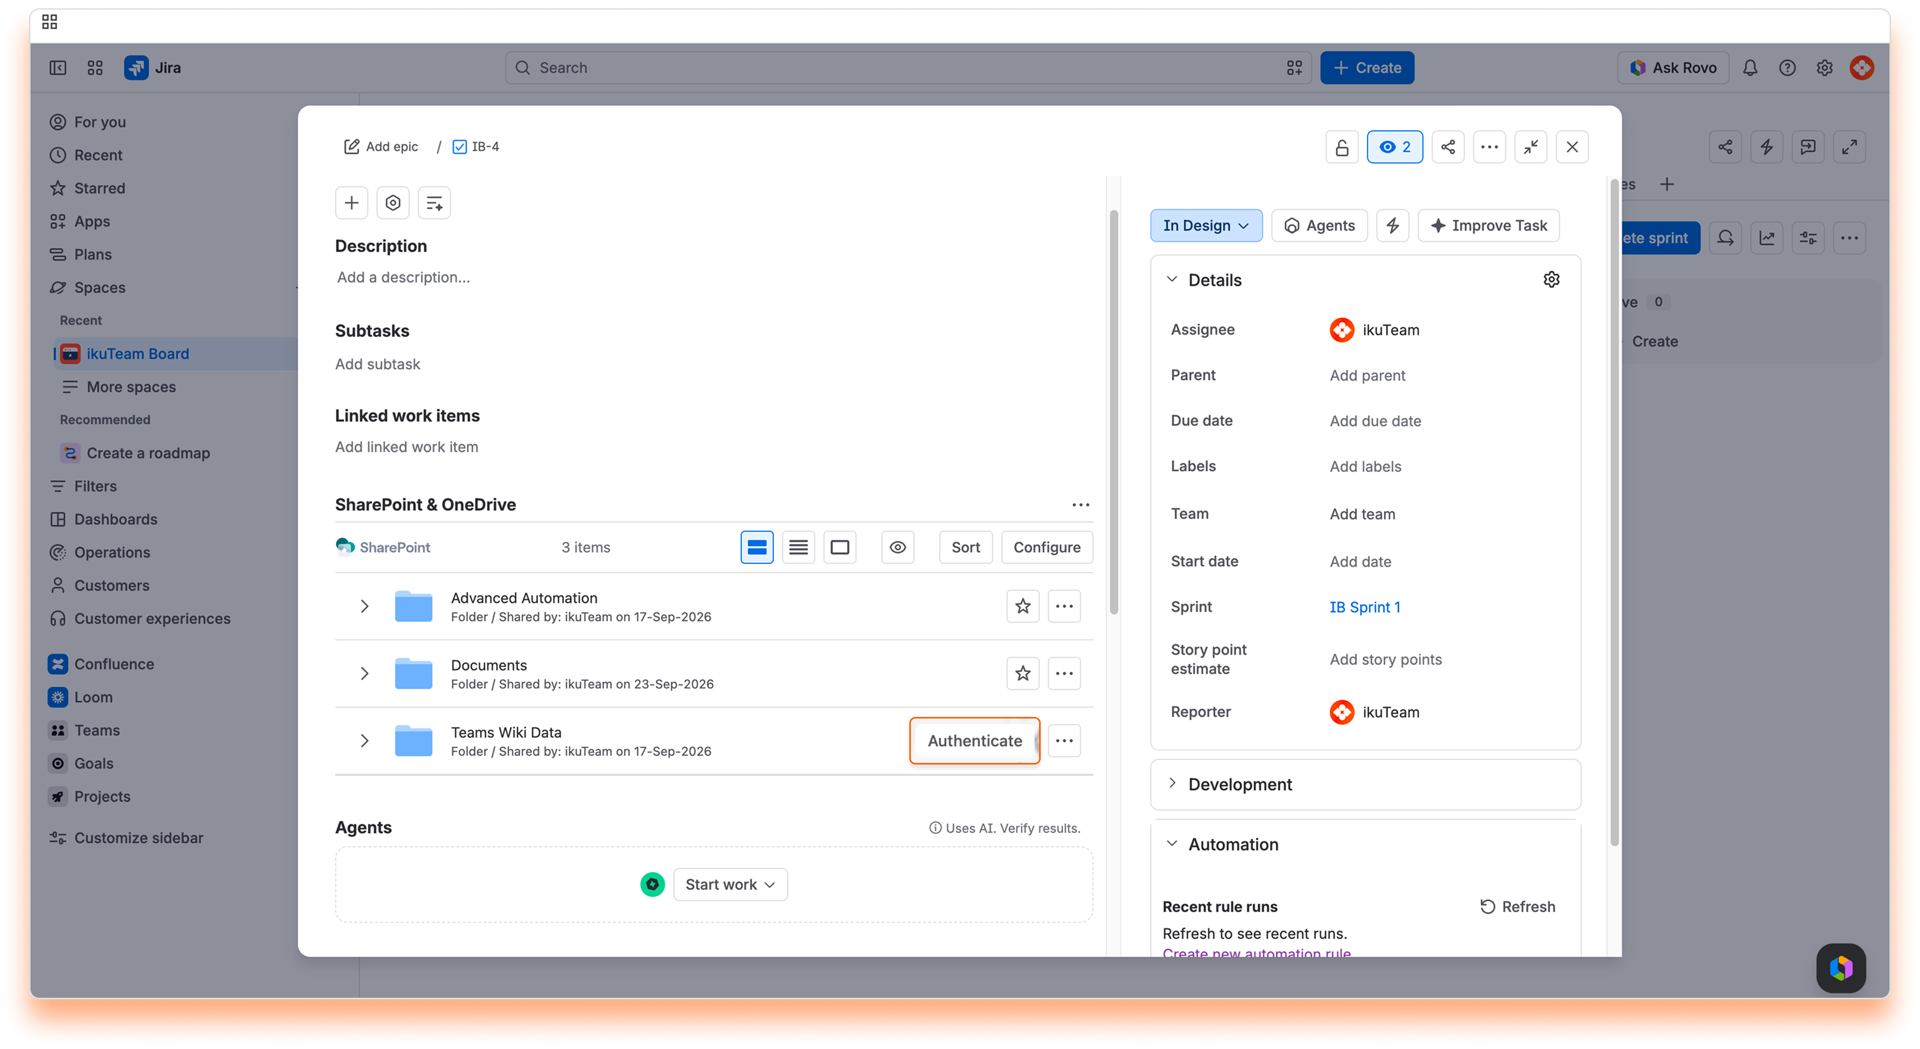
✅ All done. You can now use the folder/file according to the permissions set for it.
⚠️ If the account selected doesn't have access to the folder, an error will be shown with the option to connect to a different account.
After authenticating to a folder/file with an account, you can remove the access if needed (e.g., by authenticating with a different account).
✅ All done. To view the folder's content or file, you'll need to authenticate again.
This section is the foundation for folder automation, giving you the power to tailor file management to your business needs using ikuTeam's automation actions. Combine these actions with any Jira condition, like "if/else" or "work item field conditions," to get the most out of your automation flow.
Every action here can be configured at the space level or globally, depending on the trigger you choose.
Let's walk through each ikuTeam action and how to set it up within an existing automation flow.
When to use this
Great for teams that want every new work item to start with a structured storage location already in place, think design teams, client projects, or anything that needs predictable, ready-made documentation from day one.
How to set it up
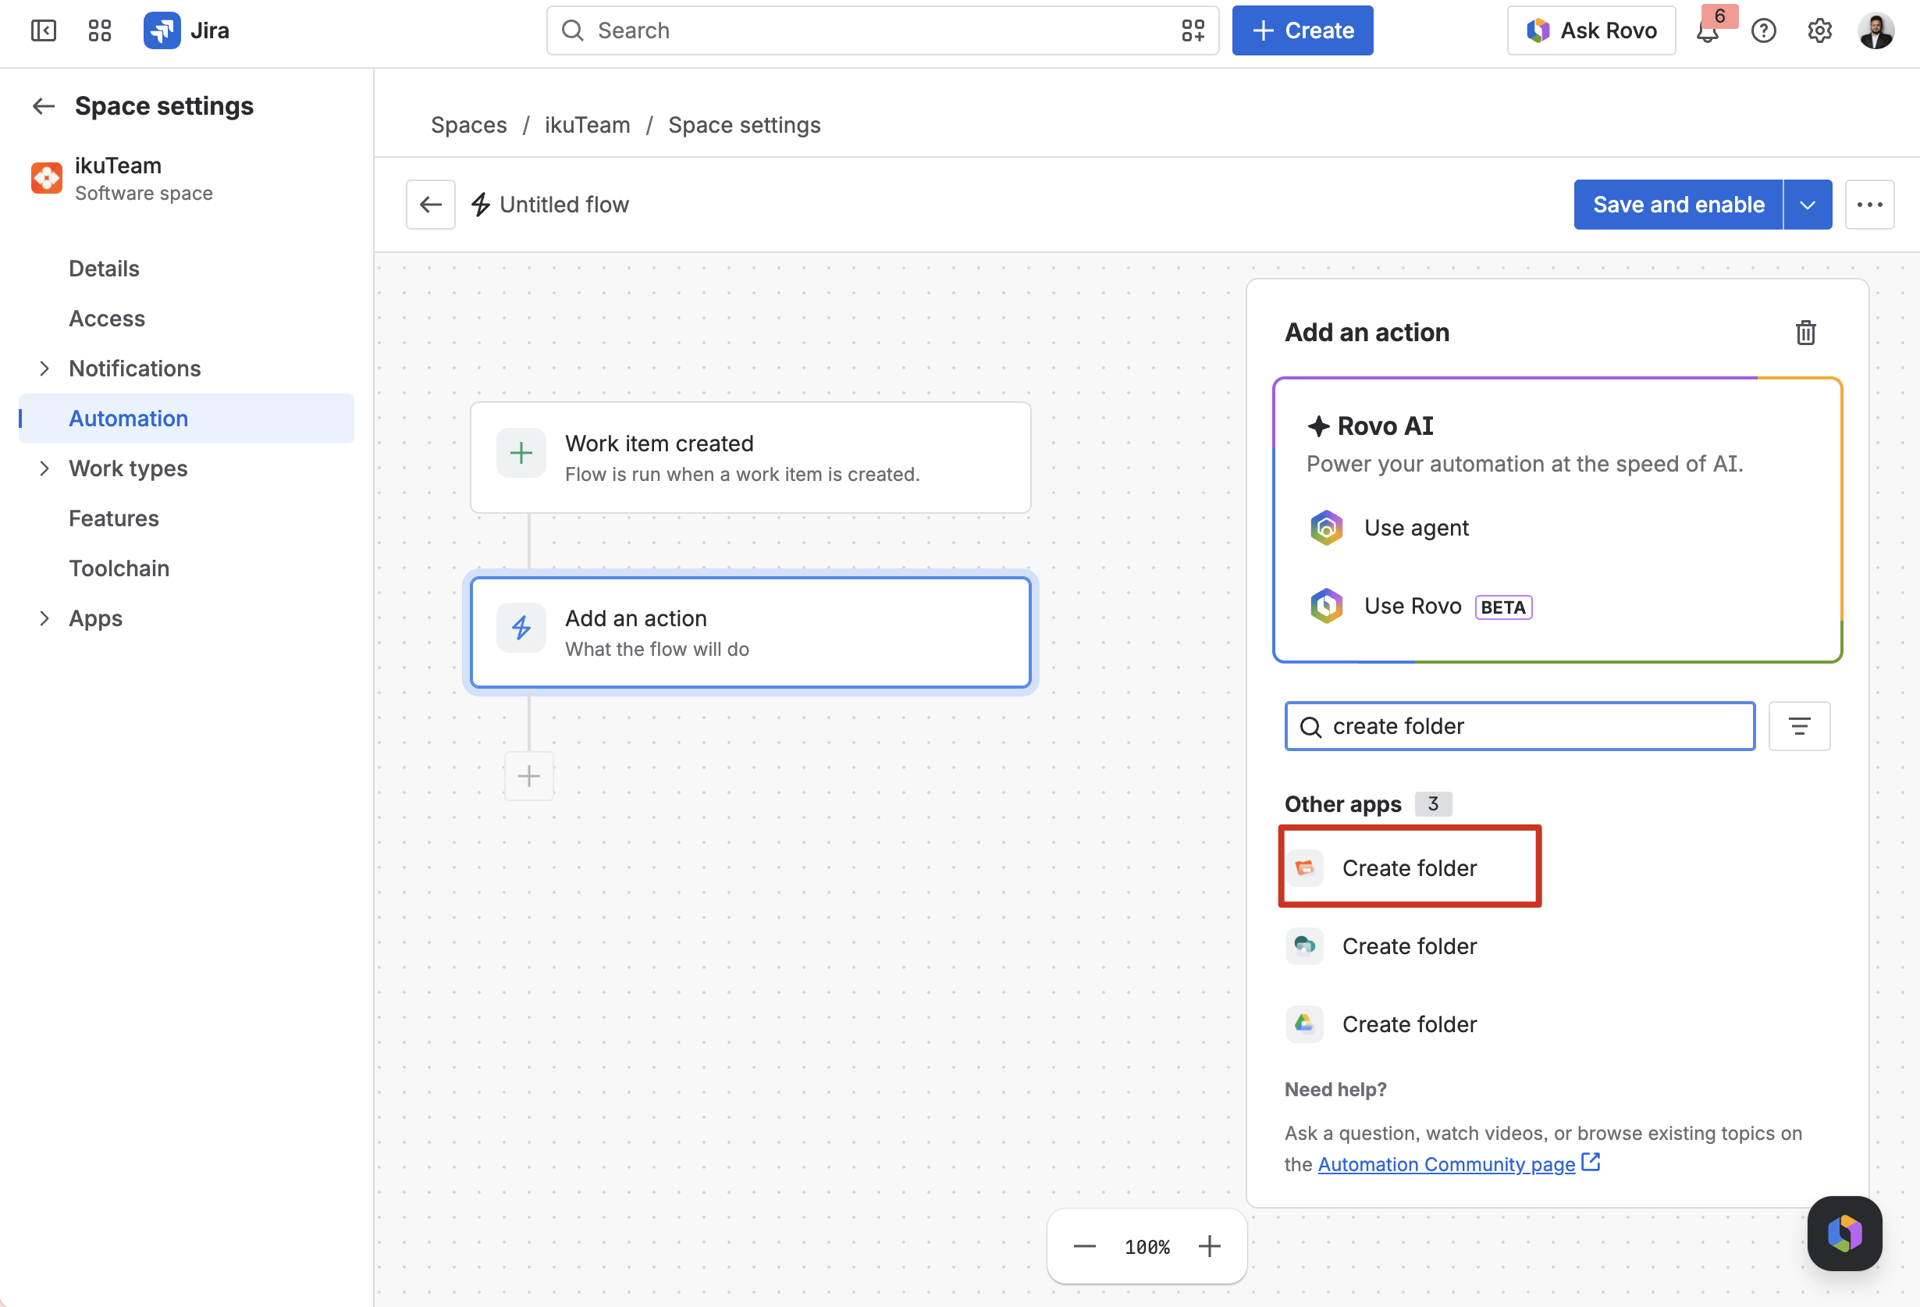
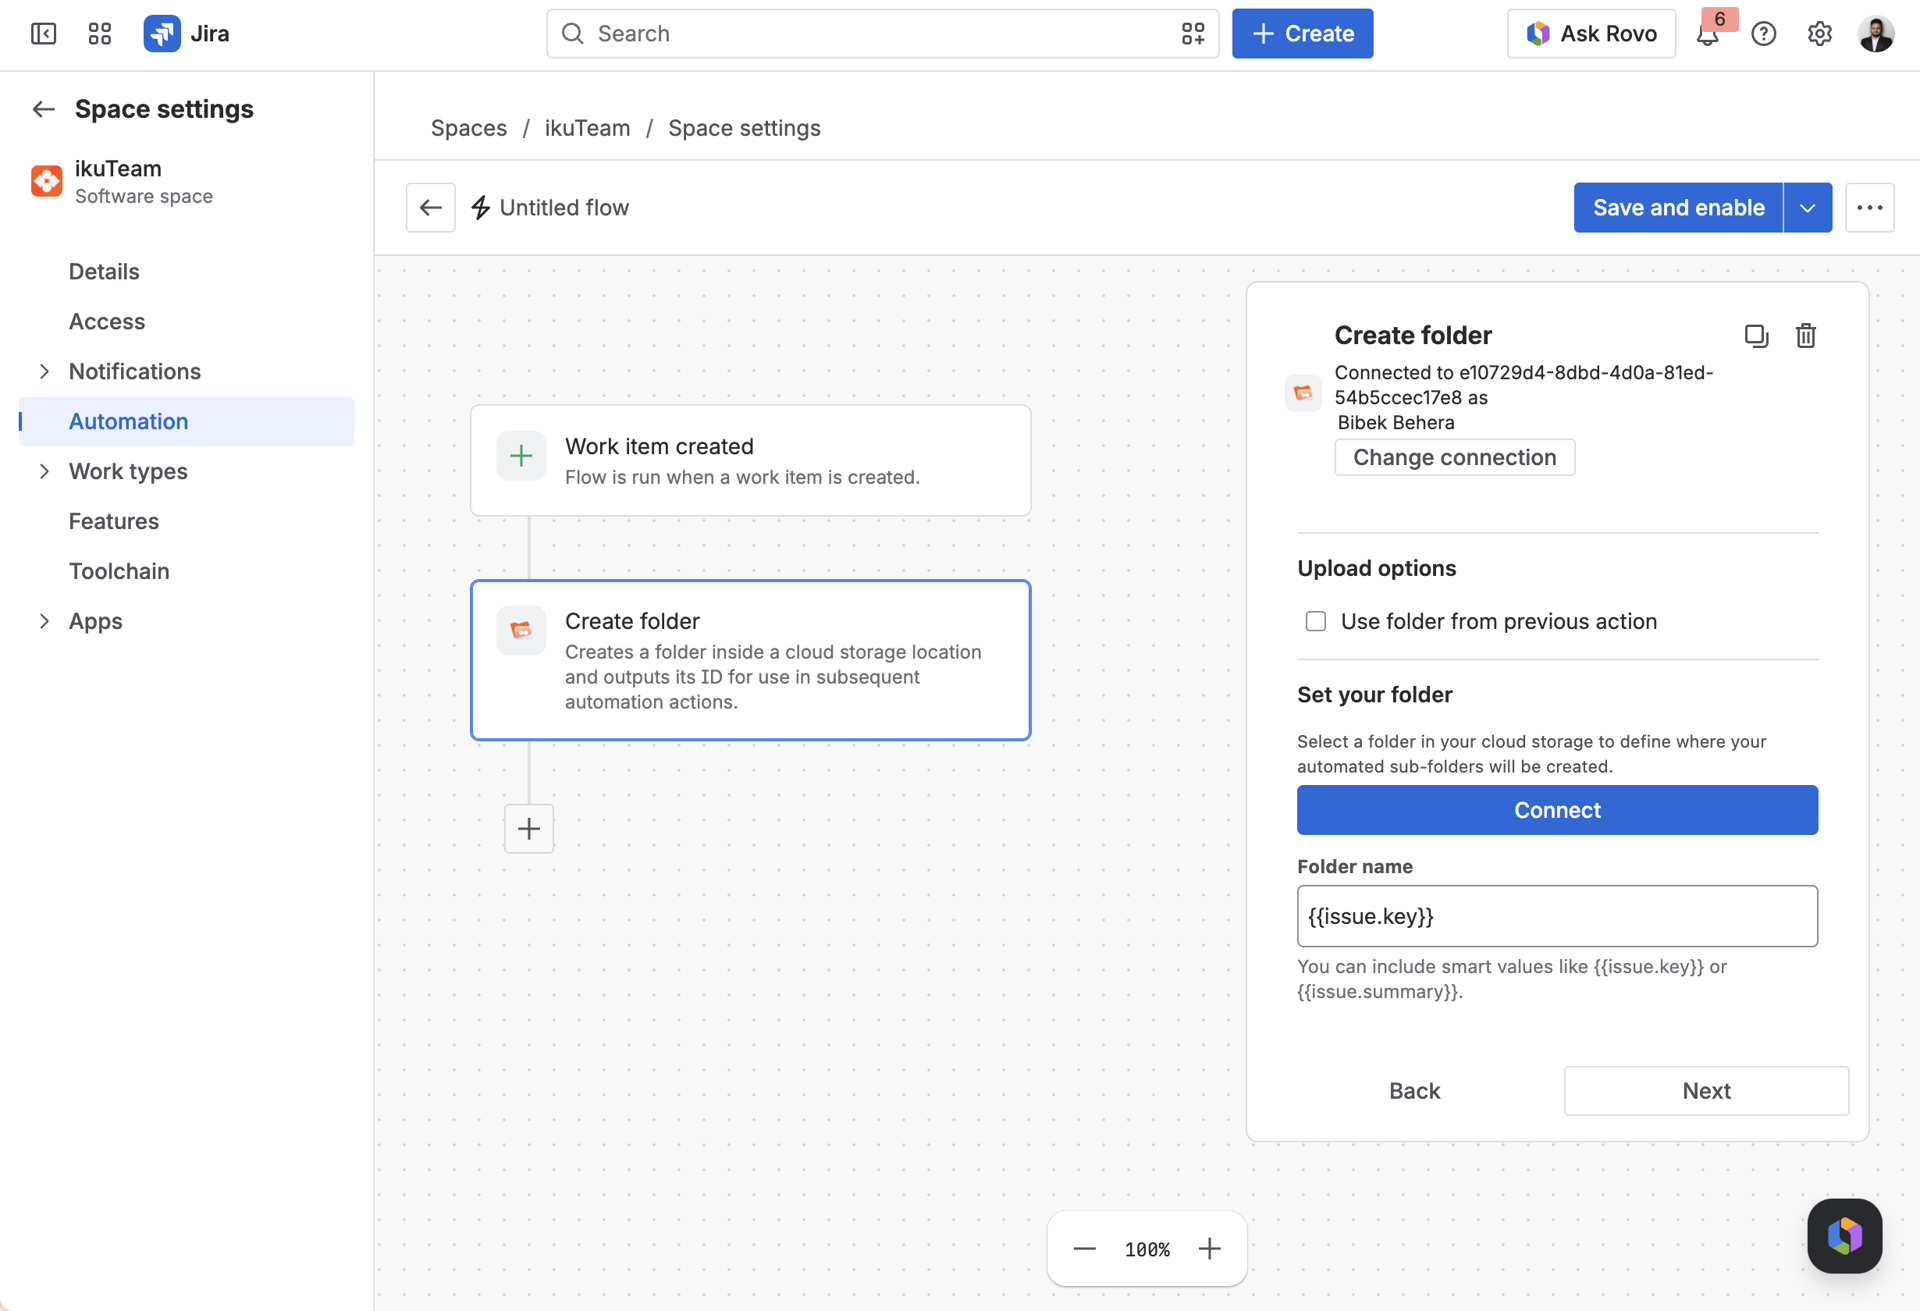
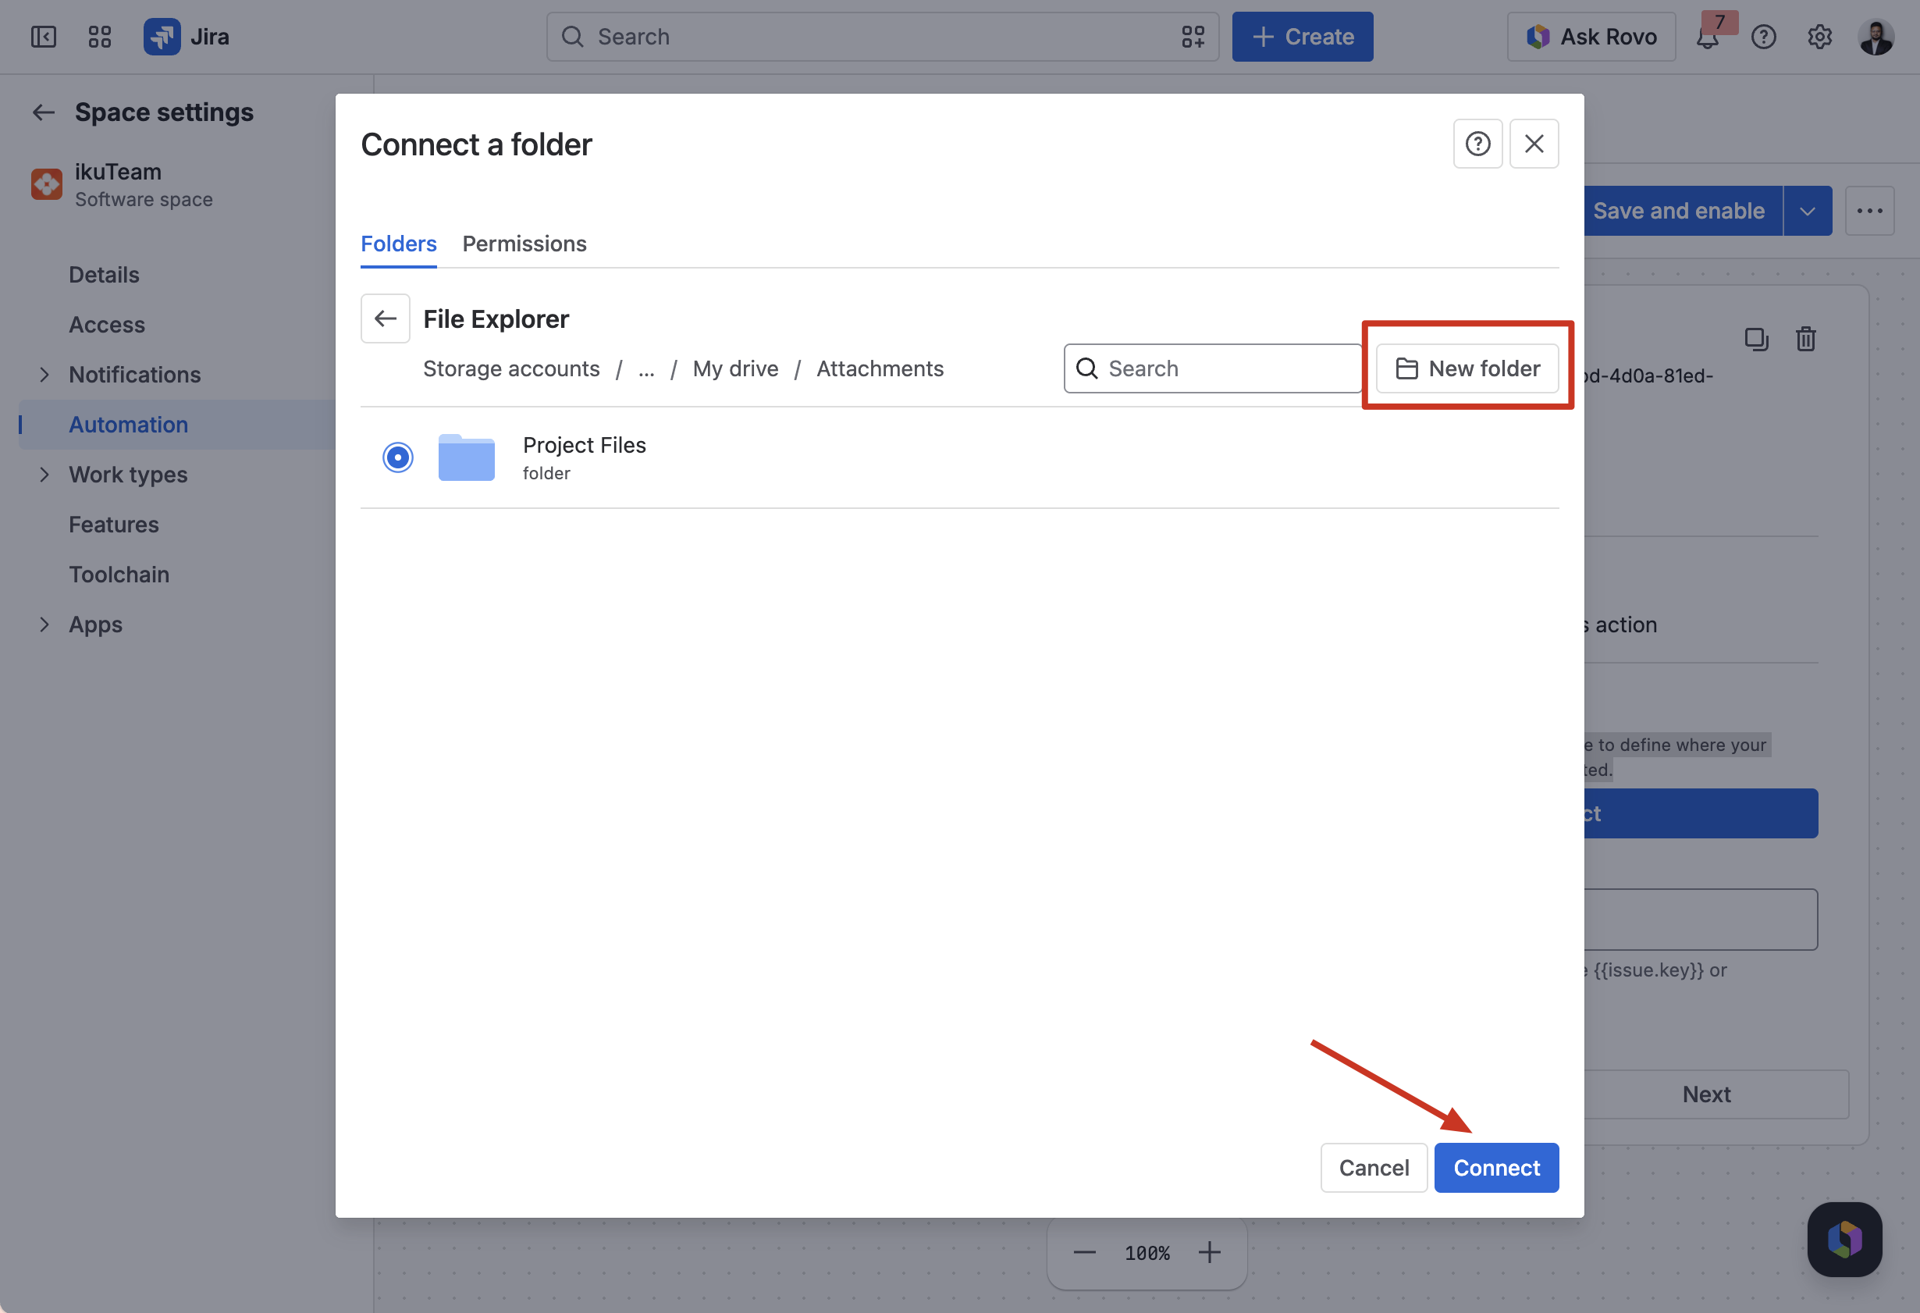
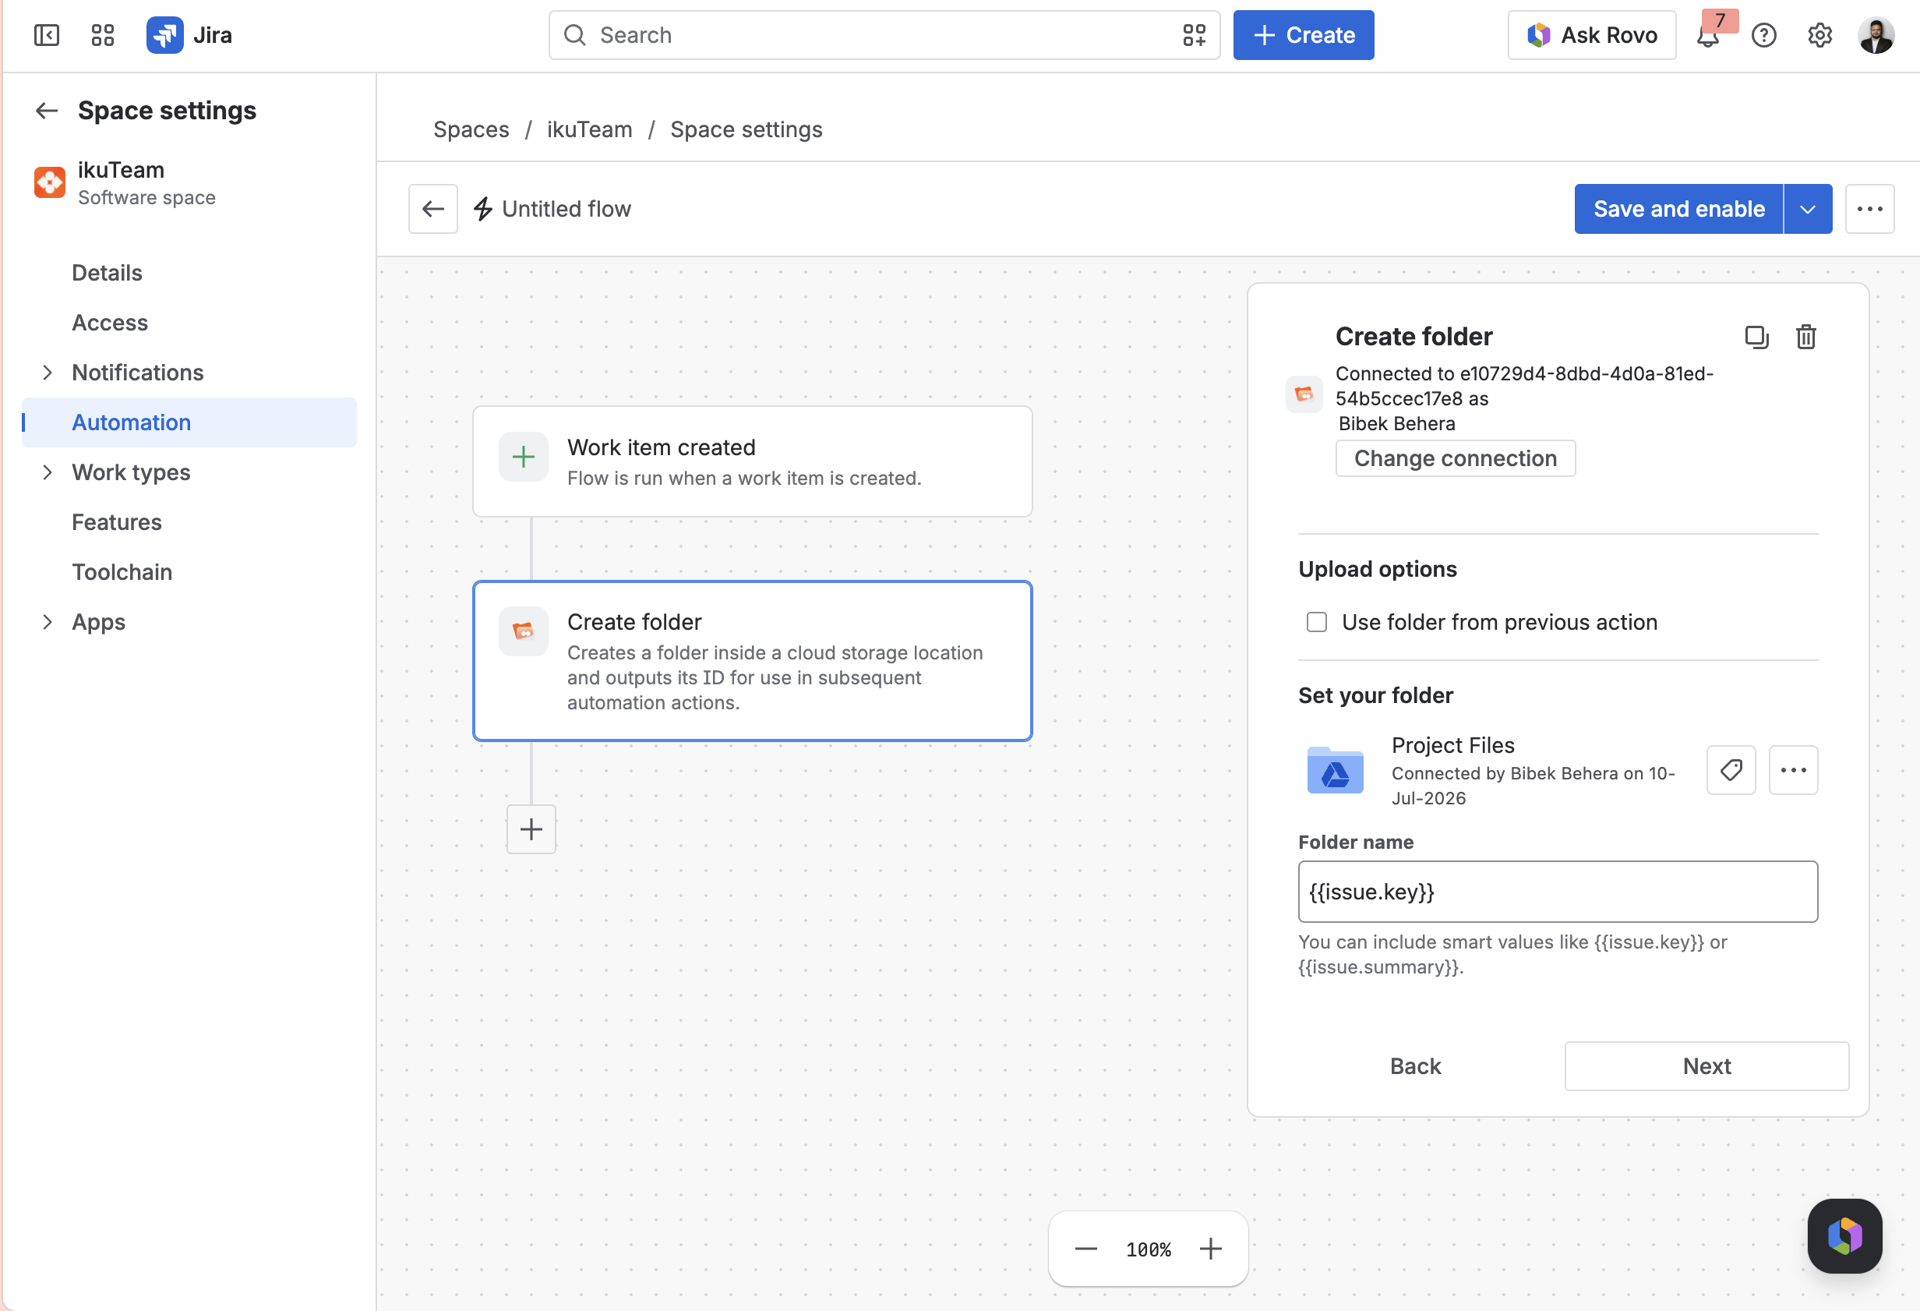
When to use this
Your team already has a working folder structure, and you just want to see it in Jira, no need to recreate anything.
How to set it up
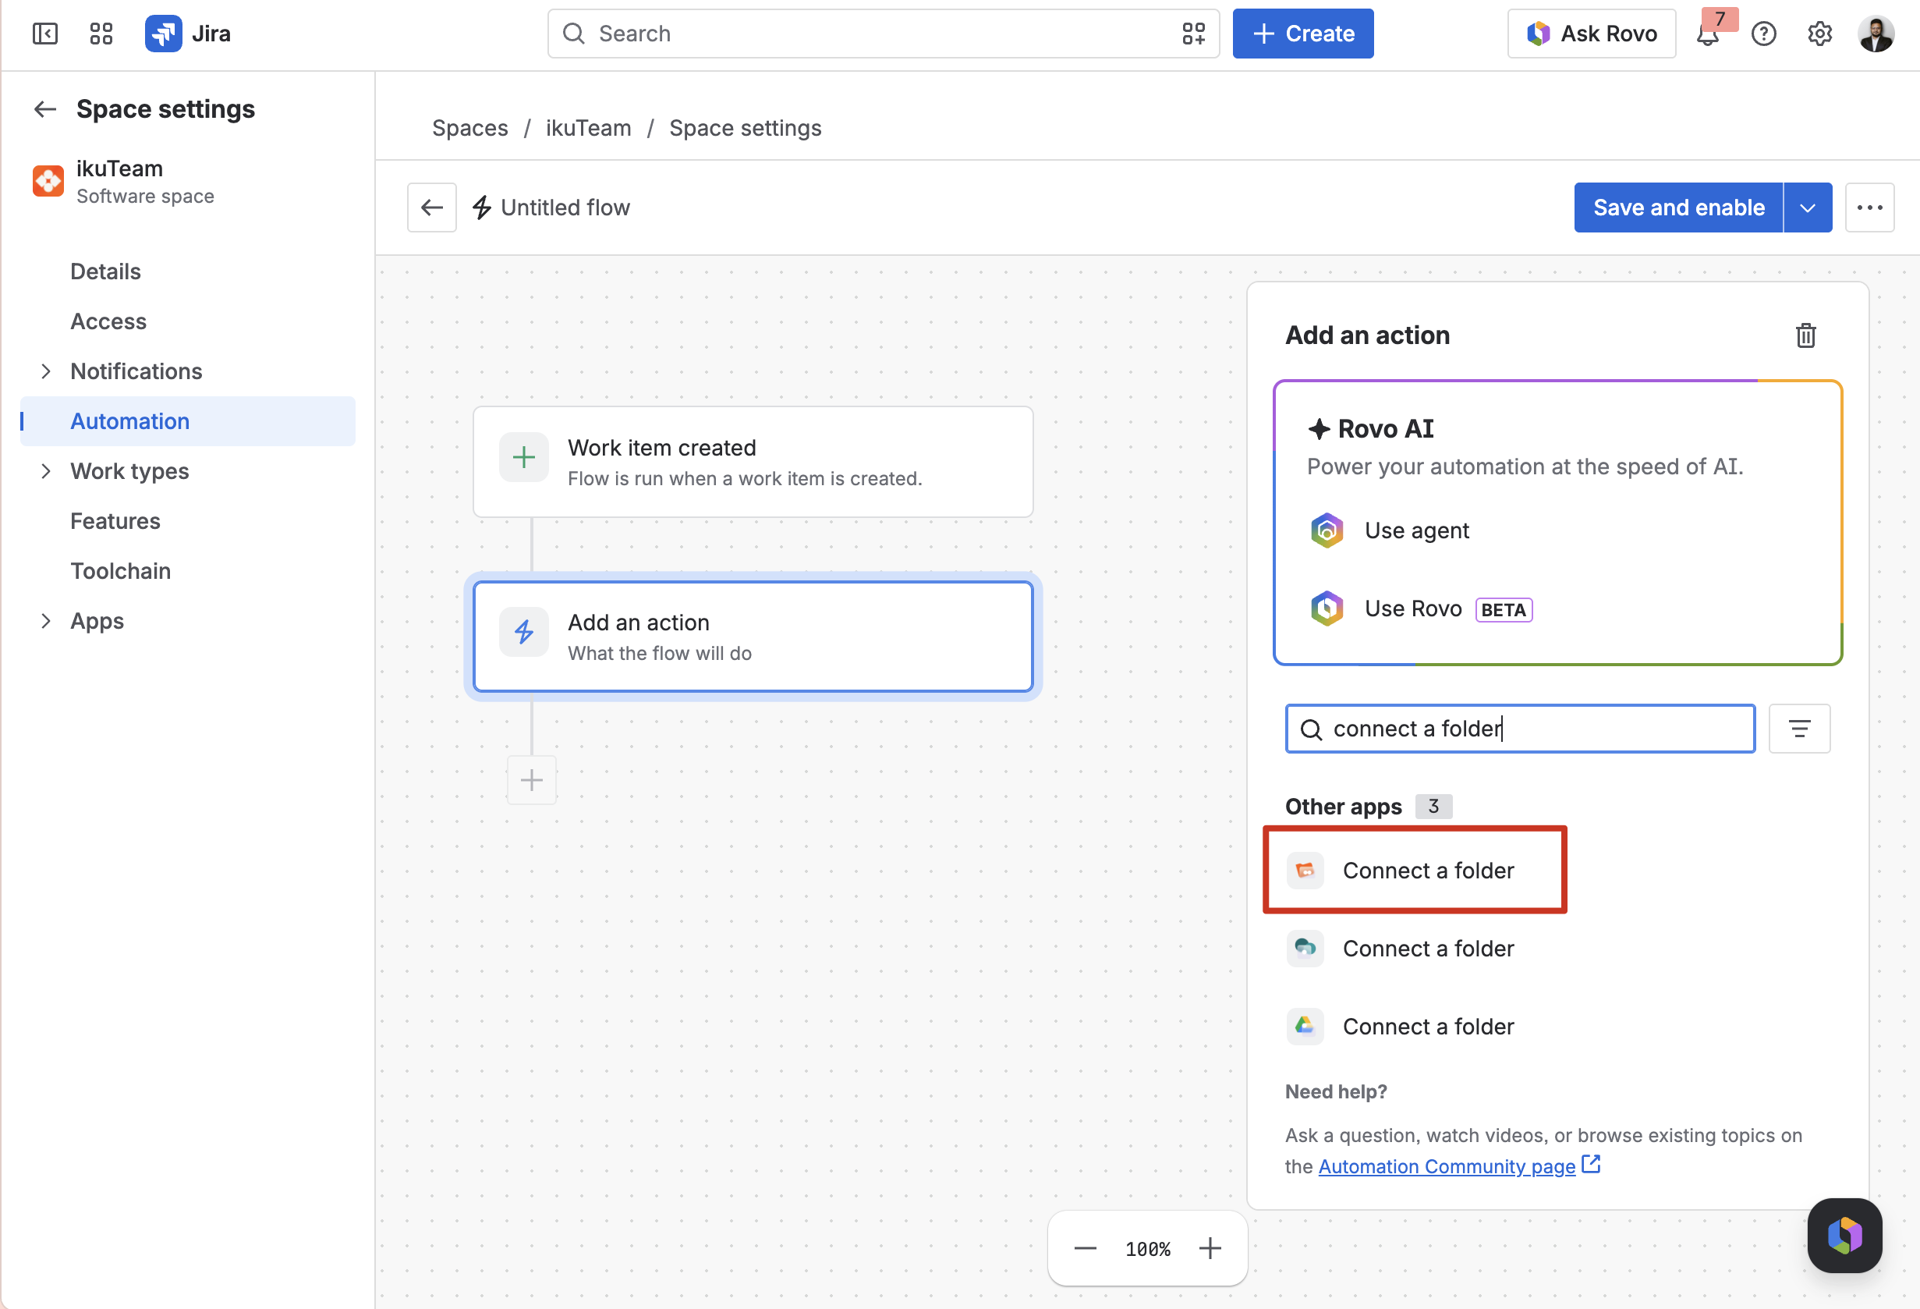
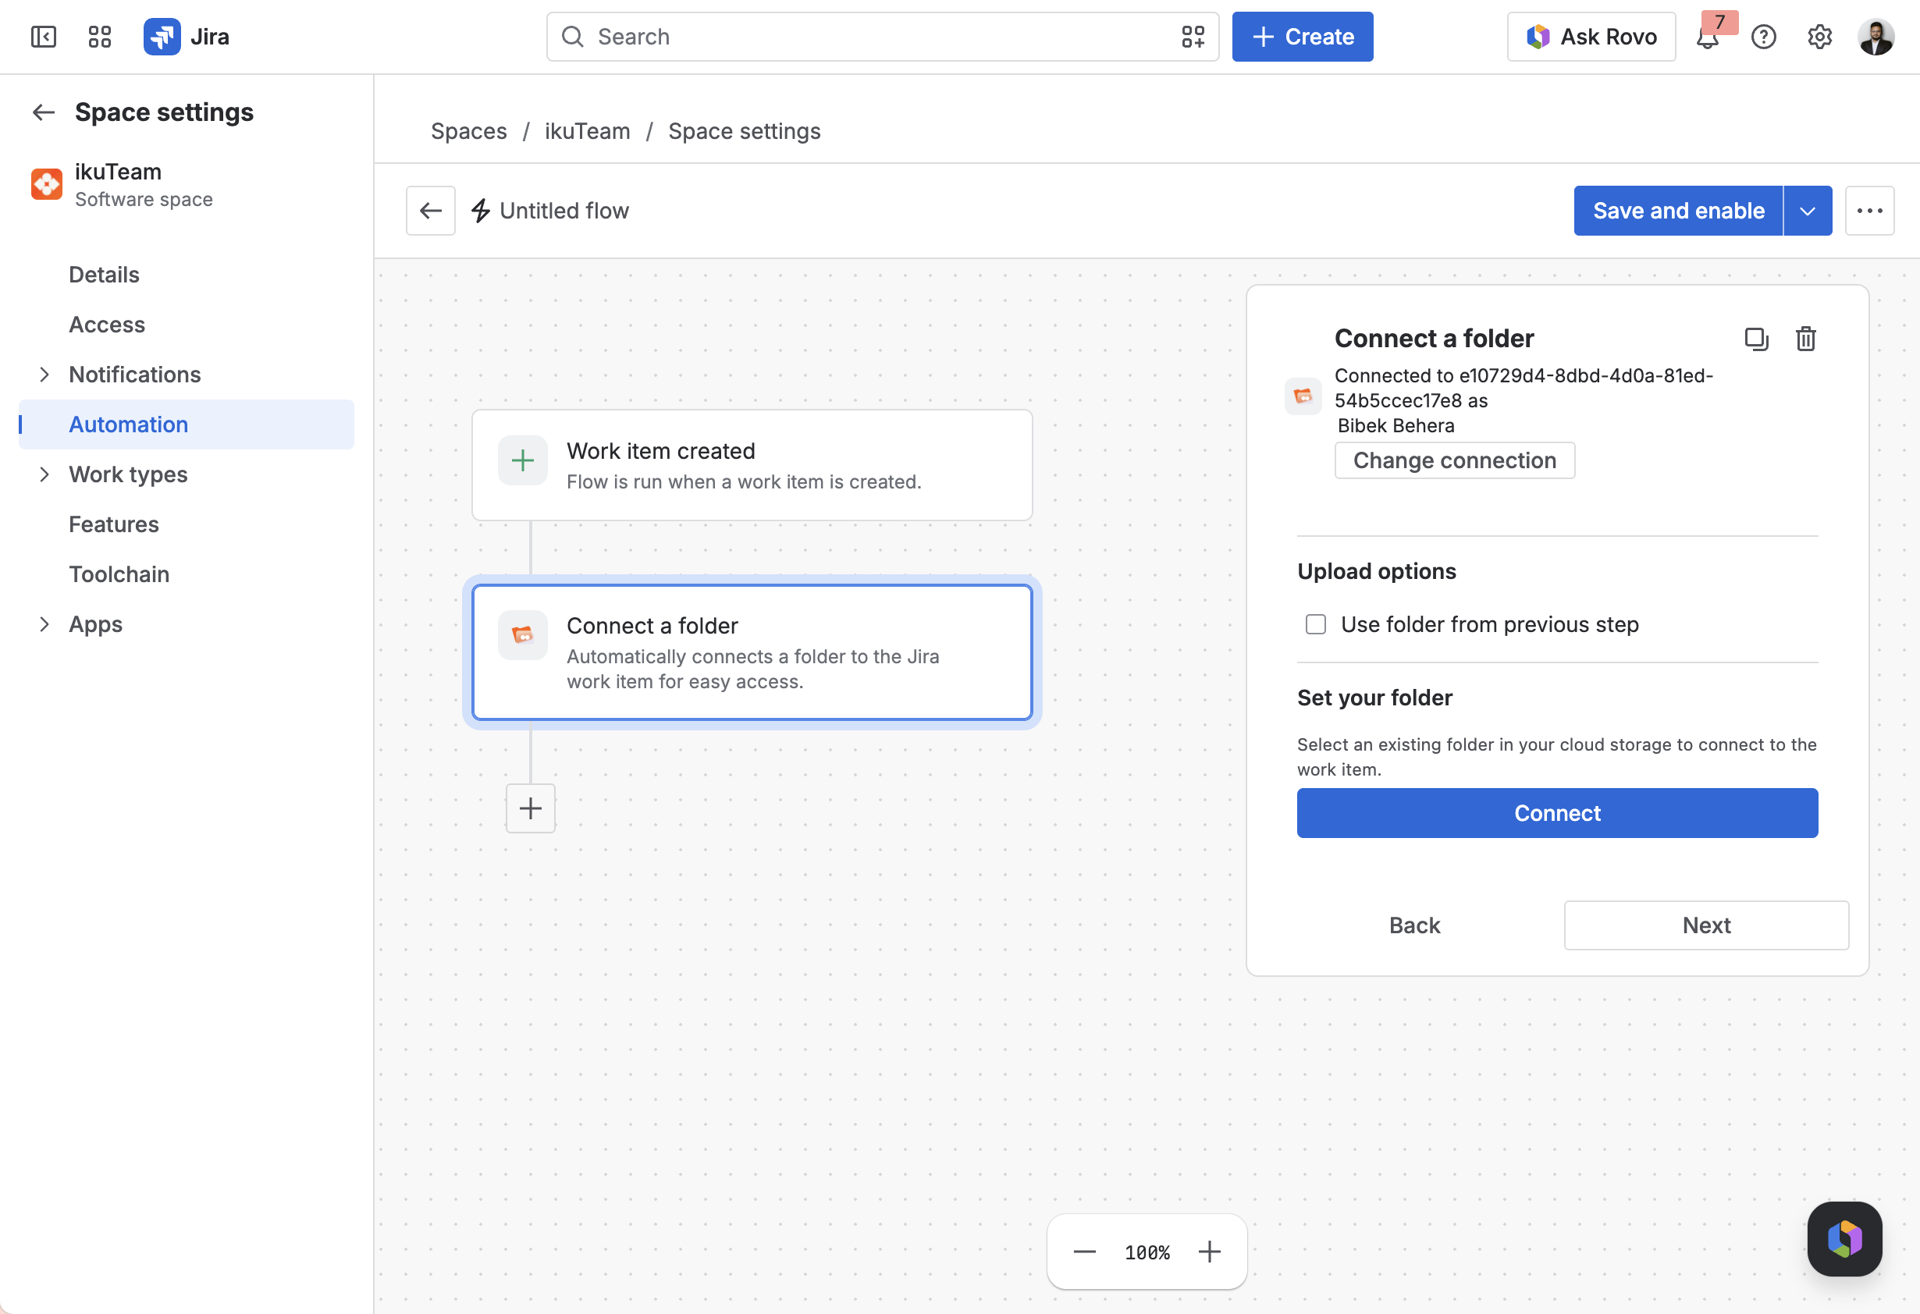
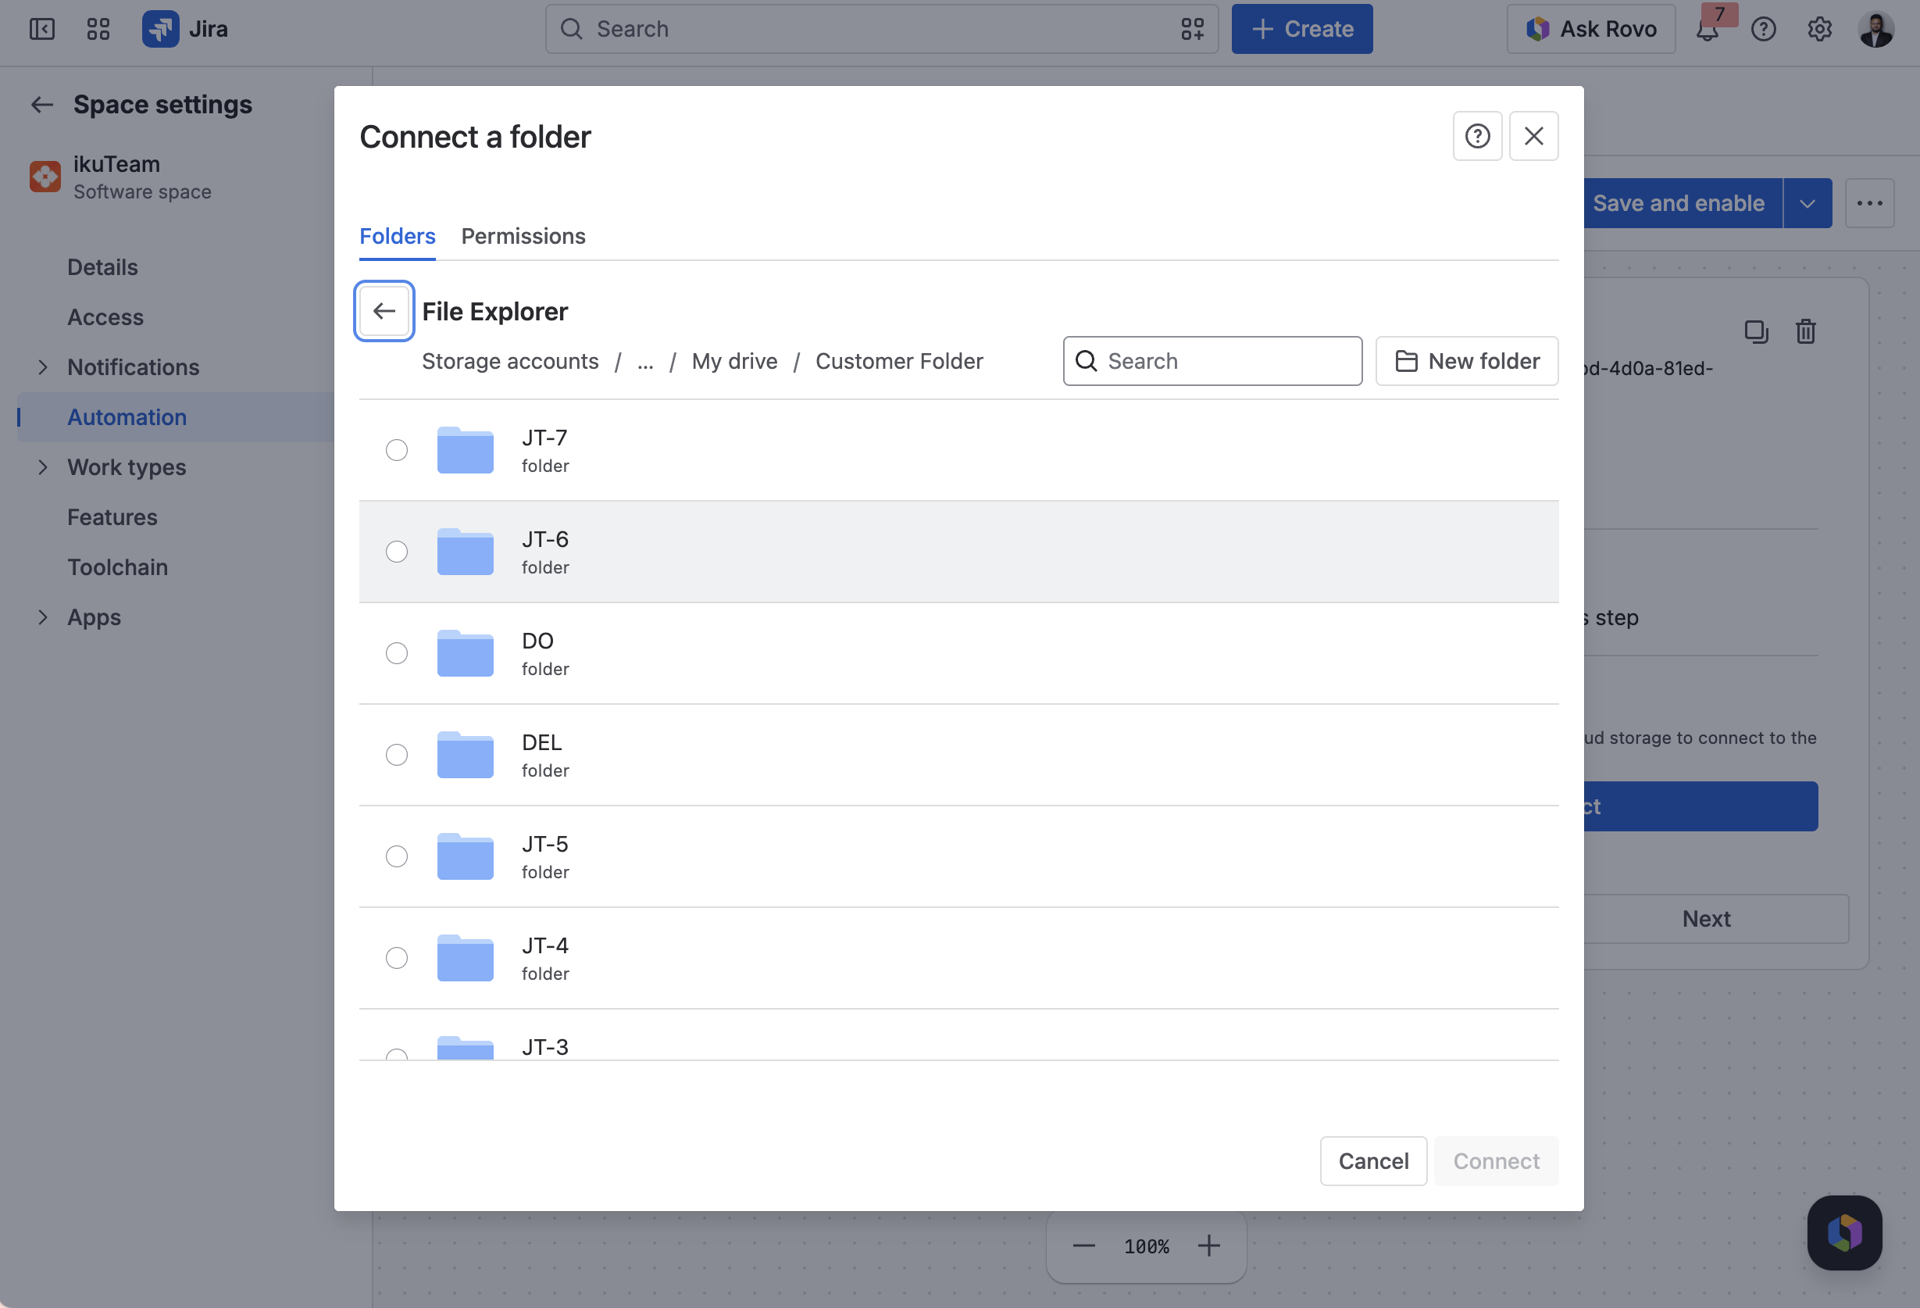
When to use this
Built for service teams and client-facing spaces (JSM) that need a clear, dependable line between what customers can see and what stays internal.
ℹ️ This action is only available in the advanced version of SharePoint Connector, which lets agents share folders directly with customers in Jira Service Management.
How to set it up
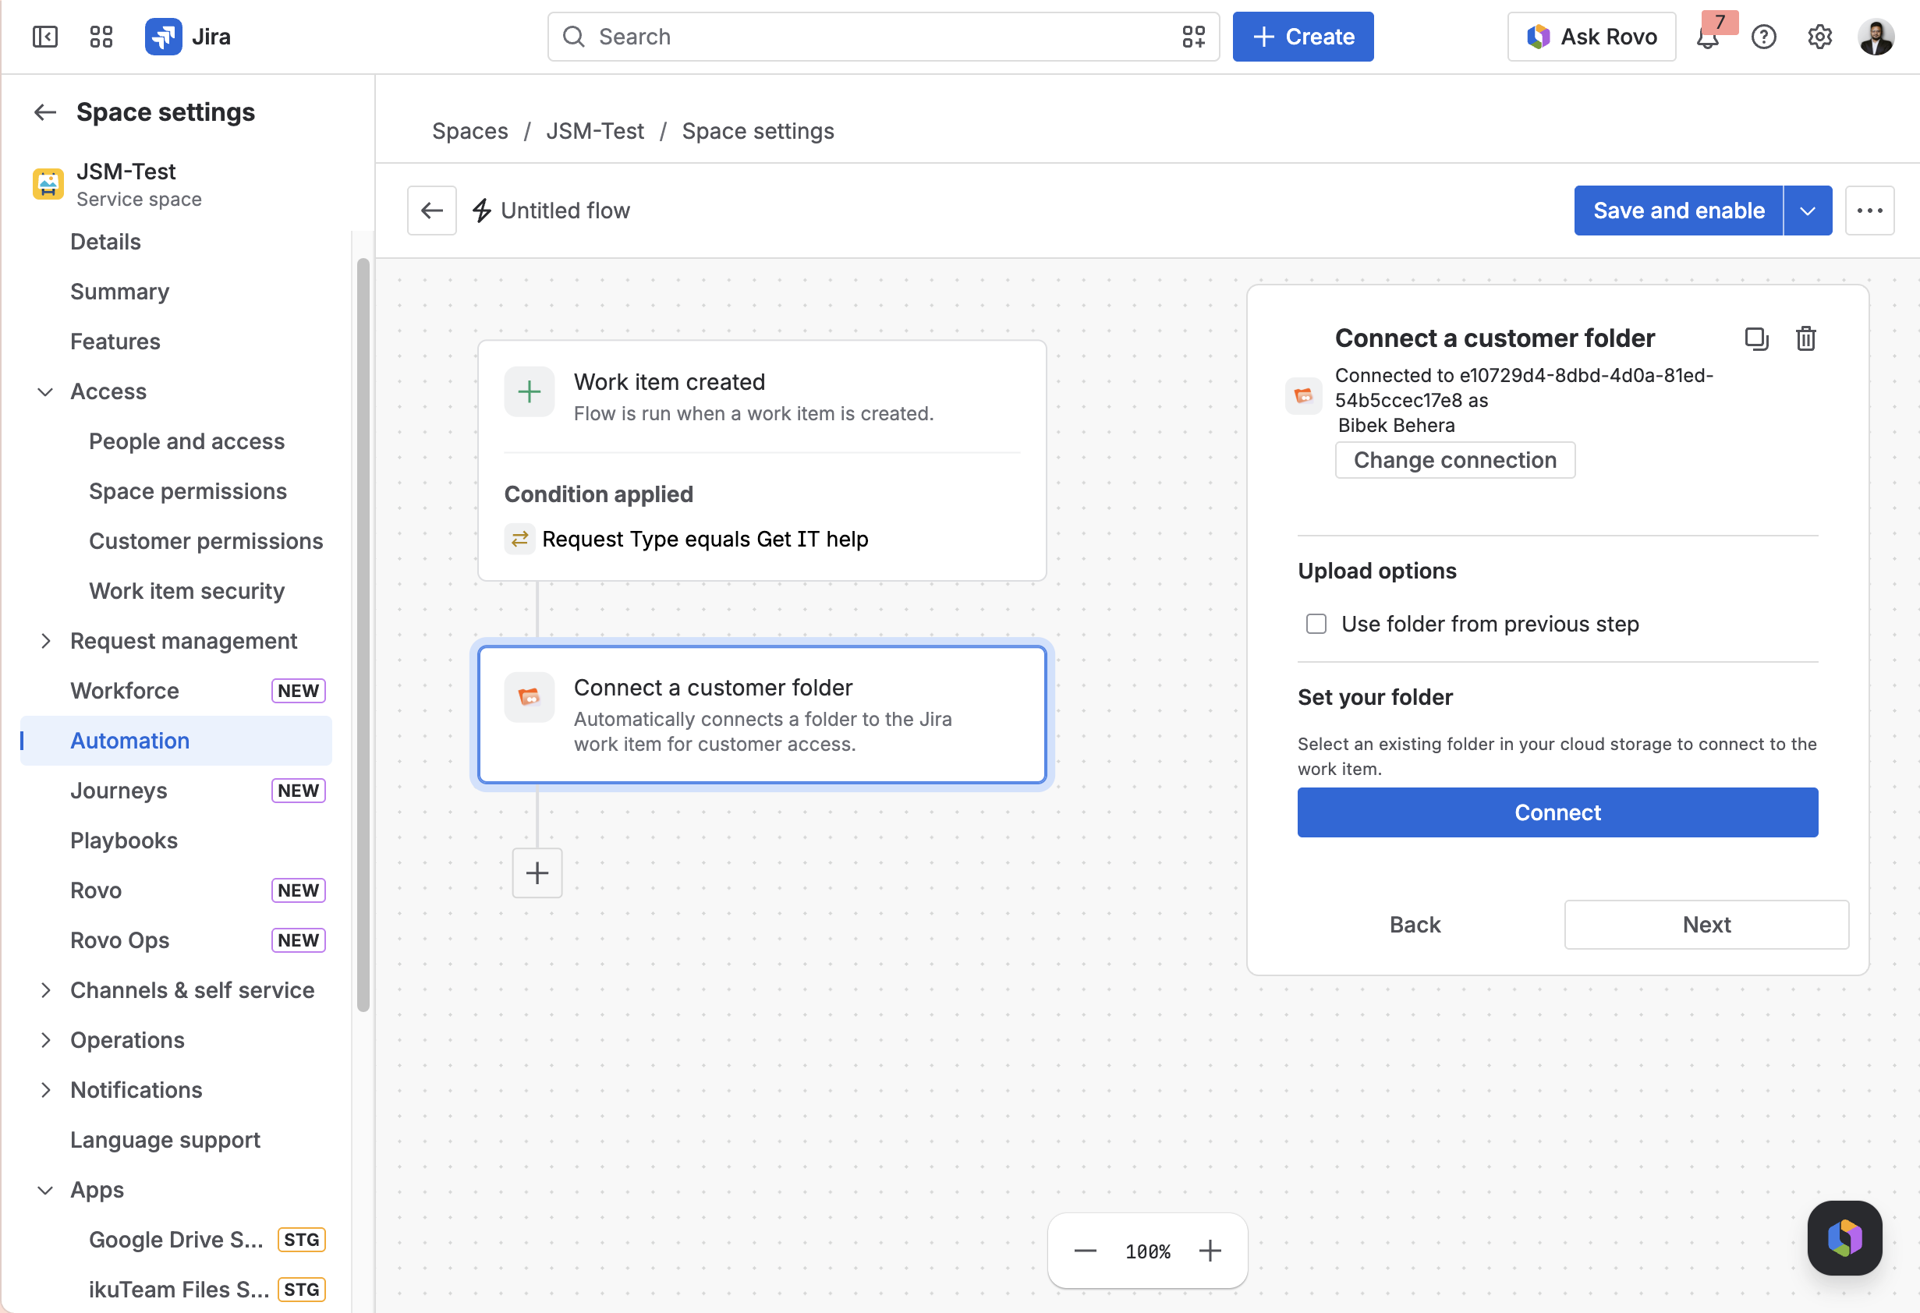
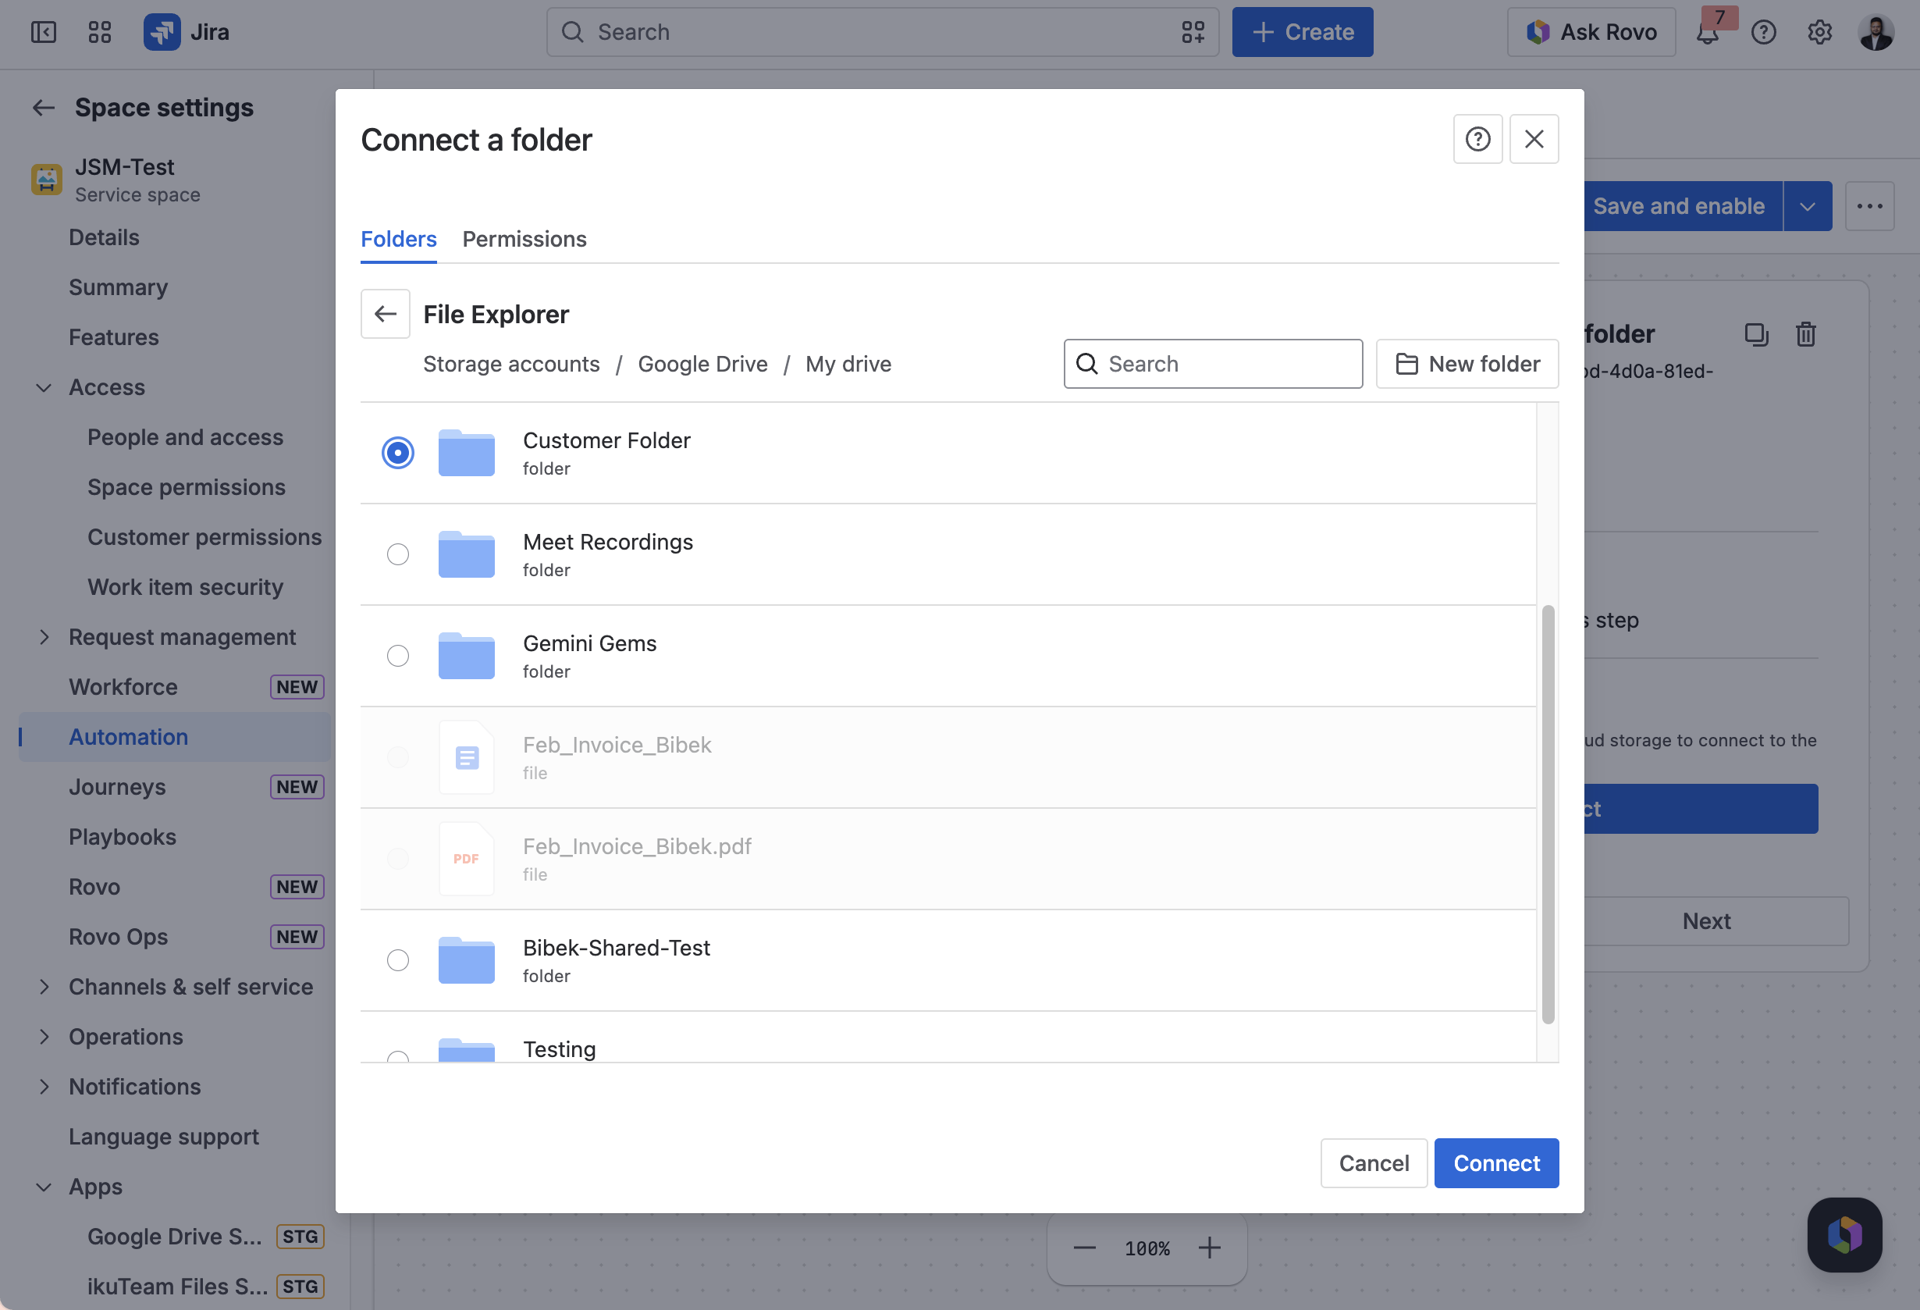
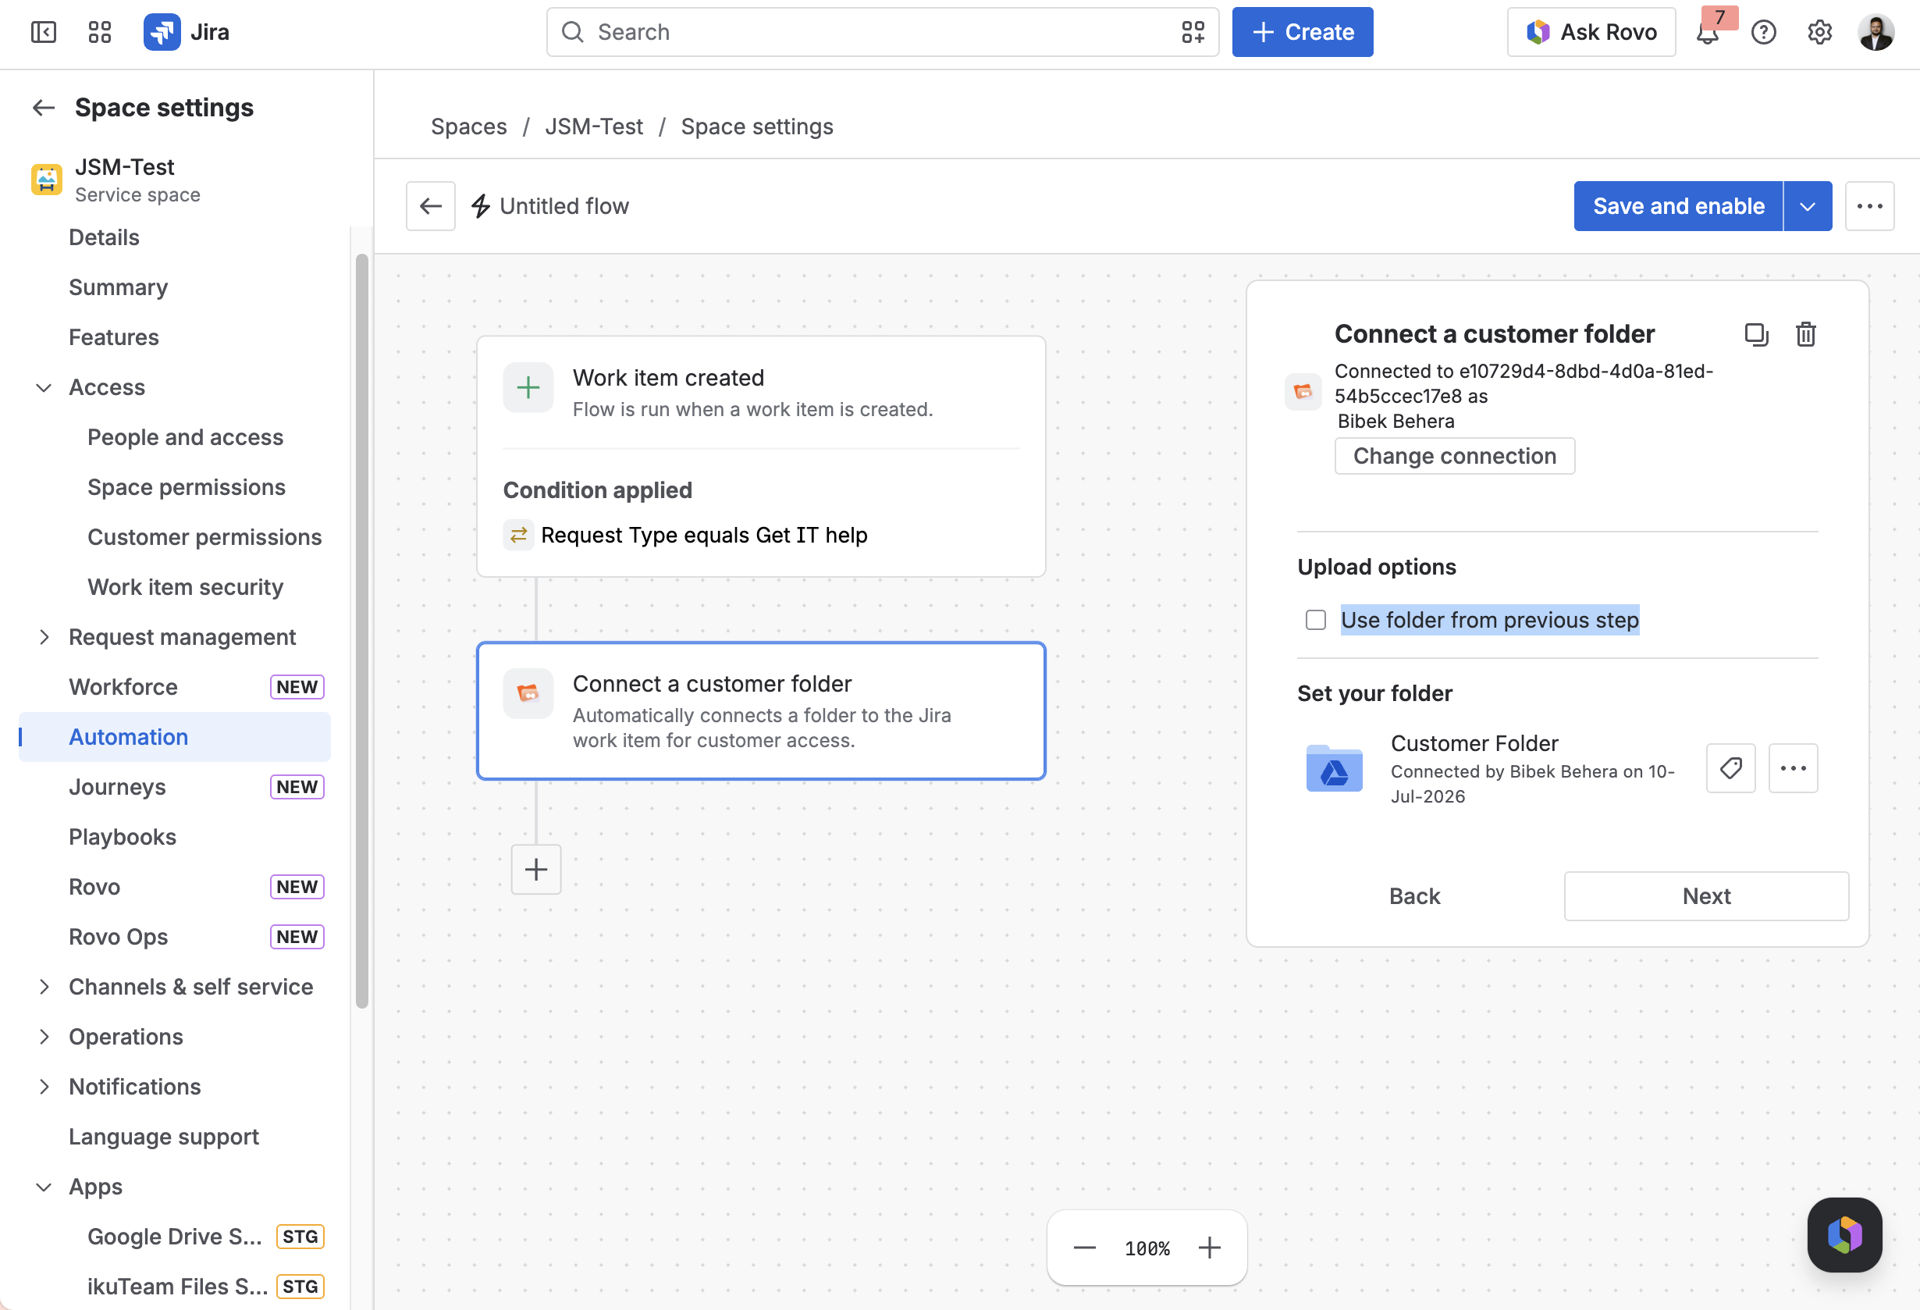
When to use this
Ideal for cross-functional teams sharing a common set of resources, brand assets, SOPs, shared references, where consistency matters more than customizing per issue.
How to set it up
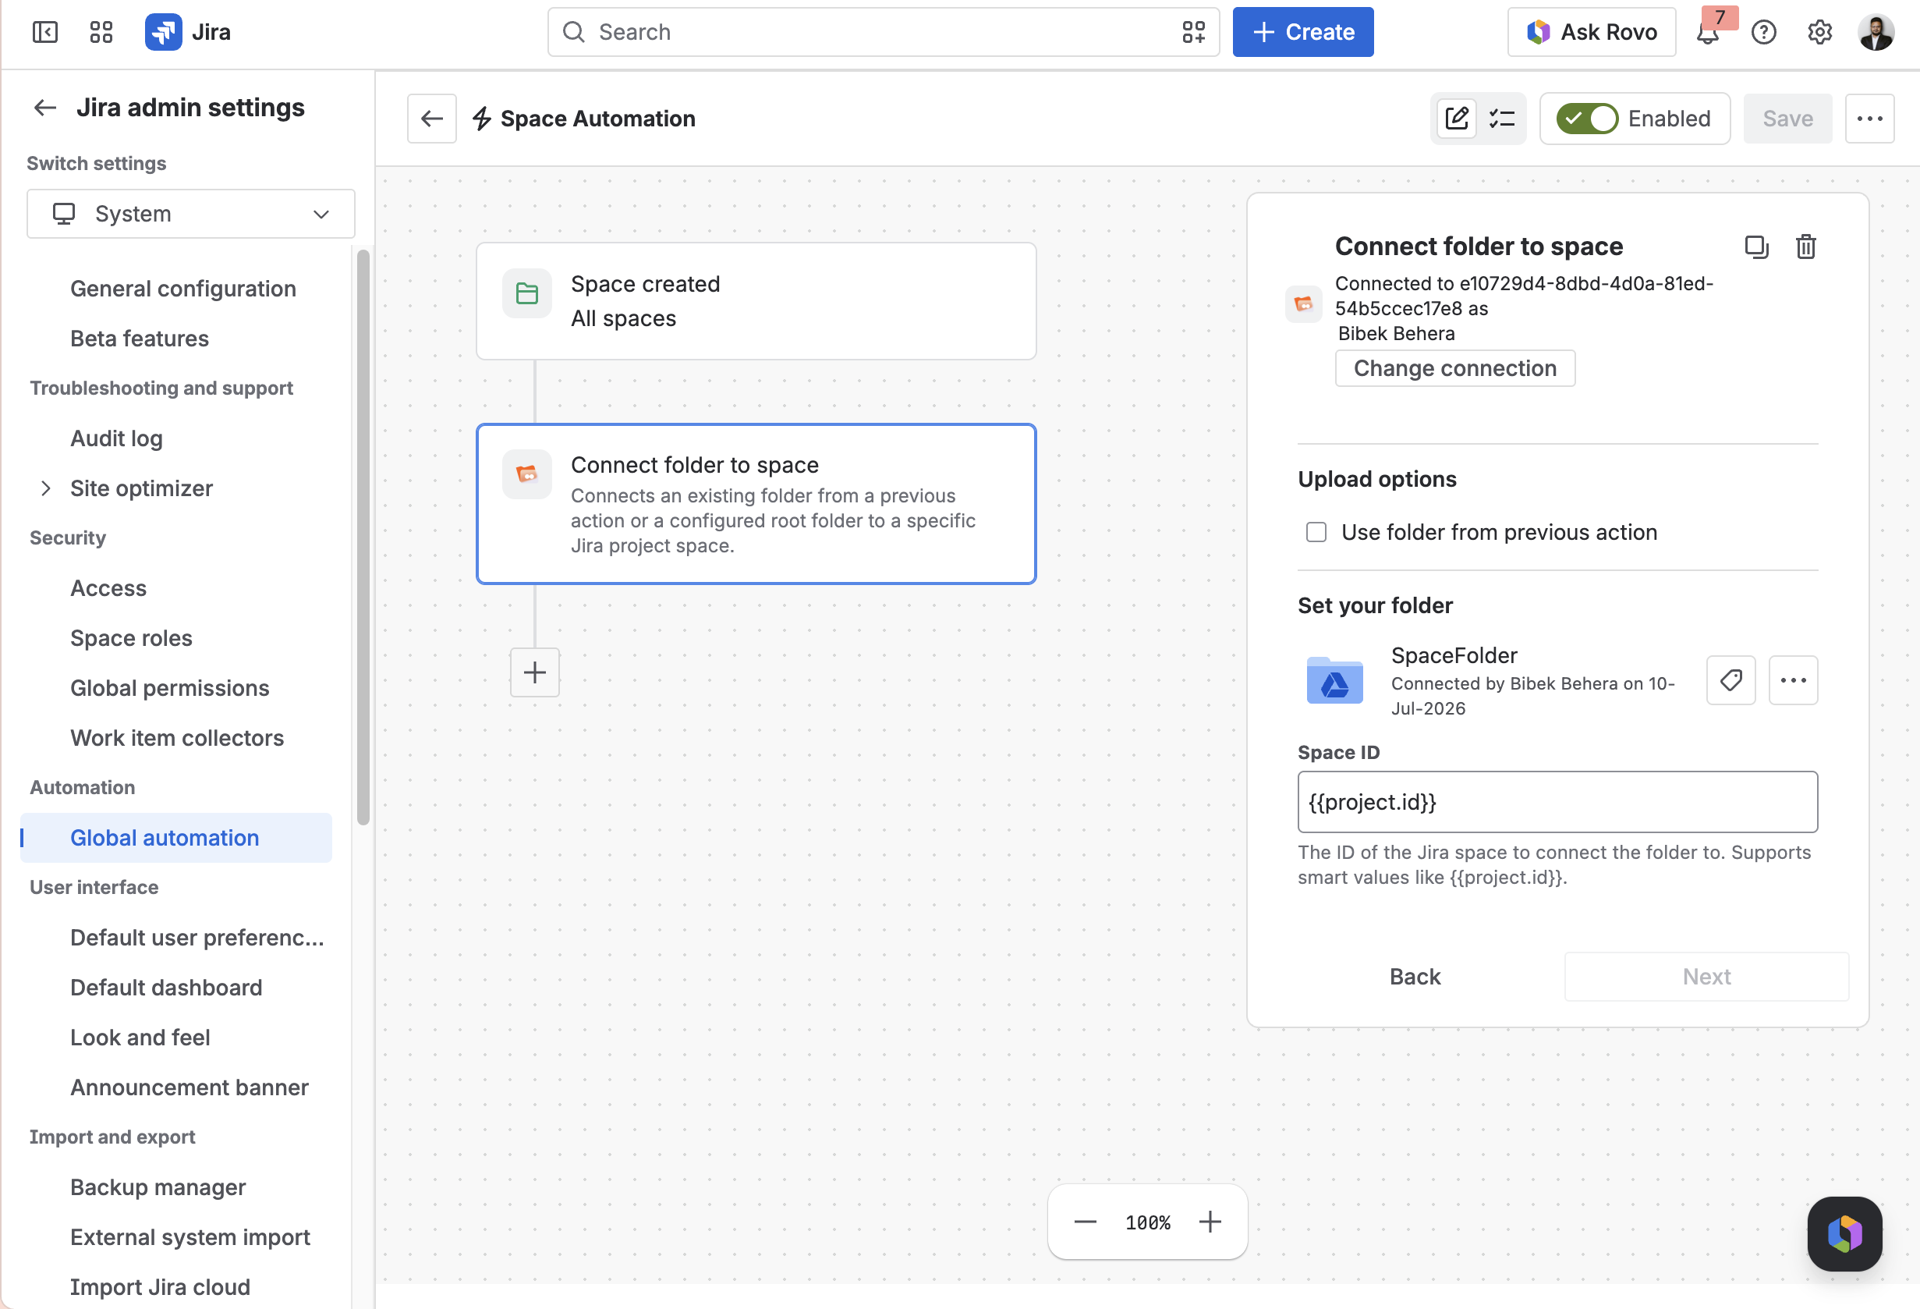
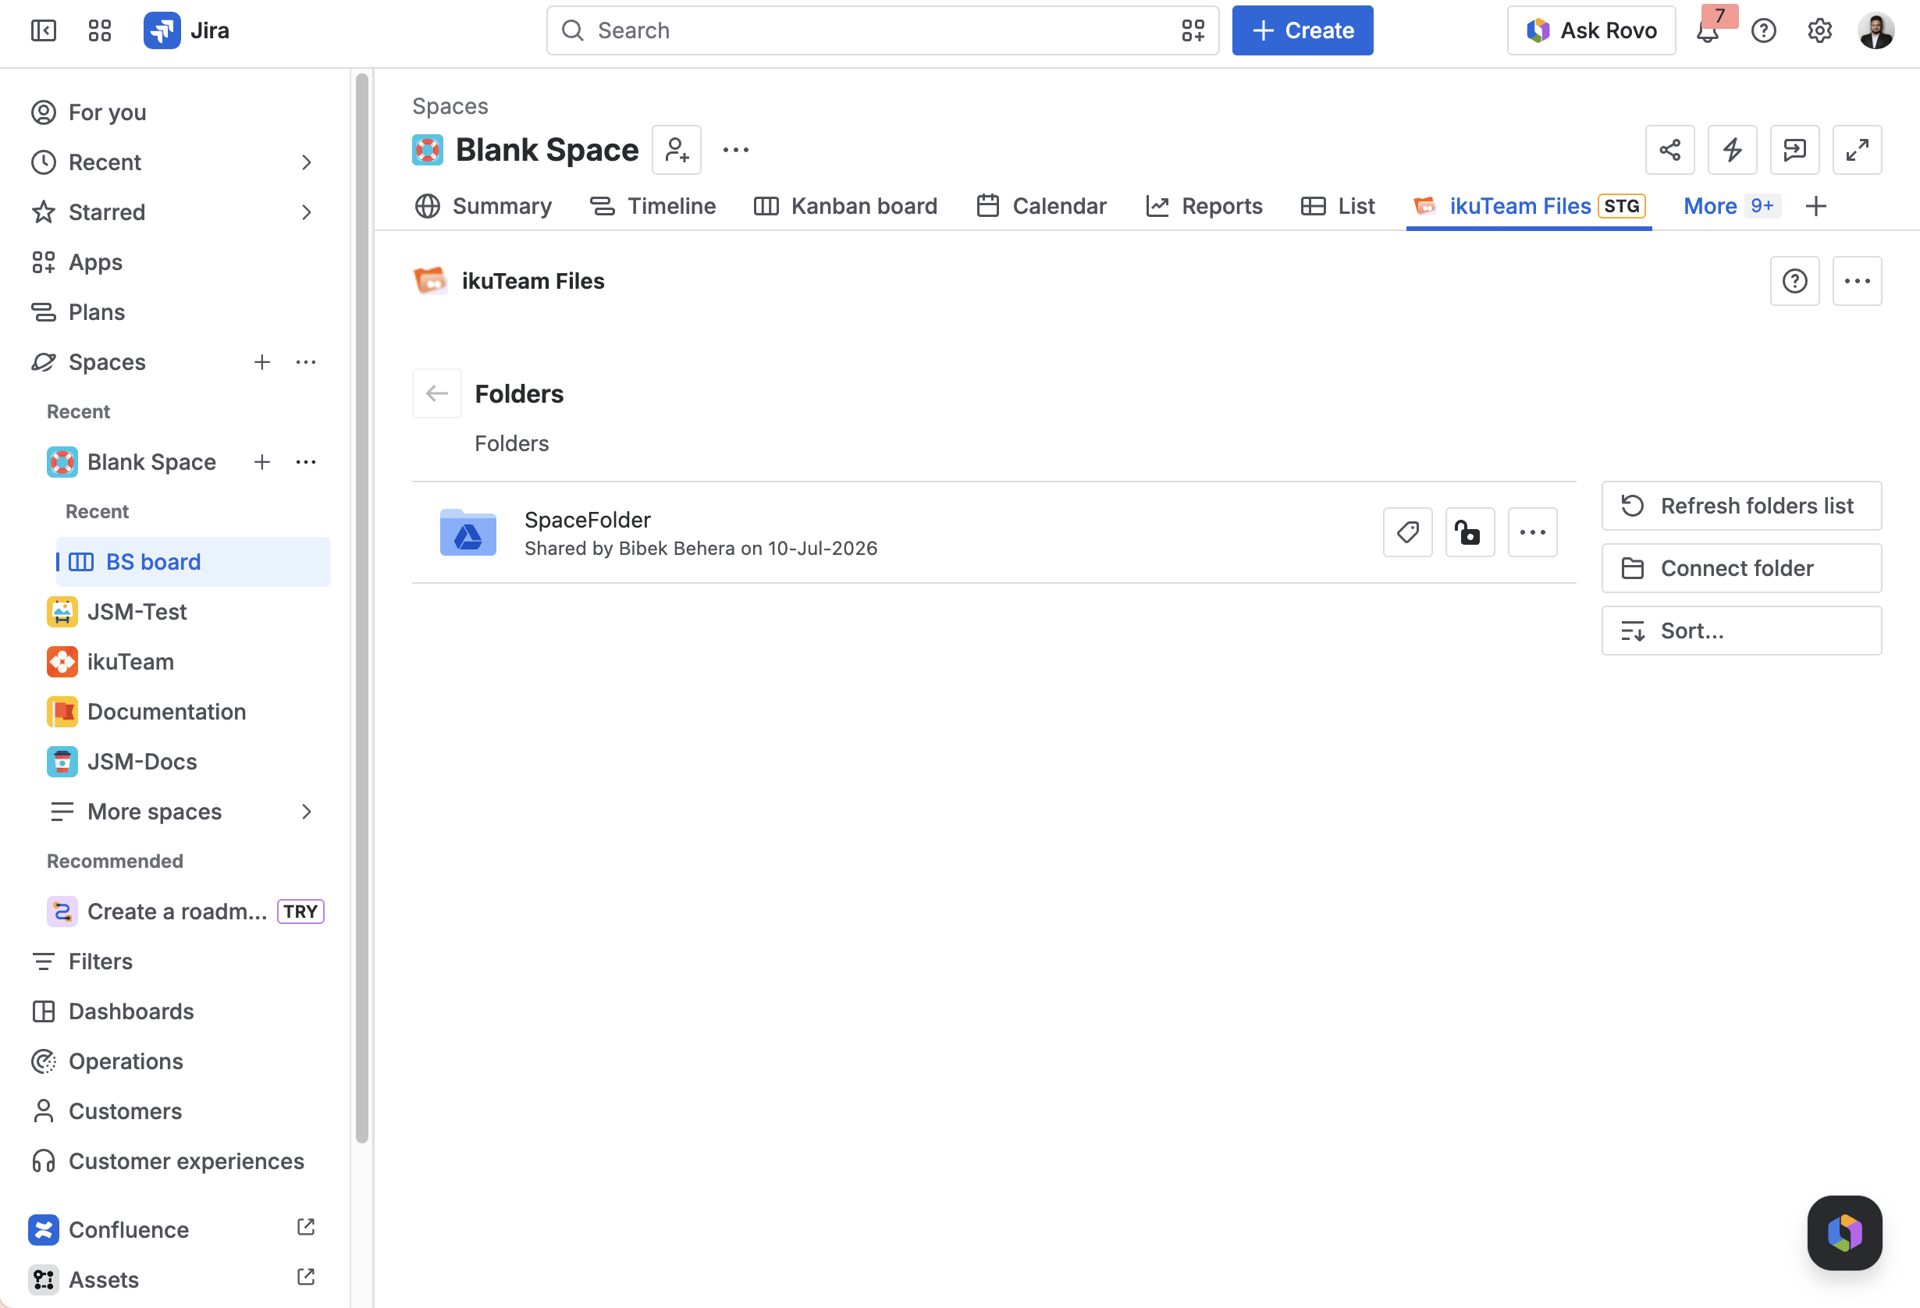
When to use this
Useful when duplication is exactly the point, not a problem. Think pushing an approved template into a new project folder, or copying a finished deliverable from your internal workspace into client-facing storage.
How to set it up
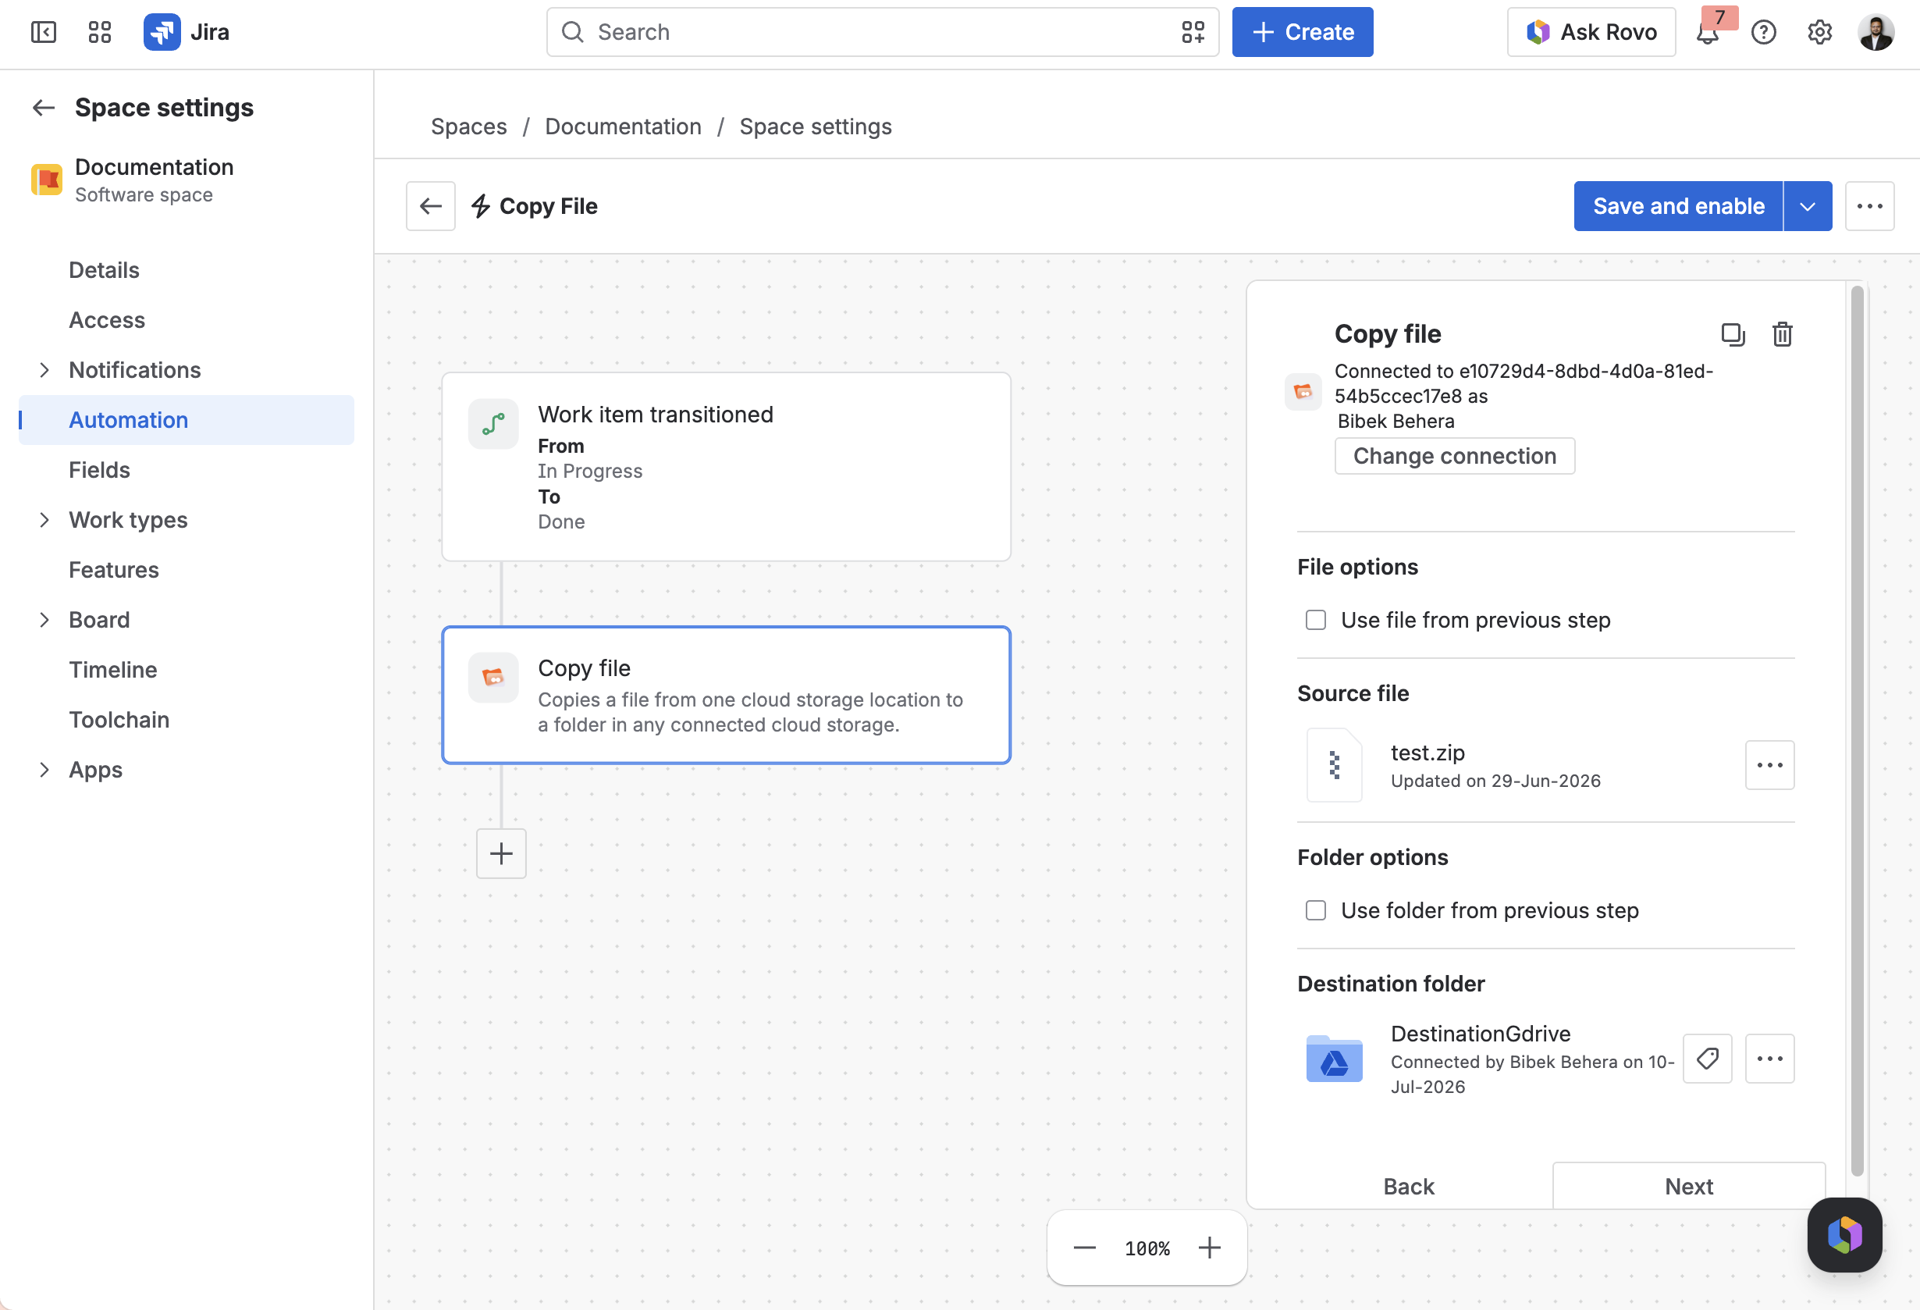
When to use this
Perfect for cleaning up legacy attachments, or closing the loop at the end of a workflow so nothing stays stranded as a static Jira file.
How to set it up
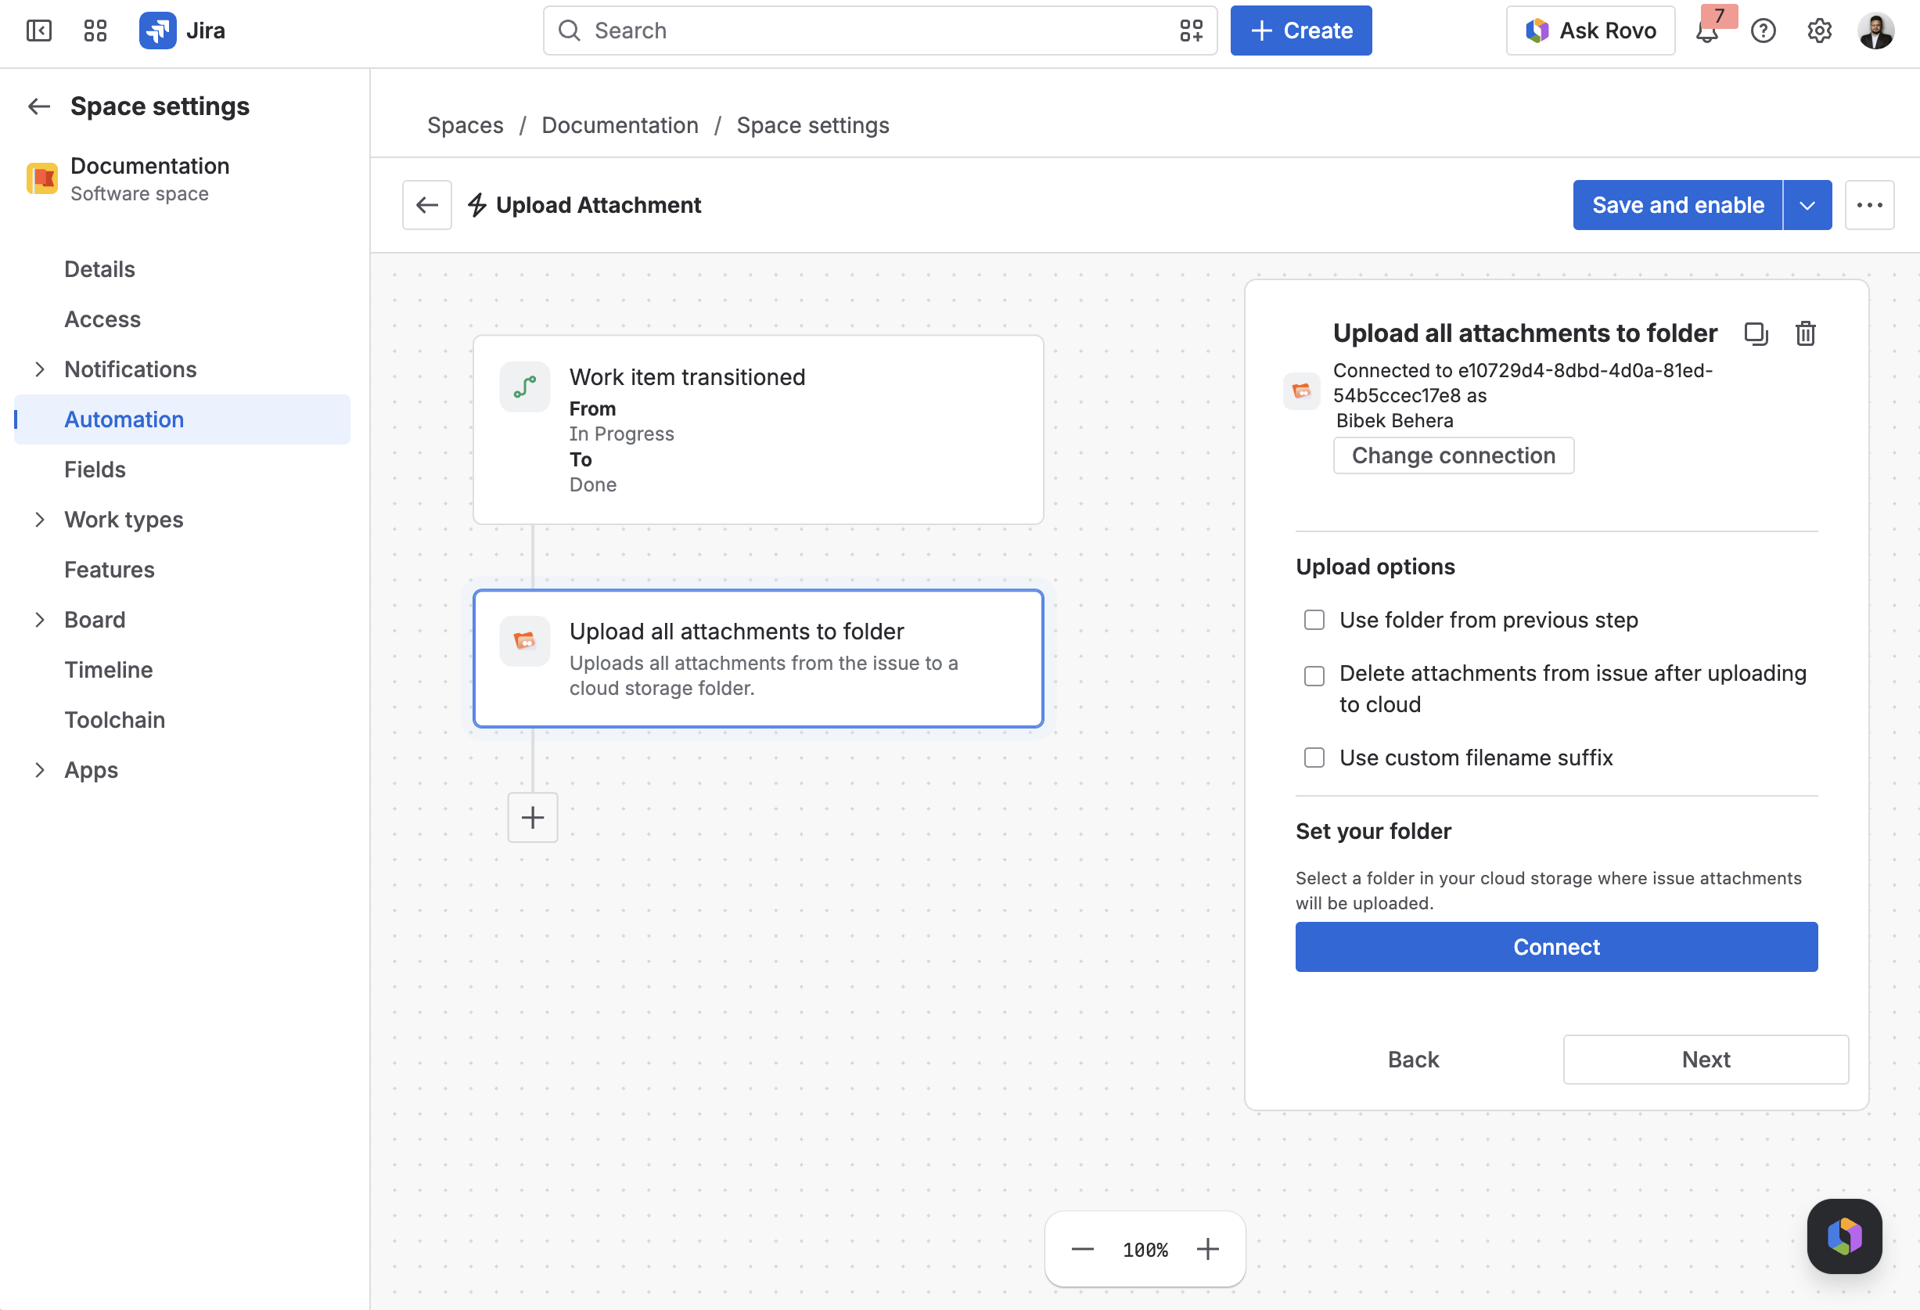
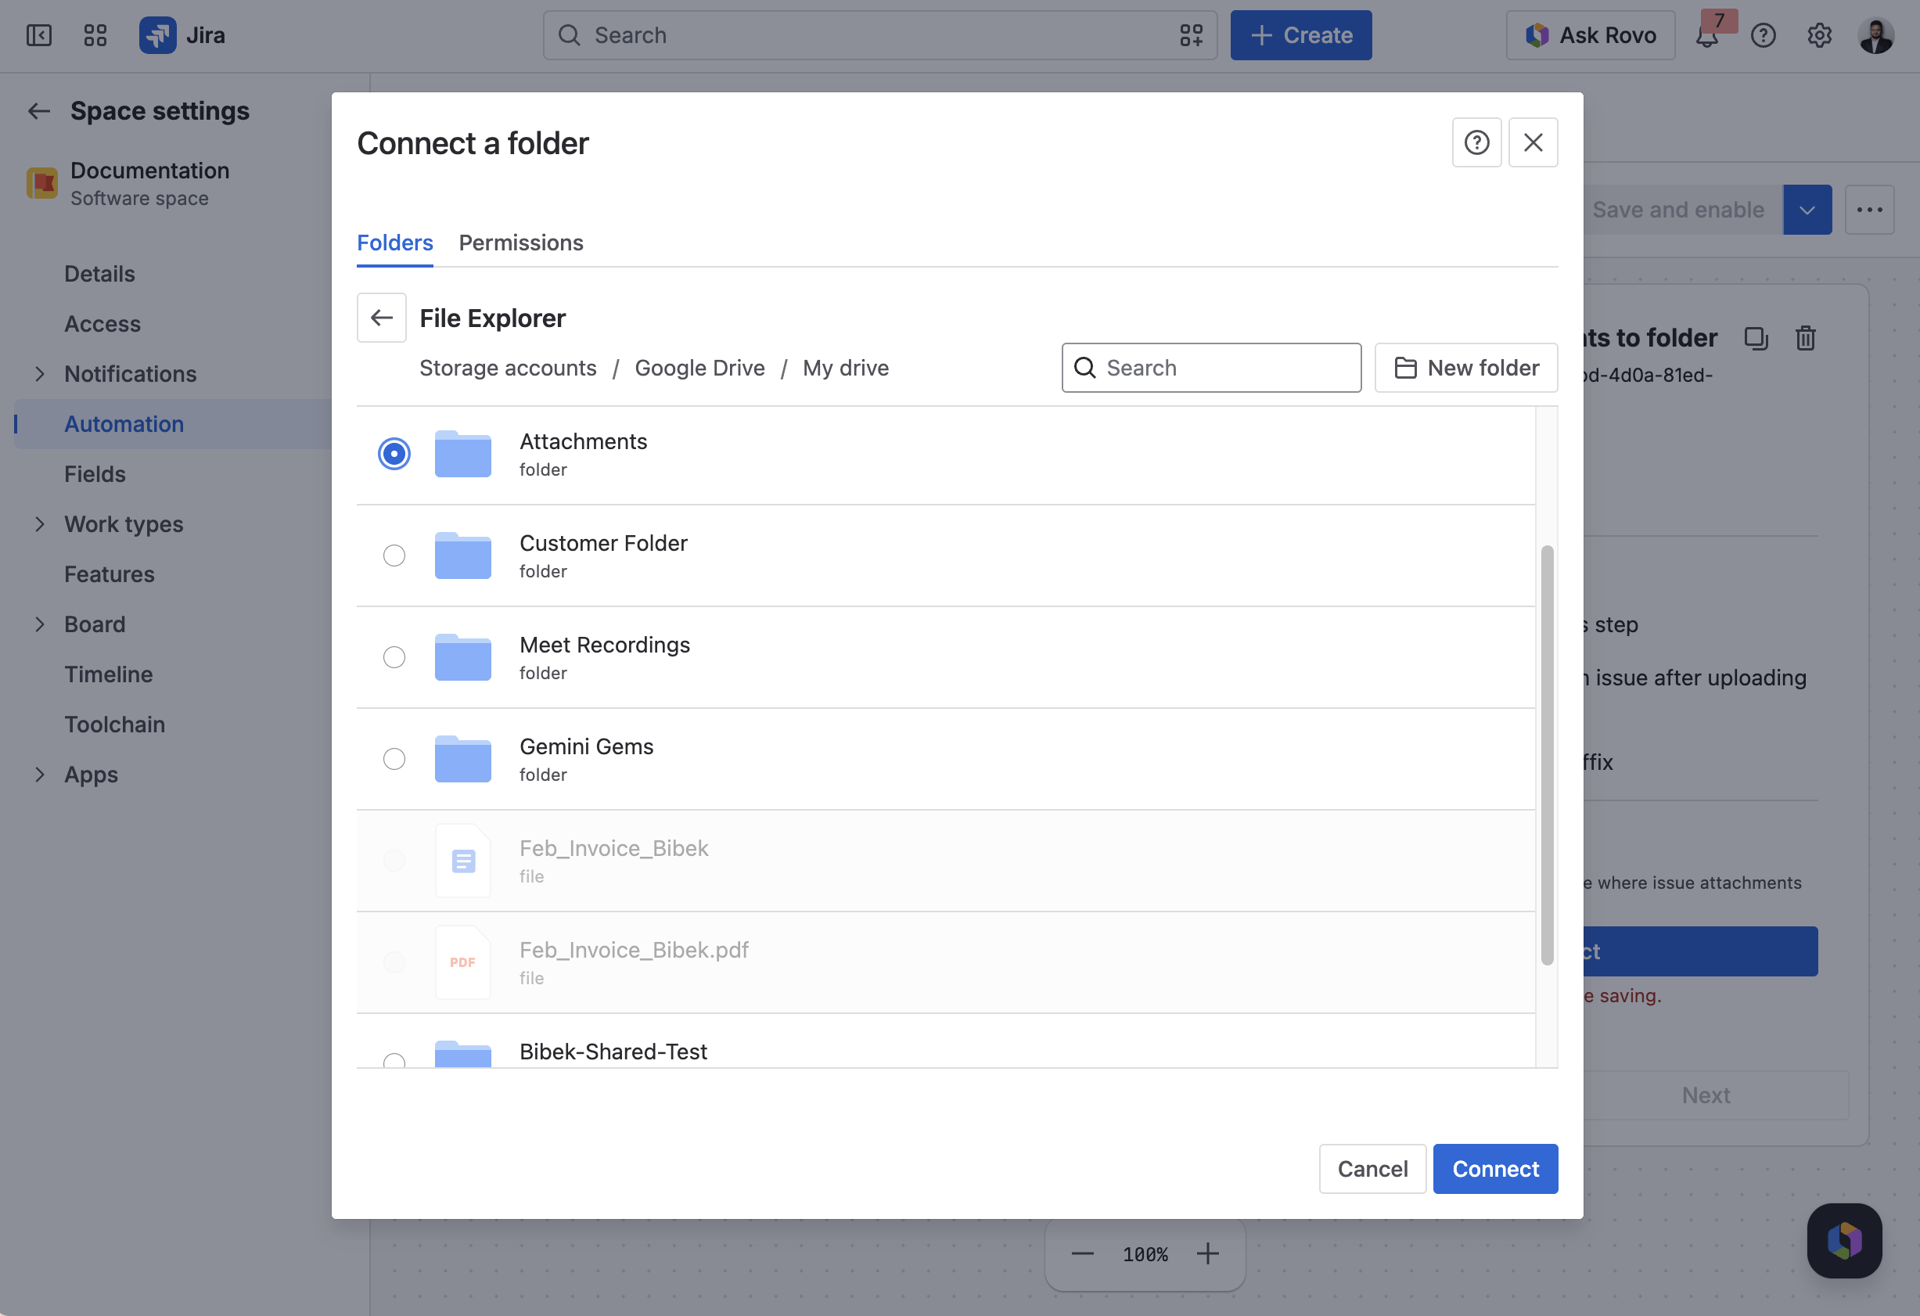
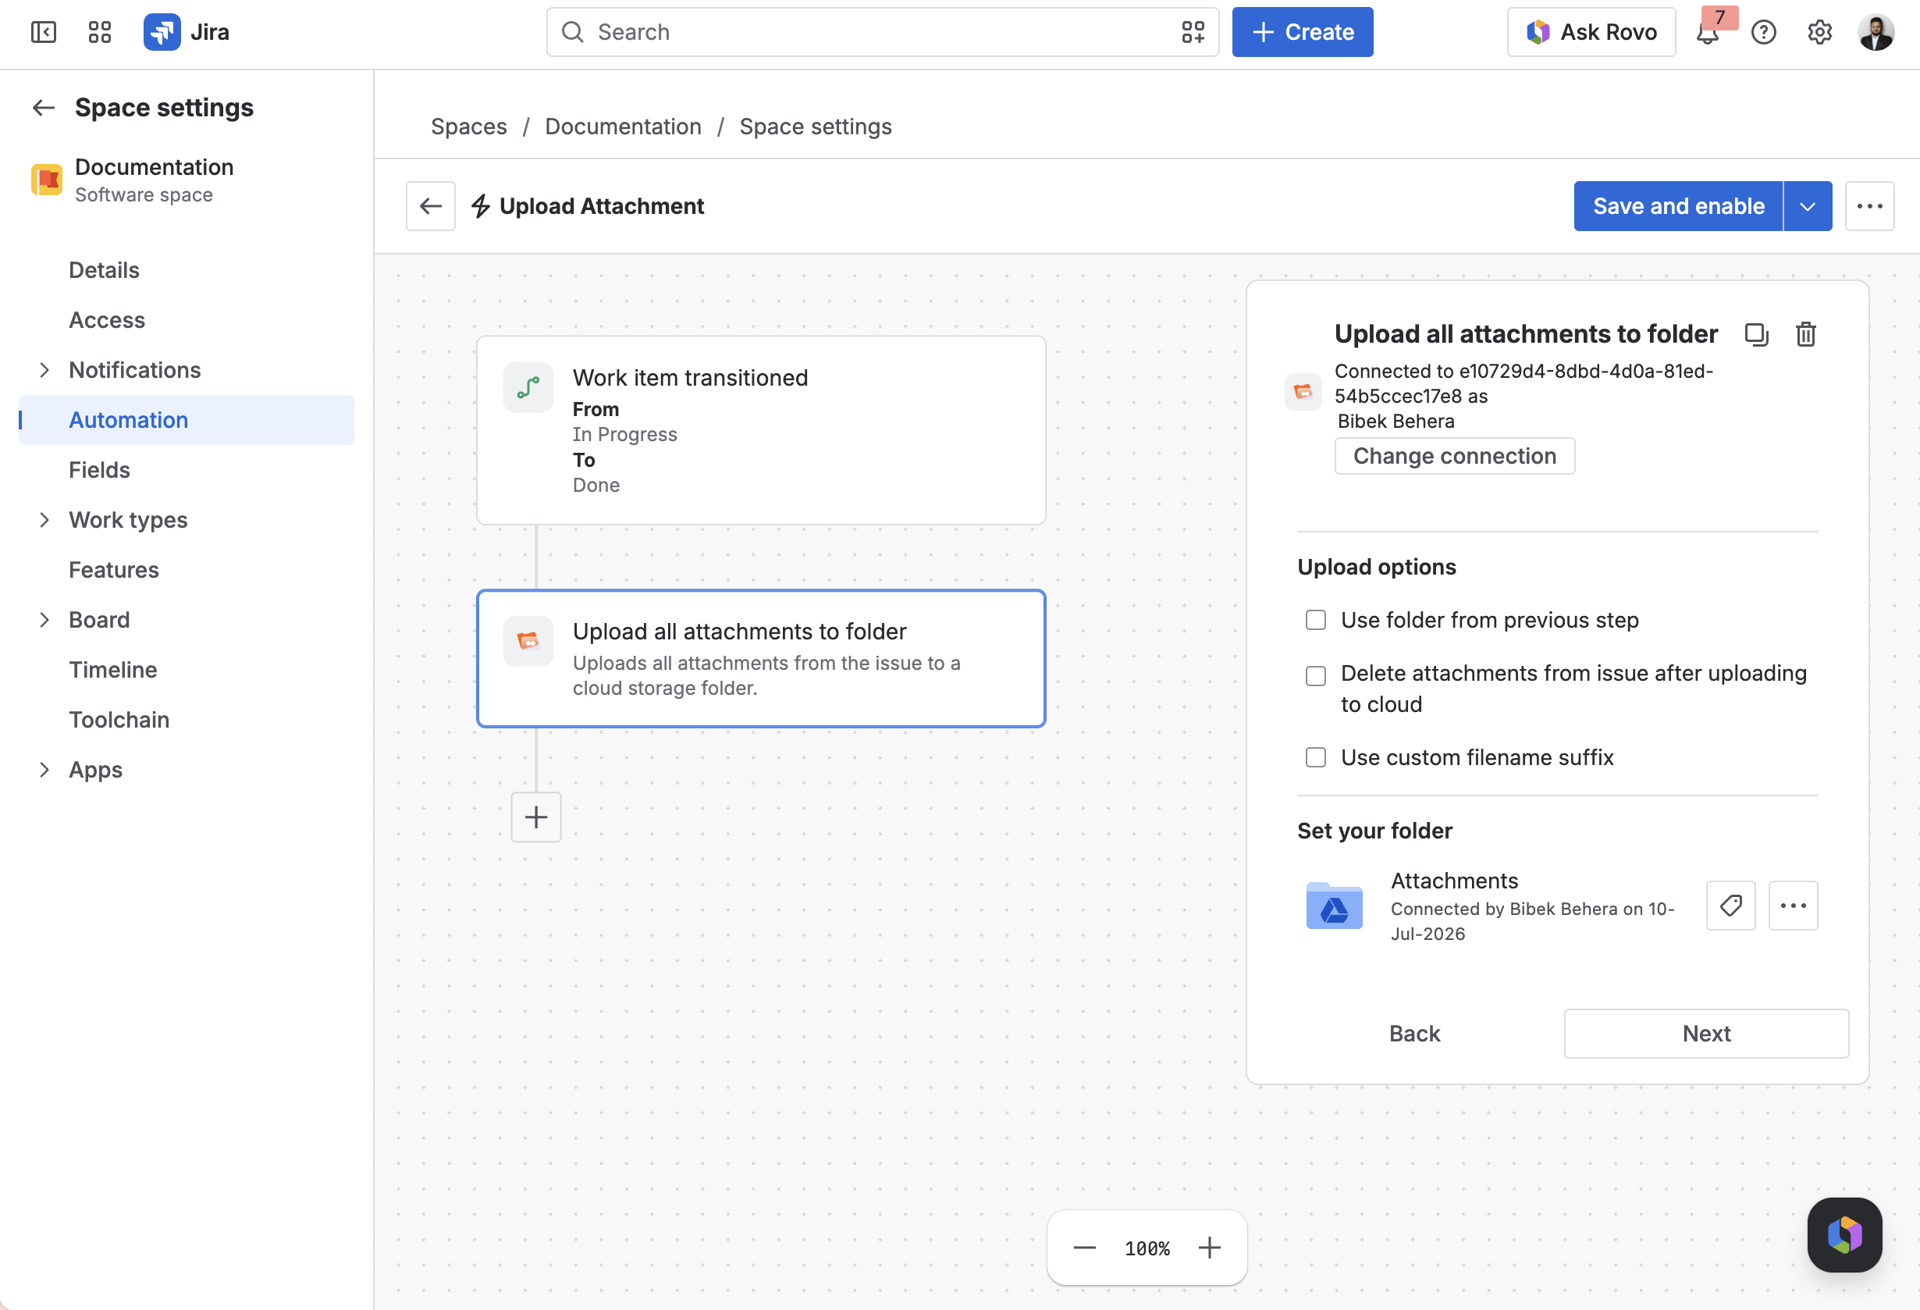
This is what advanced file automation looks like with ikuTeam: not more tools to manage, just the ones you already use, working quietly together so your team can focus on the work that matters.
The SharePoint Agent is an AI extension built into the SharePoint Connector for Jira, working alongside Atlassian Rovo to connect your Jira workspace directly to SharePoint.
Instead of opening and reading through every attached or linked file yourself, the agent lets Atlassian Rovo read and index the content of your documents. It's built on Atlassian's Forge platform, so your data stays securely within the Atlassian ecosystem throughout.
To use Atlassian Rovo, you'll need to be an Organization Admin, and your site will need to be on a Premium or Enterprise plan.
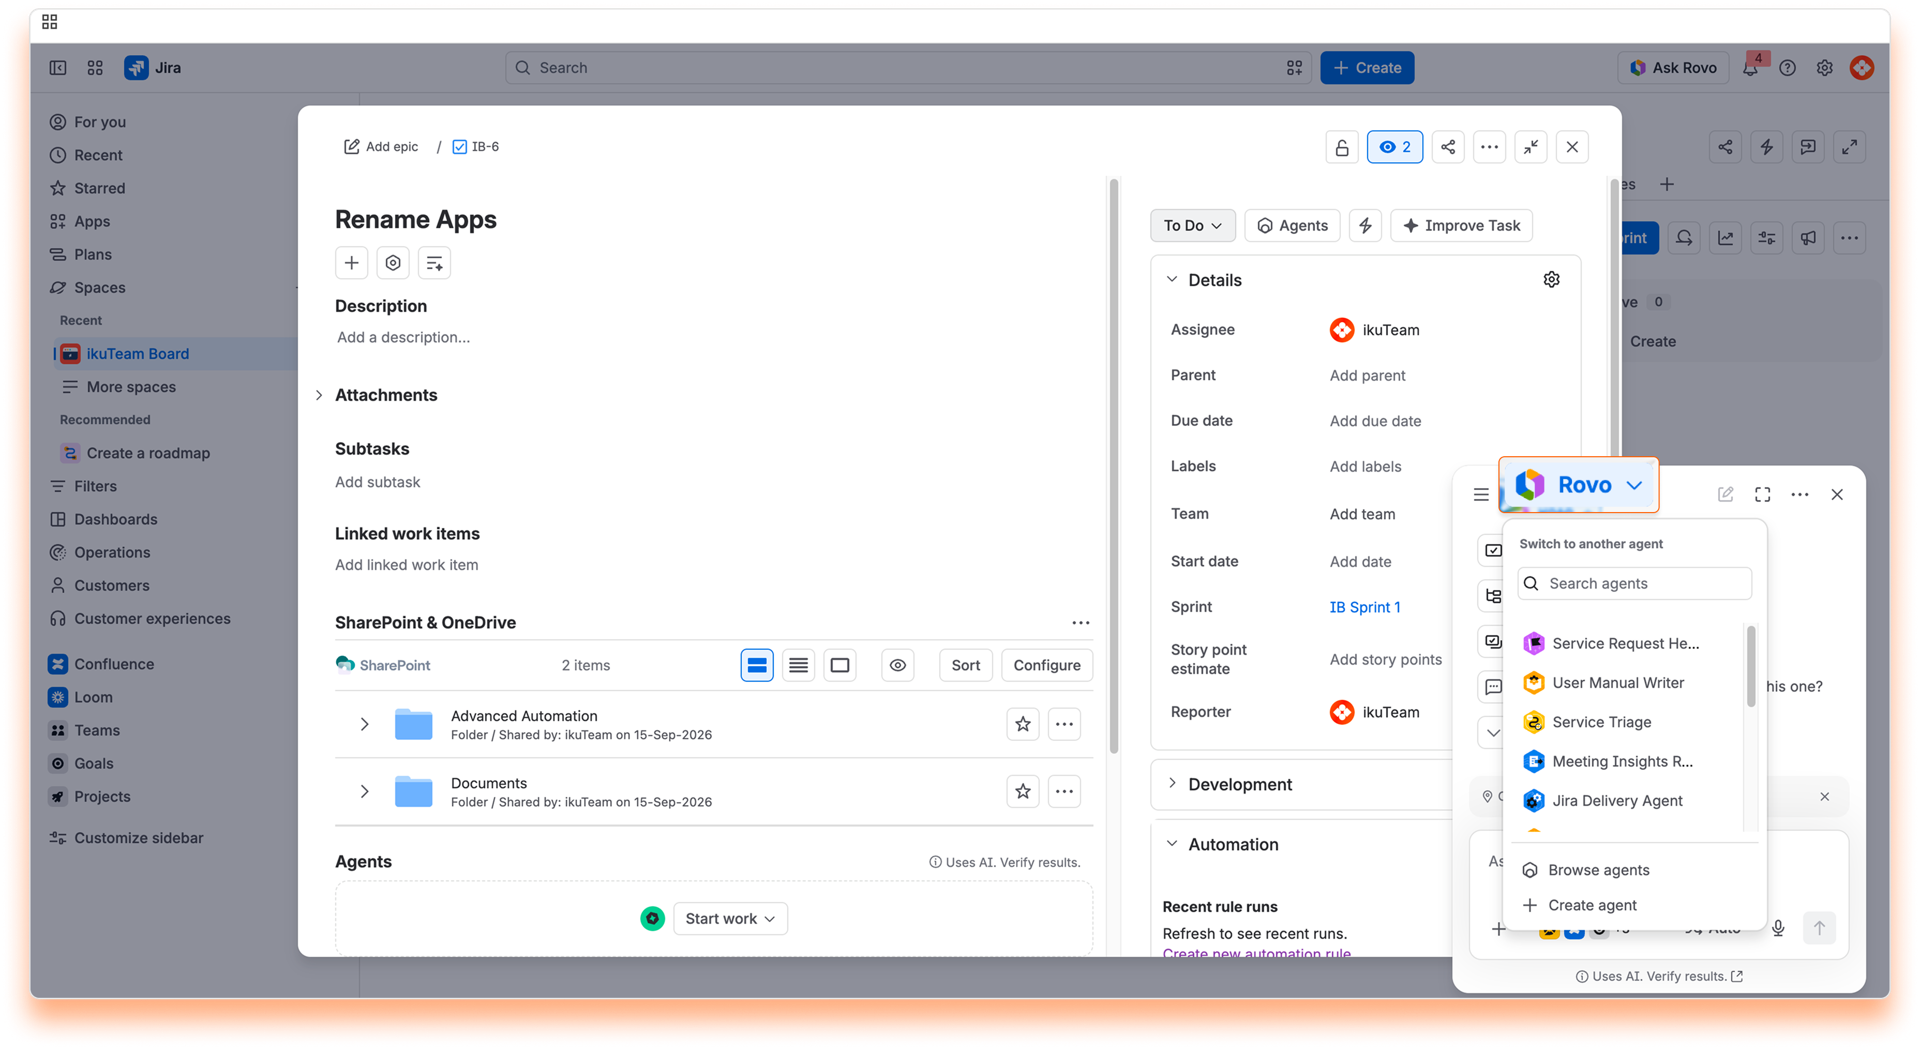
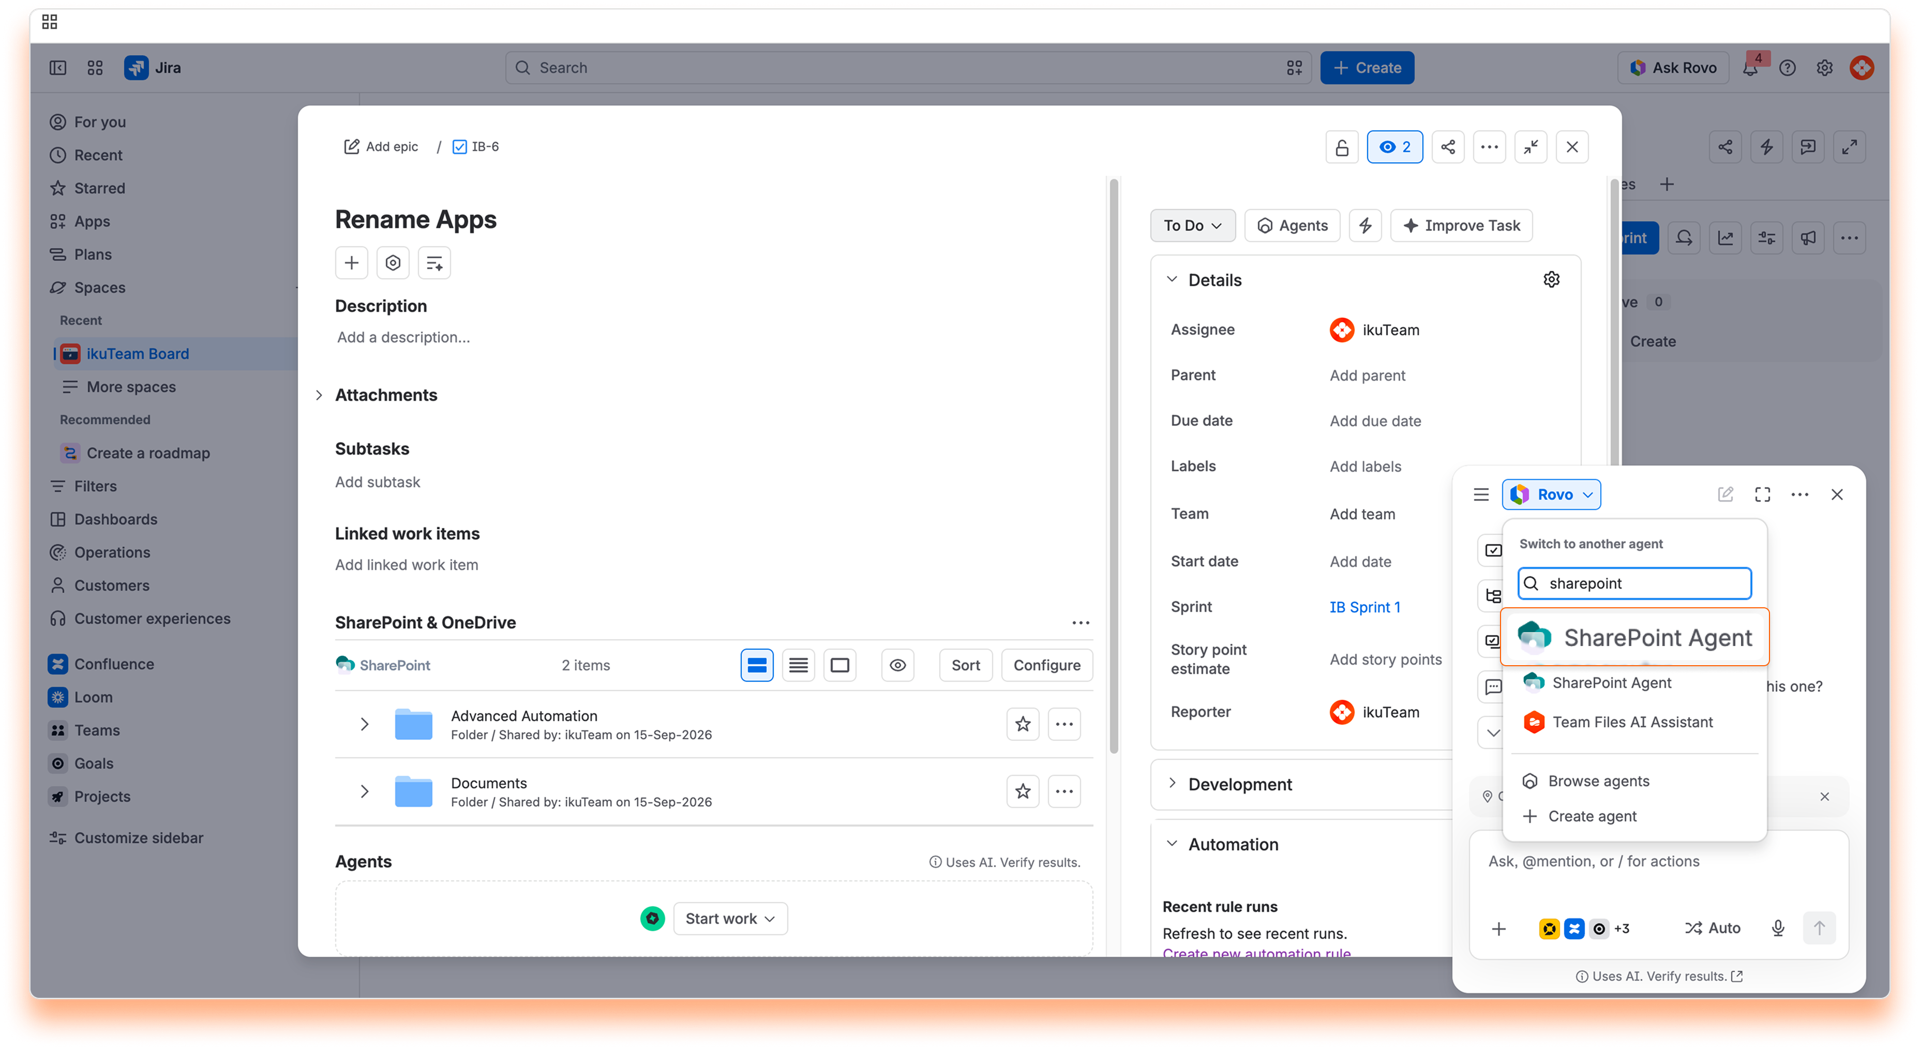
ℹ️ We're just getting started. More file features are on the way, so keep an eye out for what's next.
You can talk to the agent just like you'd talk to a teammate. A few ideas to get you started:
We're just getting started. More file features are on the way, so keep an eye out for what's next.
Setting up the SharePoint Connector for Jira the first time involves one important step: getting sign-off from your organization's SharePoint or Azure admin. If that step hasn't happened yet, you might see an "Approval Required" prompt or run into authentication errors when trying to connect. That's expected, and it's easy to fix.
1. Get the one-time admin approval
Before anyone in your organization can use the app, someone with the right authority needs to approve it once, for everyone.
2. Choose the right permission level
We recommend granting Full Control when approving the app.
3. After approval, everyone else is set
If authentication problems continue after approval, here's where to look:
4. Still running into issues?
If authentication issues persist after granting permissions:
SharePoint Connectors for Jira is designed for highly regulated environments. The app utilize a delegated access model, performing operations exclusively through each user’s specific permissions.
Under our Atlassian Forge architecture, user OAuth tokens are stored securely within Atlassian’s native infrastructure rather than the browser. This transition reinforces our Zero-Persistence guarantee: because ikuTeam never stores your data or credentials on our own servers, your information remains protected even in the unlikely event of a security incident affecting our external systems.
Note for SharePoint/OneDrive Users: If you receive a “Need admin approval” prompt during connection, please contact your SharePoint or Azure Administrator to authorize the app’s use for your organization.
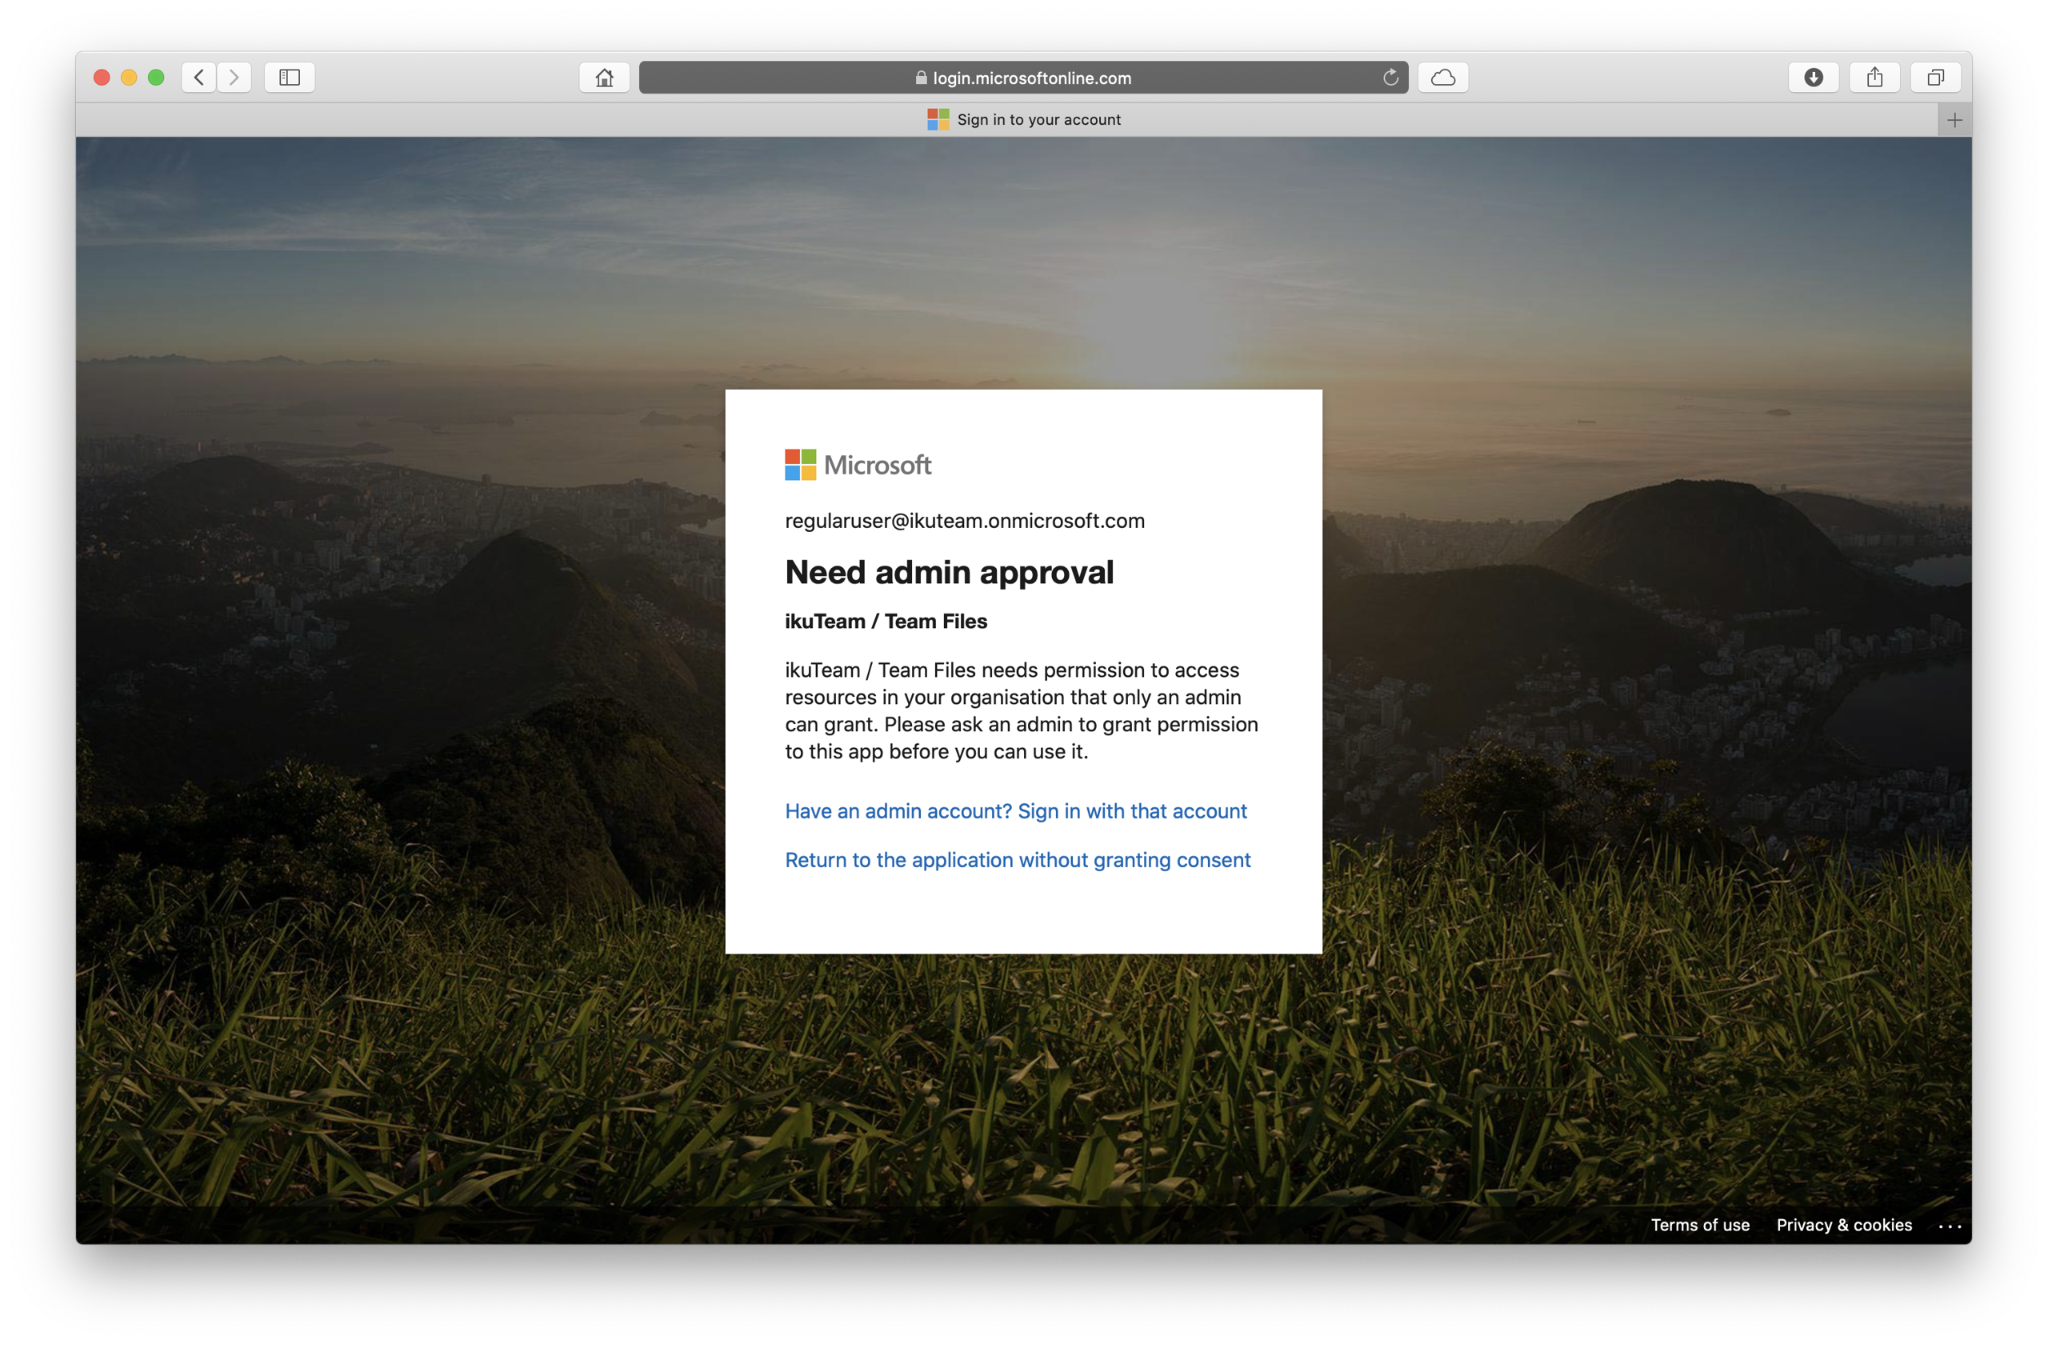
Authorize the SharePoint Connector for Jira app to be used on SharePoint from Jira:
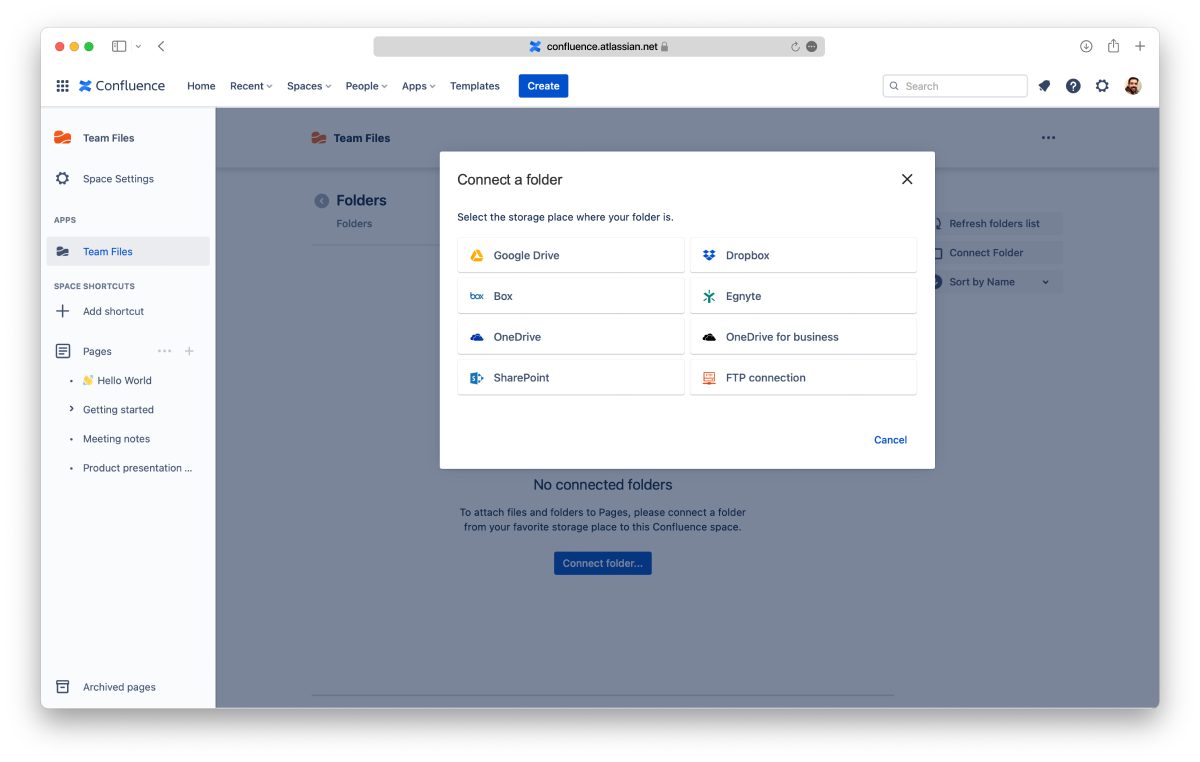
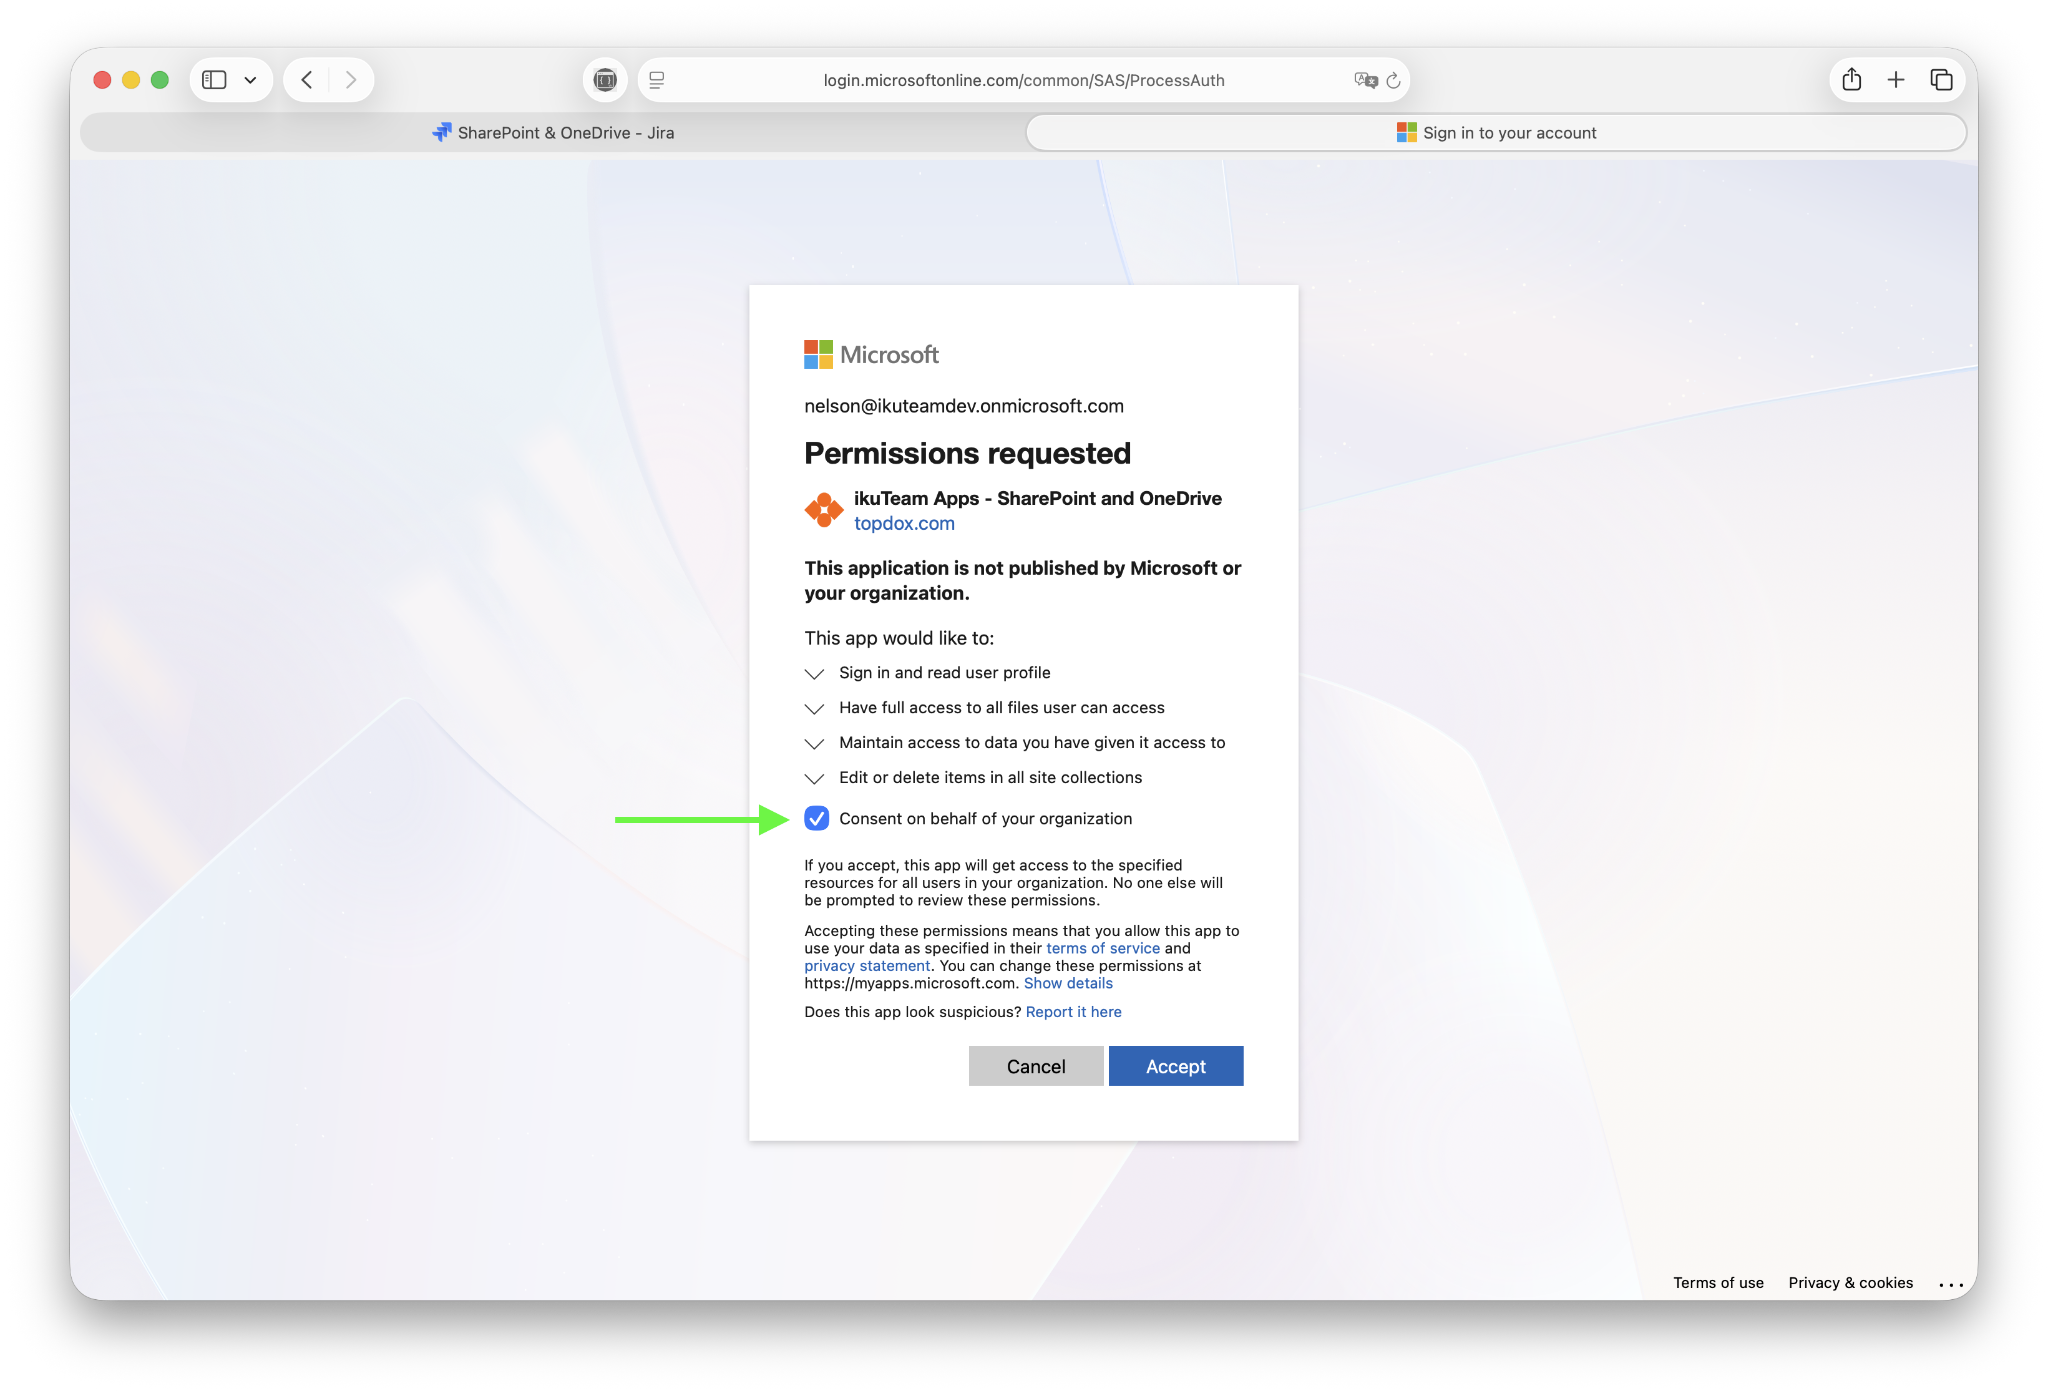
The SharePoint Connector for Jira app use the following permissions on behalf of the user to make the files and folders accessible on Jira and Confluence via OAuth 2.0. The apps alone do not have any read or write permissions, even after authorization. The apps use each user’s access token to access content in SharePoint from Jira.
|
API/Permissions name |
Type |
Description |
Admin Consent Required |
|
Microsoft Graph |
|||
|
Delegated |
Have full access to all files user can access |
No |
|
Delegated |
Edit or delete items in all site collections |
No |
|
Delegated |
Sign in and read user profile |
No |
|
Delegated |
Maintain access to data you have given access to |
No |
SharePoint permissions on Jira
Ensure that “Mirror Storage Permissions” are ON in the SharePoint Connector for Jira app in Jira Admin Settings. Learn more.
Also, check here for more details about what changes if you change this setting.
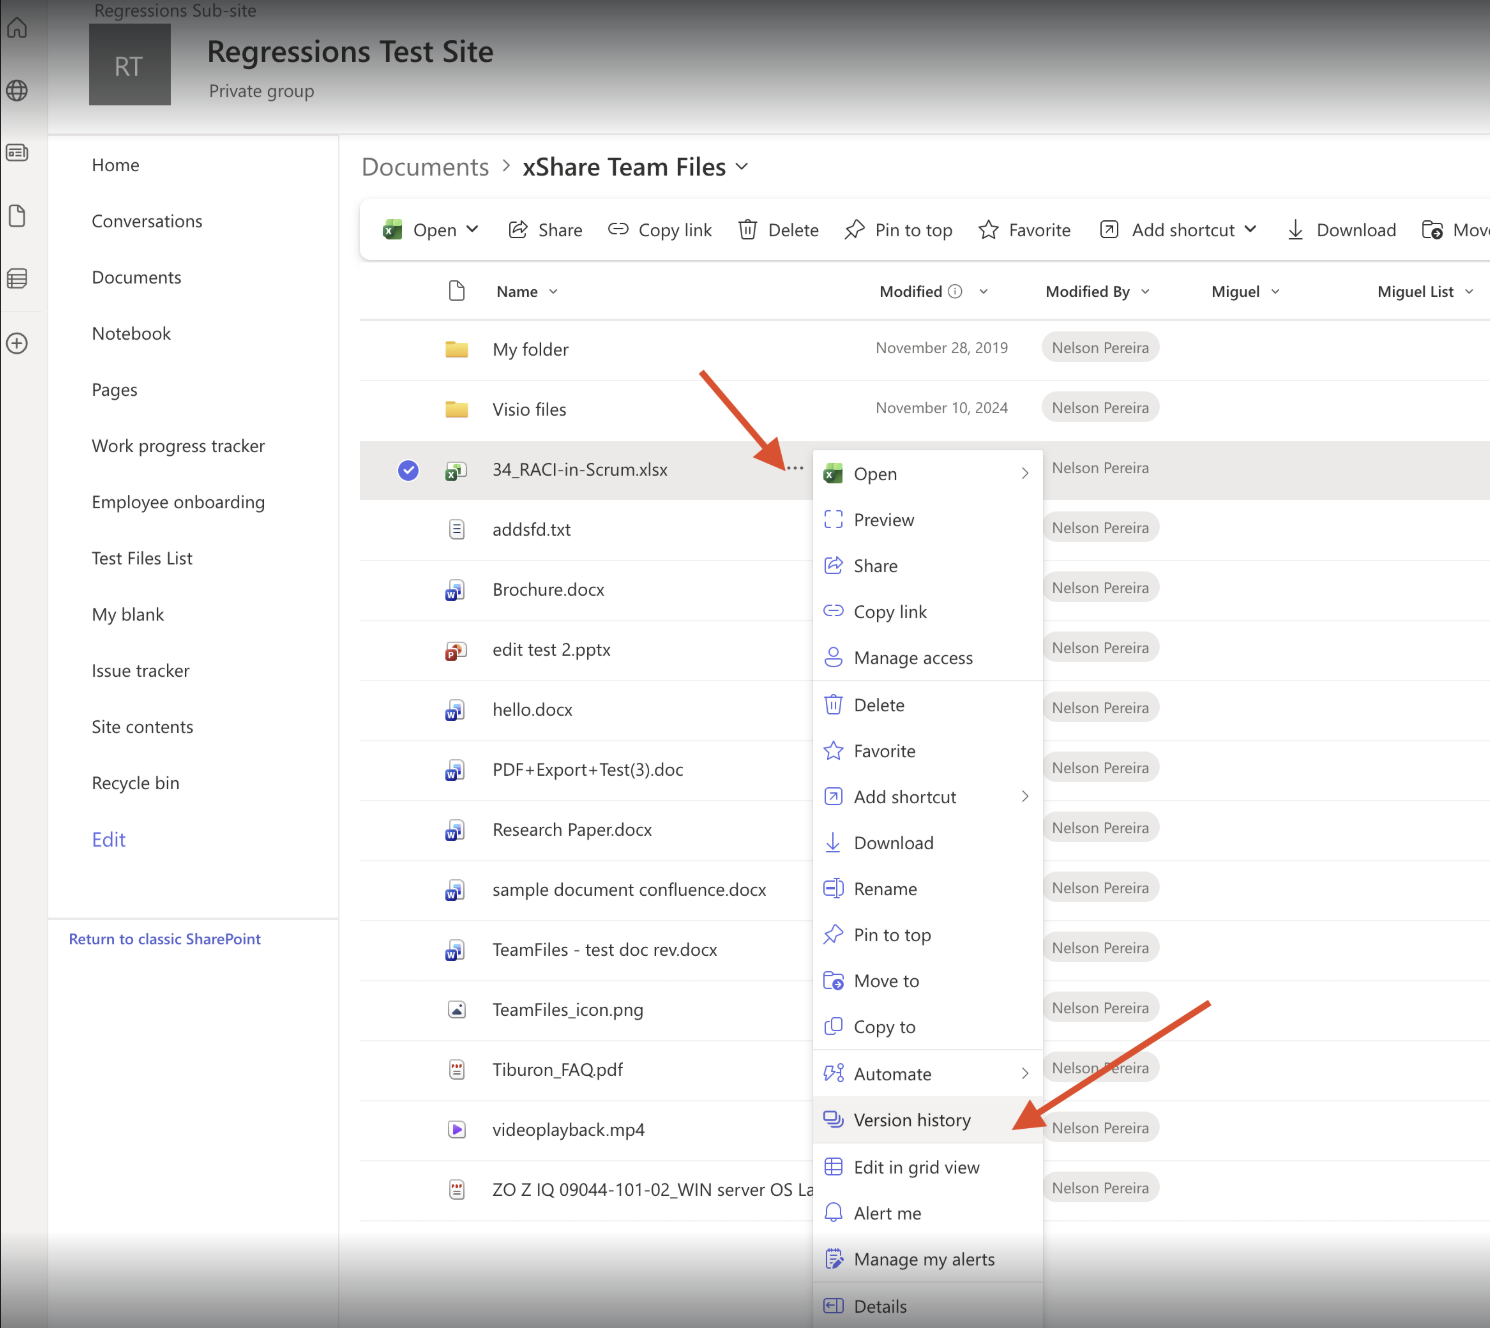
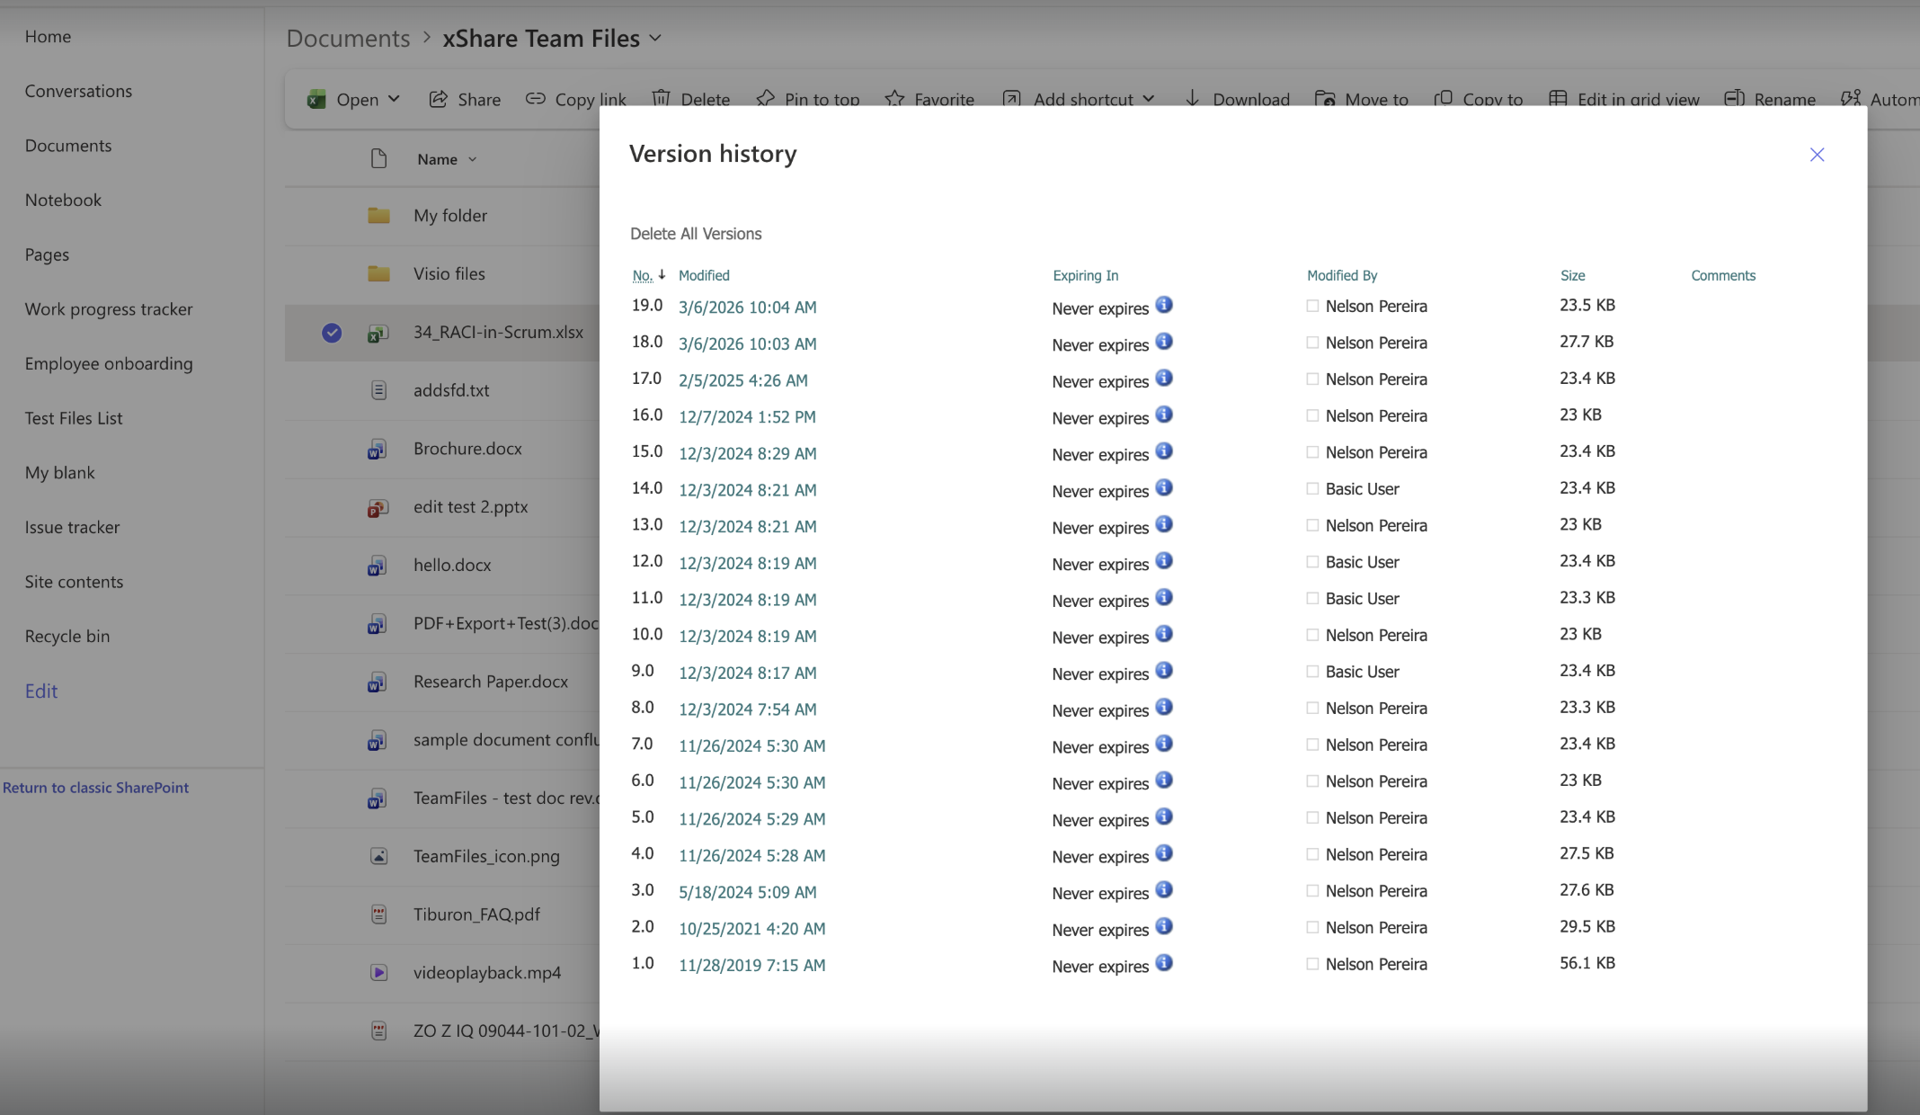
When a file is uploaded to Jira and added to SharePoint via the SharePoint Connector for Jira app, subsequent edits made through the Jira Service Management (JSM) Customer Portal do not appear in the SharePoint document version history as expected. Specifically, users were unable to see detailed version logs or the identity of editors in SharePoint, similar to the standard check-in/check-out process. The concern is whether the connector supports version tracking for files edited via Jira, and how SharePoint permissions settings affect this behavior.

_2026-03-26_20-48-42-1.png?length=960&name=untitled_Gemini%203%20(Nano%20Banana%20Pro)_2026-03-26_20-48-42-1.png)


