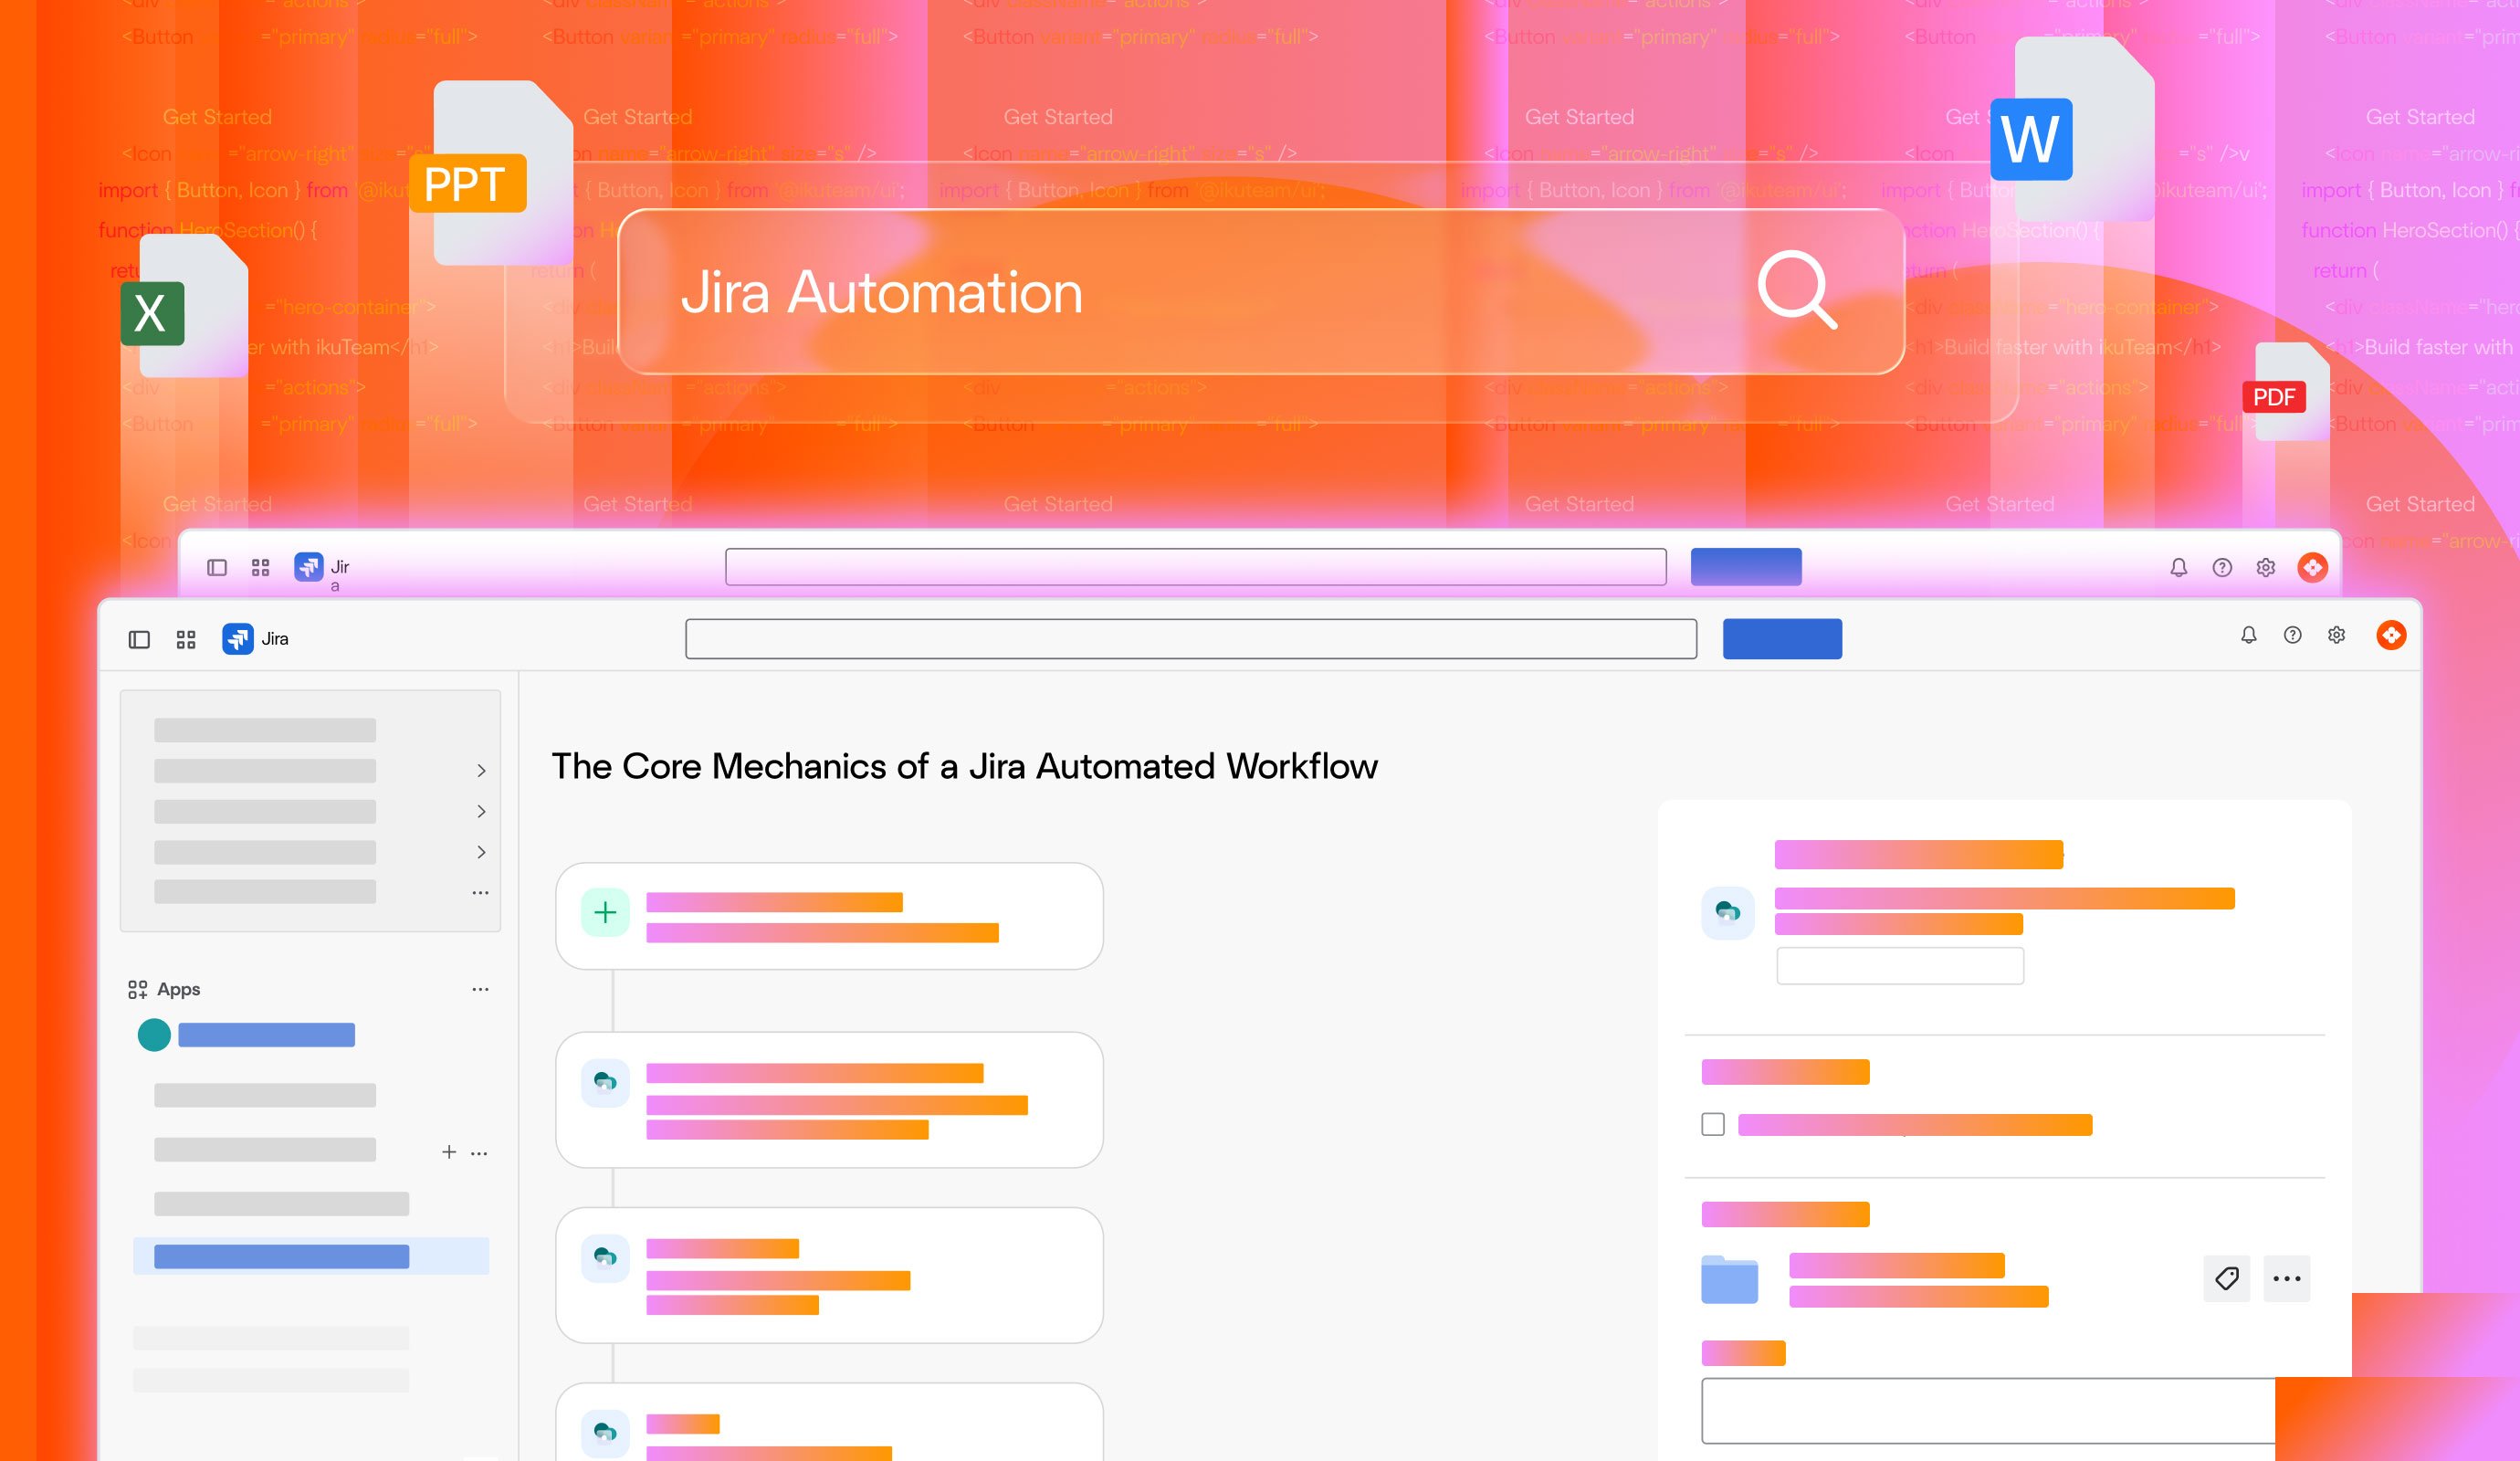
Confluence Google Drive Integration
Create a single source of truth with seamless syncing and real-time collaboration.
Read more

_2026-03-26_20-48-42-1.png?length=720&name=untitled_Gemini%203%20(Nano%20Banana%20Pro)_2026-03-26_20-48-42-1.png)


Every scaling engineering, product, or operations team eventually collides with the same operational bottleneck: administrative overhead. When engineers spend hours every week manually transitioning a Jira issue, updating a custom field value, or alerting stakeholders about milestones, project momentum stalls.
This is where Jira automation becomes an architectural necessity. Far from being a luxury feature, it functions as a built-in, no-code optimization engine within Atlassian's Jira Cloud platform, designed to eliminate repetitive tasks and streamline cross-functional processes and workflows.
The operational impact of implementing a structured Jira automation rule is mathematically clear. Industry data compiled by Atlassian indicates that deploying well-scoped Jira automation rules decreases manual team errors by up to 30% while increasing overall delivery capacity by as much as 25%.
Across an enterprise lifecycle, automating routine task triaging can save an individual Jira user over five hours per week. By delegating these manual handshakes to an automated layer, you eliminate the operational lag that occurs when a ticket sits unassigned in a Jira project, directly removing bottlenecks in broader corporate processes.
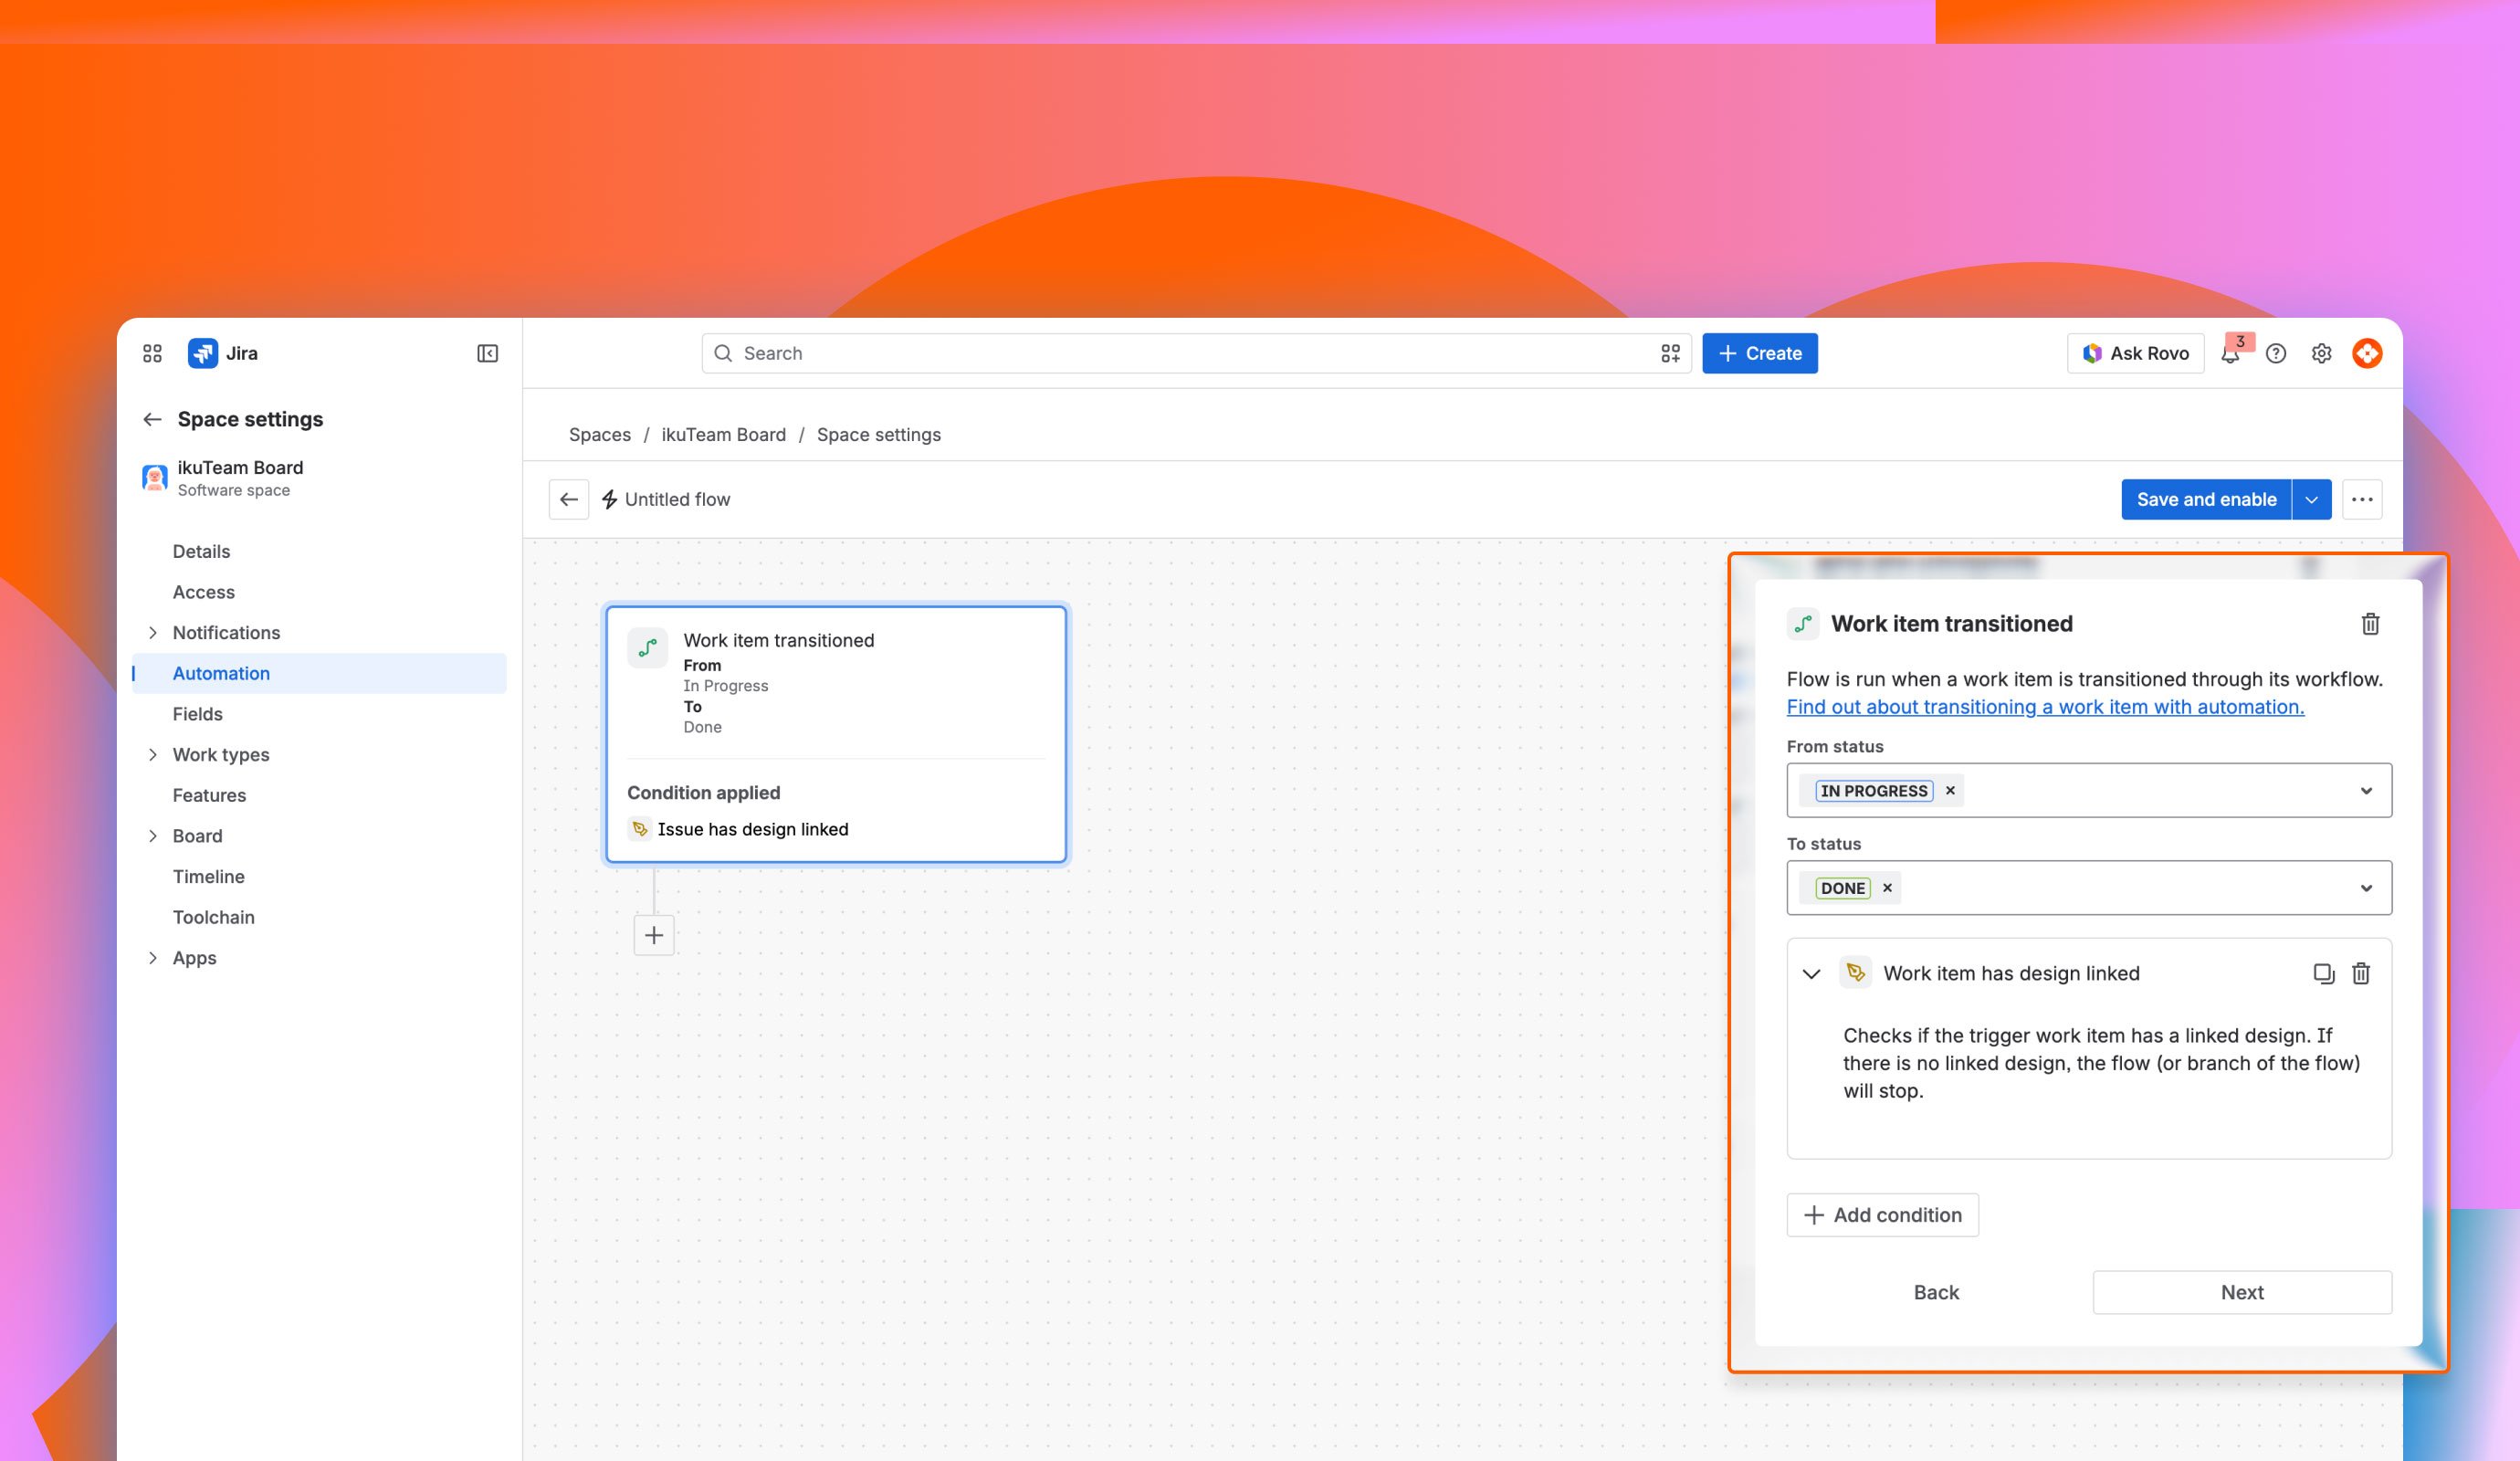
At its foundation, automation for Jira operates on a deterministic, three-part logical framework: Triggers, Conditions, and Actions.
While this native no-code engine excels at moving text fields and routing workflows, enterprise teams quickly encounter a significant architectural limitation when it comes to document governance and asset management. Native Jira storage is costly, and attaching heavy design files, motion graphics, or technical requirements directly to tickets causes rapid instance bloat. Furthermore, native rules cannot cross the boundary into your corporate cloud file systems to organize assets.
To bridge this gap, teams integrate native workflows with ikuTeam apps such as the Cloud Attachment & Workflow Automation for Jira, the SharePoint Connector for Jira, and the Google Drive Connector for Jira. This allows Jira's native automation engine to safely extend across external cloud environments, initiating hands-off folder structures and file syncing the exact second an automation rule runs.
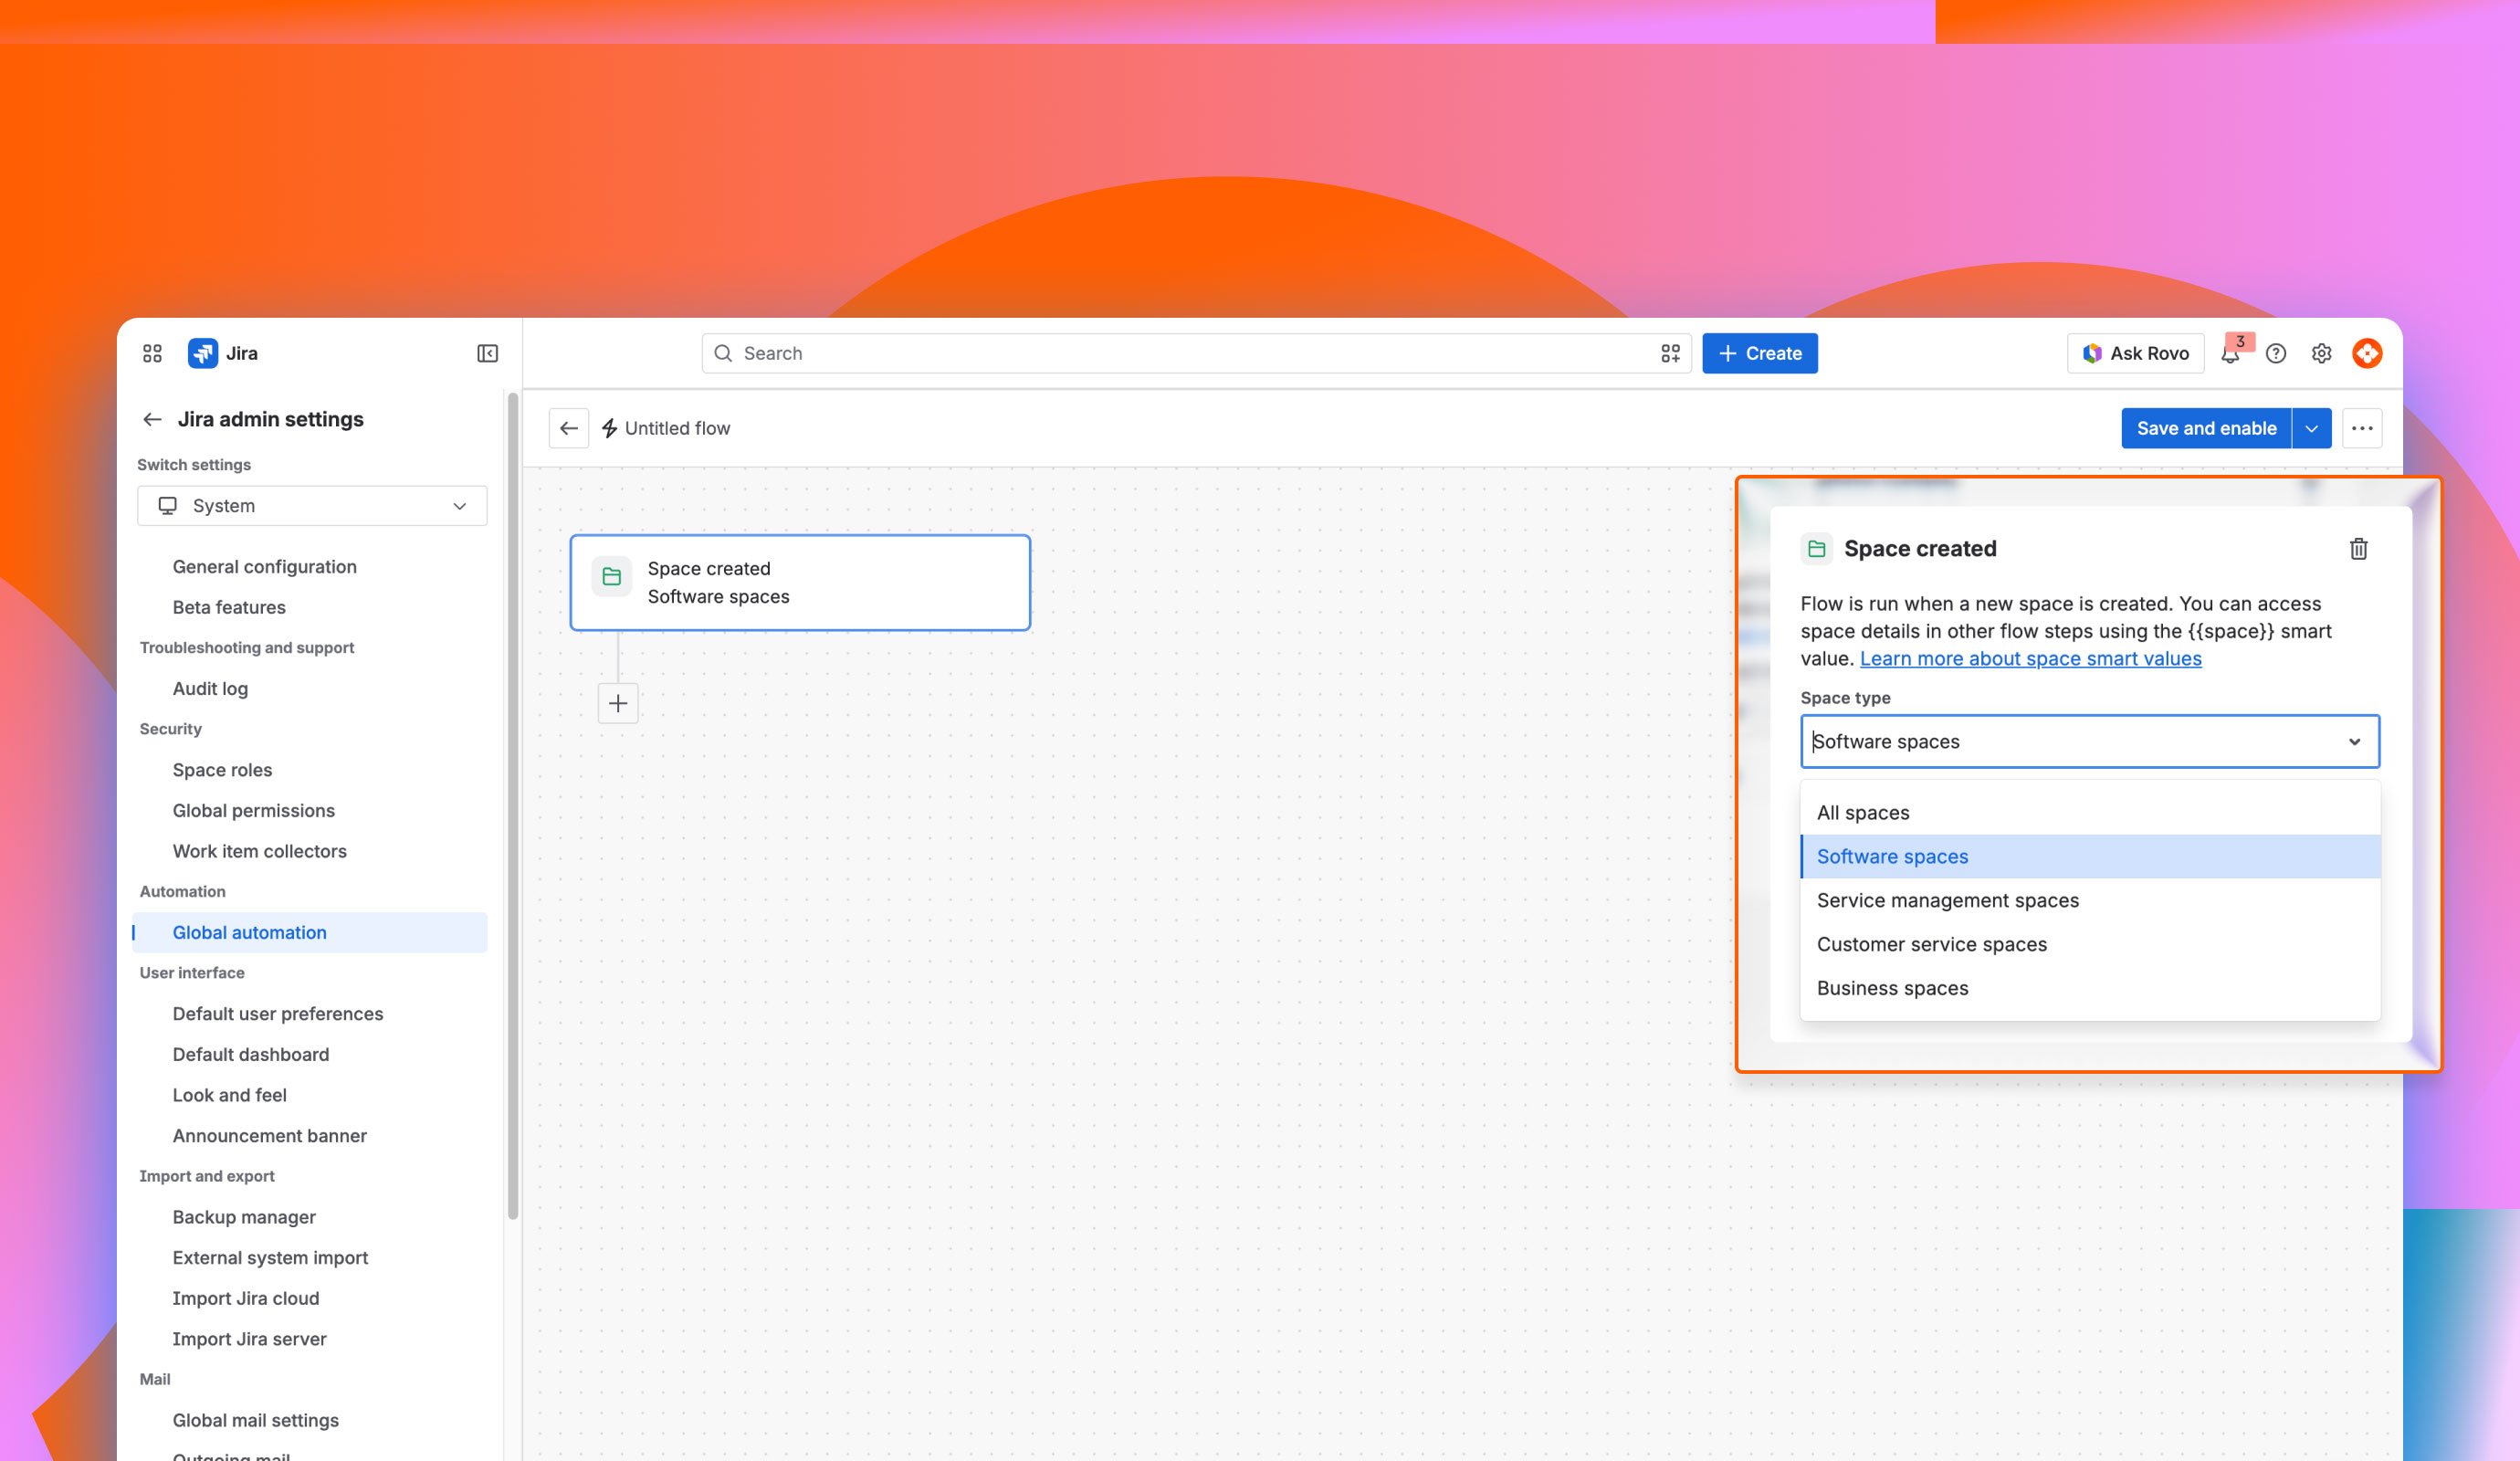
When building an optimized workflow, understanding rule scope is critical to maintaining high performance across your Jira instance. Jira determines where and how a rule executes based on its assignment within the rule builder.
Jira breaks down rule execution into two primary architectural layers:
Your choice directly impacts your monthly billing plan boundaries. On Jira Cloud, single-project rules are unlimited across all plans. However, global and multi-project rules are governed by strict monthly execution quotas. While Standard plans provide a foundational baseline, Jira Premium and Enterprise allocations offer significantly higher limits to accommodate enterprise-scale automation.
Beyond plan quotas, the biggest hidden bottleneck is the Rule Actor permission matrix. The Rule Actor is the virtual user account that executes the automated steps. When a global rule is triggered, this virtual user must possess explicit permissions in every target project the rule attempts to touch. If the actor lacks access to even one destination space, the rule fails immediately.
This permission isolation highlights the value of the ikuTeam Forge Architecture. Because ikuTeam's Cloud Connectors (such as the SharePoint and Google Drive apps) are built on Atlassian Forge, they map permissions accurately. When a rule executes a cloud storage action, the app respects your provider-side security constraints or handles access via Jira groups, allowing you to configure automated cloud folder matching without manually over-provisioning your native Jira Rule Actor permissions.
To move beyond basic workflows, you must master dynamic data manipulation and relational issue tracking. Static templates fall short when managing complex project ecosystems. Jira solves this limitation by using Jira automation smart values, which act as dynamic placeholders to access and manipulate data across your workspaces.
Smart values allow you to inject real-time data directly into your automation rules. Instead of hardcoding text, you can use expressions to pull contextual details dynamically:
While smart values handle dynamic content, your rules also need to operate across hierarchical structures like sub-tasks, epics, and linked tickets. Native automation runs on the trigger issue by default, but you can use the "Related Issues" branch to expand its reach across multiple related issues.
Common patterns for managing nested relationships include:
Operating at this scale requires careful design to prevent cross-project loops. If one rule triggers a status change that fires another rule, you risk creating an infinite execution loop. The best practice is to restrict branches using targeted JQL conditions, ensuring your rules focus strictly on relevant tasks and ignore other issues.
This structured approach highlights the power of ikuTeam’s advanced automation layer. When you branch rules to create folders or manage assets across sub-tasks, ikuTeam's deep workspace integration ensures the entire folder tree mirrors your Jira hierarchy exactly. Whether you are aggregating data inside Jira or organizing linked folders in your cloud storage, the structural relationships remain perfectly intact.
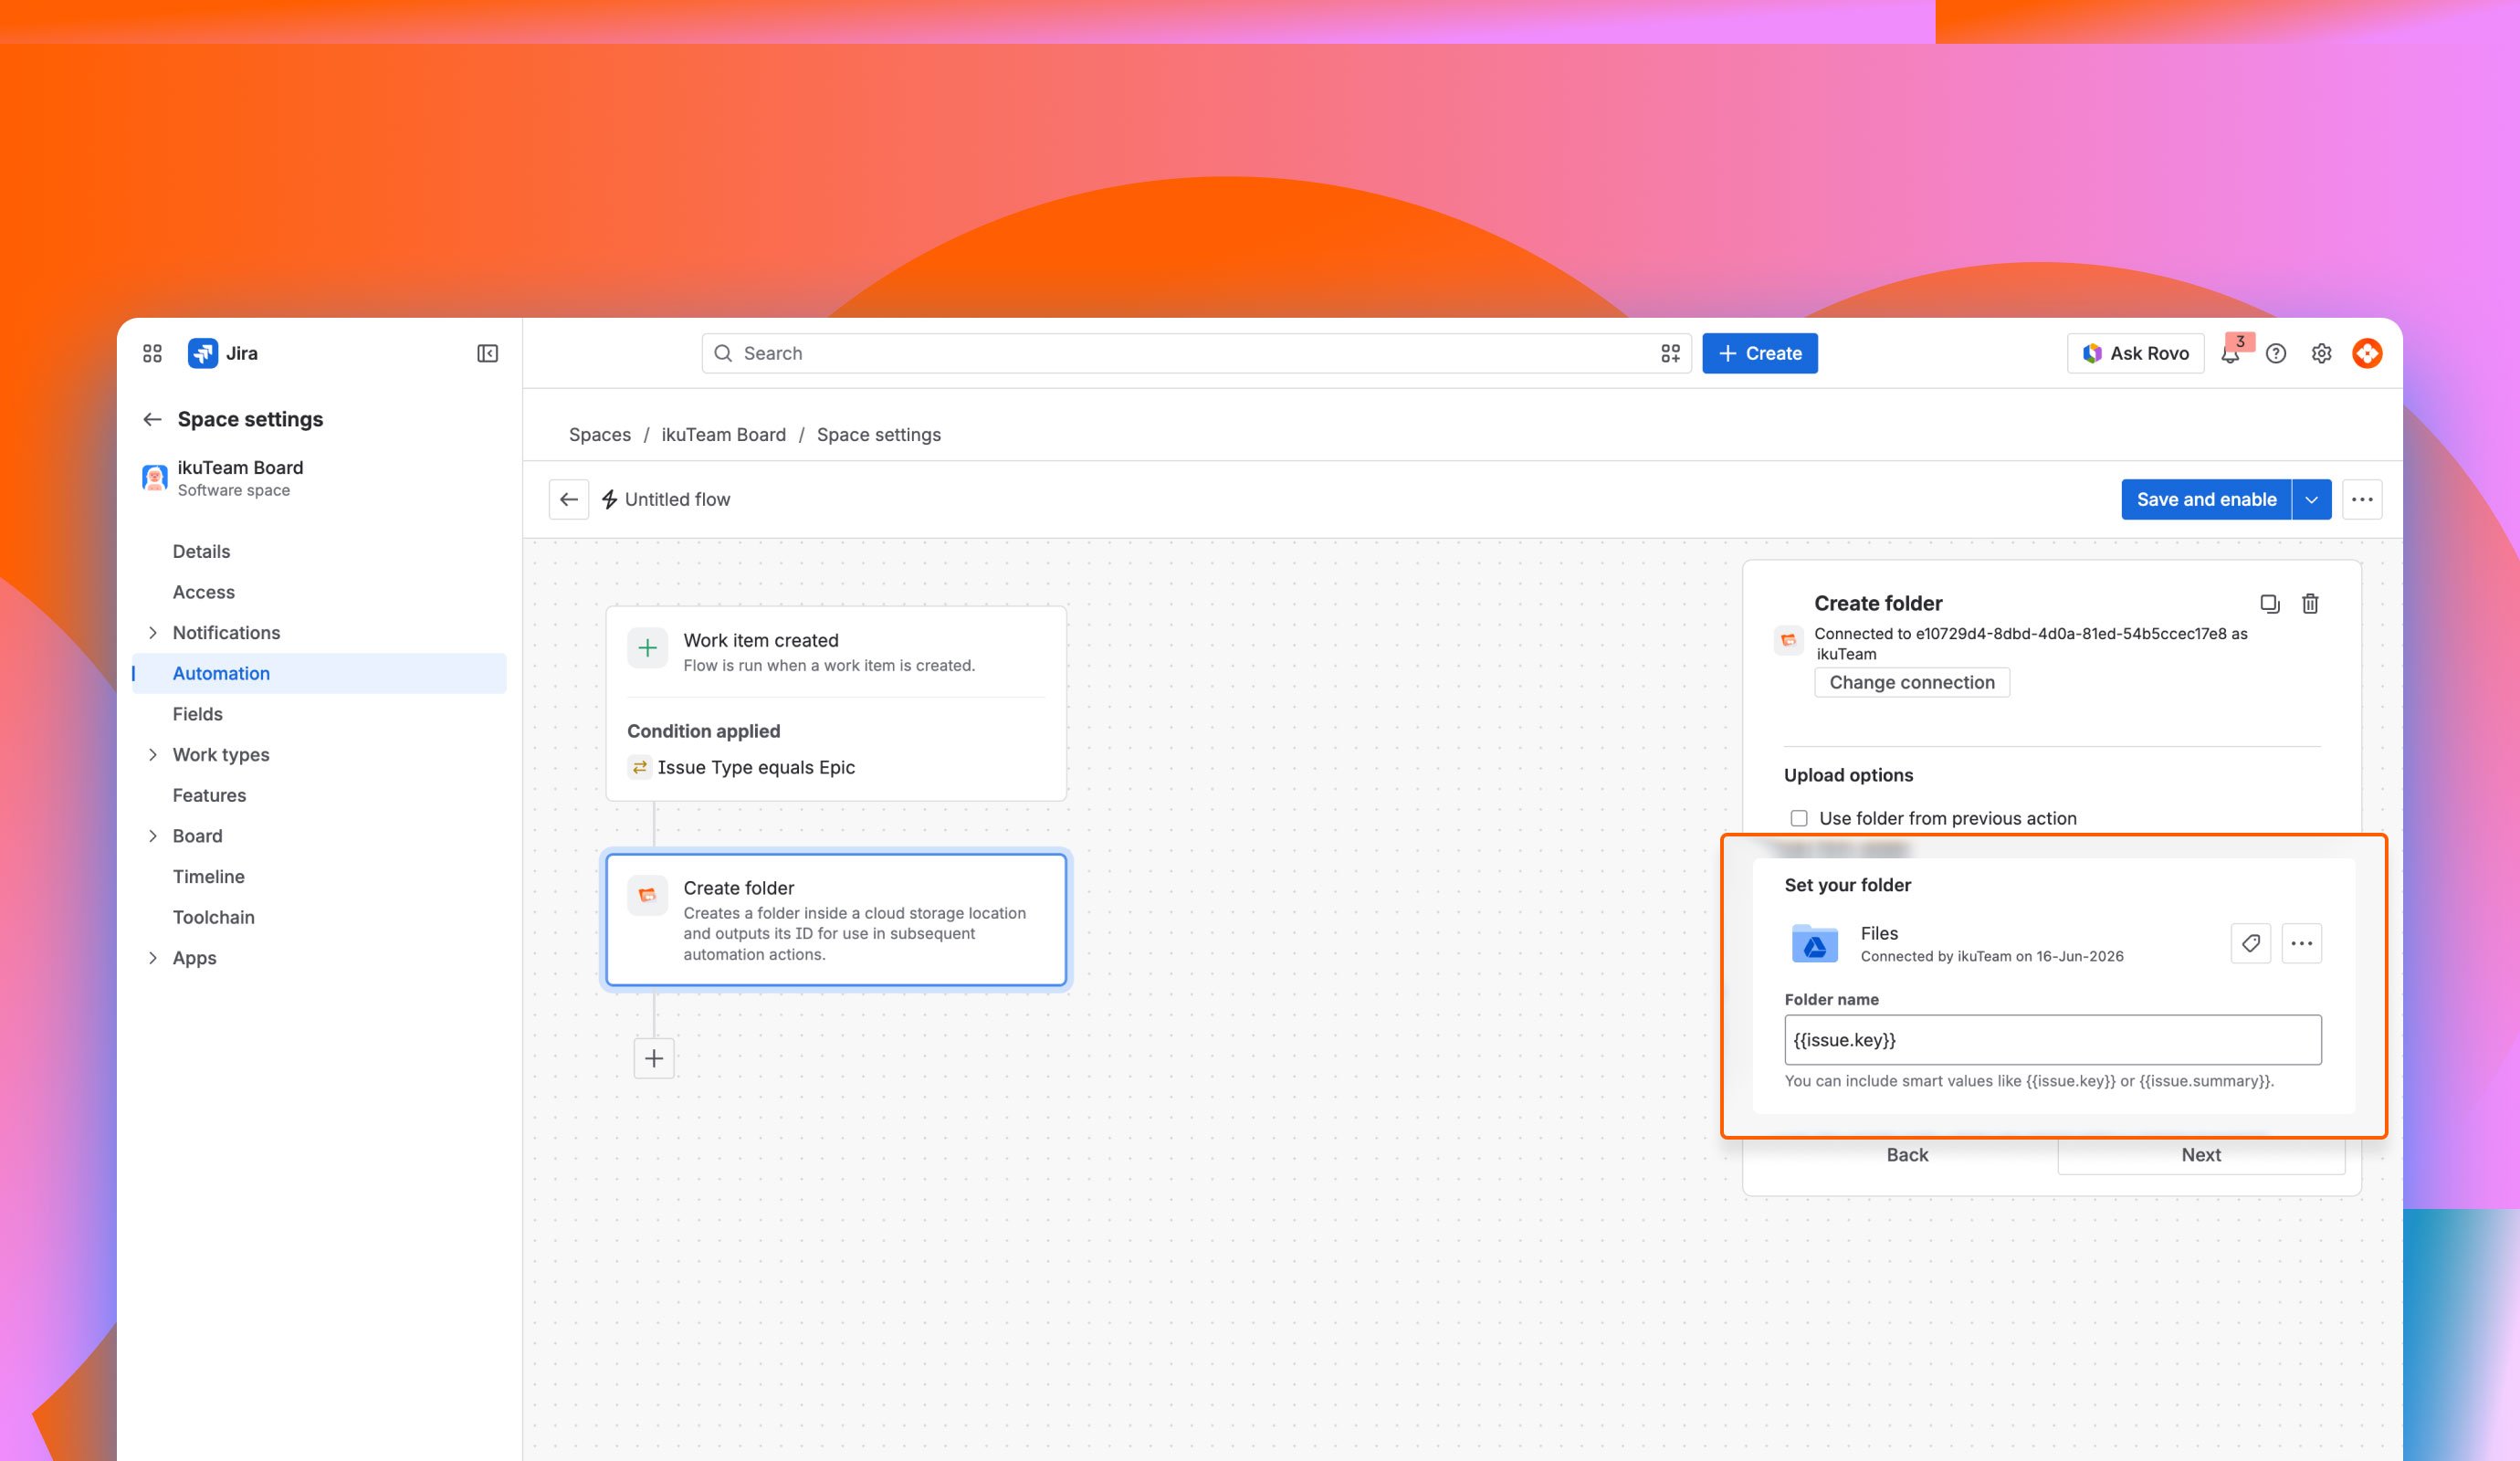
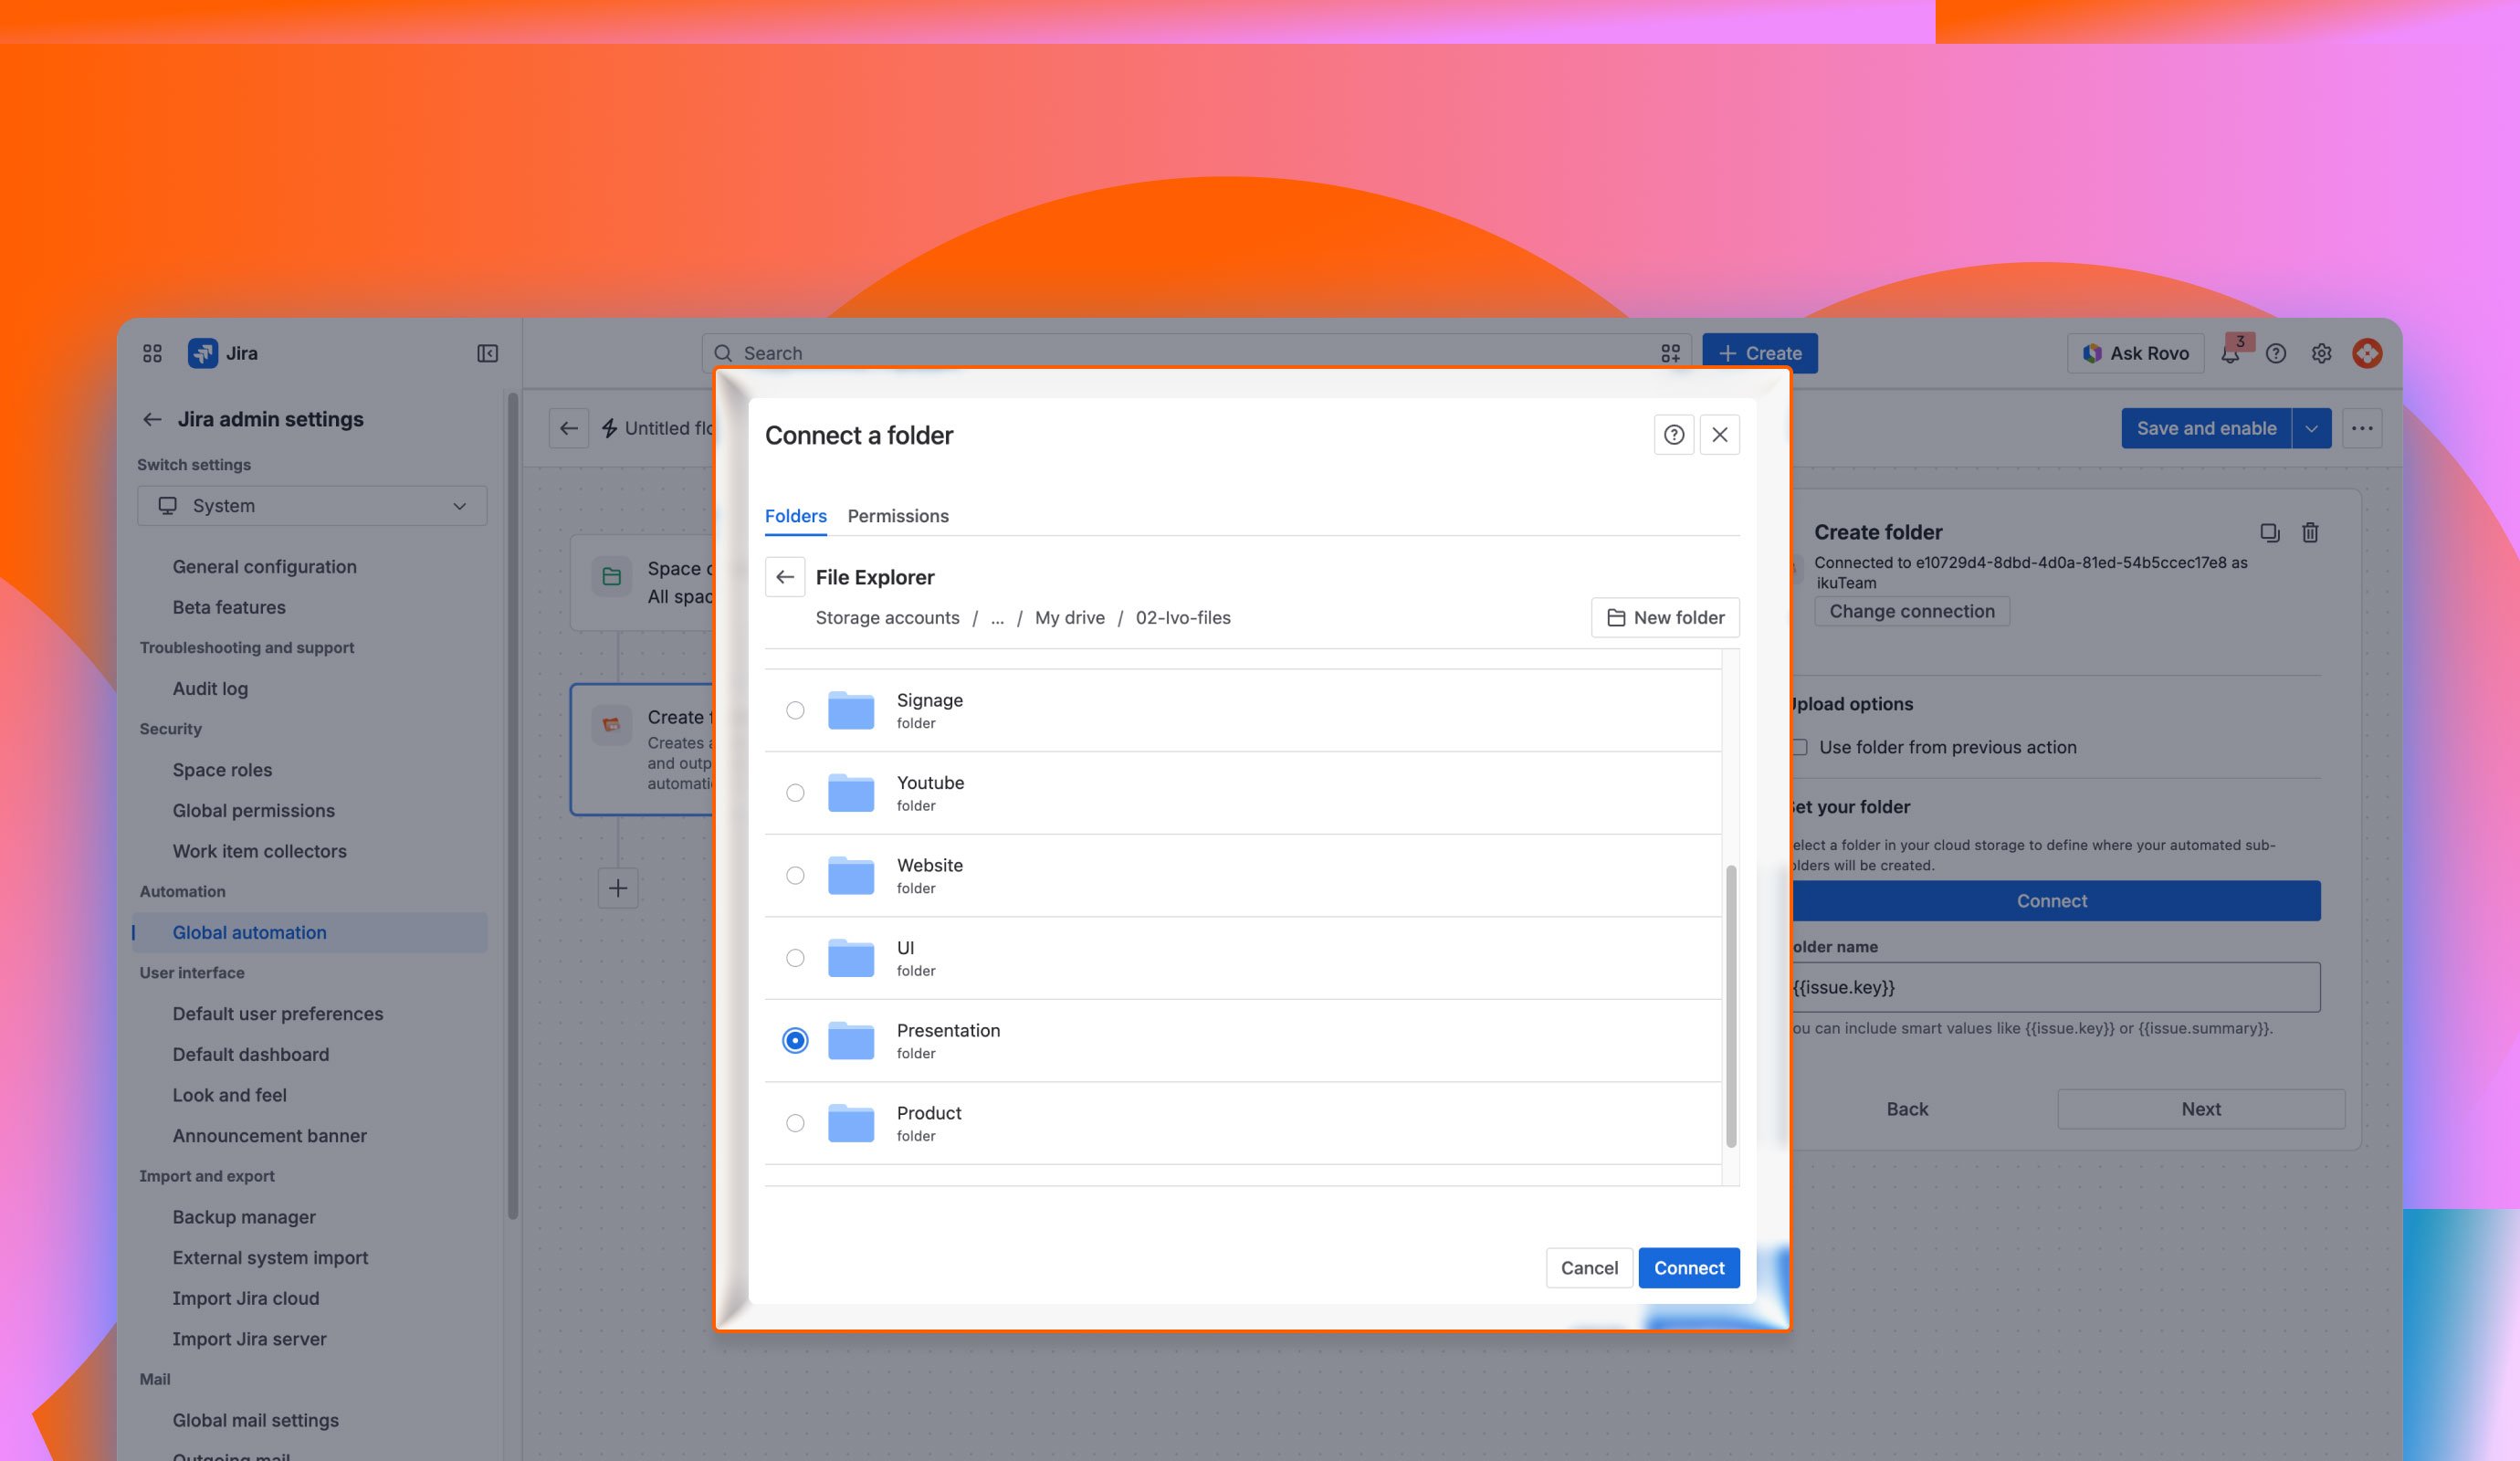
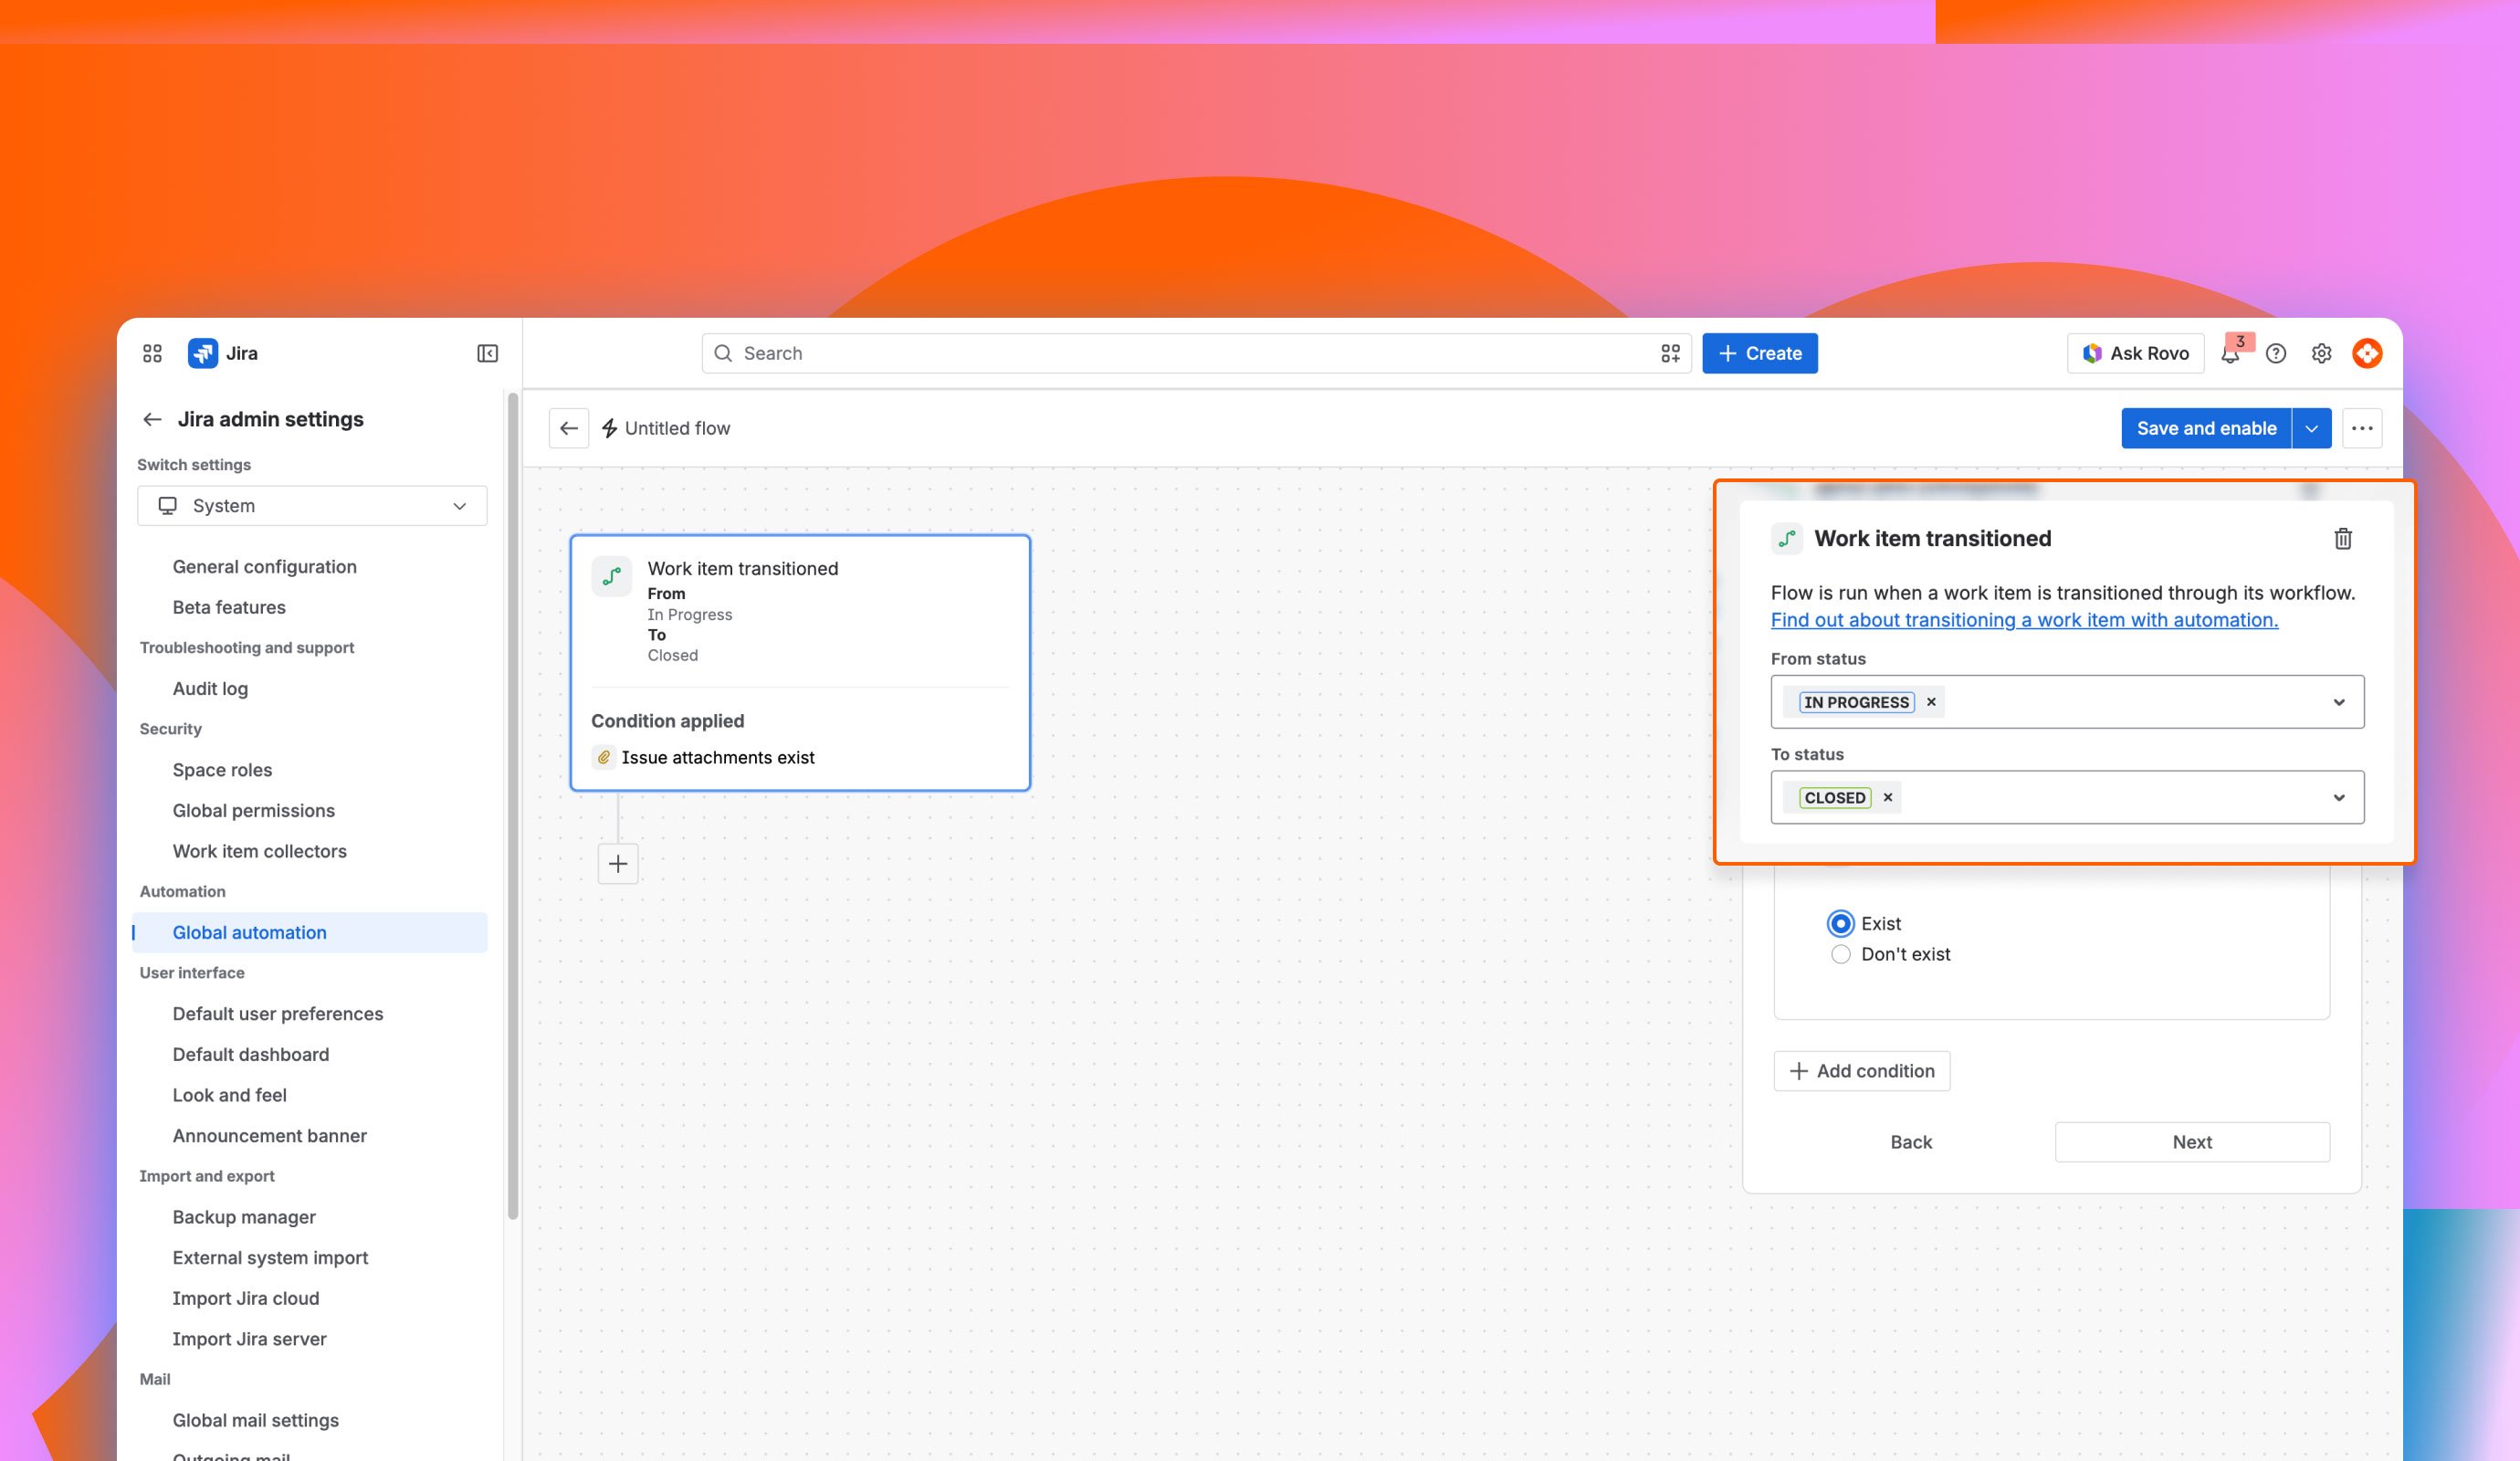
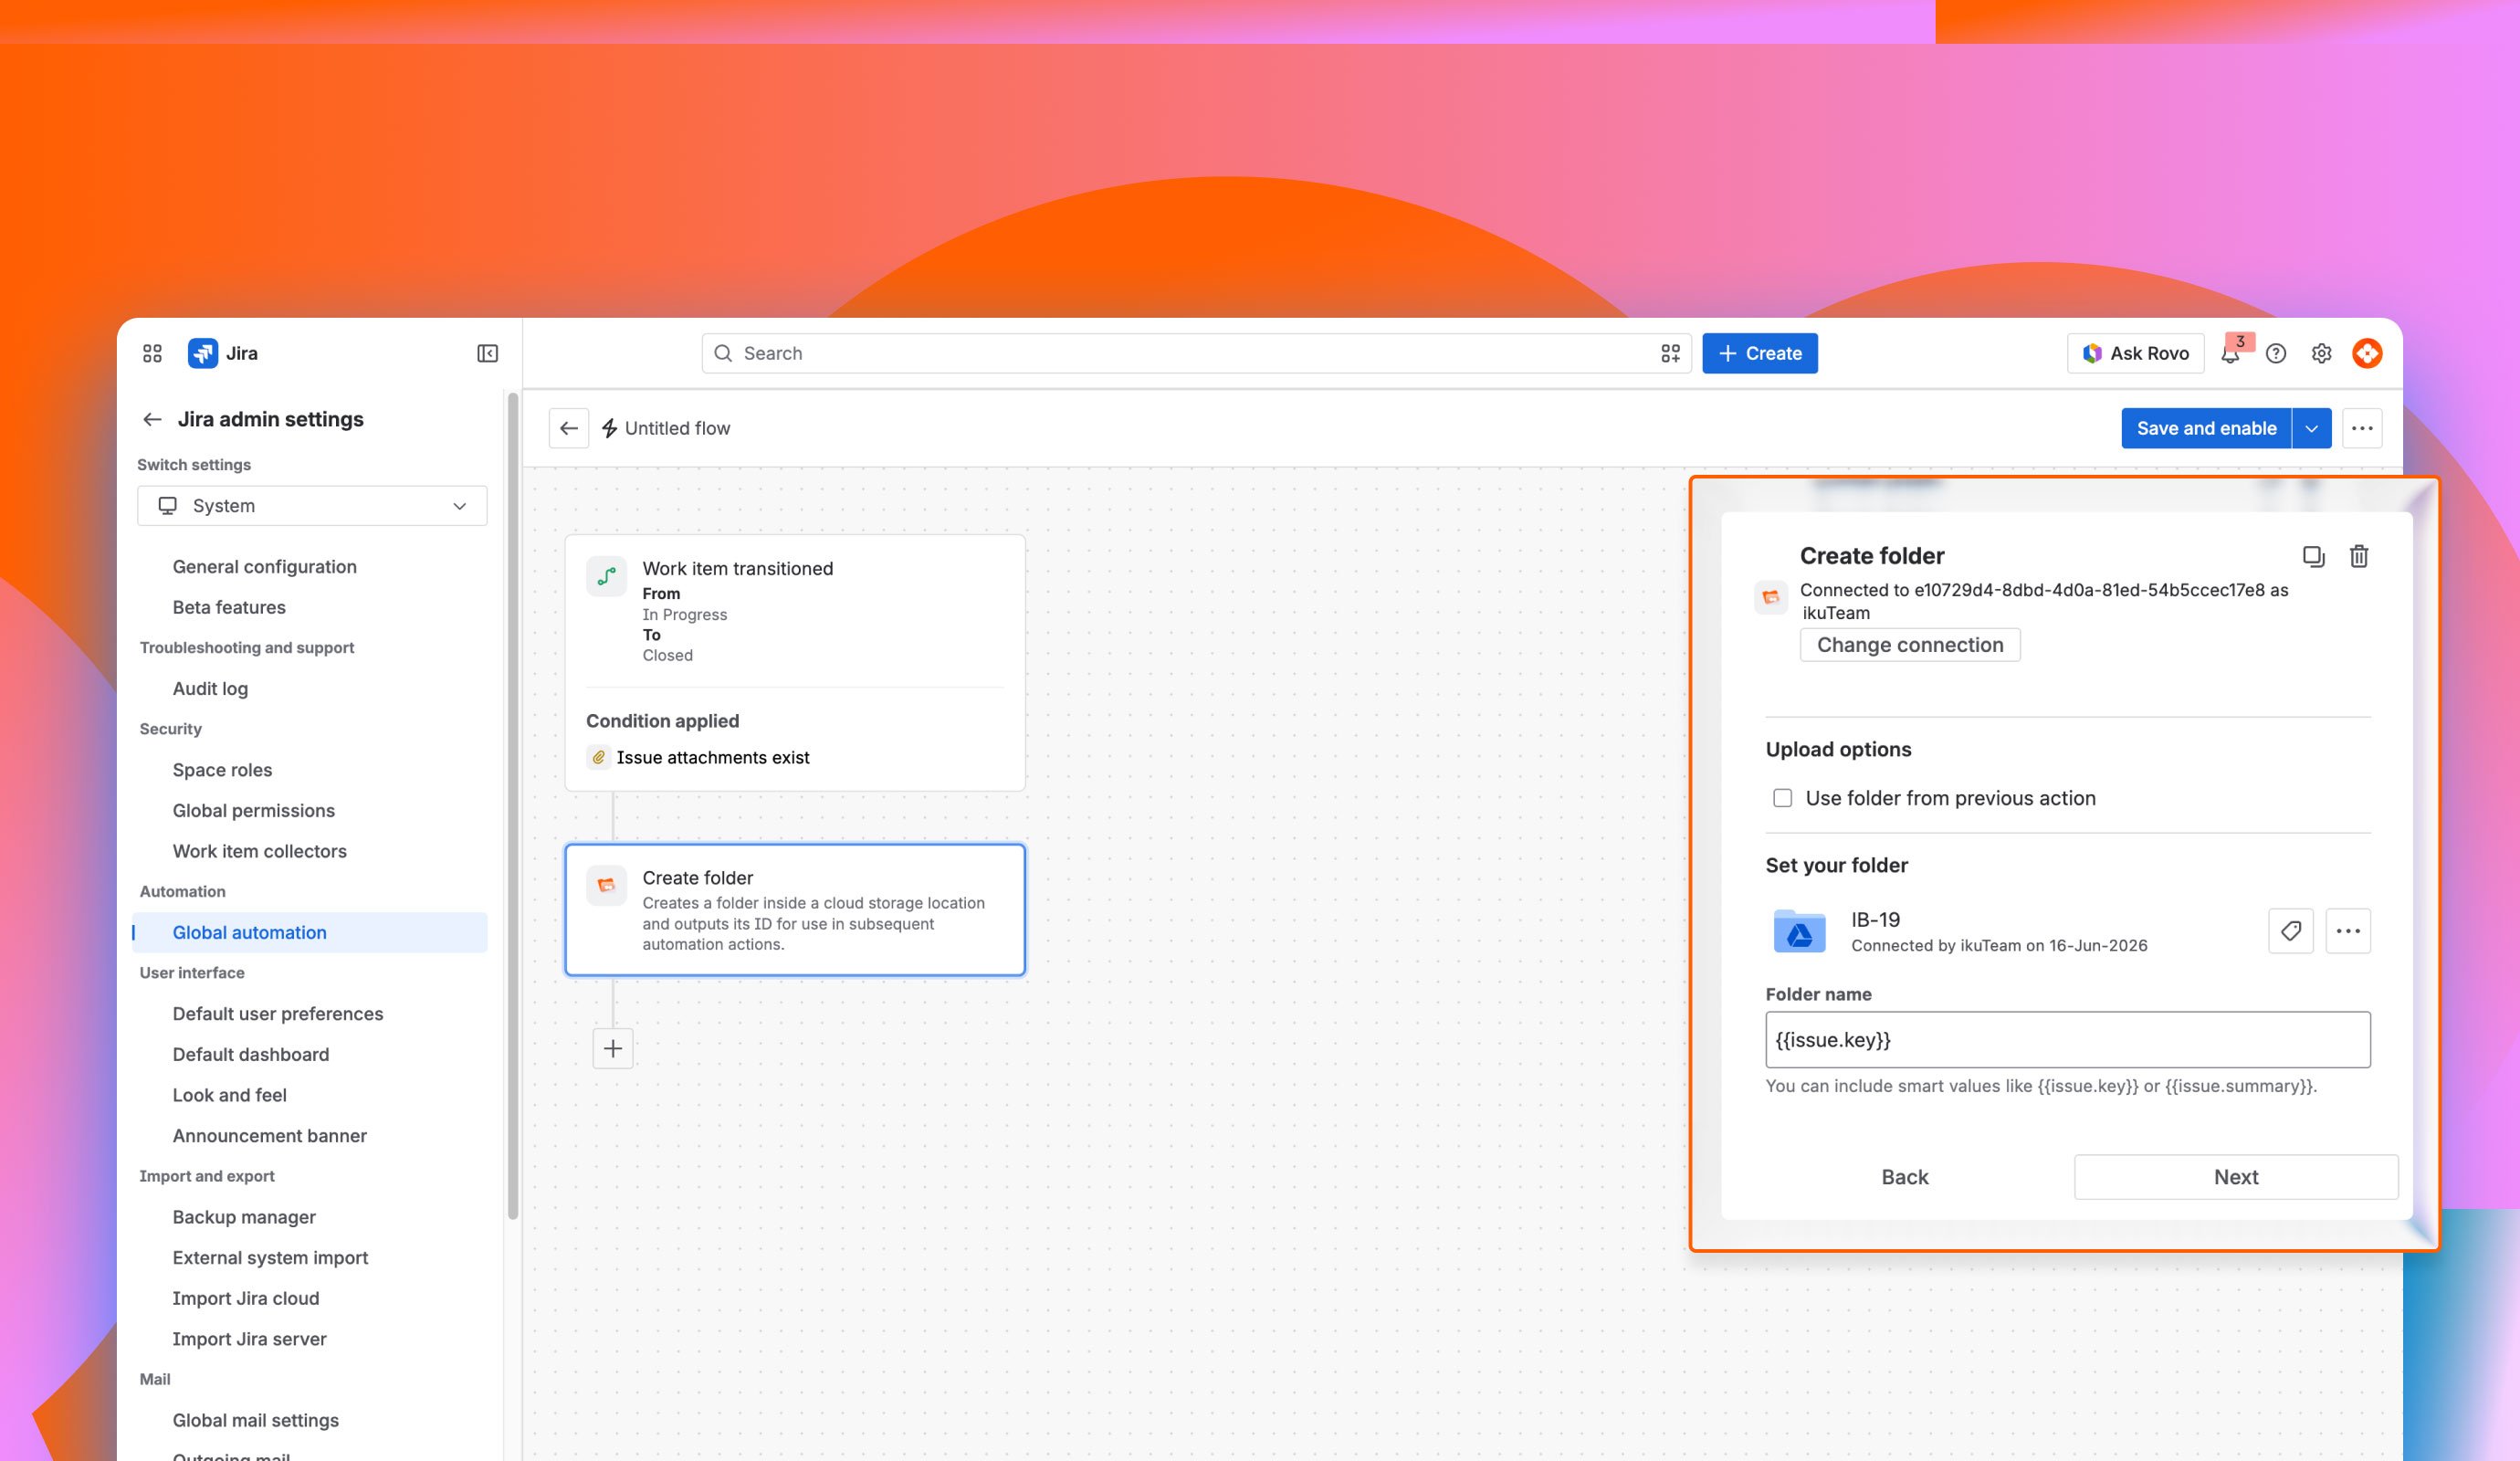
This first blueprint explains how to set up an automation flow that automatically creates a new folder in your cloud storage and attaches it to a Jira work item (previously called an issue) as soon as it is created.
By following these steps, every time a new work item is created in your space, a corresponding folder named with the work item key or summary will be created in your connected storage system, such as the SharePoint Connector for Jira or Google Drive Connector for Jira.
Key Performance Features
Real-World Use Case
Consider a Design Asset Organization Scenario: Your design team needs a dedicated space for every new "Design" work item to store high-resolution mockups, Figma exports, and brand assets without cluttering Jira.
Rule Configuration Prerequisites
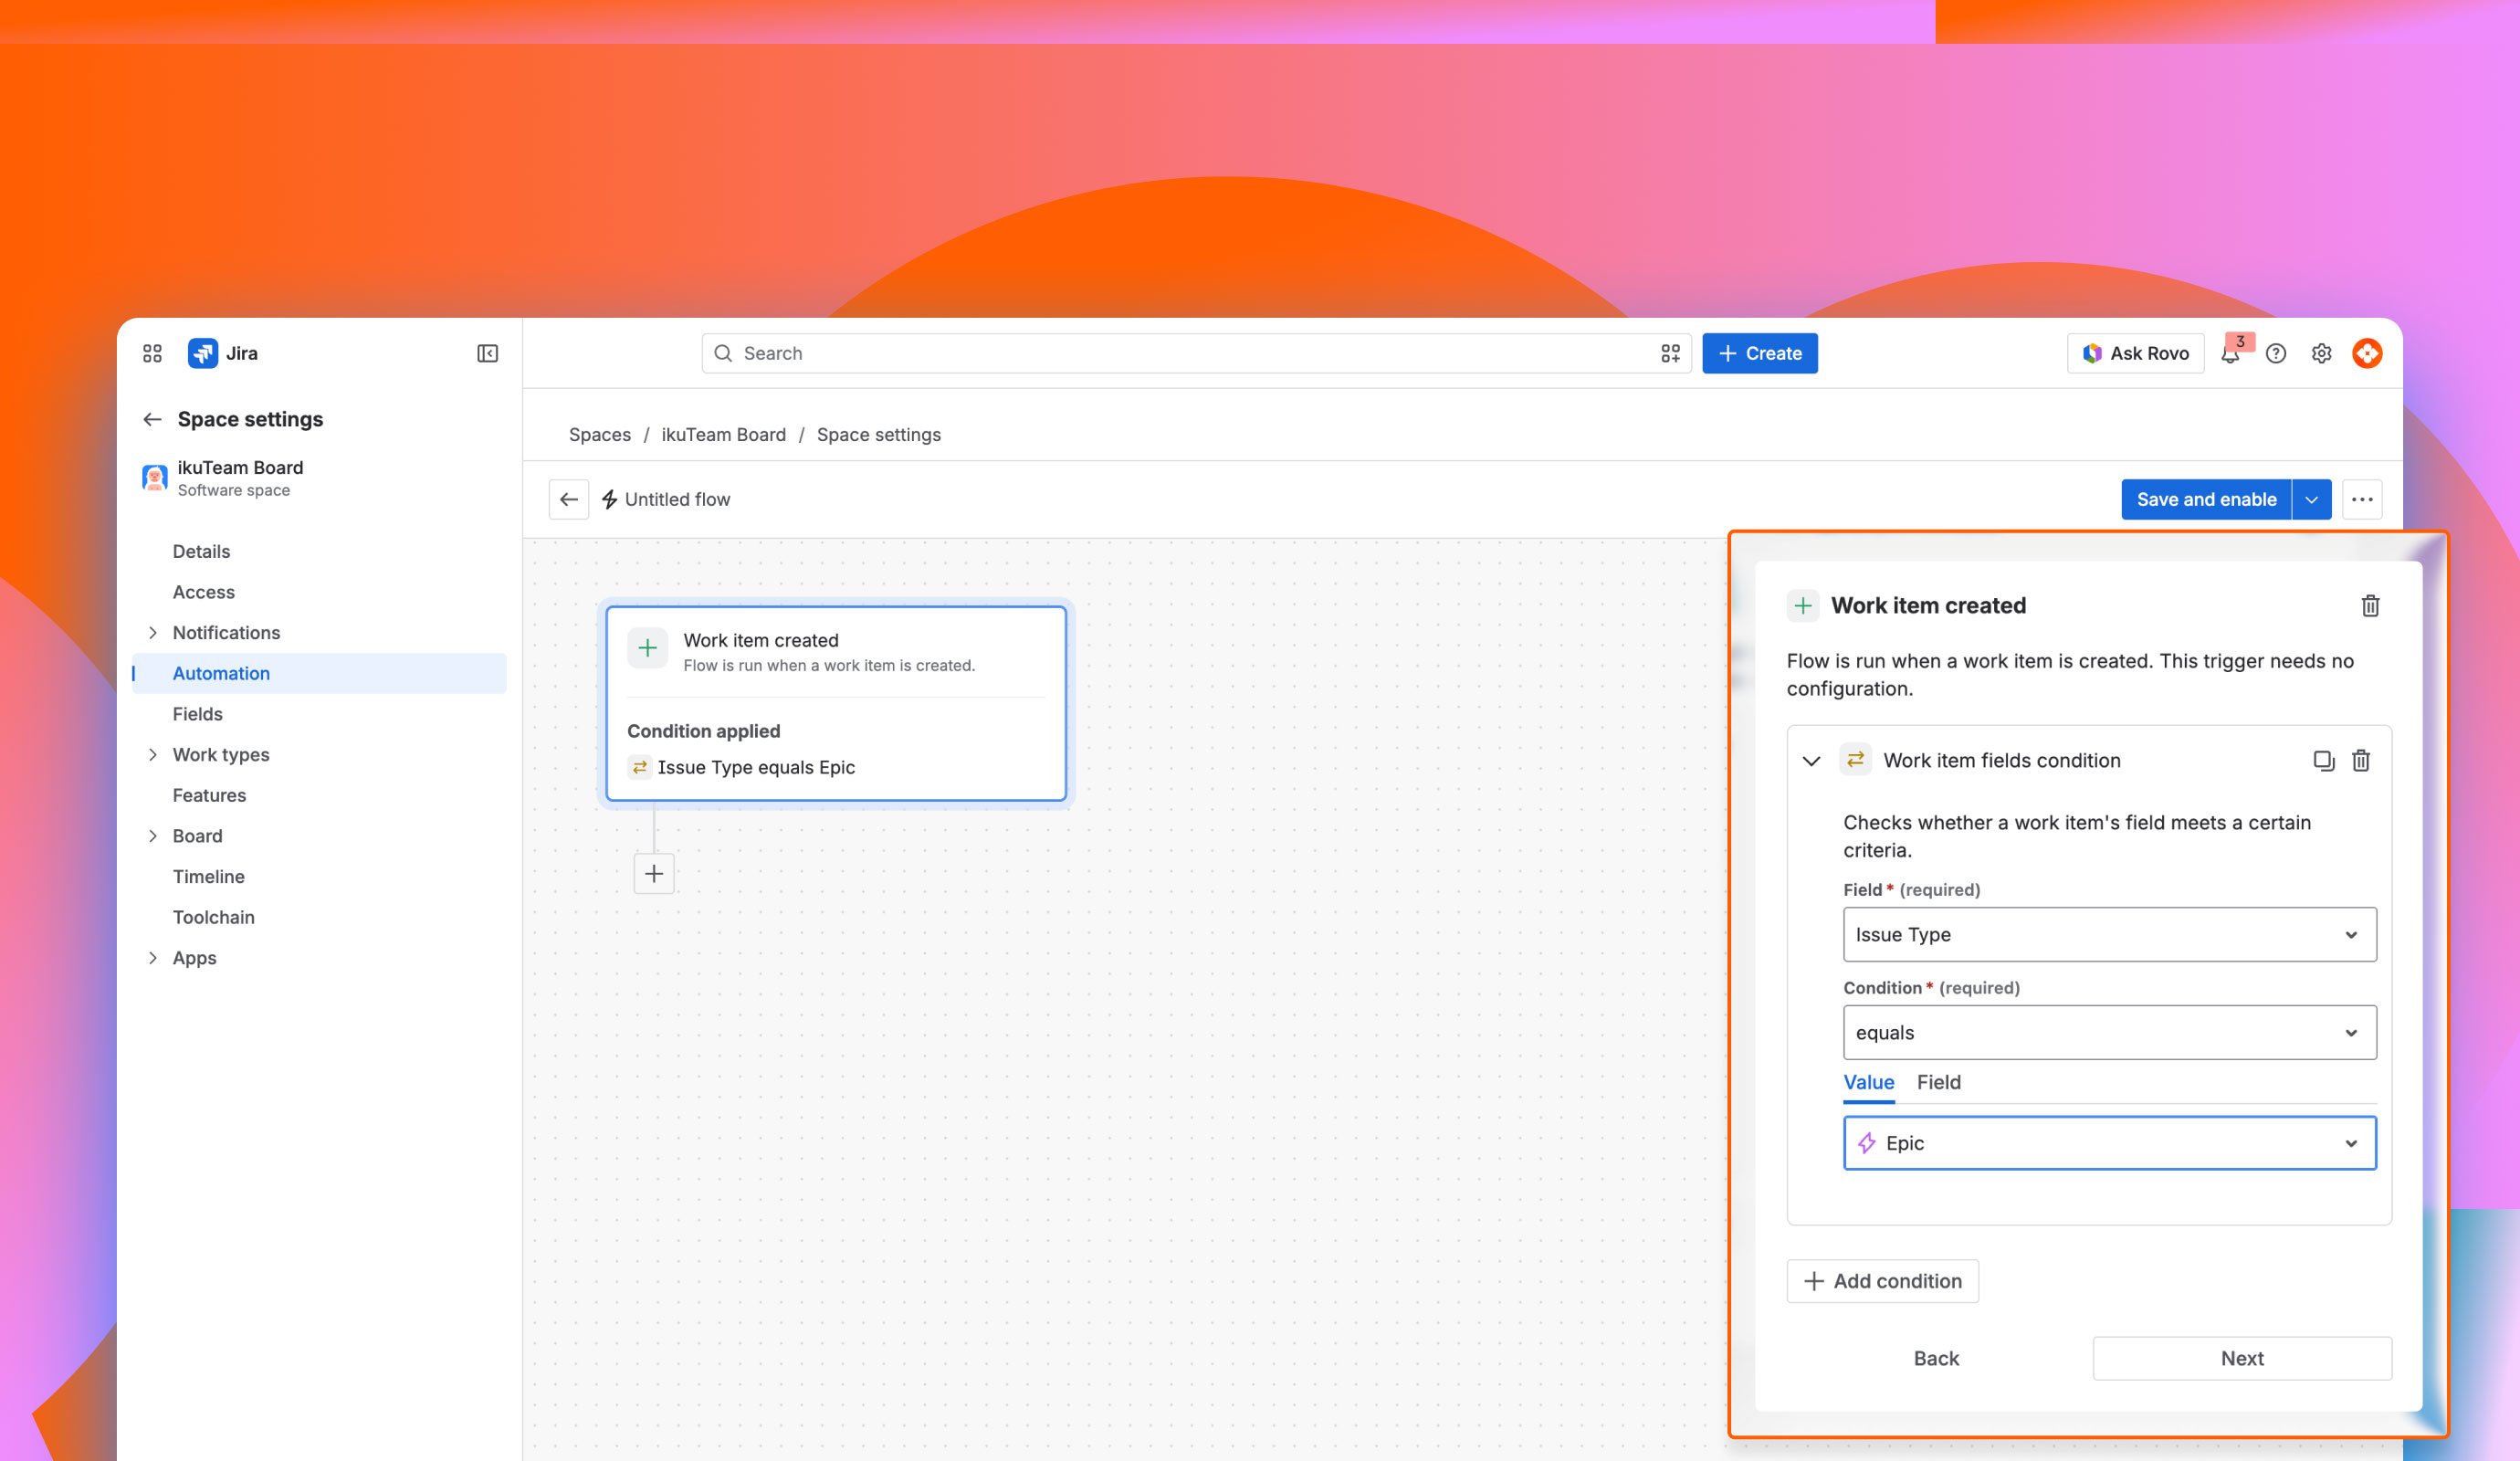

To keep your storage organized, use Jira smart values to name the new folders automatically.
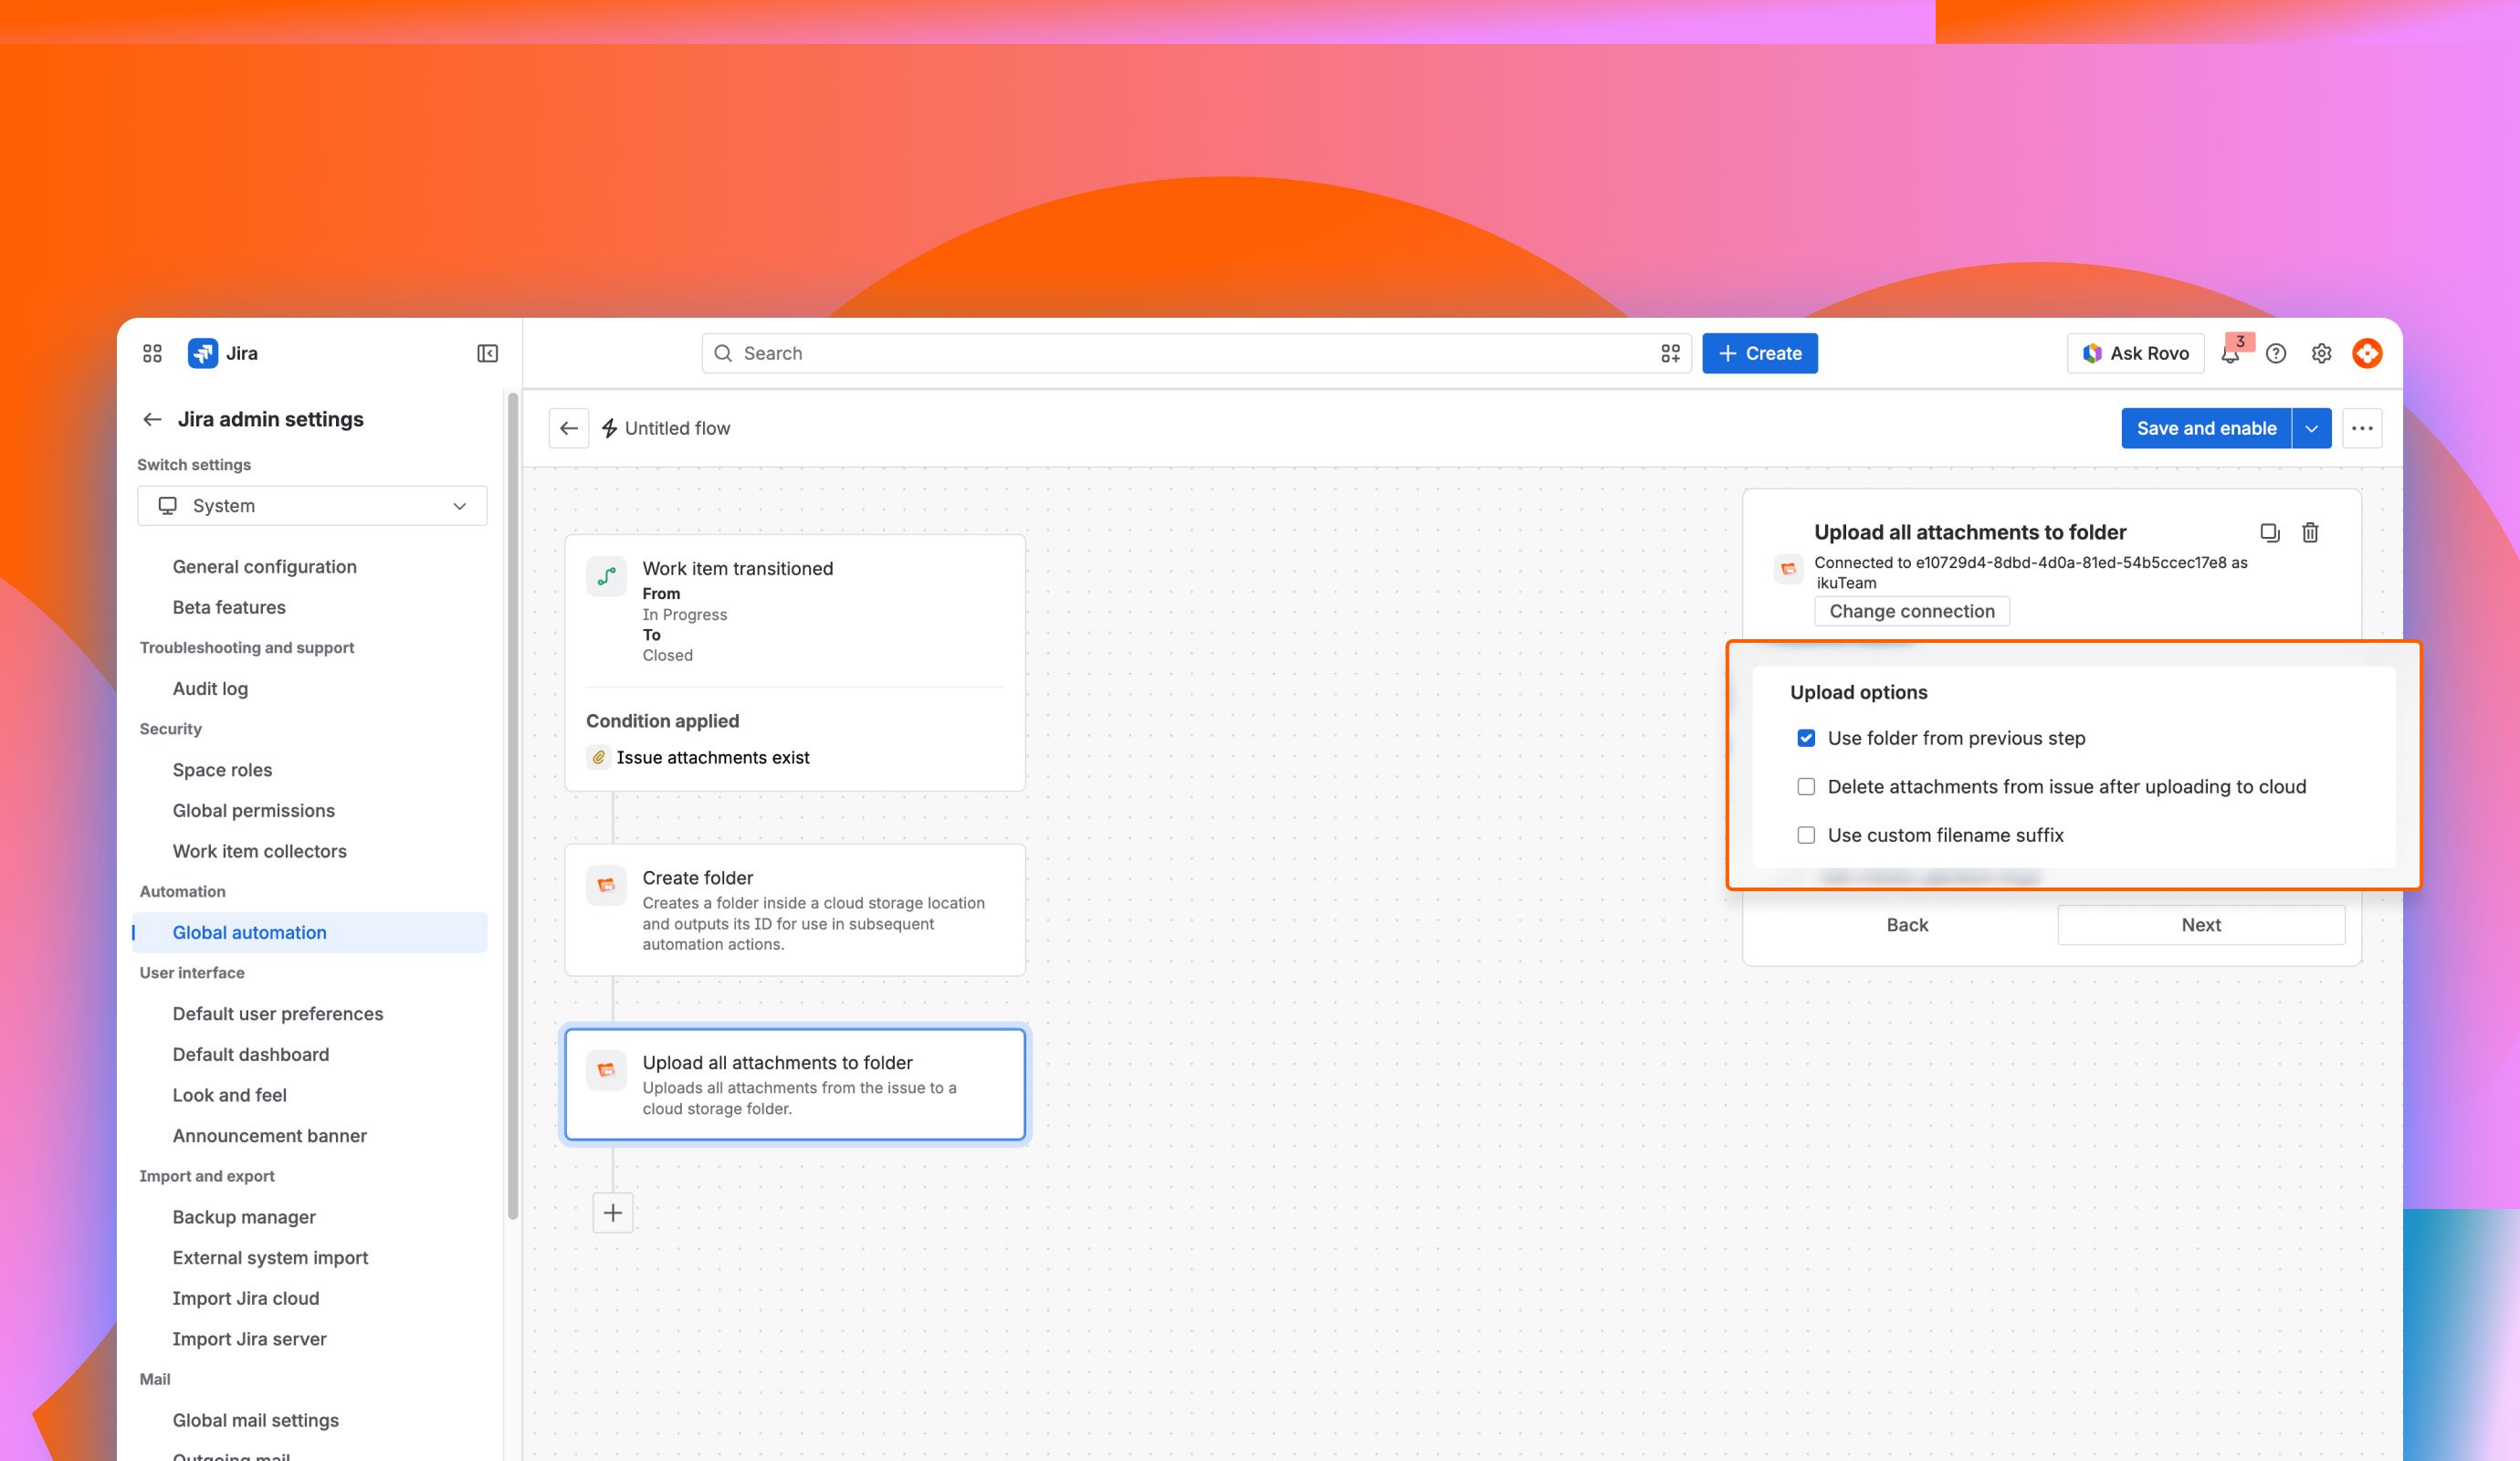
This second blueprint explains how to set up an automation rule to automatically upload attachments from a Jira work item (previously called an issue) to a connected cloud storage folder and then delete them from Jira to save space.
This workflow is ideal for teams that want to centralize documentation in tools like Google Drive or SharePoint while keeping their Jira space (previously called a project) clean and organized.
Key Performance Features
Real-World Use Case
Consider a Marketing Creative Team Scenario: A team produces heavy campaign assets, such as video ads, high-resolution banners, product photography, and motion graphics, that go through multiple rounds of review and revision before final approval, causing massive instance bloat.
Rule Configuration Prerequisites
Start by creating a new automation rule.
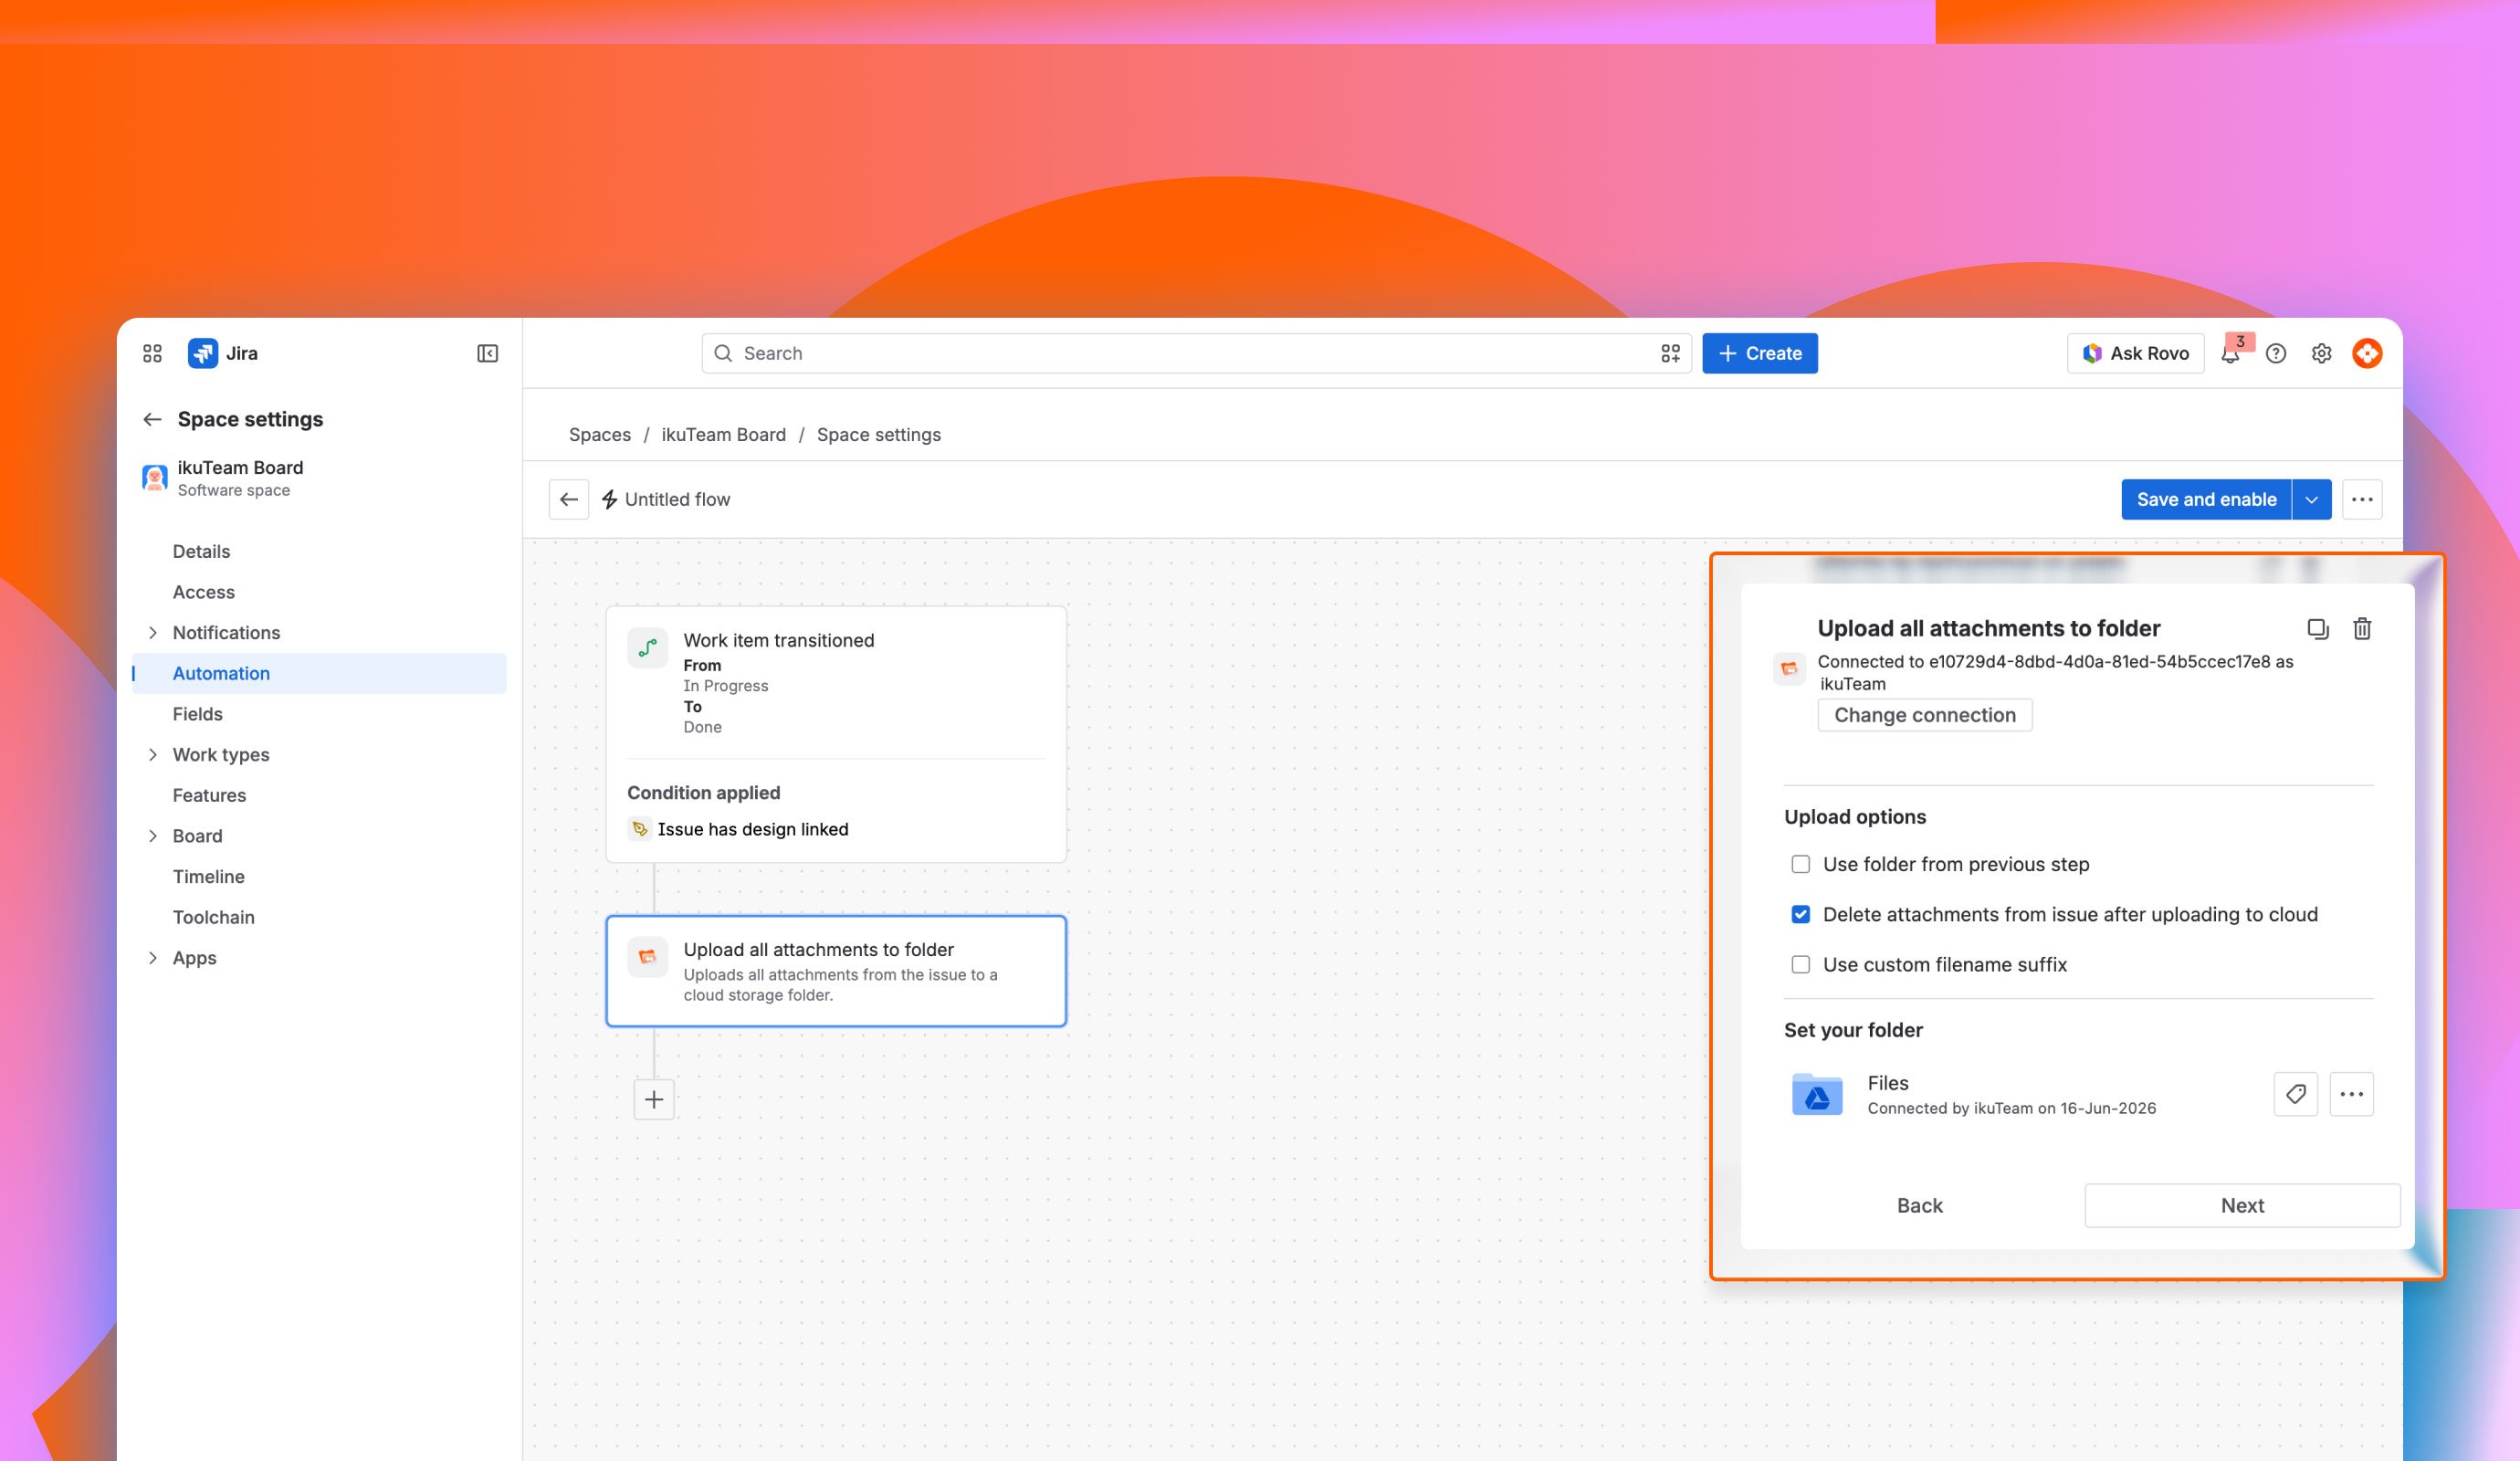
Add the “Upload all attachments to folder” action and click on connect to select the folder for upload.
ATTENTION: “Delete attachments from issue after uploading to cloud“ when selected, the action completely removes files from Jira. Once deleted, they are only available in your remote cloud storage.
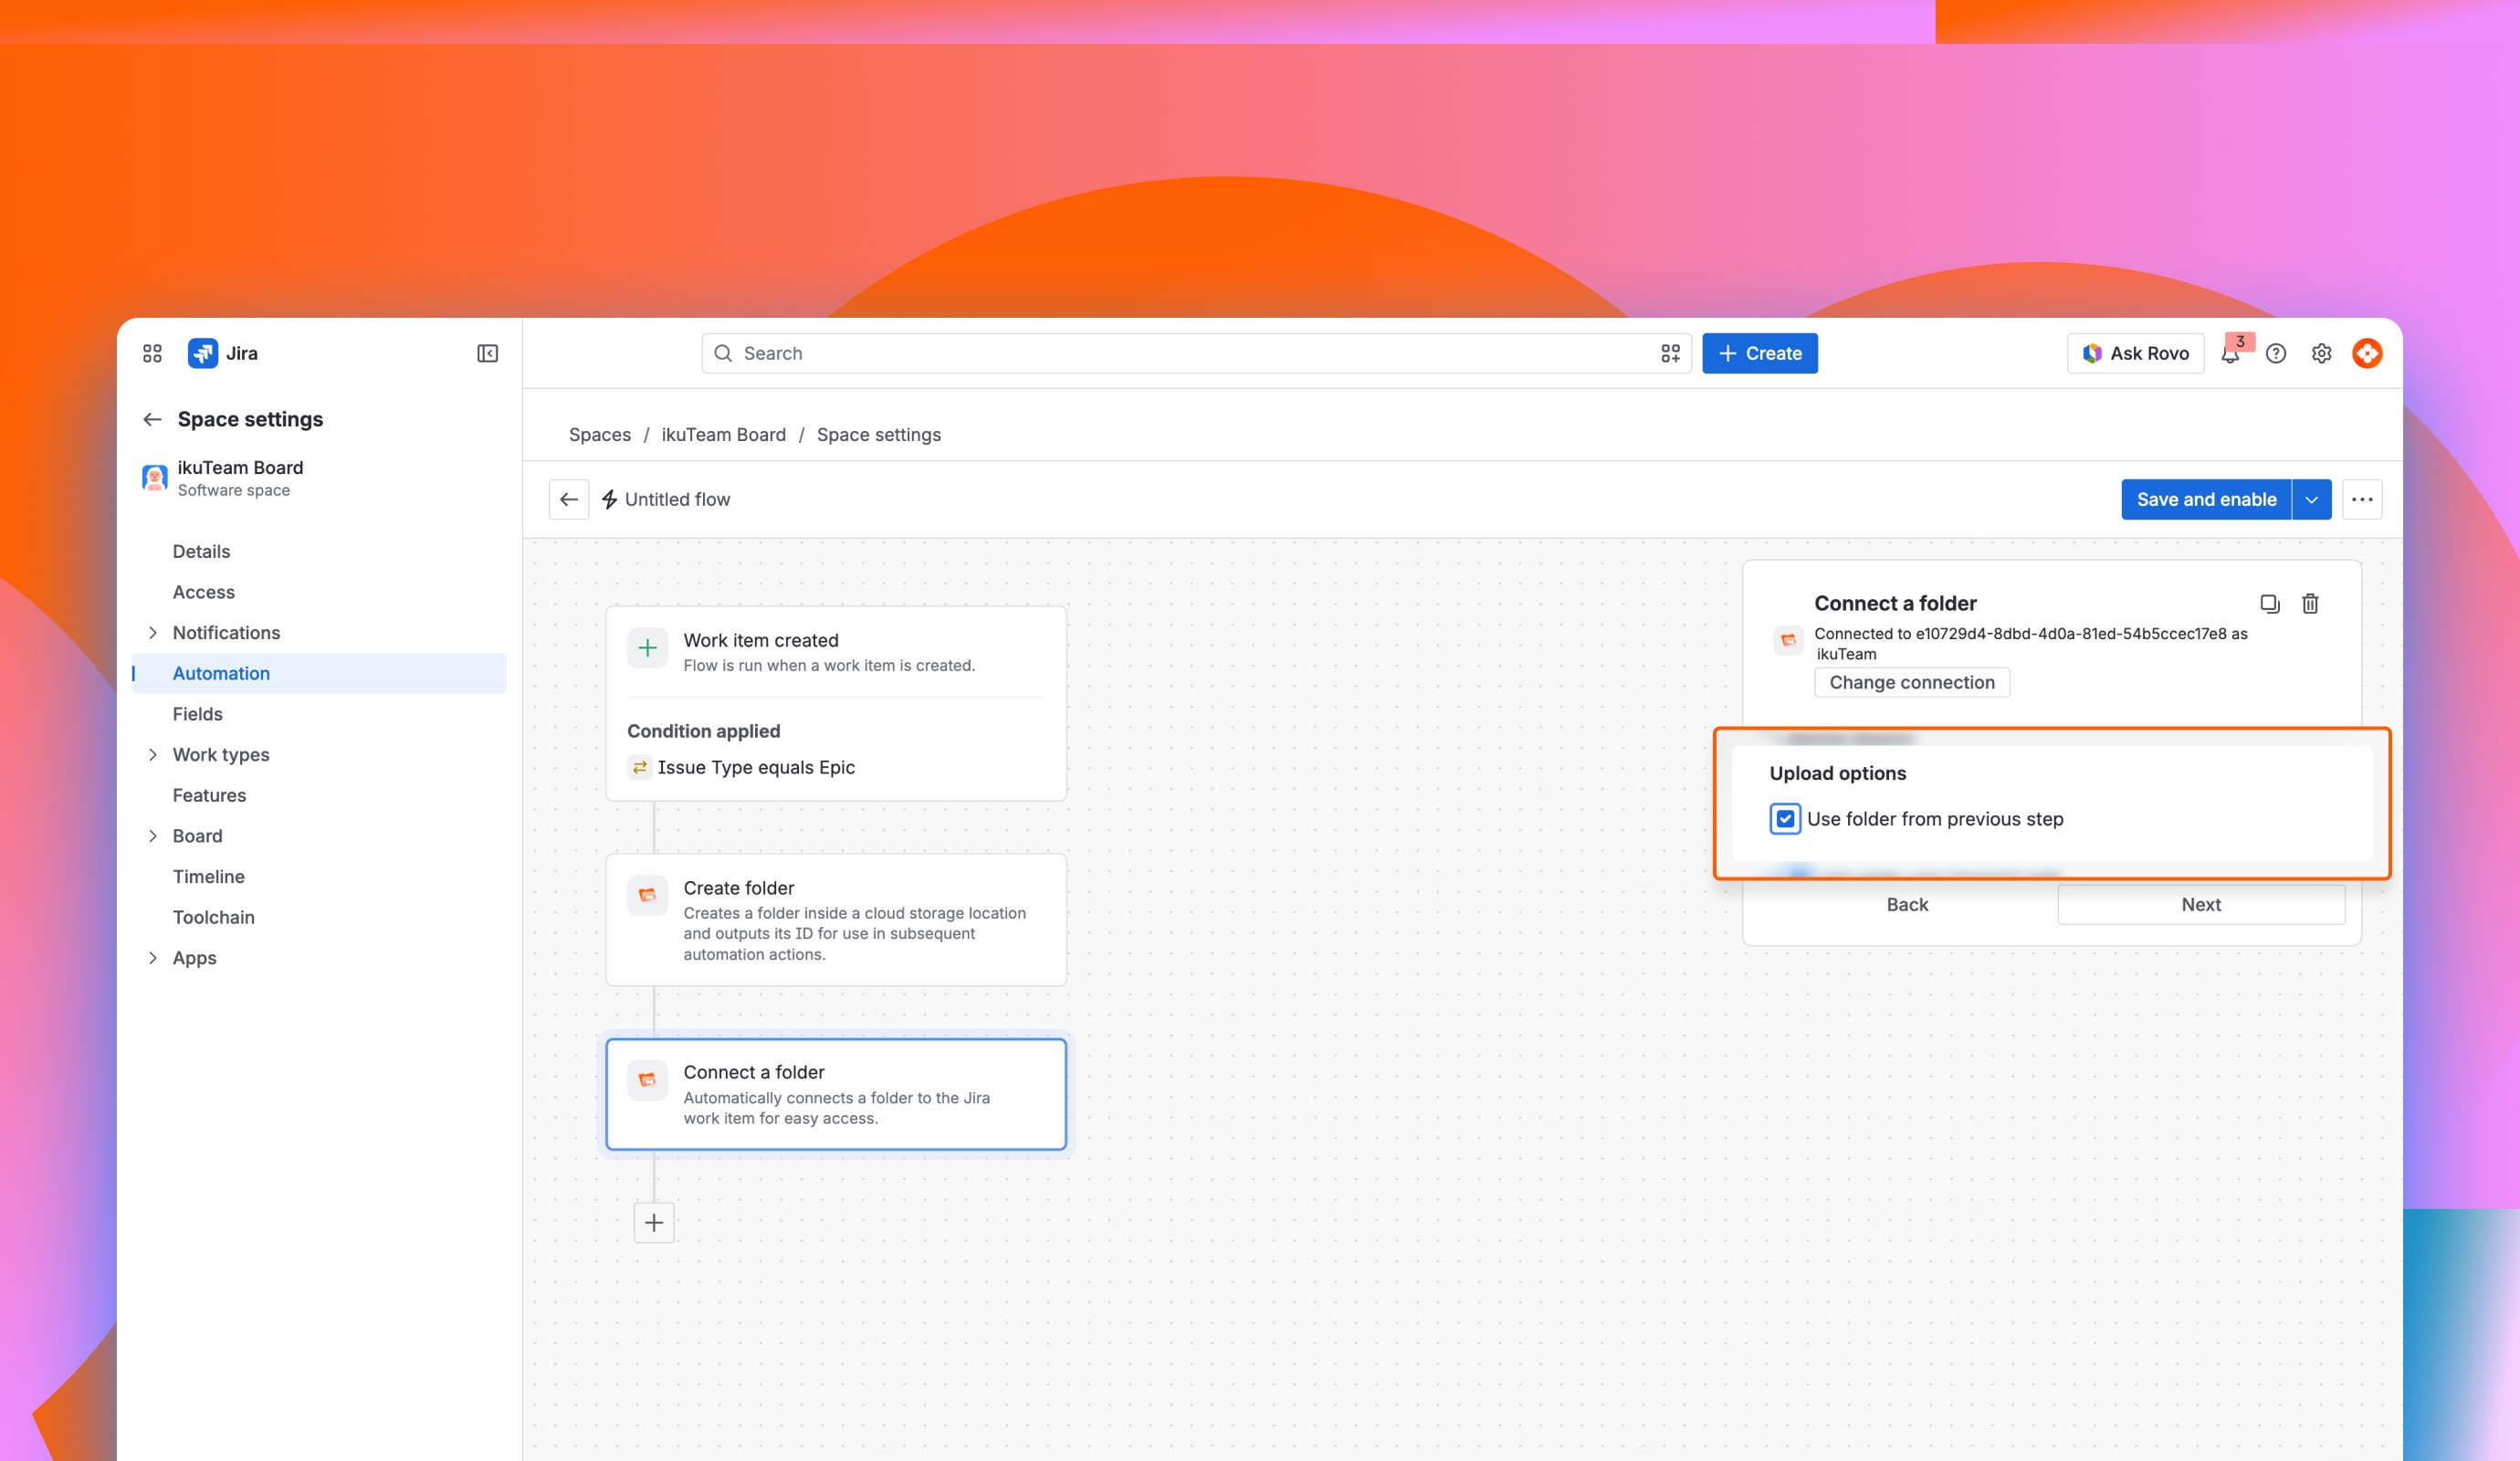
Check “Use folder from previous step” ONLY when you want to upload attachments to a folder created by the “Create folder“ Action before it.
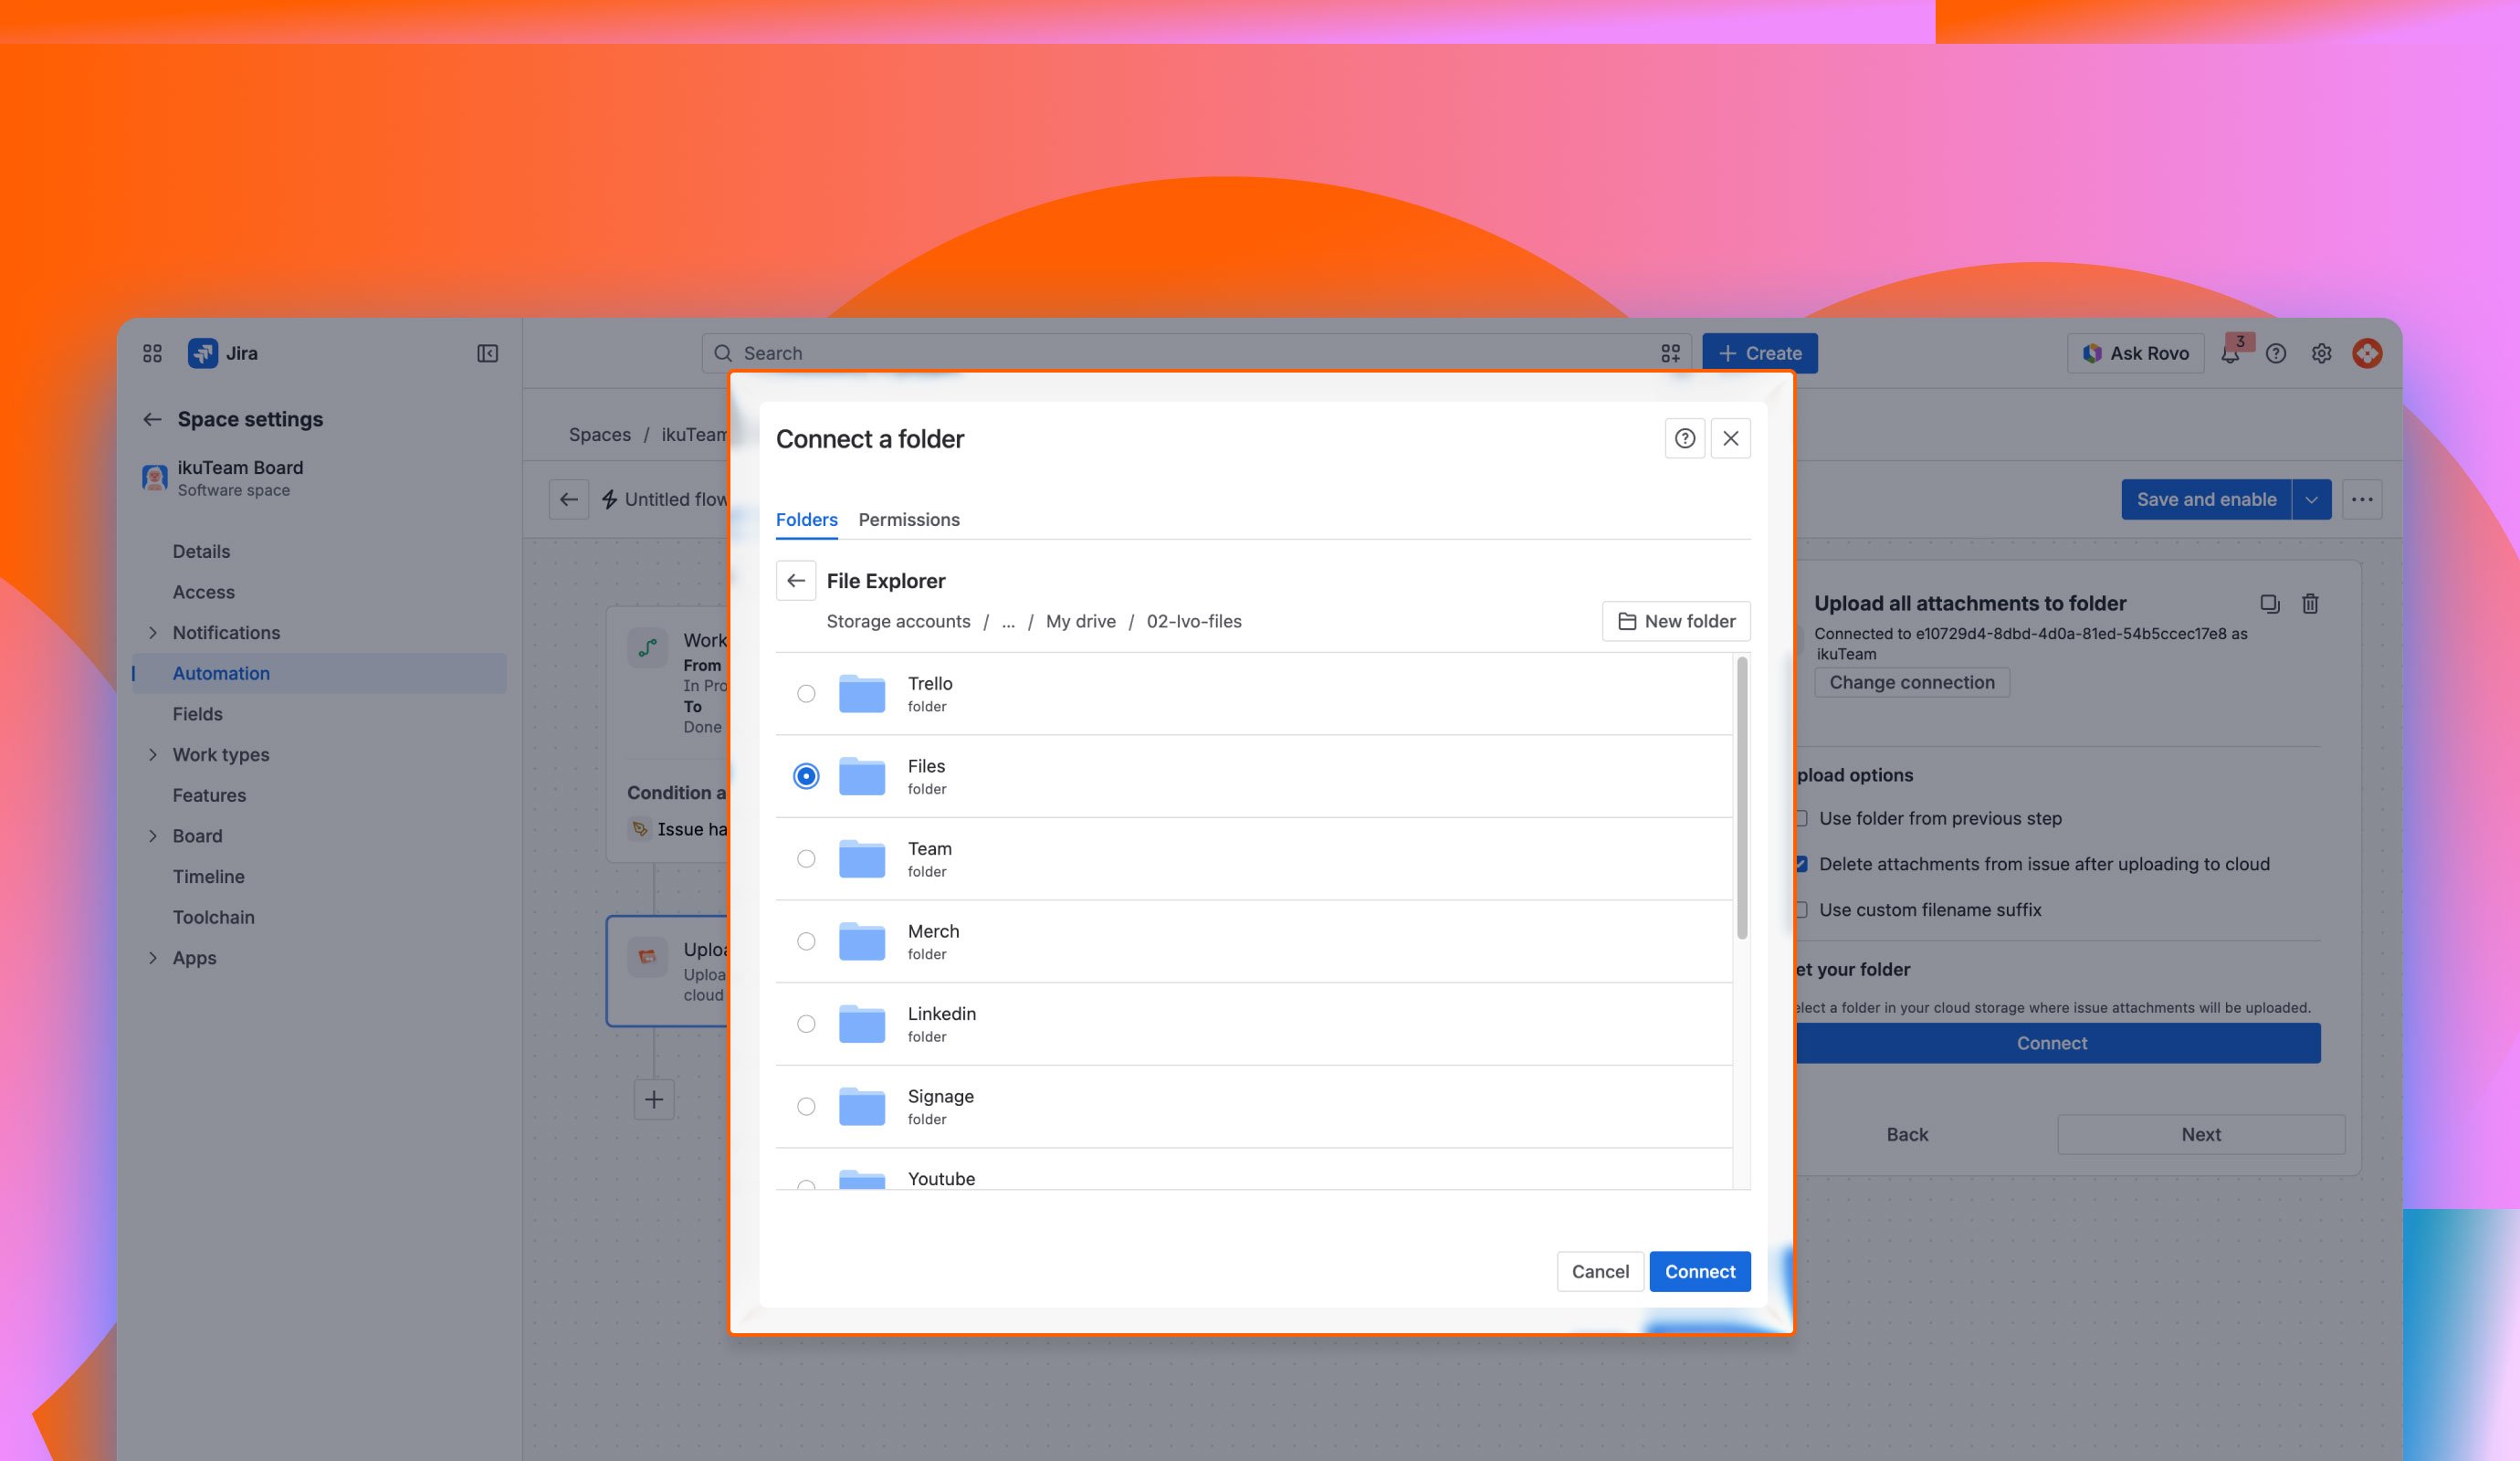
Using custom file name suffixes may cause filename conflicts. When a file with the same name already exists, the behavior depends on your cloud provider; the file may be duplicated, overwritten, or the upload may fail.
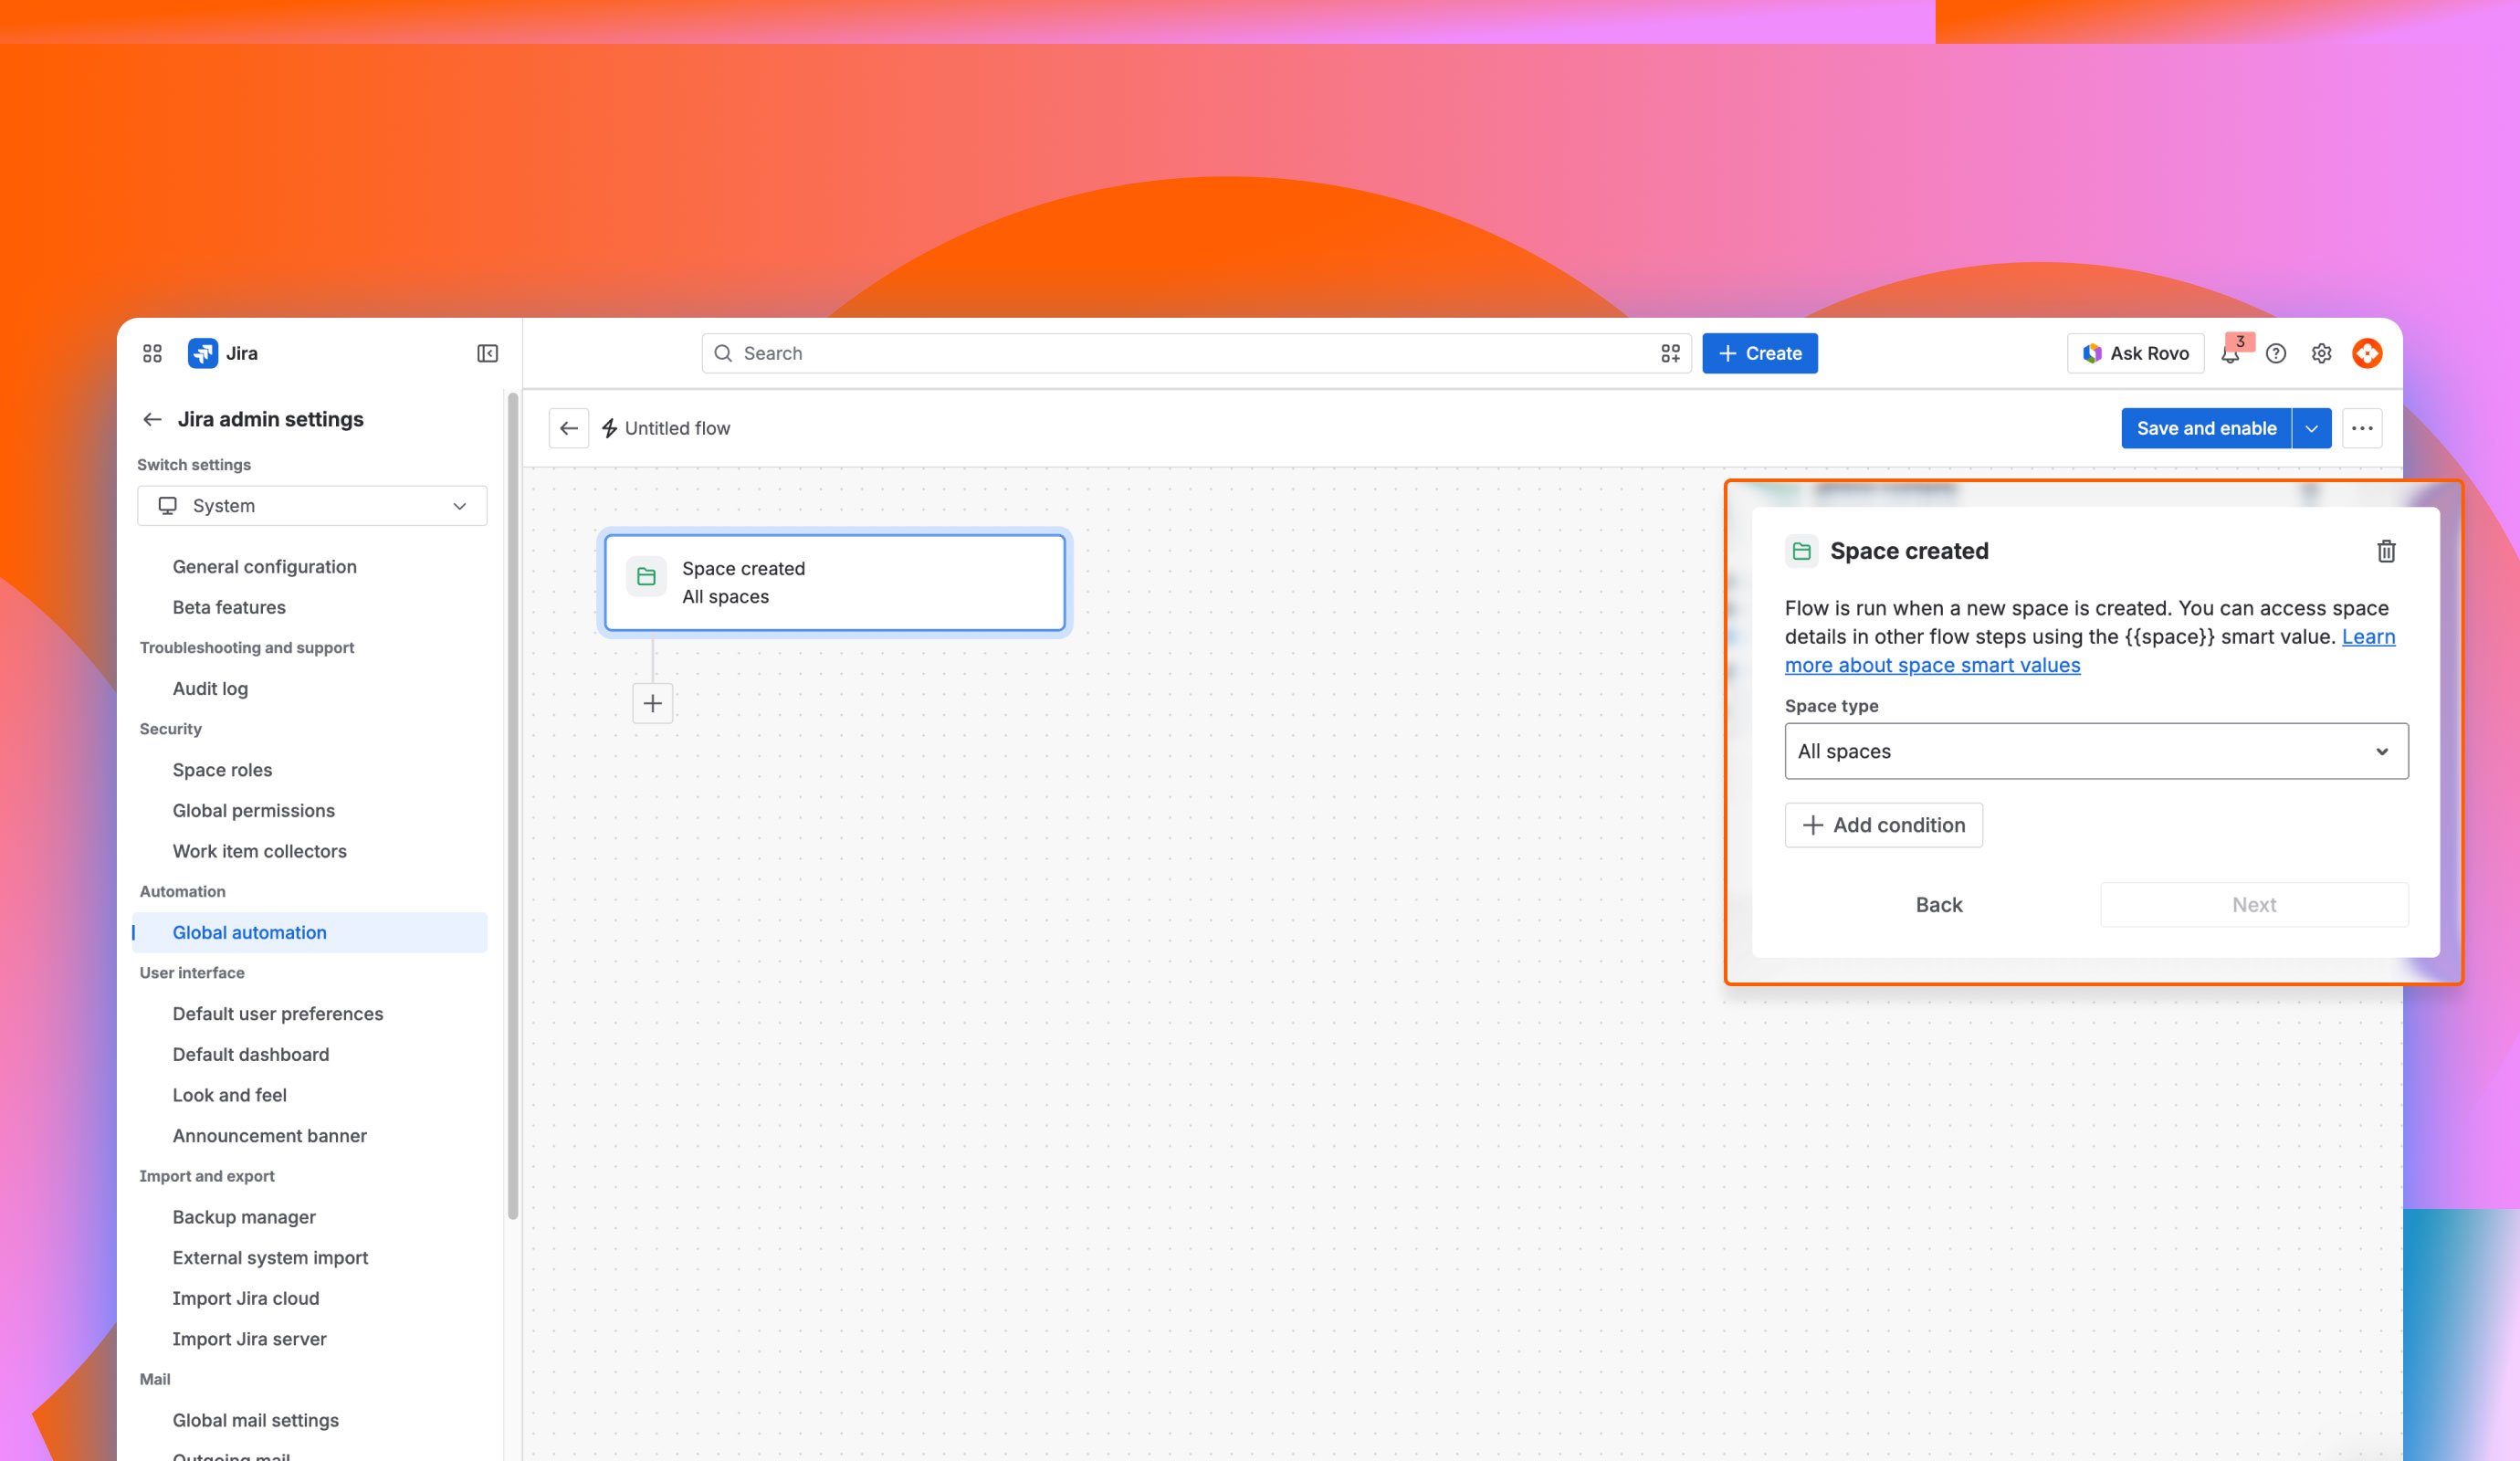
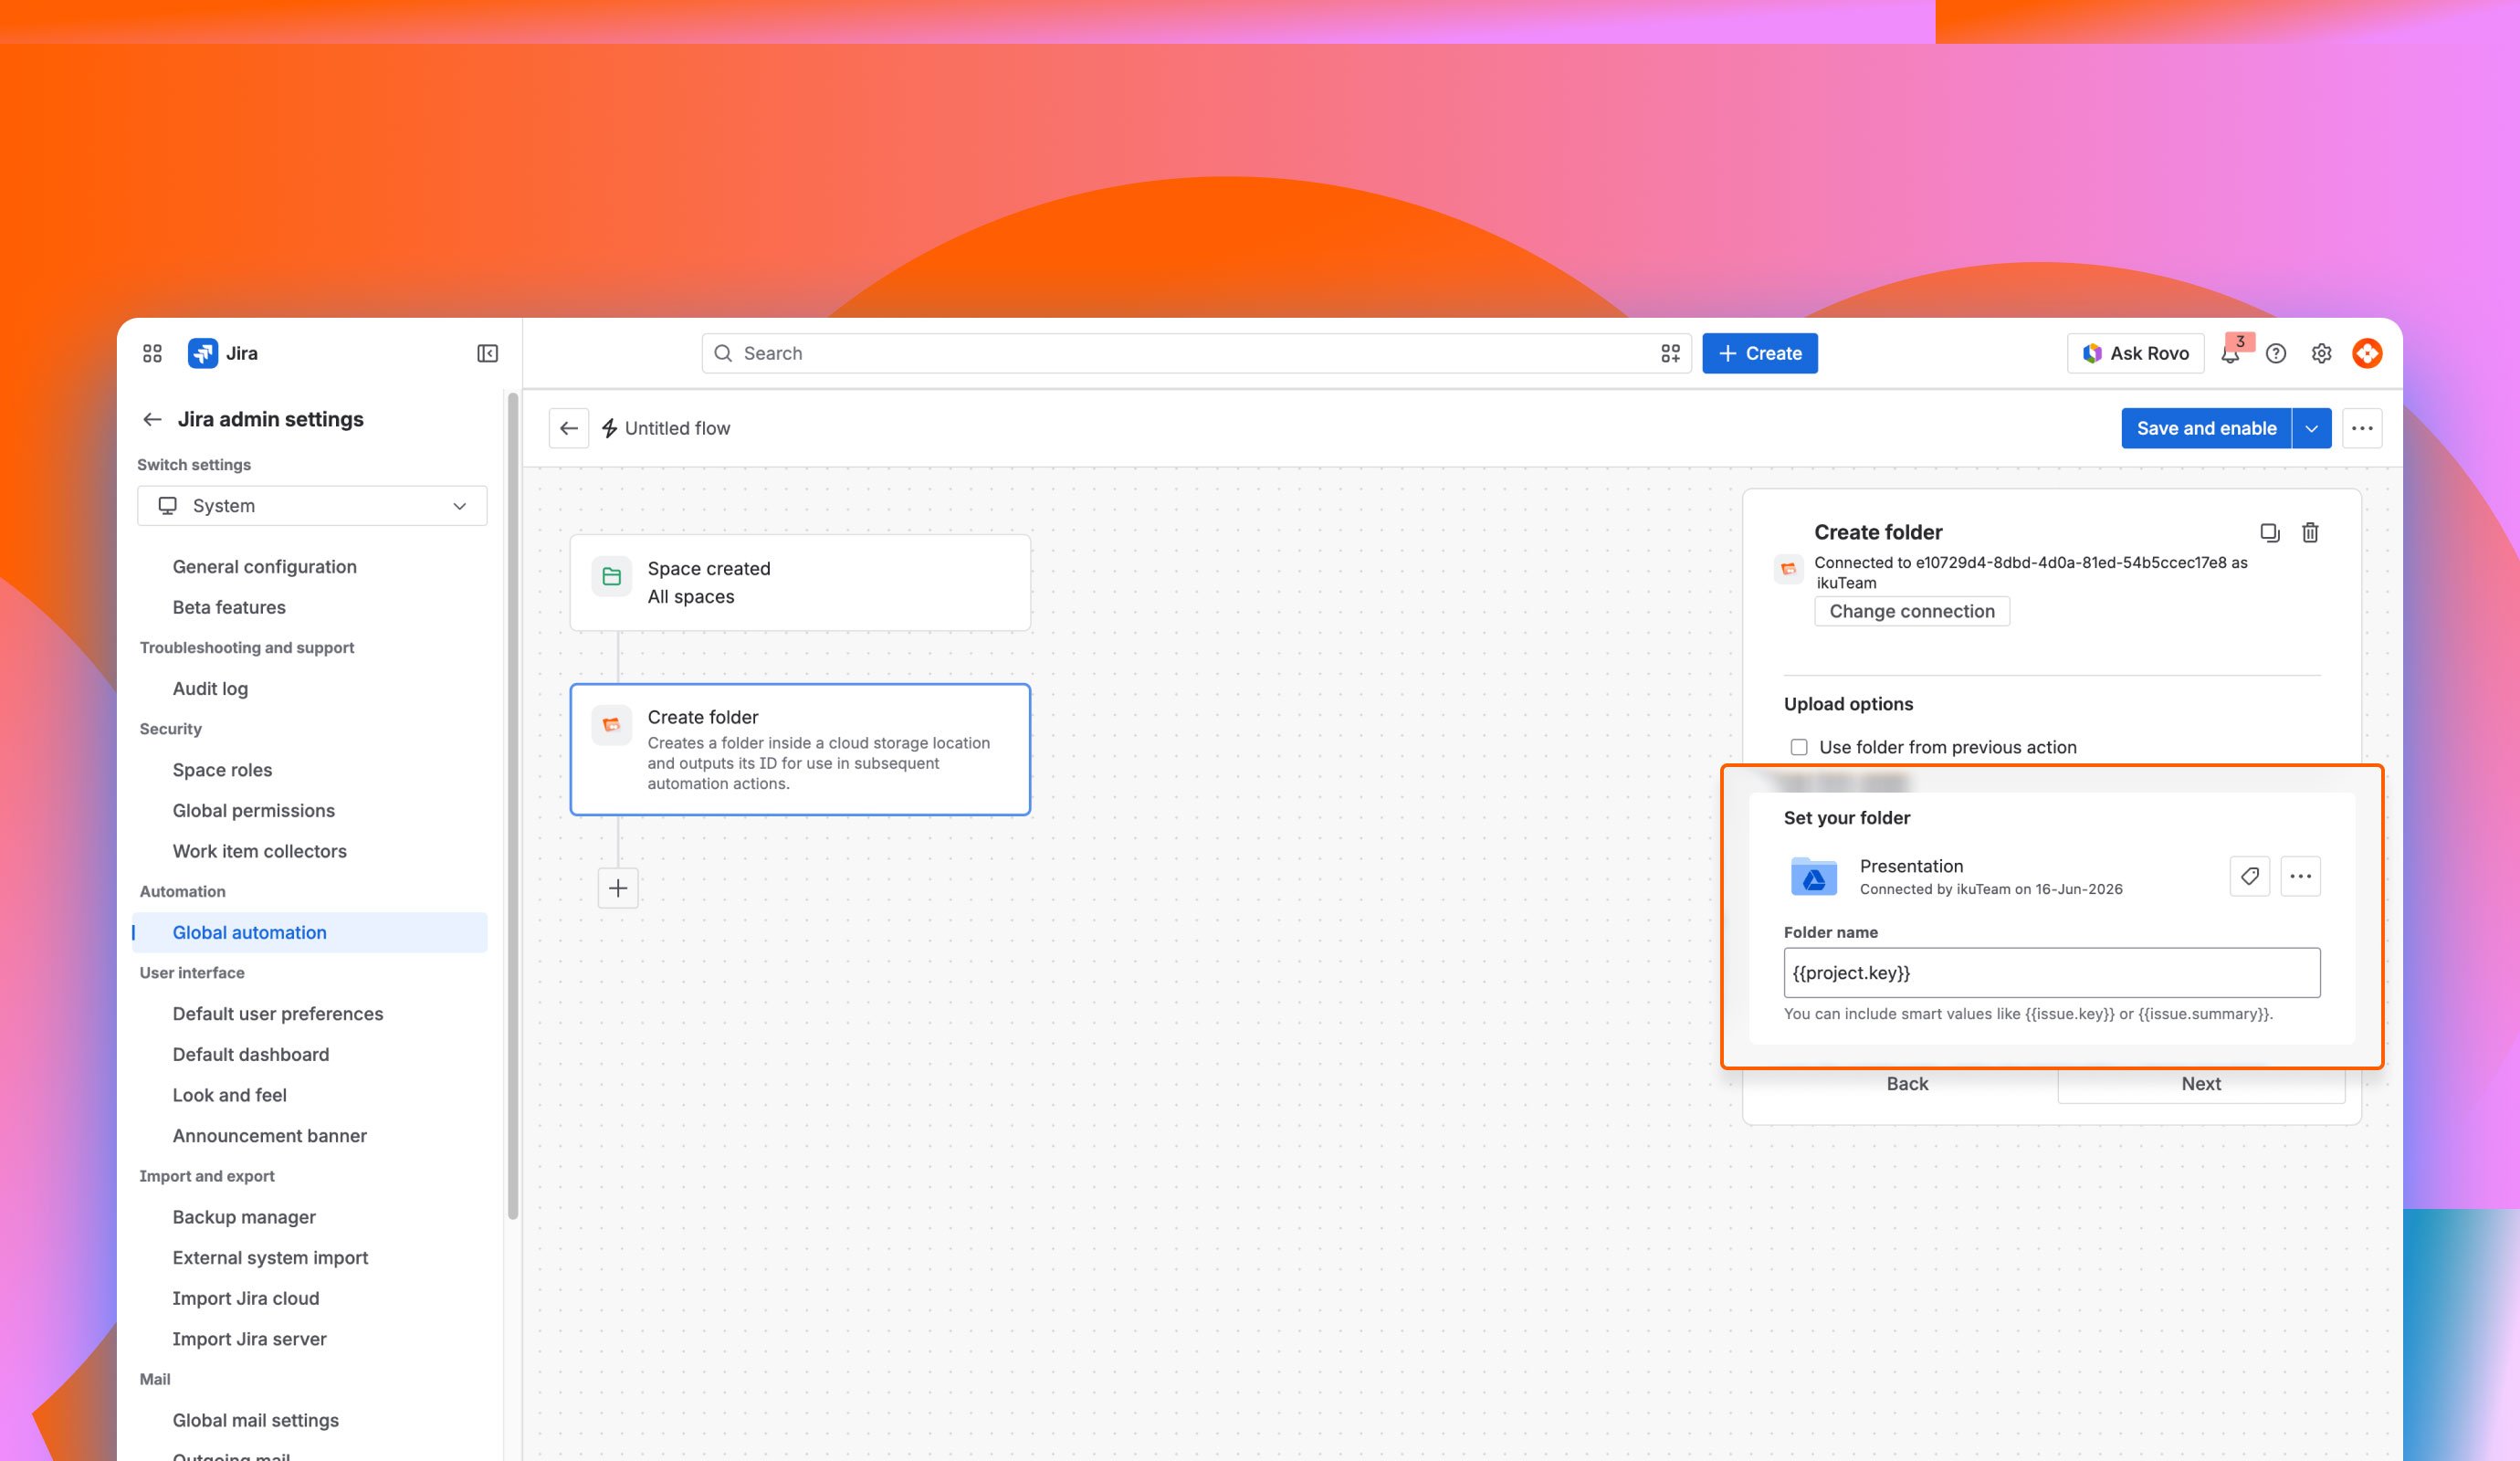
This third blueprint explains how to set up an automation rule to automatically create and connect a new base folder from your cloud storage when a new Jira Space (previously called a project) is created.
By implementing this rule, you ensure that every new Jira Space automatically gets a dedicated, well-organized cloud storage folder. This completely eliminates manual configuration, reduces onboarding times for new projects, and guarantees that team members have a consistent, centralized location for all project files from day one.
Key Performance Features
Real-World Use Case
Consider a Product Launch Scenario: A small marketing team (5–8 people) is managing a product launch campaign. All project-related files, such as marketing briefs, design assets, timelines, budgets, meeting notes, and deliverables, need to be stored and tracked in a single, shared folder structure rather than getting scattered across individual tickets.
Rule Configuration Prerequisites
To keep your storage organized, use Jira smart values to name the new space folders automatically.
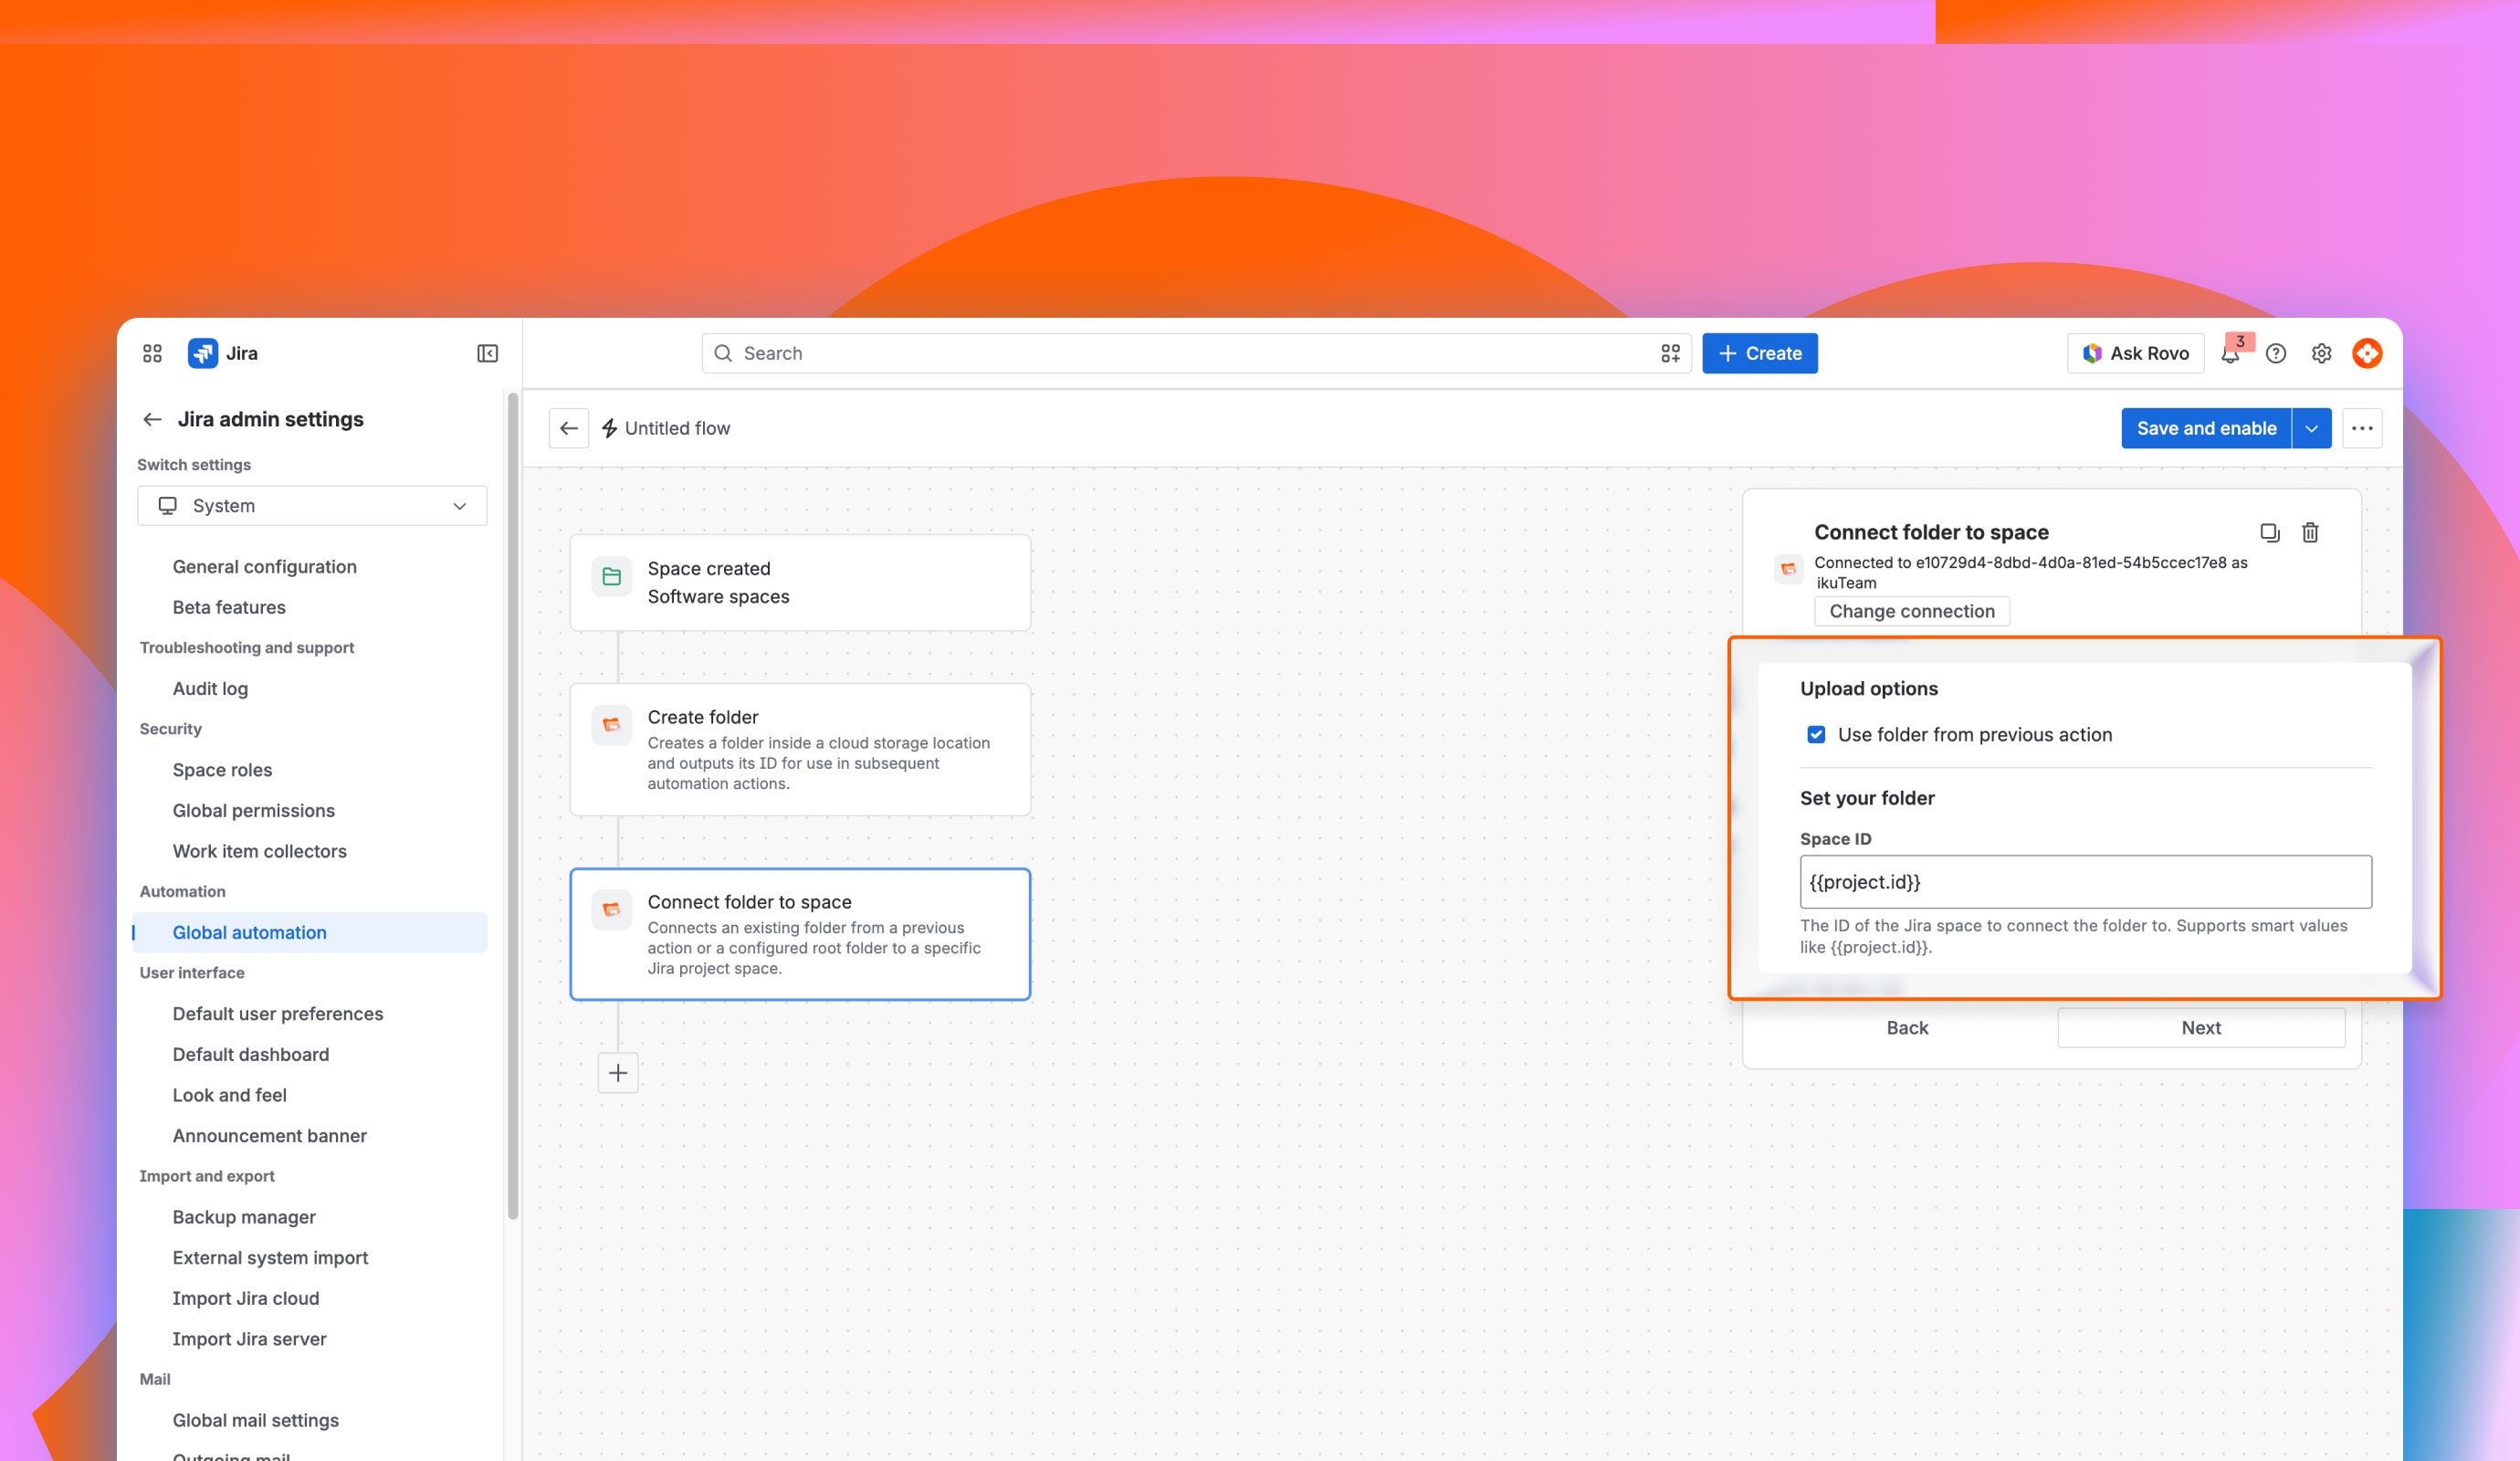
This fourth blueprint demonstrates how to automate the complete workflow for attachments using a highly scalable, self-maintaining two-step automation hierarchy. The first automation creates and links a dedicated cloud storage folder when a new space is created, and the second automatically uploads work item attachments into uniquely named subfolders upon task completion, keeping your file management clean and hands-free.
Key Performance Features
Real-World Use Case
Consider a Marketing Campaign Scenario: A marketing team creates a new Jira space called "Q3 Campaign". As soon as the space is created, the 1st automation triggers and automatically creates a folder named "Q3 Campaign" inside the team's Project Files directory on SharePoint, then links it directly to the space.
Over the following weeks, team members work on tasks like MKT-101: Design Social Media Banner and MKT-102: Write Blog Post Draft, attaching design files and assets directly to each work item. When a designer moves MKT-101 from In Progress to Done, the 2nd automation kicks in, which creates a subfolder named MKT-101 inside the Q3 Campaign folder on SharePoint and uploads all attachments from that work item into it.
No one on the team has to manually create folders or upload files; everything is handled automatically upon task completion.
Rule Configuration Prerequisites

Once the 1st automation run is complete, this flow will continue to run based on the work item condition.
Note: This can also be set at the space level (previously called project) automation. A space admin can set this up.
We will use the space folder already created and attached to the space by the 1st Automation.
Select “Use folder from previous step“ to use the dedicated work type folder from the previous trigger.
This will use the unique folder for that particular work item type can be easily identified by the folder name as the issue key.
Operating an automated ecosystem at scale requires robust administrative oversight. When dozens of rules run simultaneously across a complex system, poorly configured logic can cause operational disruptions. If two rules monitor the same field change and trigger opposing updates, they can easily form an infinite execution loop. Jira Cloud includes built-in loop protection that stops execution after roughly 10 recursive cycles, but relying on this fallback safety net is not a sustainable administrative best practice.
To maintain the integrity of your workflows, you must establish defensive guardrails inside your rule builder configurations. Before activating any rule that updates an issue status or modifies a text comment, always include a clear validation step. For example, add a condition verifying that a field does not already contain the target value before allowing a rule to perform an update. This ensures that actions execute only when a user or a development event meets precise criteria.
When a rule fails or behaviors stall, the native Jira automation audit log serves as your primary diagnostic environment. Accessible via your project settings or the global administration dashboard, it provides a step-by-step history of every single rule execution, successful step, and failed handshake.
When diagnosing issues within the Jira automation audit log, look for these common root causes:
Managing automation health across external ecosystems becomes significantly simpler when using enterprise-grade tools like ikuTeam's Cloud Connectors. Because apps like Cloud Attachment & Workflow Automation for Jira are built on Atlassian Forge, they do not introduce external caching layers or secondary points of failure. Every folder creation, file upload, or permission change registers directly within the native Jira log, keeping your monitoring unified under one interface.
Jira automation is a built-in, no-code rules engine that allows teams to automate repetitive tasks and optimize workflows across any Jira project, including Jira Software and Jira Service Management. It operates using straightforward "if this then that" logic, meaning you can set up workflows without writing custom code.
Yes. “Can Jira be used for automation?” is a common question among new administrators. Jira can easily automate complex operational loops across your workspace, such as changing statuses based on a developer merging code in GitHub, auto-assigning incoming tickets, or cleaning up native storage systems.
If you want to know how to automate tasks in Jira, the process is straightforward:
To streamline this process, you can select pre-built configurations from the built-in library of automation templates.
Yes, the core functionality ships natively with all Jira Cloud plans. However, your specific billing tier determines your rule execution scope. Single-project rules are unlimited on all plans, but global rules and multi-project rules are governed by strict monthly limits that vary based on whether you are on a Standard, Premium, or Enterprise subscription.
Automation rules can automatically update fields, priorities, and statuses that directly influence your active SLA timers. For example, transitioning an incident request to a status like "Waiting for customer" can pause specific SLA clocks. Testing your automated rules in a sandbox first helps ensure you keep the internal customer experience accurate and predictable.

_2026-03-26_20-48-42-1.png?length=960&name=untitled_Gemini%203%20(Nano%20Banana%20Pro)_2026-03-26_20-48-42-1.png)