

Confluence Google Drive Integration
Create a single source of truth with seamless syncing and real-time collaboration.
Read more


Customize the preview of the attached files to your needs.
By default, the files in the macro use a regular header and appear in the collapsed view to use less space on the screen. It’s easy to preview the file by clicking the arrow to open the expanded view, which uses the width of the page and is 400 px tall.
You can change this for each macro. To access the layout settings:
Edit the page.
Select the macro and click the edit icon.
Click the Layout tab.
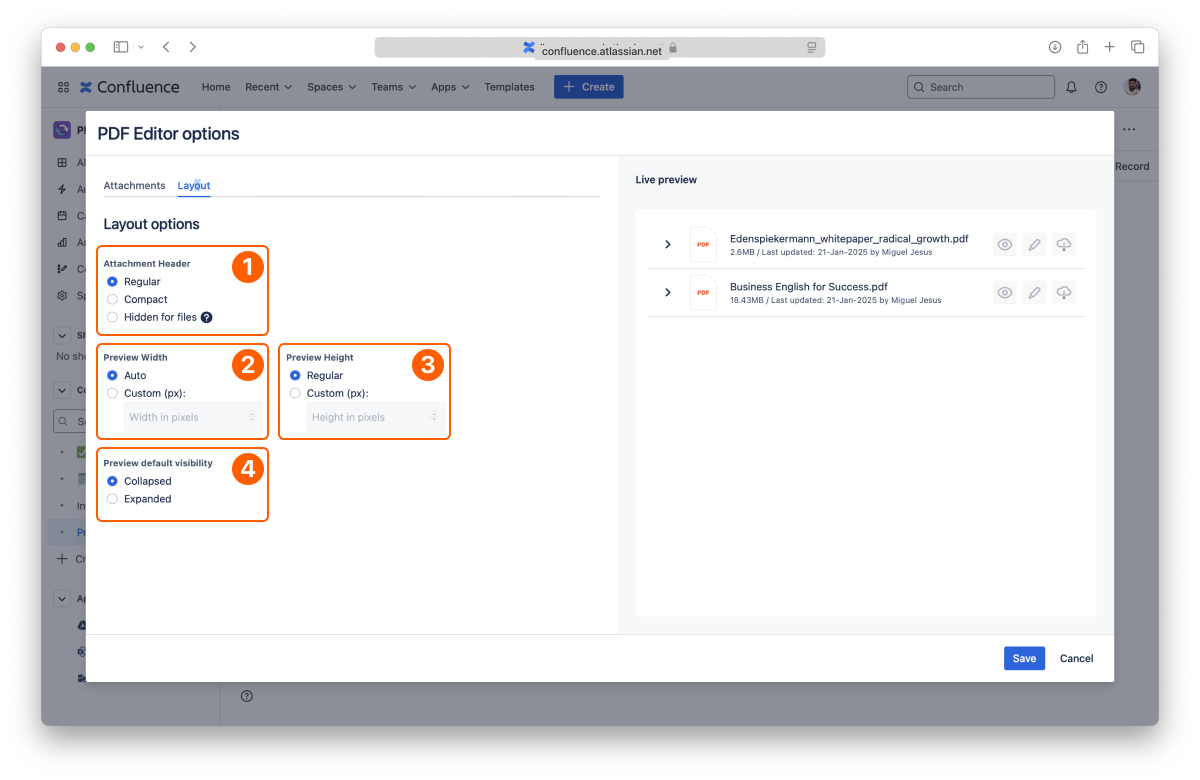
Attachment header options
Preview width options
Preview height options
Preview default visibility options
Select the size for the header of the attachment:
Regular: The standard size for the header of attached files. It shows a big icon and additional details.
Compact: Uses a smaller icon and only indicates the name of the file.
Hidden for files: Hides the file header, so previews are always expanded. Moving the mouse over the file shows a compact header.
Select the width for the preview:
Auto: The standard width. The preview uses the available space.
Custom (px): Enter the width of the preview area in pixels.
Select the height for the preview:
Regular: The standard height for previews (400 px).
Custom (px): Enter the height of the preview area in pixels.
Select the behavior for the preview:
Collapsed: The standard option. Previews stay hidden until you expand a file.
Expanded: Shows the preview of every file automatically. This option is always used with the Hidden for files header.
Choose the order of the files in the macro: by Name, Type, Size or Date modified, in Ascending or Descending order. By default, the most recently modified files come first. People viewing the page can also change the order for themselves with the Sort button in the toolbar.
Next to the tabs, the Live preview panel shows how the macro will look on the page. You can also choose what it shows:
Show toolbar: the toolbar above the files, with the header and preview buttons and Sort.
Show upload hint: an area below the files where people can drop a PDF to upload it.
Both are selected by default.
The Attachments tab of the macro settings sets which PDFs the macro shows:
Available attachments: every PDF attached to the page. Select the files the macro shows, or use Select all.
Upload file...: attach a new PDF to the page, up to 100 MB.
Automatically add future attachments: show every PDF on the page, including the ones added later. This option is off by default.
Click Insert to save your changes, then publish the page.
This covers all the macro settings.
If you still have questions about any topics covered on this page, visit our support portal and send us your questions. Our team is always happy to help.


