

Confluence Google Drive Integration
Create a single source of truth with seamless syncing and real-time collaboration.
Read more


This guide shows you how to set up two Jira Automation flows that organize work item attachments in SharePoint or OneDrive from start to finish. The first flow creates a dedicated folder when a new space is created and connects it to the space. The second uploads each work item's attachments into its own subfolder when the work item is done, keeping your file management clean and hands-free.
You build it with SharePoint Connector for Jira, which works with SharePoint, OneDrive for Business and OneDrive.
Automatic folder setup for new spaces: When a new space is created, a dedicated folder is created in SharePoint or OneDrive and connected to the space, with no manual setup.
Condition-based attachment uploads: Attachments are uploaded to SharePoint or OneDrive when a condition is met, for example when a work item moves from In Progress to Done.
Organized folder structure: Each work item gets its own subfolder named after the work item key, so files are easy to find.
Two-layer automation: The first flow runs once per space to set up the root folder. The second runs for each work item, so the folder structure maintains itself.
A marketing team creates a new Jira space called "Q3 Campaign". As soon as the space is created, the first flow creates a folder named Q3 Campaign inside the team's Project Files folder on SharePoint and connects it to the space.
Over the next few weeks, the team works on work items like MKT-101: Design social media banner and MKT-102: Write blog post draft, attaching design files and documents to each one. When a designer moves MKT-101 from In Progress to Done, the second flow runs. It creates a subfolder named MKT-101 inside the Q3 Campaign folder and uploads all attachments from that work item into it.
By the end of the quarter, the SharePoint folder has a clean structure:
Project Files/
  └── Q3 Campaign/
        ├── MKT-101/
        │     ├── banner-v3-final.png
        │     └── design-specs.pdf
        ├── MKT-102/
        │     └── blog-draft-final.docx
        └── ...
No one on the team had to create folders or upload files by hand. The flows handled it as each work item was completed.
SharePoint Connector for Jira is installed on your Jira site.
You're a Jira admin. Only Jira admins can create global automation flows.
You have an active SharePoint or OneDrive account, with permission to create folders in the parent folder you'll choose. A service account is recommended.
Your site has the Advanced Edition of SharePoint Connector for Jira. The automation actions are part of it.
Each flow runs as the user set in Actor, in the flow's Settings panel. That person needs access to the app and permission on the folders. With Mirror Storage Permissions ON, they must also have signed in to the SharePoint or OneDrive account.
This flow runs once, when a new space is created.
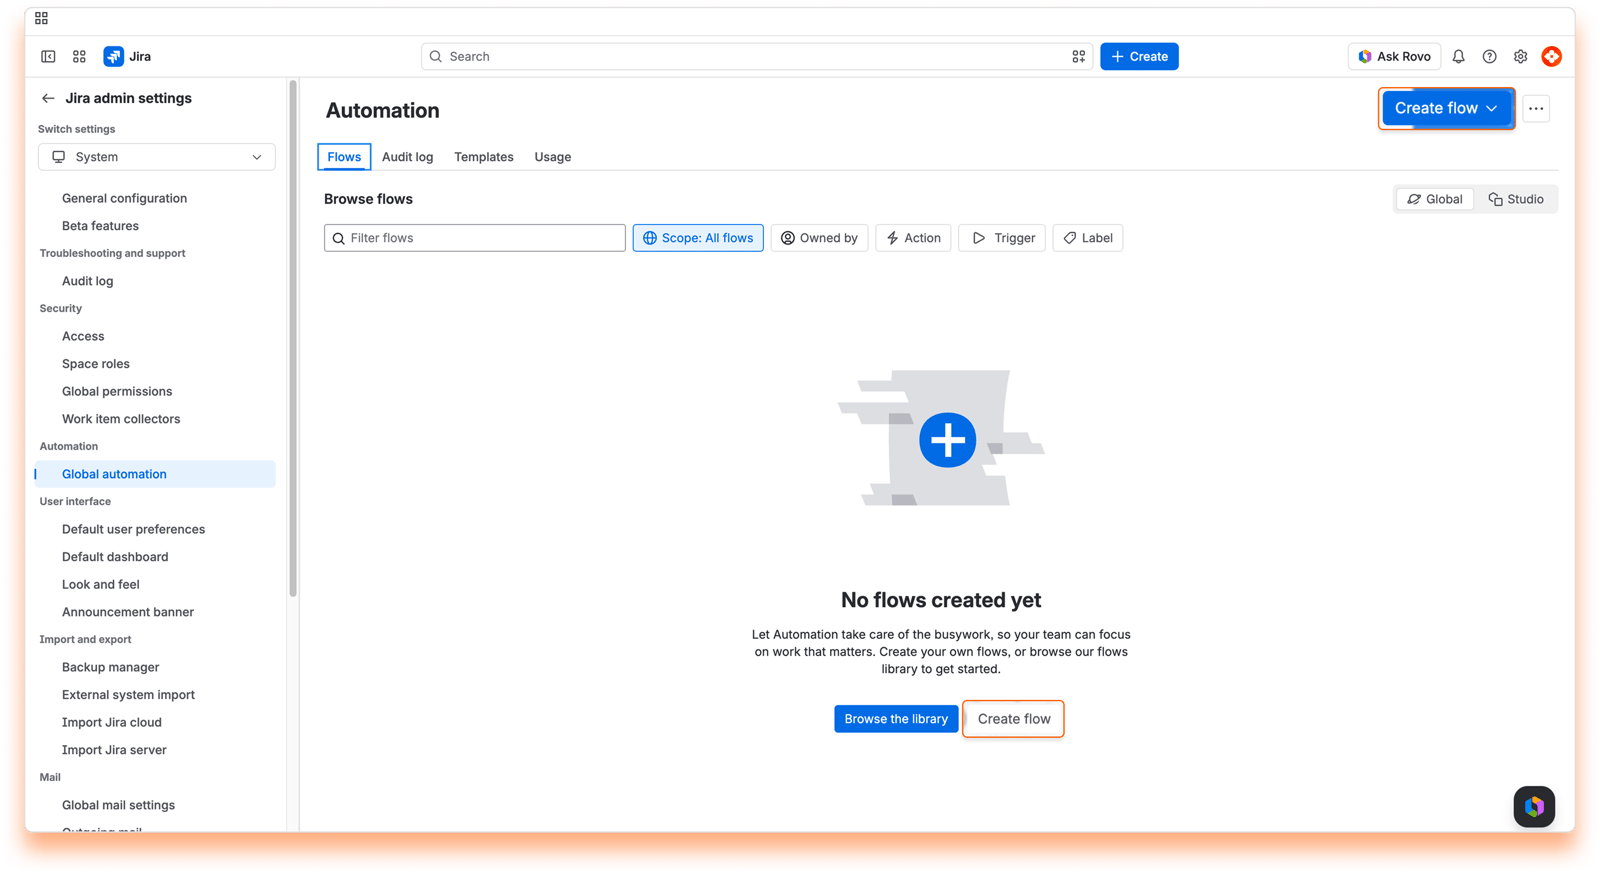
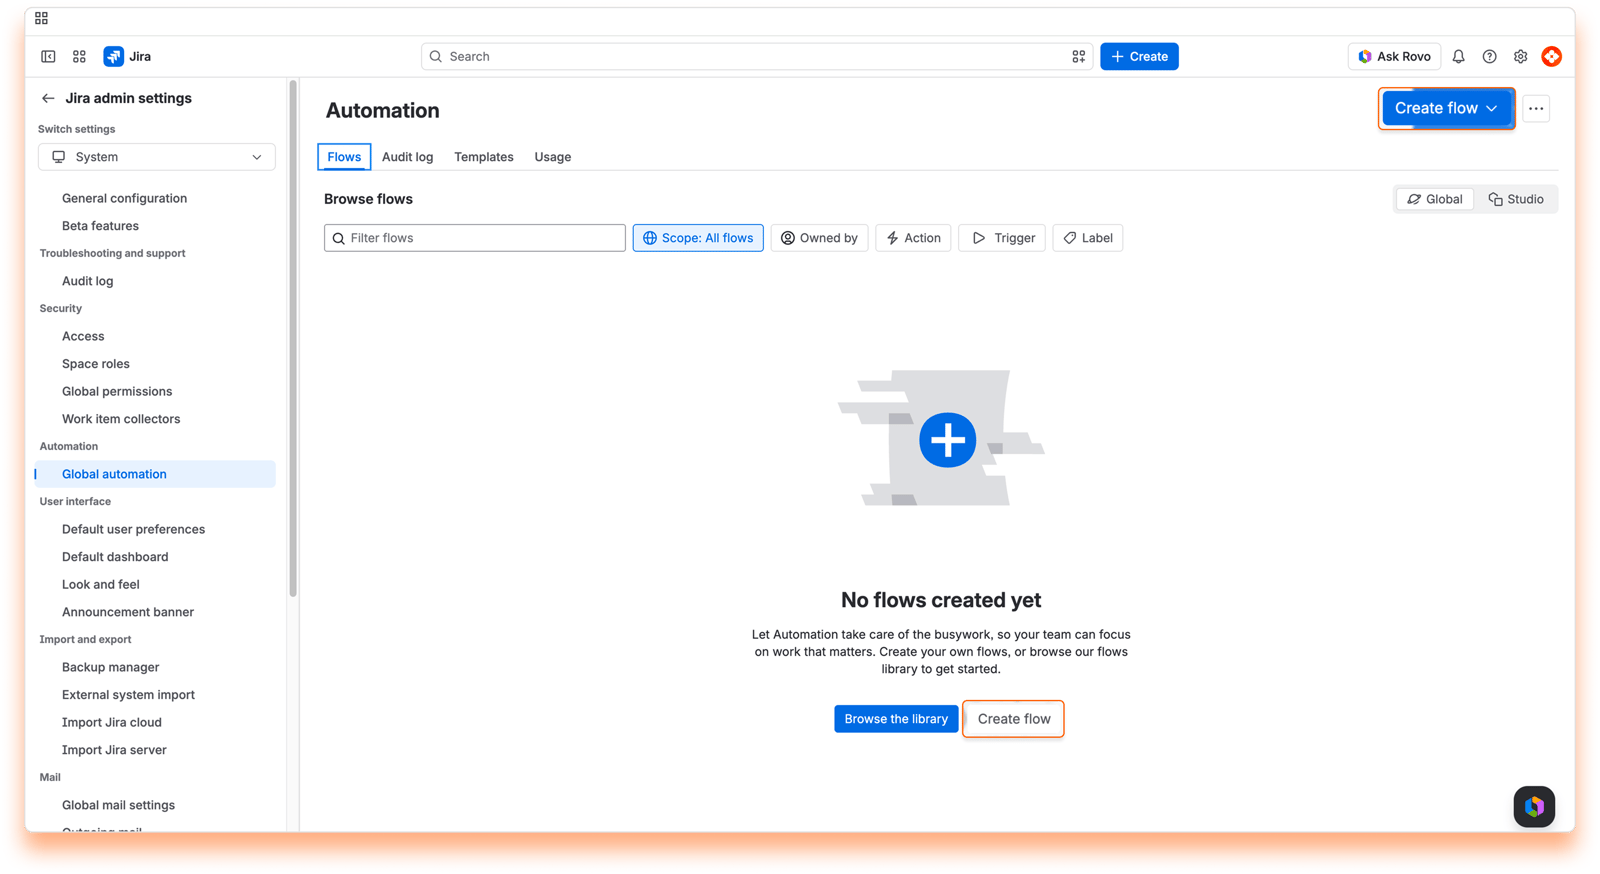
Go to Settings > System > Global automation and click "Create flow".
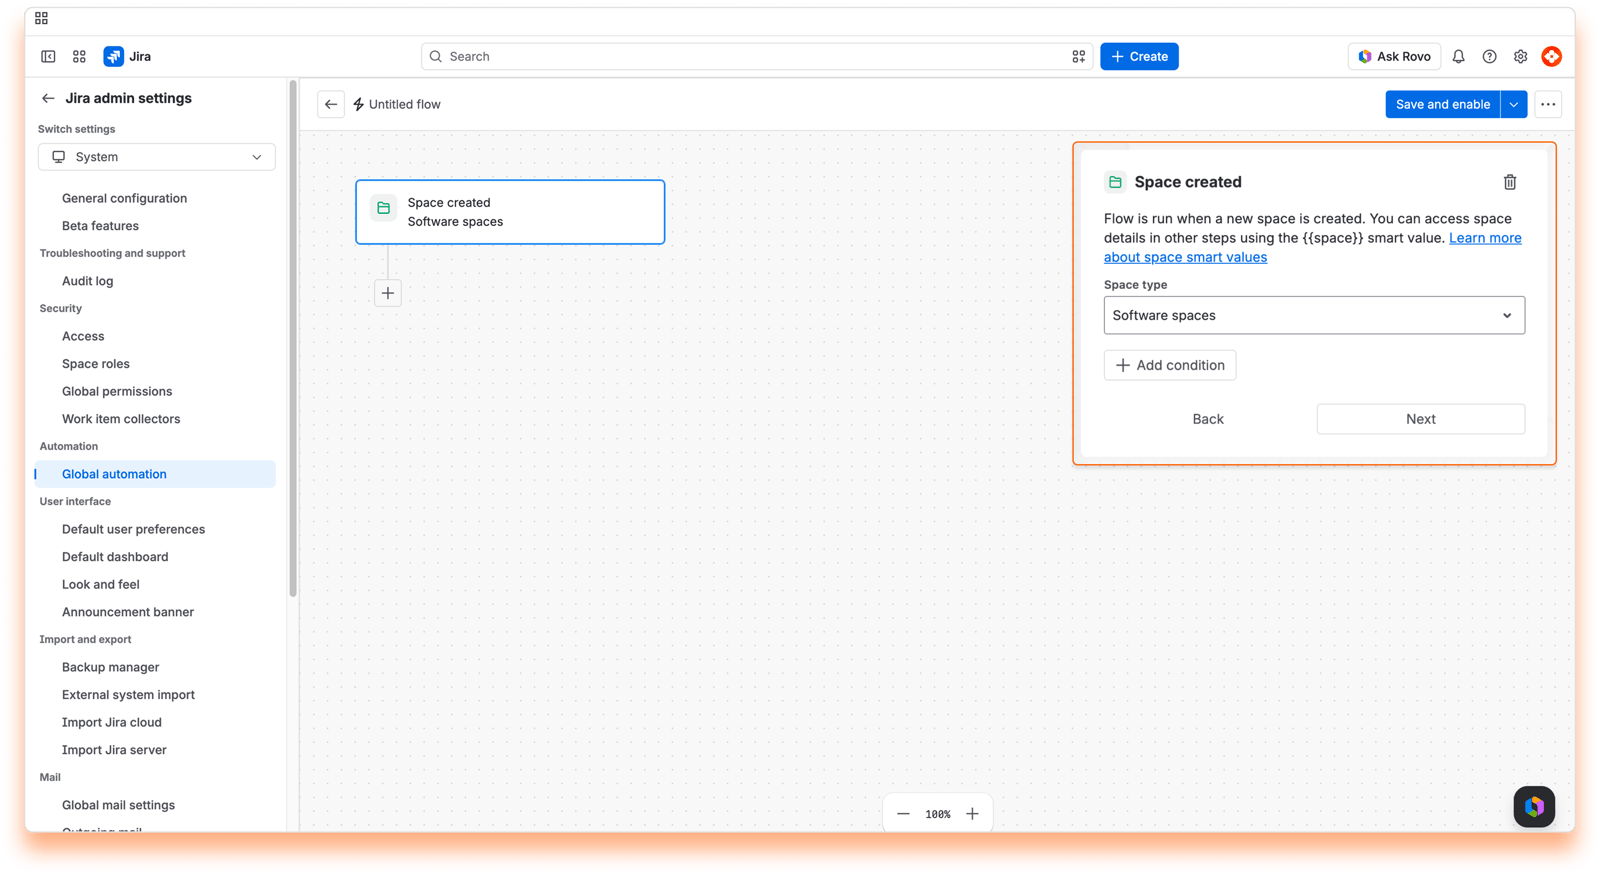
Set the trigger to run when a new space is created, and pick the space types the flow should run for.
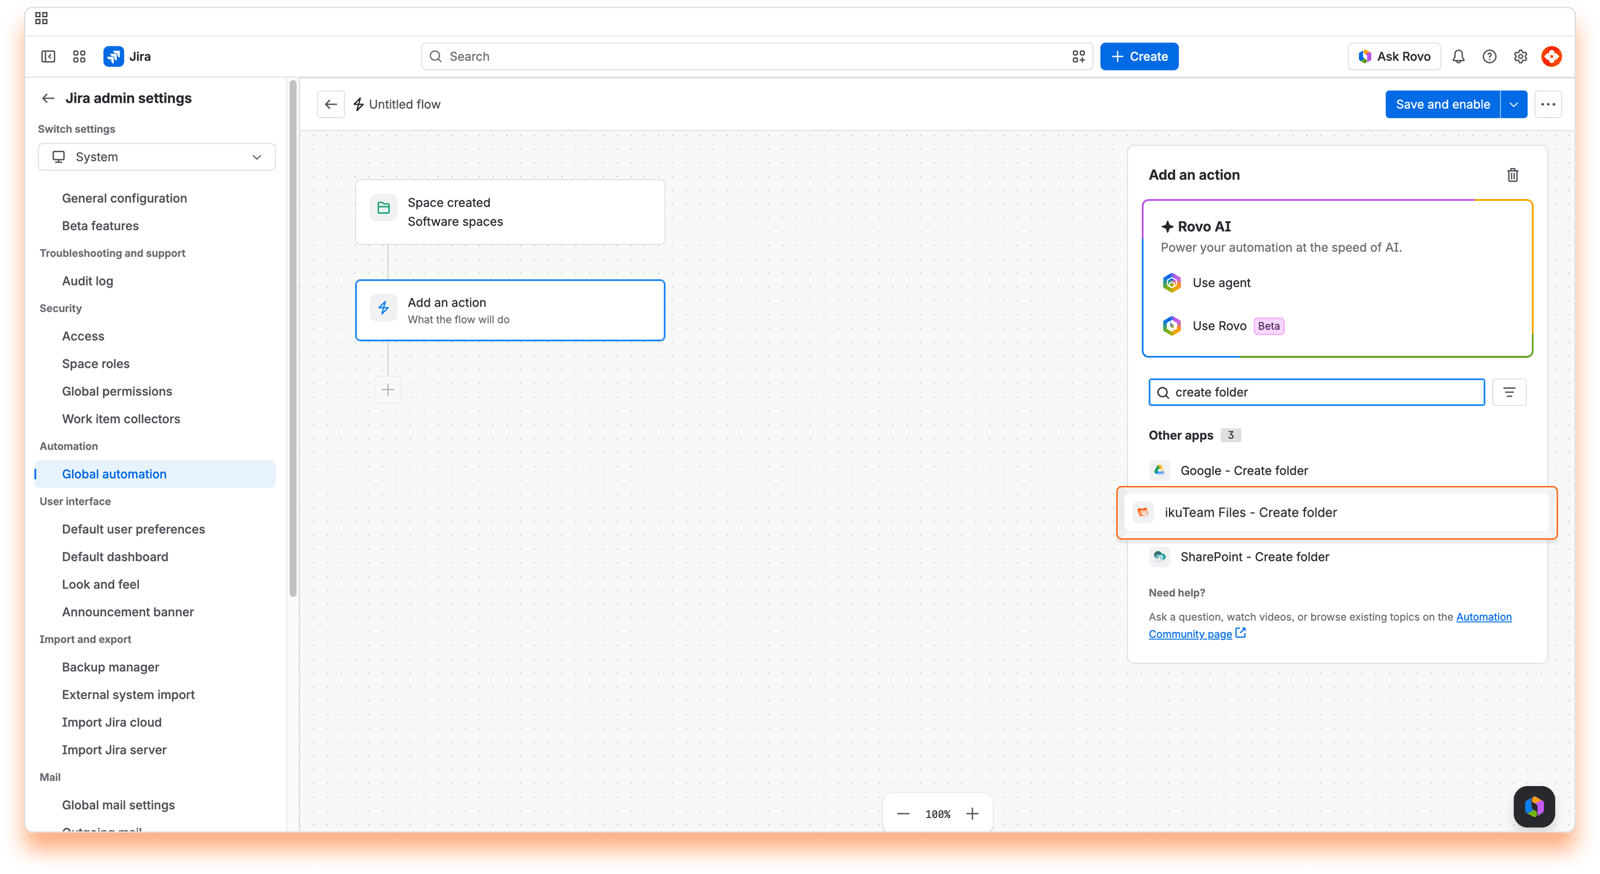
Add a new action, search for "SharePoint - Create folder", and select it.
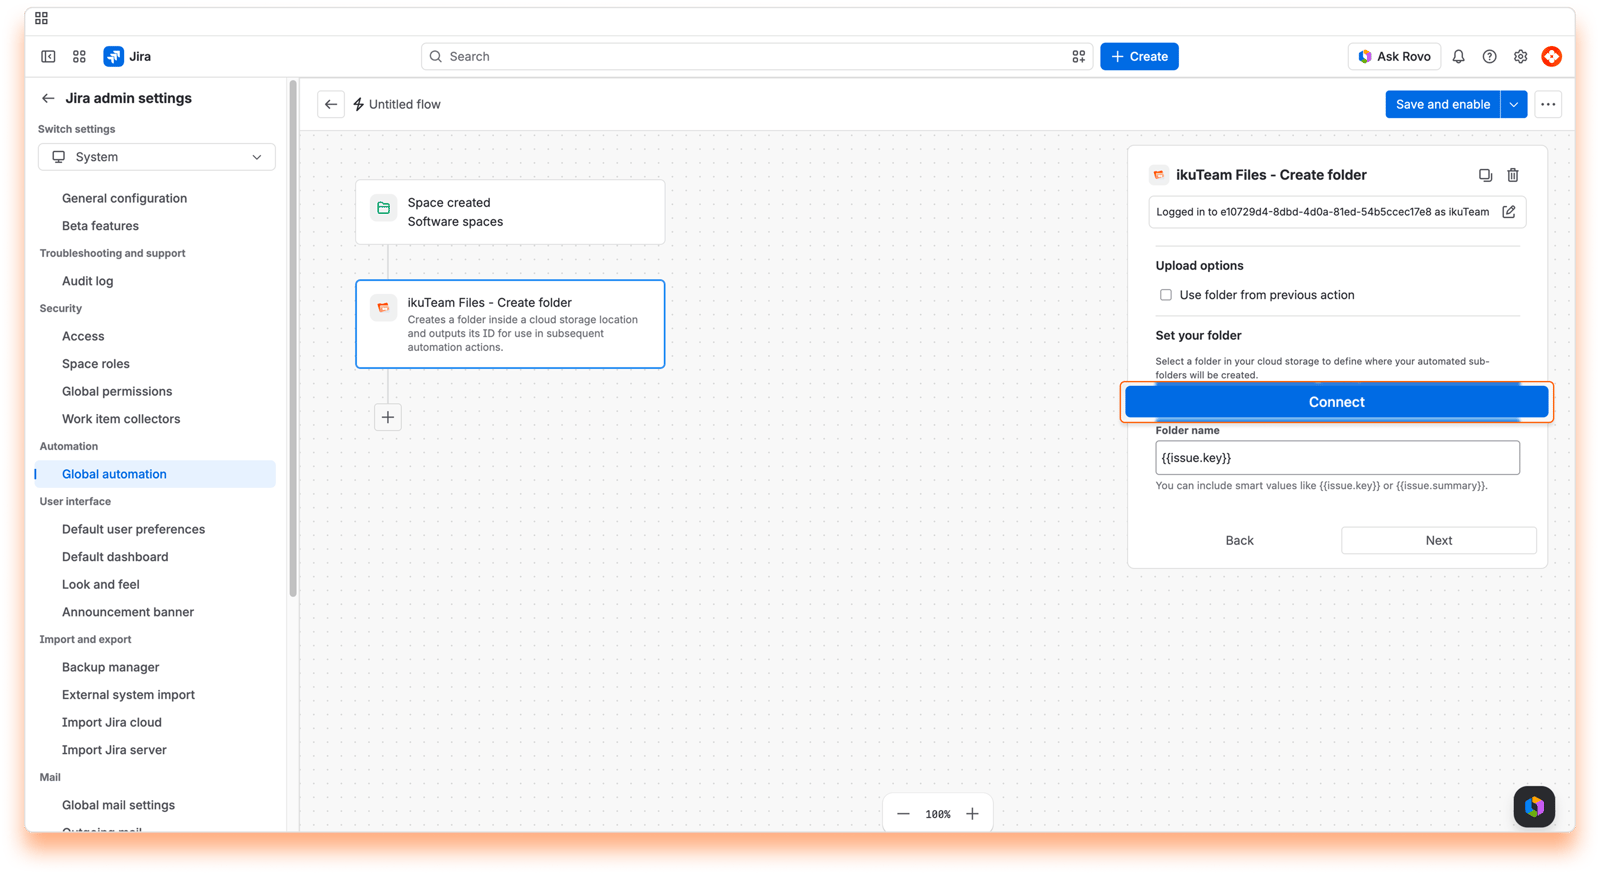
Click "Connect" and authenticate your SharePoint or OneDrive account.
Choose the parent folder where the space folders will be created, in this example Project Files.
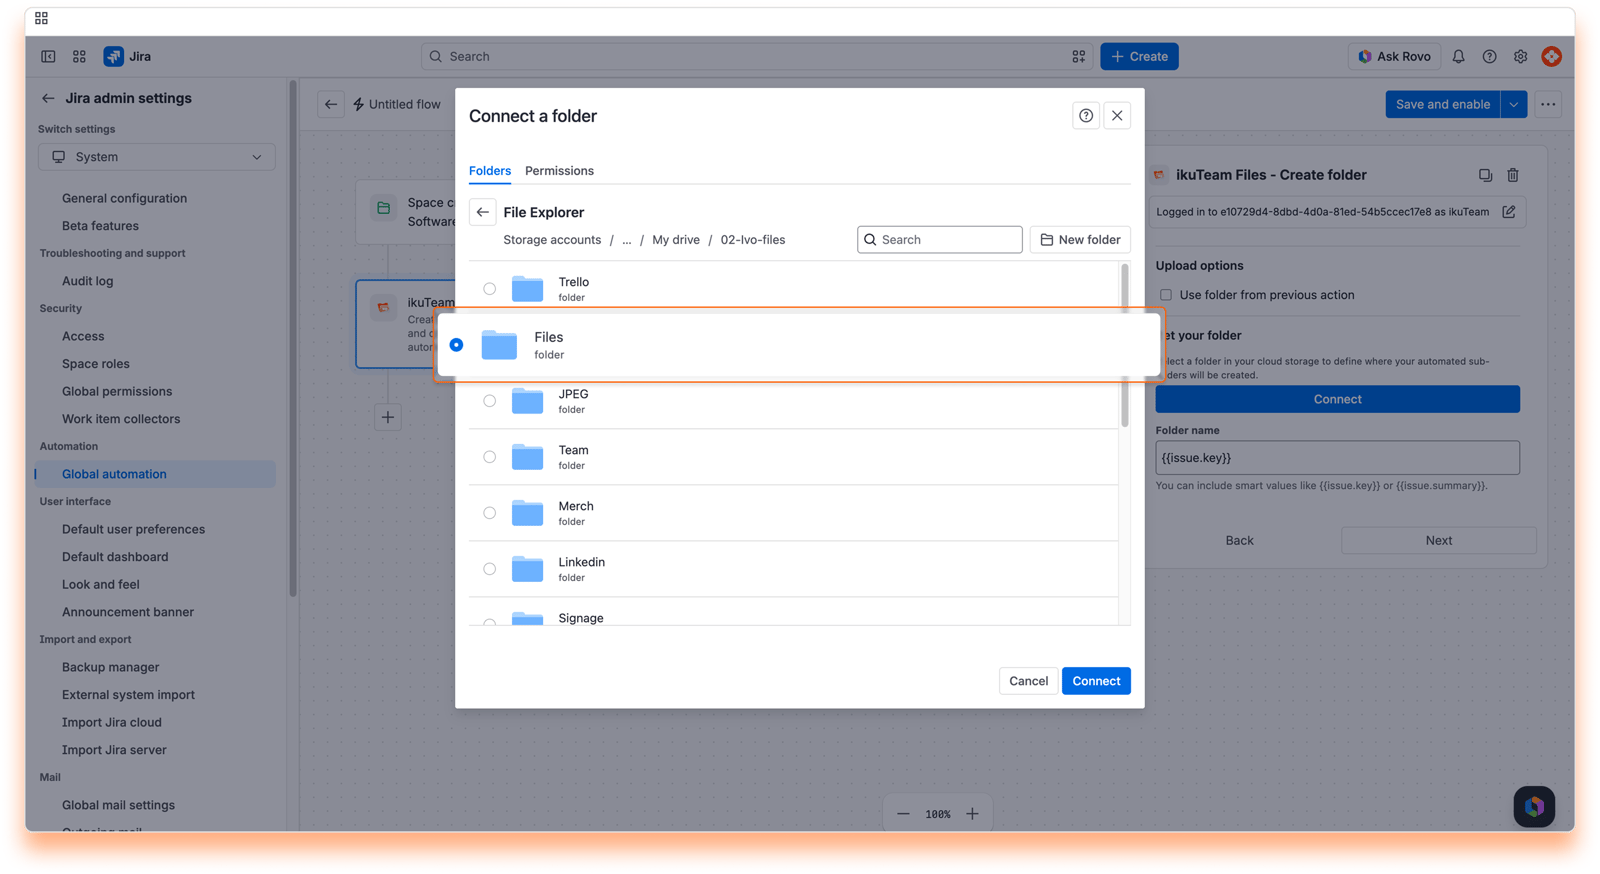
In the "Folder name" field, enter {{project.name}}, so the folder is named after the space.
Keep "Use the existing folder" selected under "If a folder with this name already exists": if a folder with the space's name is already there, the flow reuses it instead of creating a second one.
Add another action and search for "SharePoint - Connect folder to space".
Select "Use folder from previous action" and enter {{project.id}} as the "Space ID".
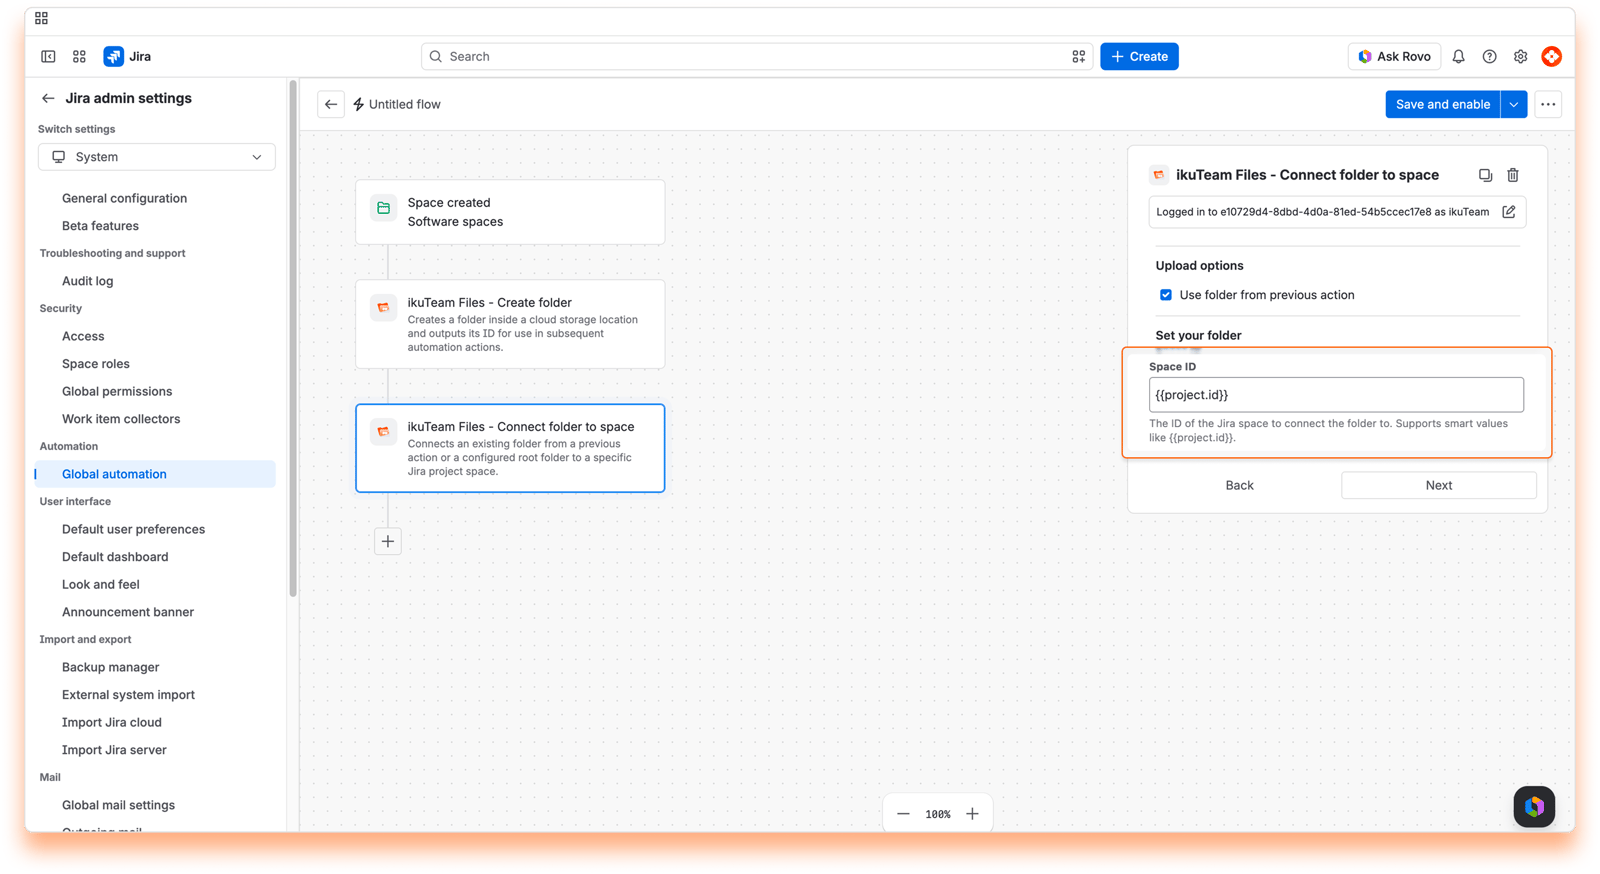
Type the smart values exactly as shown. They still say "project", even though Jira now calls them spaces.
Known issue: when you connect a folder from a previous action, the folder may show up in the space with the name of its parent folder (for example, Project Files) instead of the space name. It's the right folder, only the name shown is wrong. To fix it, open SharePoint Connector in the space, select Rename in the folder's menu and enter the space name. Renaming also renames the folder in SharePoint or OneDrive, which already has the space name, so you can keep it the same. We're working on a fix.
Save and turn on the flow, and your automation is ready to create and connect a folder for every new space.
Once the first flow has set up the space folder, this flow runs every time a work item meets your condition.
A space admin can also build this flow for a single space from Space settings > Automation.
Go to Settings > System > Global automation and click "Create flow".
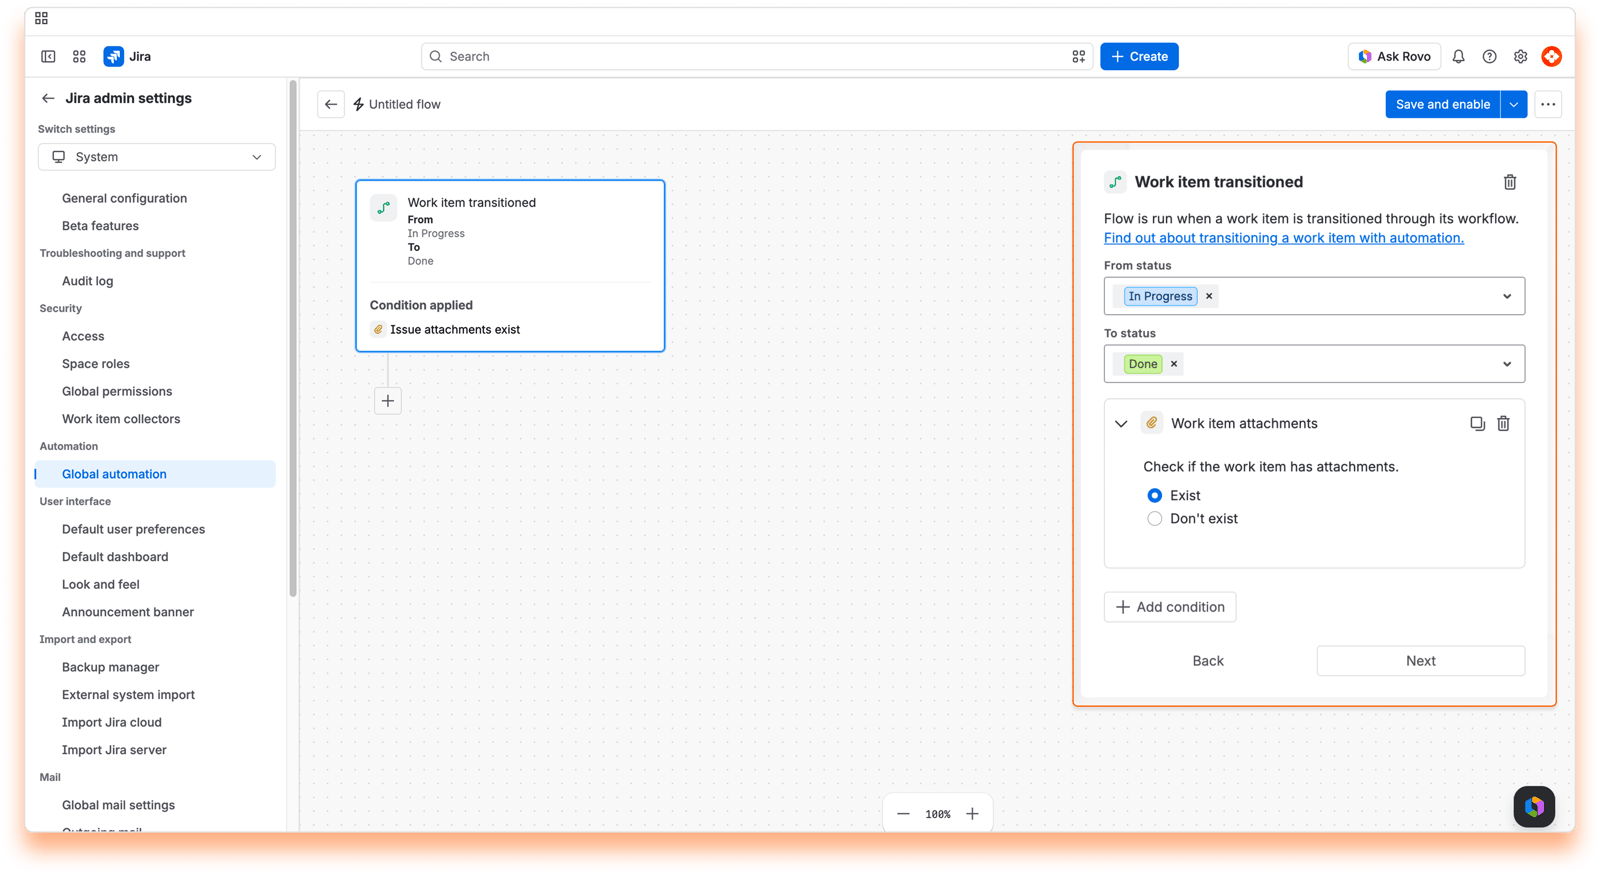
Set the trigger to "Work item transitioned" from In Progress to Done, and add a condition so the flow only runs when the work item has attachments.
Add a new action, search for "SharePoint - Create folder", and choose the same parent folder as in the first flow, in this example Project Files. Enter {{project.name}} in the "Folder name" field and keep "Use the existing folder" selected. The action then picks up the space folder the first flow created, instead of making a new one.
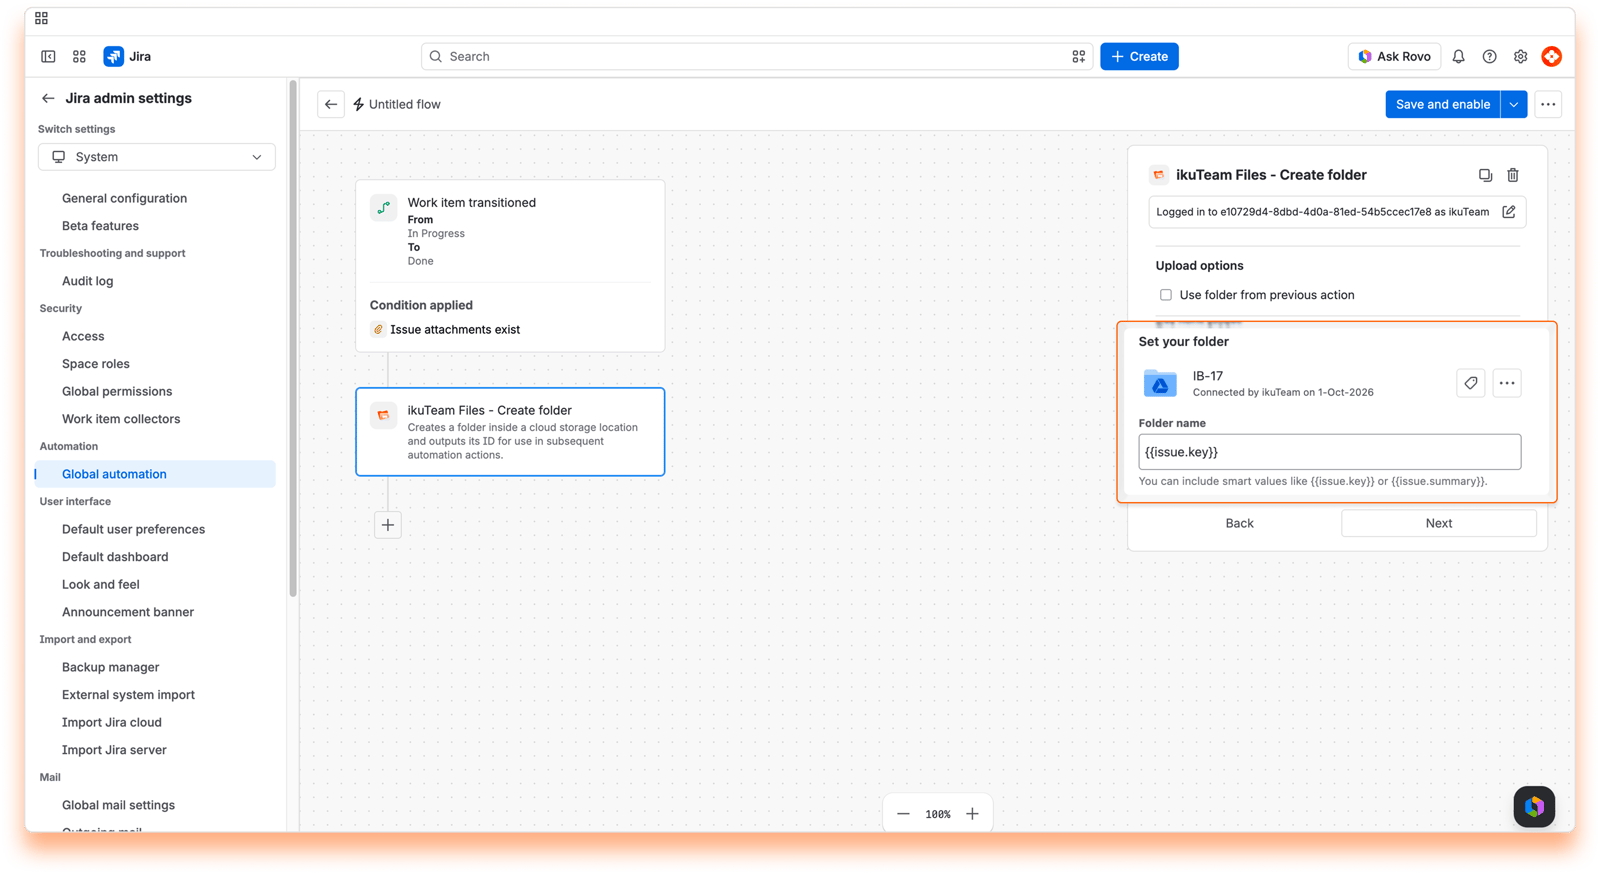
Add a second "SharePoint - Create folder" action. Select "Use folder from previous action" and enter {{issue.key}} in the "Folder name" field, so each work item gets its own subfolder inside the space folder, named after the work item key.
In this second action, also keep "Use the existing folder" selected, so the flow reuses the work item's folder instead of stopping if it's already there.
Why not pick the space folder directly? This flow runs for every space, and a fixed folder can only be one space's folder, so every work item's files would land there. Looking the folder up by {{project.name}} keeps each space's files in its own folder.
Add another action and search for "SharePoint - Upload attachments to folder".
Select "Use folder from previous step", so the attachments go into the work item's own folder from the second action in step 2.
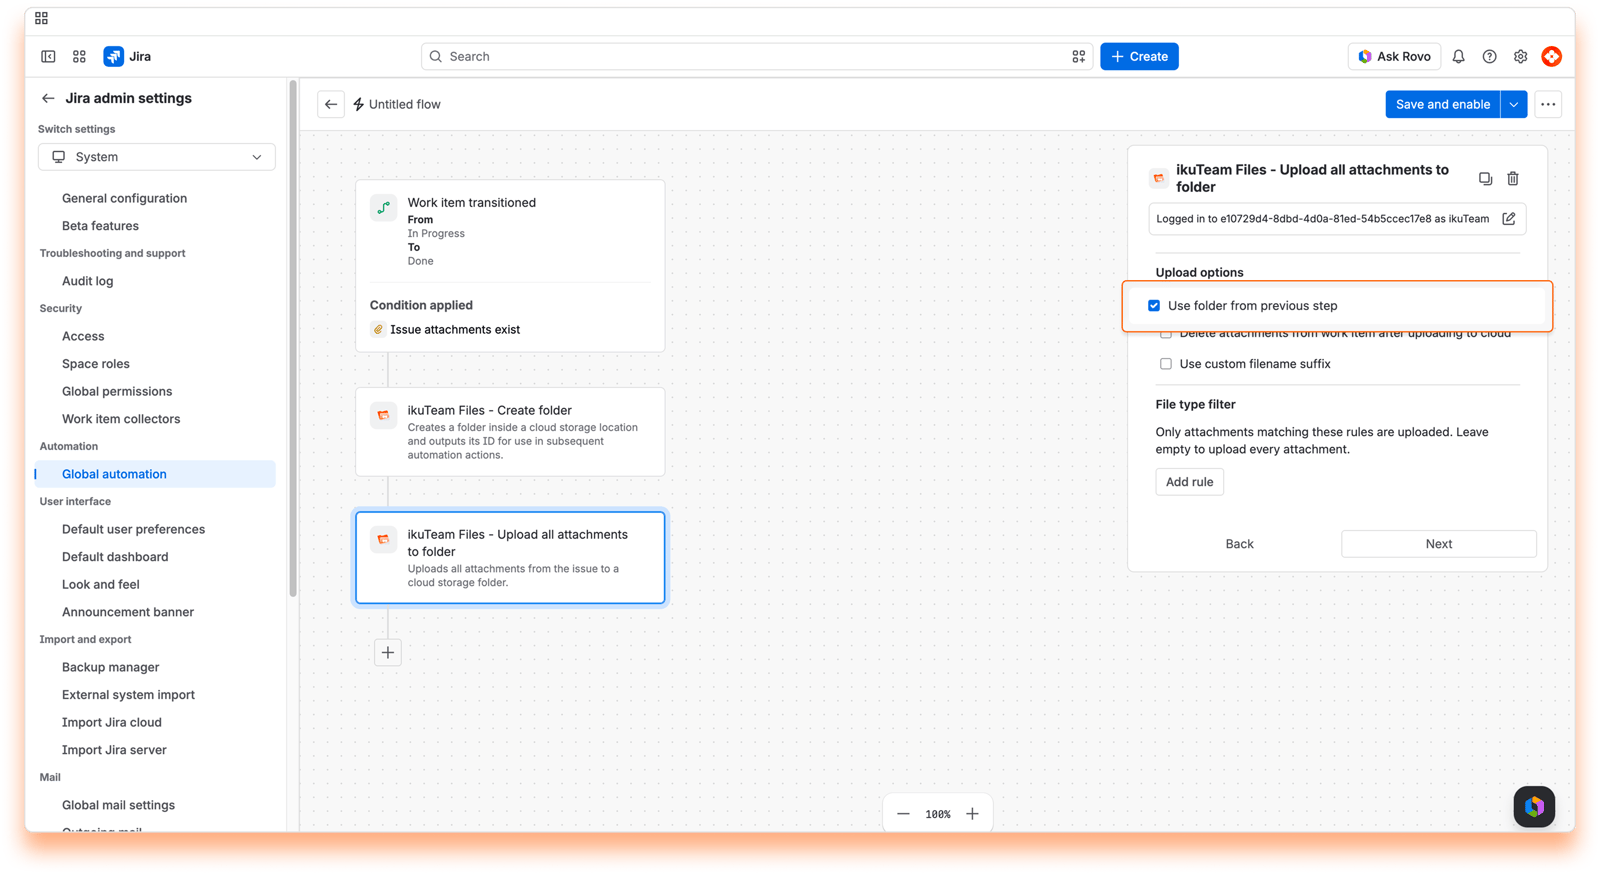
To keep the original file names, as in the example folder above, select "Use custom filename suffix" and leave "Filename suffix" empty. Otherwise the action adds the work item key and a unique ID to each name, for example design-specs (MKT-101 - 3f2a...).pdf. Without a suffix, SharePoint returns an error if a file with the same name already exists in the folder, and that upload is skipped.
Save and turn on the flow, and your automation is ready to upload each work item's attachments to its own folder on every successful run.
Test first. Run new flows in a sandbox or staging environment before turning them on in production. It's the easiest way to confirm the folder structure works before it affects real work.
Keep the folder names in step. Both flows name the space folder {{project.name}} inside the same parent folder, so the second flow finds the folder the first one created. If a space is renamed, the second flow creates a new folder with the new name, and that folder isn't connected to the space.
Check the audit log. If folders or files aren't appearing as expected, the flow's "Audit log" is the best place to find out why. It shows every time the flow ran, or failed to run.
Use the work item key in folder names. Keys are unique, so folders stay easy to tell apart even when work items have similar summaries.
With these two flows in place, every new space gets its own folder, and every finished work item files its attachments into it automatically. To see every action you can use, read 4.1 SharePoint Connector automation actions. If you need a hand, reach out on our support portal.


